
Here is the HOW TO on changing your valve body. I also included a doc file with the same thing in it, and the transmission tech manual as well. Enjoy.
UPDATED ON MAY 14,2008 The purpose of using an upgraded valve body is to get quicker and tighter shifts, by raising the fluid pressure, therefore reducing friction and wear, as well as reducing heat in the transmission. This allows for more horsepower to be put to an automatic transmission.
The following is a how-to on the installation of a Street Terminator Valve Body from Lentech Automotive Performance. I ordered the 7A100-4F27-STT----4F27E/FN4A-EL Street Terminator Valvebody and had it shipped for $491.00.
Tools and things you will need:
Valve Body- Duh
RTV Blue Silicone
10mm Socket w/ratchet and 6” extension
18mm Socket for Oil Plug or use visegrips like I did
Small Flat head screwdriver
Oil Drain Pan
Transmission Fluid of your choice
I am not going to go into the details about things that have been covered before in other threads. I also don’t have pictures for every step.
1. Using a 10mm socket take the black shroud that is under the transmission oil pan off. There is also a plastic sink screw near the axle. That will need to come out for the whole shroud to be taken off.
2. Using your 18mm or Vise grips take out the oil plug and allow the transmission fluid to drain for a while. Also make sure that you haven’t been hauling ass up and down the street before doing this. Tranny fluid can get very hot and burn you. I just ran my car long enough to get her up on the ramps and the fluid was lukewarm.
3. Once the majority of the fluid is drained and it is just dribbling start loosening and removing the 10mm bolts that hold the oil pan on. Once all the screws are out, take a small flat head screw driver and carefully pry the pan away from the transmission, being careful not to scar up the transmission.
4. Once you have the oil pan off it should look like this.
5. Remove the plastic oil strainer and unplug the sensor that is in it.
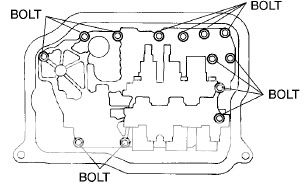
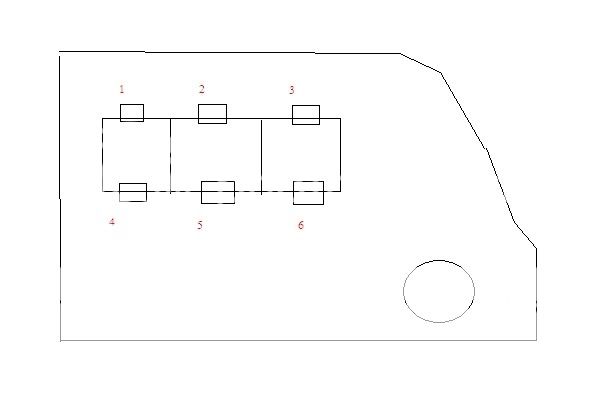
6. Using the 10mm socket start loosening the bolts that are holding the valve body on. Don’t take all of them out. Leave the ones in the corners in there, but loosen them. Here is a diagram of the bolts that need to be removed.
7. Once you have most of the bolts out, and the ones on the edges loosened up a bit you will notice more fluid starts to come out. Leave it be for a few minutes and let it drain.
8. Come back in a few minutes and if the fluid has pretty much stopped flowing, finish removing the bolts while holding onto the valve body, so that it doesn’t fall. Let the valve body ease down and something might fall out, if it does, try to grab it, if not just let it fall, that’s what I did. I will get to this later.
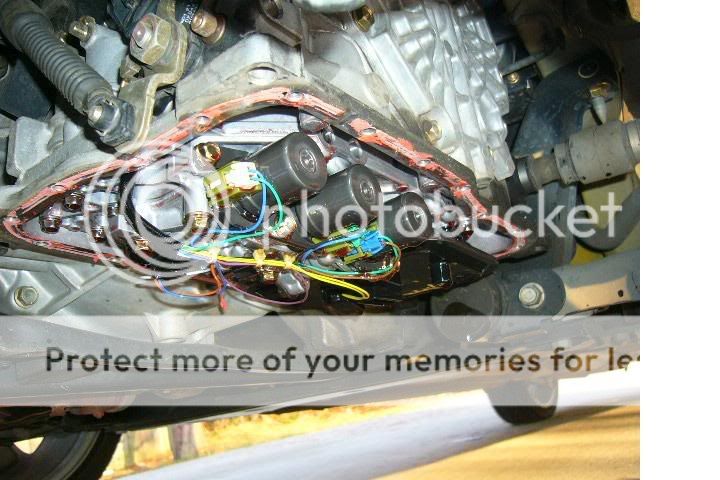
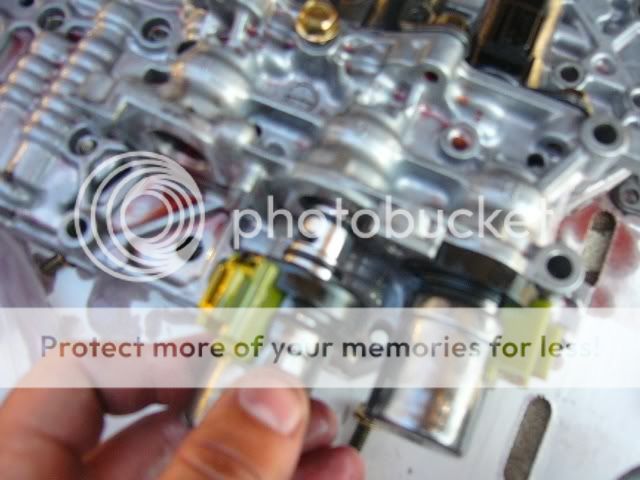
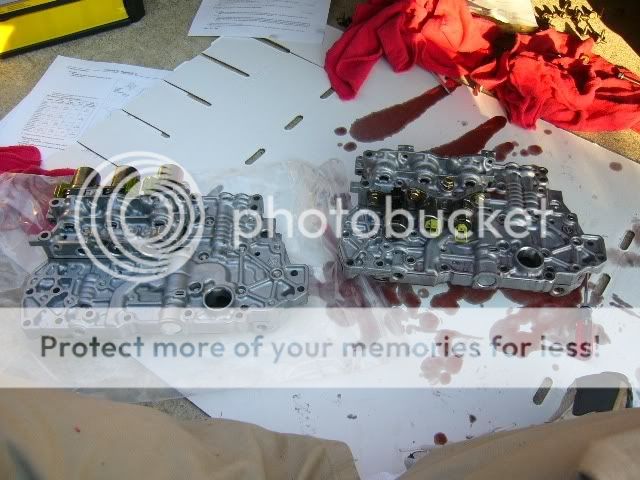
9. Now using the oil drain pan, or something about 8-9” high rest the valve body on it at an angle and start studying the valve body. Like this.
10. Take note of the colors of the plugs and wires that go to each solenoid. You can write them out yourself or you can go by this.
1.White Plug- two wires- green and blue
2.Green Plug- two wires- black and blue
3.Blue Plug- two wires- green and brown
4.Black Plug- two wires- orange and blue
5.Brown Plug- one wire- white
6.Black Plug- one wire- purple
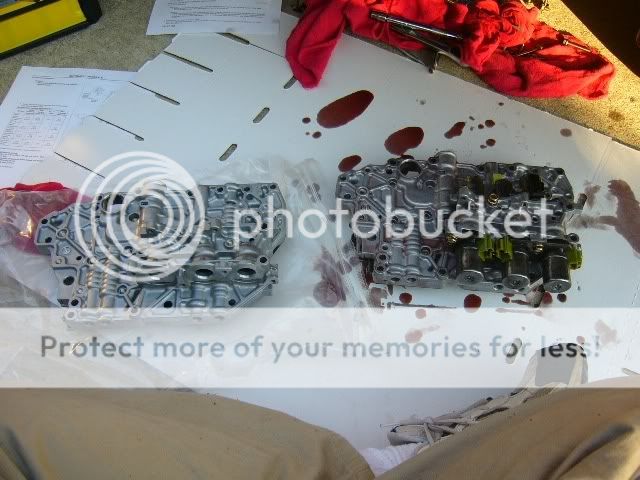
11. Once you have this information and you are sure it is correct go ahead and unplug all the connectors. Using the 10mm socket remove the bolt that is being used to hold the ground on. Now put the valve body on a rag or piece of cardboard next to the new one. Lay it in the same position as the new one to avoid confusion.
12. Now using a 10mm socket remove the bolts that are holding the metal plate down on top of the solenoids. There should be four to five bolts holding the plate on.

13. Once the plate is removed, insert a small flat head screwdriver in between the rubber seal on the solenoid and the actual metal on the valve body and pry it loose then once it is loose you can pull it out with your hands.

14. As you take each one out, put it in its new home in the corresponding hole on the new valve body. After you have put all of them in fit the plate back over them and turn the solenoids until the connectors are in the correct place and re install the bolts and tighten.
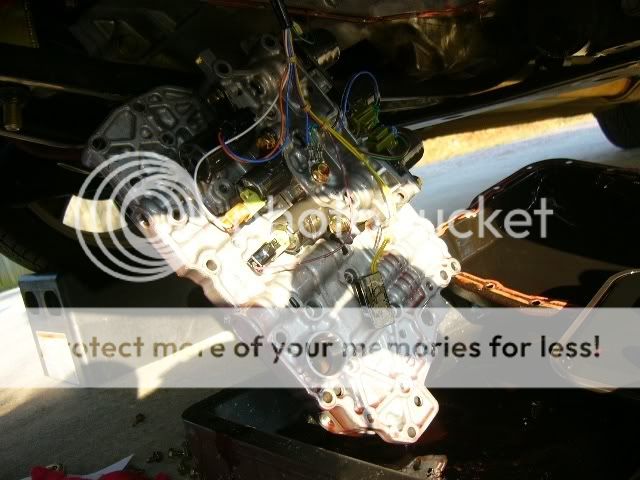
15. Now flip your valve body around to make for easier access to the remaining solenoids and to not mix them up as well.
16. Using a 10mm socket remove each bolt that holds the other solenoids on. You will notice there is no plate on this side. Just a bolt to take out and then pry each solenoid out and put it in its new home just like the others and re install the bolts and tighten.
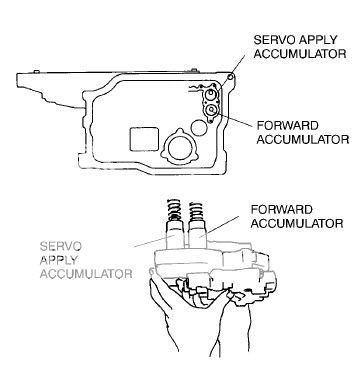
17. Once you are done with that, you can take a break or keep going. Now, remember when I said something might have fallen out of your tranny when you took the valve body came off. If nothing fell out for you, still listen to this. Those things are called accumulators. There will be a metal thing that looks like a socket and a bigger and a smaller spring in each one. Hopefully you didn’t mix the springs up.
18. This is where it gets a bit tricky, but not too bad. There are two ways to do it. You can balance the accumulators on the top side of the valve body to install them or you can go ahead and stick them in and hold them until you have the valve body back on. I chose to stick them in and hold them. Here’s a pic of them.
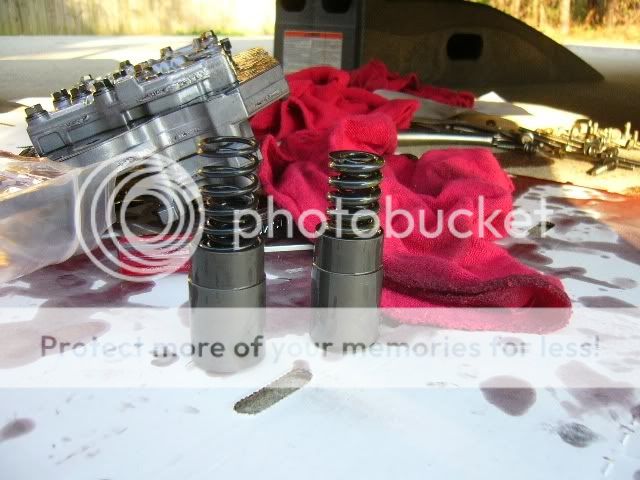
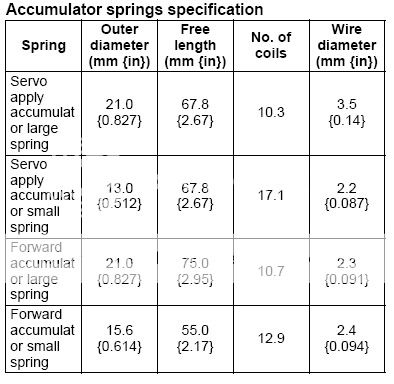
19. One of these has a very tightly wound center spring, around 17 winds. This is the servo apply accumulator and it goes in the outer hole where these things are installed. The other one goes in the other hole. Check diagram and chart.
20. Go ahead and let the valve body rest on the prop right under your transmission again, just like in step 9. Plug all the connectors back up, like they are supposed to go.
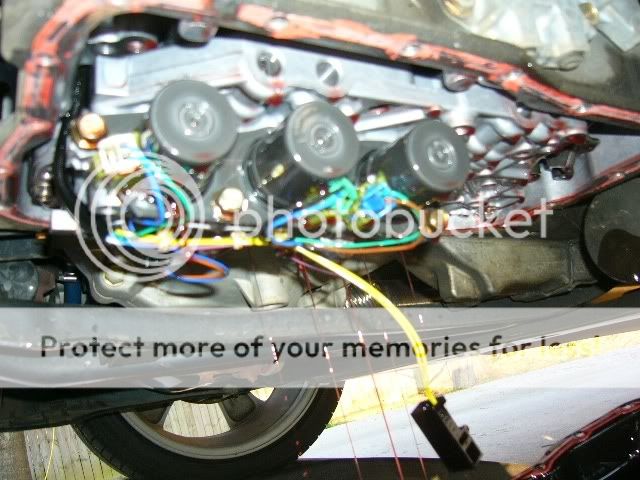
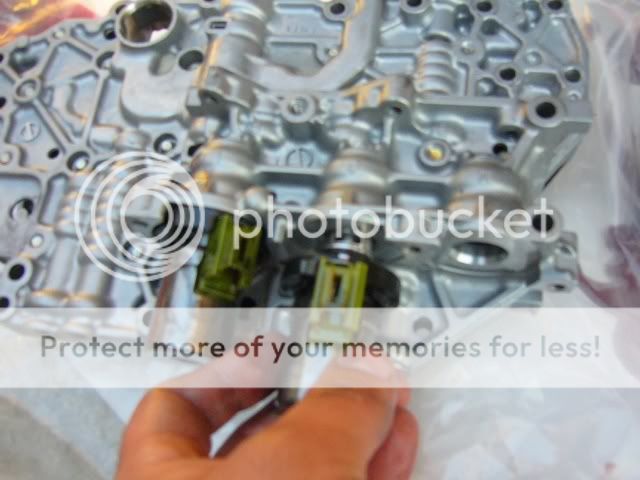
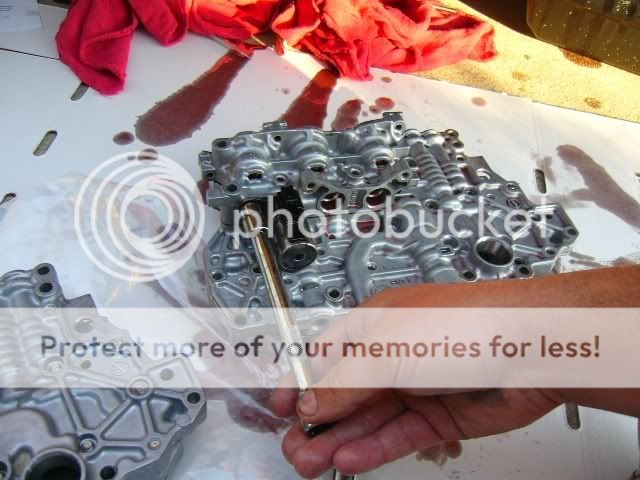
21. Once you push the accumulators up in their home and push the valve body up onto the transmission, don’t put any bolts in yet. I didn’t get a picture of this step and I don’t have a very good diagram. You may have noticed a little metal rod with a 90 degree bend on it when you were messing with the valve body. That is the parking assist lever. Look for it towards the rear of the valve body. It is right around the yellow circle in the picture. Make sure it lines up in the metal plate that is right there at it.


22. When you have made sure that parking assist lever is in the right place and the accumulators are in the right place and the valve body seems to fit flush to the transmission, go ahead and start putting the bolts back in by hand. Put one in on each side and tighten those finger tight, so you can let go of the valve body. Finish installing all the bolts and tightening them, using the two longest bolts on top of the solenoid housing.
23. Reinstall the oil strainer and make sure its snug. Reinsert the sensor that goes into the oil strainer as well.
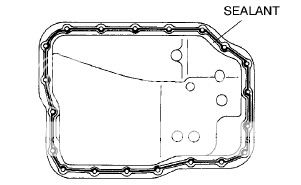
24. Scrape and clean the old silicone off of both the oil pan and the transmission. Re apply RTV Blue Silicone onto the oil pan like so.
25. Reinstall the oil pan and put all the bolts back in and tighten them. Reinsert drain plug and fill up with 5-6 quarts of tranny fluid.
26. Once you put the fluid in crank the engine and let it idle. DO NOT shift the transmission. You are going to hear a God awful whirring sound. It’s ok. Don’t shut the engine off. That is the oil pump trying to get oil and it doesn’t hurt it to let it idle and try to feed it self. I let mine idle for about 7 minutes and it finally stopped. Then it was drivable. Top off any fluid you may need after that. And you are good to go.
Thanks for reading. Bumpin_P5.
Update on after a few hundred miles:
The car is holding up well. I am safely boosting 7 psi right now and enjoying the mad power. There are some pointers though. This valve body does shift very very fast and if you aren't at the correct rpm when using the Sport mode and try to shift, it does kinda jerk. If you thought you had the shifting down without this upgrade and you think it will be the same after installing, you are in for a big surprise. I have figured out that if you shift right as the BOV is blowing off, it works out well. You will still get a decent jerk from 1st to 2nd gear, but that is just because of the slight delay. If you are very serious about getting rid of that delay, you can get your ecu tuned to your tranny according to the Lentech Mechanics. It not worth it though, unless you race.
I drive in full auto mode and try to stay out of boost when just driving around town, but when I want to get in it, I use the sport mode. I would suggest that you all do the same. On a side note, I am currently researching the possibility of using a Split Second AFC with an auto. I will make a thread if it ever happens. This will be probably around the end of the year. Thanks all. Adam
UPDATED ON MAY 14,2008 The purpose of using an upgraded valve body is to get quicker and tighter shifts, by raising the fluid pressure, therefore reducing friction and wear, as well as reducing heat in the transmission. This allows for more horsepower to be put to an automatic transmission.
The following is a how-to on the installation of a Street Terminator Valve Body from Lentech Automotive Performance. I ordered the 7A100-4F27-STT----4F27E/FN4A-EL Street Terminator Valvebody and had it shipped for $491.00.
Tools and things you will need:
Valve Body- Duh
RTV Blue Silicone
10mm Socket w/ratchet and 6” extension
18mm Socket for Oil Plug or use visegrips like I did
Small Flat head screwdriver
Oil Drain Pan
Transmission Fluid of your choice
I am not going to go into the details about things that have been covered before in other threads. I also don’t have pictures for every step.
1. Using a 10mm socket take the black shroud that is under the transmission oil pan off. There is also a plastic sink screw near the axle. That will need to come out for the whole shroud to be taken off.
2. Using your 18mm or Vise grips take out the oil plug and allow the transmission fluid to drain for a while. Also make sure that you haven’t been hauling ass up and down the street before doing this. Tranny fluid can get very hot and burn you. I just ran my car long enough to get her up on the ramps and the fluid was lukewarm.
3. Once the majority of the fluid is drained and it is just dribbling start loosening and removing the 10mm bolts that hold the oil pan on. Once all the screws are out, take a small flat head screw driver and carefully pry the pan away from the transmission, being careful not to scar up the transmission.
4. Once you have the oil pan off it should look like this.
5. Remove the plastic oil strainer and unplug the sensor that is in it.
6. Using the 10mm socket start loosening the bolts that are holding the valve body on. Don’t take all of them out. Leave the ones in the corners in there, but loosen them. Here is a diagram of the bolts that need to be removed.
7. Once you have most of the bolts out, and the ones on the edges loosened up a bit you will notice more fluid starts to come out. Leave it be for a few minutes and let it drain.
8. Come back in a few minutes and if the fluid has pretty much stopped flowing, finish removing the bolts while holding onto the valve body, so that it doesn’t fall. Let the valve body ease down and something might fall out, if it does, try to grab it, if not just let it fall, that’s what I did. I will get to this later.
9. Now using the oil drain pan, or something about 8-9” high rest the valve body on it at an angle and start studying the valve body. Like this.
10. Take note of the colors of the plugs and wires that go to each solenoid. You can write them out yourself or you can go by this.
1.White Plug- two wires- green and blue
2.Green Plug- two wires- black and blue
3.Blue Plug- two wires- green and brown
4.Black Plug- two wires- orange and blue
5.Brown Plug- one wire- white
6.Black Plug- one wire- purple
11. Once you have this information and you are sure it is correct go ahead and unplug all the connectors. Using the 10mm socket remove the bolt that is being used to hold the ground on. Now put the valve body on a rag or piece of cardboard next to the new one. Lay it in the same position as the new one to avoid confusion.
12. Now using a 10mm socket remove the bolts that are holding the metal plate down on top of the solenoids. There should be four to five bolts holding the plate on.
13. Once the plate is removed, insert a small flat head screwdriver in between the rubber seal on the solenoid and the actual metal on the valve body and pry it loose then once it is loose you can pull it out with your hands.
14. As you take each one out, put it in its new home in the corresponding hole on the new valve body. After you have put all of them in fit the plate back over them and turn the solenoids until the connectors are in the correct place and re install the bolts and tighten.
15. Now flip your valve body around to make for easier access to the remaining solenoids and to not mix them up as well.
16. Using a 10mm socket remove each bolt that holds the other solenoids on. You will notice there is no plate on this side. Just a bolt to take out and then pry each solenoid out and put it in its new home just like the others and re install the bolts and tighten.
17. Once you are done with that, you can take a break or keep going. Now, remember when I said something might have fallen out of your tranny when you took the valve body came off. If nothing fell out for you, still listen to this. Those things are called accumulators. There will be a metal thing that looks like a socket and a bigger and a smaller spring in each one. Hopefully you didn’t mix the springs up.
18. This is where it gets a bit tricky, but not too bad. There are two ways to do it. You can balance the accumulators on the top side of the valve body to install them or you can go ahead and stick them in and hold them until you have the valve body back on. I chose to stick them in and hold them. Here’s a pic of them.
19. One of these has a very tightly wound center spring, around 17 winds. This is the servo apply accumulator and it goes in the outer hole where these things are installed. The other one goes in the other hole. Check diagram and chart.
20. Go ahead and let the valve body rest on the prop right under your transmission again, just like in step 9. Plug all the connectors back up, like they are supposed to go.
21. Once you push the accumulators up in their home and push the valve body up onto the transmission, don’t put any bolts in yet. I didn’t get a picture of this step and I don’t have a very good diagram. You may have noticed a little metal rod with a 90 degree bend on it when you were messing with the valve body. That is the parking assist lever. Look for it towards the rear of the valve body. It is right around the yellow circle in the picture. Make sure it lines up in the metal plate that is right there at it.
22. When you have made sure that parking assist lever is in the right place and the accumulators are in the right place and the valve body seems to fit flush to the transmission, go ahead and start putting the bolts back in by hand. Put one in on each side and tighten those finger tight, so you can let go of the valve body. Finish installing all the bolts and tightening them, using the two longest bolts on top of the solenoid housing.
23. Reinstall the oil strainer and make sure its snug. Reinsert the sensor that goes into the oil strainer as well.
24. Scrape and clean the old silicone off of both the oil pan and the transmission. Re apply RTV Blue Silicone onto the oil pan like so.
25. Reinstall the oil pan and put all the bolts back in and tighten them. Reinsert drain plug and fill up with 5-6 quarts of tranny fluid.
26. Once you put the fluid in crank the engine and let it idle. DO NOT shift the transmission. You are going to hear a God awful whirring sound. It’s ok. Don’t shut the engine off. That is the oil pump trying to get oil and it doesn’t hurt it to let it idle and try to feed it self. I let mine idle for about 7 minutes and it finally stopped. Then it was drivable. Top off any fluid you may need after that. And you are good to go.
Thanks for reading. Bumpin_P5.
Update on after a few hundred miles:
The car is holding up well. I am safely boosting 7 psi right now and enjoying the mad power. There are some pointers though. This valve body does shift very very fast and if you aren't at the correct rpm when using the Sport mode and try to shift, it does kinda jerk. If you thought you had the shifting down without this upgrade and you think it will be the same after installing, you are in for a big surprise. I have figured out that if you shift right as the BOV is blowing off, it works out well. You will still get a decent jerk from 1st to 2nd gear, but that is just because of the slight delay. If you are very serious about getting rid of that delay, you can get your ecu tuned to your tranny according to the Lentech Mechanics. It not worth it though, unless you race.
I drive in full auto mode and try to stay out of boost when just driving around town, but when I want to get in it, I use the sport mode. I would suggest that you all do the same. On a side note, I am currently researching the possibility of using a Split Second AFC with an auto. I will make a thread if it ever happens. This will be probably around the end of the year. Thanks all. Adam
Attachments
Last edited:
") Does something like this affect your fluid temps any?
Does something like this affect your fluid temps any?