Mixing fiberglass and MDF... need help.

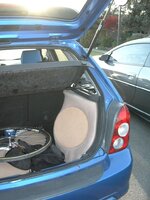
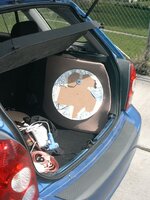
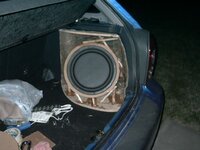
So I'm not sure if ppl are getting sick of seeing my SLOWass progress on this, but I figure I'll just sort of keep updating as I go. Stop me if it's too dull. It's also a nice way for me to keep track of my timeline, etc for doing a write-up in the future. I'm now getting ready to fleece. Mounted up my sub just to be sure that 1, there aren't any clearance issues, and 2, my "frame" is going to be enough to hold the #30 Ed12a.22 that'll be hopefully residing in it for many years to come. I know that the fleece and glass themselves will indeed have a good bit of strength, but I also figured that I'd rather not have that bigass magnet hanging off of the back torquing on a flat surface with every bump in the road. So far, I'm golden. I actually accidentally kind of "Dropped" my sub into the box, (try gracefulyl lowering a 30# sub into a angled-face box, and you'll understand) anyway, it really wasn't an issue... nothing budged. I'm kind of impressed actually with how sturdy this whole thing is turning out.

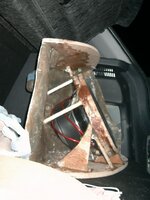
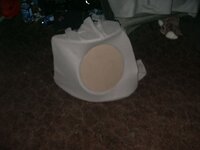
My placement is not angled as dramatically as I'd initially planned, but for one I was worrying about firing "into" the hatch directly. it already rattles a good bit inspite of my sounddeadening efforts. I figure this would only make it worse. The other thing isthat honestly, getting the first couple dowels in place with the hotglue gun was DAMN tricky. Could've used atleast 3 more hands except for the fact that there wouldn't be room for any. I got my "lean" angle down pretty good, but didn't swing it around quite as much towards the rear as I was hoping for.

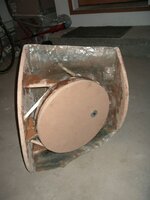
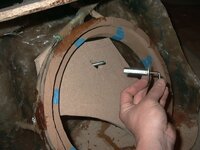
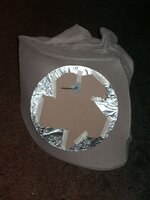
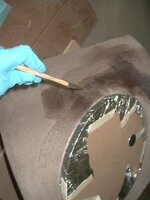
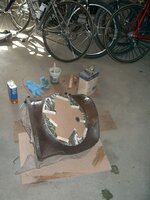
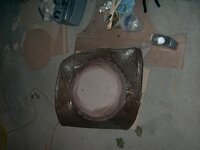
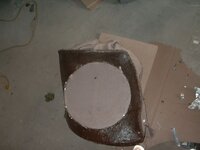
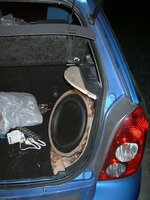
Anyway, pics, yes. For one, I realize that my fiberglass is rather thin on the end of the box that shows in my clearance pic. It's actually much thicker elsewhere, Basicalyl I'd cut it out when I had the oppertunity to use a friend's airtools. This was before all of my layering was done (the end has about 5-7layers max) I also figured I'll be fleecing around the back of the edges anyway, and I really didn't want to have to re-trim overlap from any new layers of glass I added. My other note on the images.. This fleece-stretching's purely to get an idea of what it's going to look like. And due to the nature of flash photography and fleece, the curves do not show up at all.. Additionally, there will be a "lip" around the upper part of the speaker. I'd just had that disc of wood from cutting out my trimring sitting around and it held thigns in place... I think I may prefer the look just like it is sitting, however, I realized this leaves VERY little fleece/wood contact area. whcih could make for a nasty weak-spot. so I'll just go ahead and stick with the putting a disc on top of it ll (like the links Sam1 posted)
 

Attachments

  • P1020867.JPG
    P1020867.JPG
    96.3 KB · Views: 172
  • P1020870.JPG
    P1020870.JPG
    89.5 KB · Views: 408
  • P1020868.JPG
    P1020868.JPG
    150.9 KB · Views: 172
  • P1020872.JPG
    P1020872.JPG
    63 KB · Views: 189
Soak some resin into the fleece and let it setup so that there's a solid base to glass on top of, yes. I think that after I glass a couplefew layers on top of it, I'm gonna see if I can possibly put down another layer of fleece or possibly a t-shirt type material with a smoothish finish that'll make it easier to bondo and sand down smooth to prep for painting.
 
The last picture reminds me of when I helped my friend with his 944.

We went to Walmart to buy the fleece and all they had was white with bunnies all over it. The lady at the counter that cut it for us was like "This is a very nice pattern, you don't see fleece very often, what are you going to make with it?" She was an old woman and we didn't have the heart to tell her we were going to soak it with fiberglass so I told her it was for a blanket.
 

Attachments

  • DSC00010.JPG
    DSC00010.JPG
    91 KB · Views: 188
thats funny. anyways, that box is going to have some nice curves to it. when i first looked at it, i didnt notice that the sub was angled that much. its lookin good so far.
 
*L* yea I actually just about settled for a cartoon penguin print thing just 'cause it was cheap, but I dug some more and found the plain tan. actually wound up paying a buck more for it... I'da done the penguins just for fun-value, but I just figured mostly that solid a light color would show how well my resin was soaking in better. Perhaps it matters and perhaps it doesn't... Still not quite as good as bunnies, though.

Far's the curves, yea I figure as longas I was messing with FG I might as well take advantage of the ability to make it swoopy. looking at it I still kinda wish I'd gotten it a bit more rear-angled, but ohwell... I'm kinda comitted now. When the fleece is sitting flush against the ring, the inward curves should be more dramatic.
 
its coming along nicely. and if u did make that fiberglass 3/4" thick a tank running over it wouldn't hurt it. 3/4" of strong fiberglass would be equal to about 1 1/2-2" of mdf.


and don't worry about how long it takes you. mine took me a few months from start to finish, the guys that rush are the guys with the crappy installs.
 
here's a recepie that i use to make a paint on resin/bondo mix:

1 cup resin
1 cup bondo
1 tsp resin hardener

mix the bondo and resin completely, then add hardener. the more resin you add the thinner it is, the more bondo you add the thicker it is. half and half seem to work best, though. add in a little more hardener to get it to harden quicker. take a brush and paint it on. comes out pretty damned smooth and can save you some serious sanding, if applied right. fill in larger craters or whatever with bondo, sand it down with some really course grit paper on a belt sander, orbital sander, whatever you got, then paint on the mix to smooth it all out.
 
thats a really good idea. probably better than something like kitty hair fg. thanks wake, ill have to keep that in mind.
 
i love it, and it eliminates the need for a lot of bondo work;) hell, if you have it relatively smooth to start with, you could probably just paint it after it's hardened cause it comes out so smooth.
 
Well, even if you manage to get the fleece on with no wrinkles, once you weigh it down with resin some will show up. A thick layer of bondo is the only way to smooth them out sometimes. Of course if you only plan to put carpet over it, you can get by with alot of mistakes and blemishes...
 
Nope gonna be paint. one of my friends put it to me good when I was juggling ideas... "dude why the hell are you gonna spend 3weeks building the thing, and then go and coverit all up with freakin' carpet???" Makes sense. Plus with my possible hookup at an autobody shop, I'd LOVE to color-match it. As for thickness, it's hard to say for sure, but I'm prettysure I'm up to 1/3-1/2" everywhere (except the sides like I mentioned) plus that's mostly with cloth, not mat, so hopefully I'm good. I'm definately gonna put some juice to it with my sub before I go body-color-matching it. Worst case, one of my fortunate P5 owning friends with a milder 12 than I gets a spiffy new box, and I'll have some experience under my belt to make myself an even nicer one.

And wake, You ARE the man. That's definately the kind of thing that'd work well, I'da just never known what mixing them would do and never attempted it on my own. Sounds like something that'll likely add a bit of strength in the process, so I'm all for it.
 
Yea well that was the timeline up to that point *L* I really don't mind taking my time... it's already been awhile, no sense to rush the last part. I'll see what the bondo/resin mix does for me. Hopefully It won't take toolong. I'll likely have it unfinished and functioning for at least a little bit just to test...

Thanks for all the input and help guys. I really do appreciate it. All of my friends have been blown away by exactly how cool this is even if they do make fun of me for how long it's been taking... Seeing it actually taking shape is SO dman cool...

I'm stretching my fleece right now I'll get some pics in a bit.
 

Attachments

  • P1020874.JPG
    P1020874.JPG
    126 KB · Views: 206
Last edited:
fleeced...

Alright, so as sam1 and I discussed, foil over disc seems to be the way to do this, and if something changes in my process I'll be sure to post. seems the best tool for the job at the moment, though... First, let me show how I mounted my "face" ring That I'll need soasto allow the fleece to "sink" into the upper-rear portion of my box. where my rings are "under" the edges as it were.

I called upon a young friend in shop class to make me a nice ring with the school's tools this time (call me lazy, but I'm a little peeved at that rotozip "circle cutter" and umm.. well I was out of wood and didn't wanna bave to buy a bunch more for a simple 14" ring) Anyway. seeing as it's a VERY nice circle, and I may indeed be making some more of these in the future, I didn't wanna disrupt the center incase I needed to draw another circle out and use it as a mounting ring (thinker aren't I?) So, I drilled a big hole off-center, and slapped on a contraption made from a turnbuckle, machine screw and large washer. I then lightly hot-glued a scrap piece of wood to the back of the ring (in a mannar that will allow me to remove it eventually) I slotted this rear piece in the general area of where my mounting thingy would be. and before fleecing began, lined up my face, snugged it down, and lightly glued the bolt to the back of my temporary face-holder.

Let me say that this method works VERY well up to this point. Not only does it allow me to conform fleece to unnatural angles, it also aides in stretching as I was able to "pre-stretch" my fleece under the disc while my mounting bolt was snug and put it under some tension if you will, then cinch down my ring, and lock it into place. Kind of does the work of 4 hands for you. In fact, I could see how this would make stretching even on a more conventional setup much easier as you basically just start from one point and work your way around, no need to back and fourth and take up slack, etc. The hole I'd cut in the fleece to pass the bolt through sort of actas as an anchor as well, so you can REALLY yank on the stuff. I know everyone says wrinkles happen nomatter what once you get resin on it, but I've got my fleece stretched to it's limits. I really don't think there's any room for it to sag, but I guess we'll just have to wait and see.

So there it is, the final shape of my box... lots of time for such a little blob of speaker-holding coolness.
 

Attachments

  • P1020877.JPG
    P1020877.JPG
    74.6 KB · Views: 147
  • P1020879.JPG
    P1020879.JPG
    100.7 KB · Views: 137
  • P1020885.JPG
    P1020885.JPG
    98.3 KB · Views: 137
  • P1020881.JPG
    P1020881.JPG
    87.7 KB · Views: 166
Last edited:
thats a pretty slick way to make it stay in. that way you dont have to drill any holes in the mounting ring. good idea. btw, i like the way it looks in your car, and itll look hella hot once its painted and has a speaker in it. that picture with it in your car is the only one that actually does it justice so far. thats almost the same angle mines at too, only mine faces back a little more.
 
Alright, so one last bit before I get messy again... Her'es it in the car as-of now. I'm liking it, and envisioning it painted and holding a big spiffy sub.. I've also got my bag of peanuts still handy so I'll be able to get a pretty good idea of volume I'm thinking I'm at about 1.25'

A note on stretching. I've seen ppl mention gluing THROUGH the fleece. perhaps it's a matter of the kind of fleece you get, but I could not for the life of me manage to accomplish this. I had one side of my box that i'd glued from the back, and then realized that it was not following the outer contour (it would have nothing to be bonding to) so I wound up stabbing small holes in the fleece at a couple spots and squirting glue through them, then holding that spot down with the nose of my staplegun (so I could get it back off as well as not burn my hands) Everywhere that was galss I prettymuch tried to keepa constant bead of glue down, and on the wood I glued and stapled through it. with as tight as my fleece is I prettymuch need that just to hold the tension period. I'm pretty stoked on the face-ring mount as well In fact I think that rather than using as a trim ring, I'm gonna keep it around to keep doing the same job.. 14" OD seems a pretty good size for most 12's and I s'pose it'll work for 10's that aren't recessed as well. We'll just have to see how easily I can get it back off of the fleece once the resin cures.
 

Attachments

  • P1020886.JPG
    P1020886.JPG
    119.4 KB · Views: 161
  • P1020894.JPG
    P1020894.JPG
    142.6 KB · Views: 184
once again waiting for resin to cure. Fortunately being a large amount that I could slosh on rather quickly I was able to use alot of hardener. (10 drops per oz as opposed to my norm of about 7 so it should setup pretty quickly. Knowing it would soak in alot, I first mixed up 12oz, and covered only half of my box. DAMn it soaks in ALOT...an extra 16oz proved to be sufficient to cover the rest. and then some....

One thing to note I again sort of worked around in a circle, but the place where I'd first applied was getting dry by the time I got back around to it, so I've got one spot taht doesn't appear to have fully soaked-through (Not sure if you can see it, but it's basically right above the sub if it were oriented properly) Fortunately it's on a curve, and basically I'm just gonna put a couple more layers of glass on top of it. As a side note, the light colored fleece did prove to be a good idea as I could immediately see where the resin was soaking through and where it needed more.

hmm... setup already see. well atleast it's stiff. gonna go glass...
 

Attachments

  • P1020896.JPG
    P1020896.JPG
    78.3 KB · Views: 131
  • P1020897.JPG
    P1020897.JPG
    122.7 KB · Views: 154
Poseur said:
And wake, You ARE the man. That's definately the kind of thing that'd work well, I'da just never known what mixing them would do and never attempted it on my own. Sounds like something that'll likely add a bit of strength in the process, so I'm all for it.

i can't even remember where i got that recepie from, but i've used it time and time again with great success;) what i love about it is that it goes on kinda thick, but you don't get any air bubbles. it's a little harder to sand than regular bondo, but it is stronger. if you are doing the sanding yourself, i highly recomend a 3-D sander from craftsman for the finishing sanding;)
 
foil's off...

Okay, so the good news is that the face-disc came off with no problems whatsoever. I prettymuch just had to pull the wood out from the foil, then peel the foil up around the edges. However,I had prettymuch NO bleeding like I'd expected/planned on. Instead of the resin haivng soaked throughteh fleece, I removed the disc to find clean, un-resined fleece underneath it's entirety. Prettymuch I wound up having to paint on a new ring of resin just to have somthing holding on flush against the trim-ring. My other problem is that there is a raised ridge of resin around the edges of my trim-ring. On some of the further recessed areas, most noteably right on the top, instead of angling up, the finished pile of fleece and resin instead goes vertically for what would have been the thickness of the wood where the resin puddled up. This is my mistake seeing as I intentionally slopped on a bit of extra resin all around the disc assuming that it would suck into the fleece and having extra would help it penetrate underneath.

So basically my solution is going to be to whip out the dremeltool on that bastard as soon as I can get back to it. S'pose it shouldn't be anything drastic, but just frustrating to have to do all the same. After Dremeling, I'm planning on glassing a bit on top of the trim ring (where I was un-able to glass previously) This should also clean-up my transition nicely as long as I can avoid cutting through the fleece entirely before hand. After I get that taken care of, and atleast mildly into the right shape, I'm gonna cut it open, and drop my sub in and give it a test spin... for one, I'm sick of not having my boom, and two, having it in a final shape and in my car will allow my autobody friend to get a look at it and give me either recommendations or a price for smoothing and painting. Fortunately he's the overly-retentive type, so I'm pretty sure I could trust him to do it right if the price ends up being acceptable.

As far as thickness I'm gonna hold off entirely until I can get a hand inside and check it out, but I've got about 7 layers of glass on top of the flatter more open spots, and atleast 3 everywhere else (most of which will be doubled-up on tomorrow when I glass over my newfound ridge.) Pretty sure I'll be of sufficient strength. Speaking of inside, I'm kind of worried about the potential for drip-through. I got some of that stuff SOAKED good with resin. I guess we'll find out tomorrow. but at the moment I'm glad that it occured to me to tape-off my mounting holes. Not toosure that I really could've done much harm. but you never know... The really good news is that DAMN I'm good at laying up glass now. I got the face of my box covered in no time. Granted it's a nice easy shape in a very easily accessable area and all, but I was glassing away, and just kept thinking "damn I'm good at this"
 

Attachments

  • P1020902.JPG
    P1020902.JPG
    84.1 KB · Views: 138
  • P1020900.JPG
    P1020900.JPG
    64.1 KB · Views: 144
Last edited:
Back