so is the top going to be wood as well? that may complicate things slightly, but not too bad. when i was molding mine and stretching the fleece and whatnot my best friend was a hot glue gun. it holds well until youre done glassing it. i used it to hold my fleece and my bracing as well until i could glass them in. id do the back and the bottom first, then do the top, then stretch the fleece. also, i agree with sndsgood with the tape thing. id put tape al the way to the back of the seat. i didnt use enough tape on my first one and also i didnt lay anything down on the carpet. my box ended up truning out a little smaller than i originally planned and i got a spot or two on the carpet. better to be safe then sorry.

You are using an out of date browser. It may not display this or other websites correctly.
You should upgrade or use an alternative browser.
You should upgrade or use an alternative browser.
Mixing fiberglass and MDF... need help.
- Thread starter Poseur
- Start date
You sanded the glass!?!?! I thought you were supposed to slap bondo over it and sand that!sndsgood said:well on my sub box i problaby had around 20 hours just in sanding the fiberglass.
u can see pics of it here since i can'r remote host from that site, http://www.j-body.org/members/sndsgood/cars/1/
your off to a good start me personally i'd lay down more tape or ate least plastic on the floor where youlle be working, one drop of resin on your carpet and youlle have a hard plastic blob there forever. as for the top. you can always leave that till last, get the back and sides and front done, then pulle the box out flip it upside down and do the top. if u want a certain shape, use wood to make a frame of sorts think of like your ribs. just thin pieces cut the shape u want spaced out every 4-5" to get the shape right. if it's flat u can just use mdf.
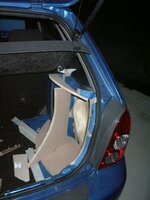
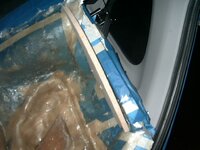
Thanks for the concern guys, I actually did end up taping out to my seatback on the plastic panel, and out away form the edges of where the wood will stop quite a bit. but either way, I'm gonna tape down a couple of garbage bags around the area, and I've got a big drop cloth thing that I'll put under the lip of the bottom wood piece. (shouldn't raise it too significantly.) Also gonna bring it out over the bumper, etc. Mosty I'm just trying to figure out my shape before I go glassing and making it perm. Oh, one piece I left out is the wood piece that'll bolt to the old jack-holder (the hole you can see in the tan taped "pocket" area) It'll run fron the top front corner to the bottom rear of that pocket this should give some stiffening in that area as well as distribute the force of that bolt when making hard turns, etc. I also intend to drill my wiring-hole through this piece of wood
I'm planning on using doweling and a hot glue gun to keep the top piece in place initially. I think I'm gonna try to do it all at once. otherwise, I'm not sure if I'll manage to glass high enough to makeit work... That top piece gains me ALOT of airspace, (think of the volume of a cylender vs. a pyramid) so hopefully it'll work out okay. I guess we'll find out, eH? I'm not entirely against dropping it, but fornow, it's a part of the plan. we shall see.
I'm planning on using doweling and a hot glue gun to keep the top piece in place initially. I think I'm gonna try to do it all at once. otherwise, I'm not sure if I'll manage to glass high enough to makeit work... That top piece gains me ALOT of airspace, (think of the volume of a cylender vs. a pyramid) so hopefully it'll work out okay. I guess we'll find out, eH? I'm not entirely against dropping it, but fornow, it's a part of the plan. we shall see.
well thast kinda what i was meaning. i sanded the fiberglass with a hand sander just to get in big drops out of the way. but once the bondo started it was by hand.
word of advice when u stretch the material stretch it tight, any wrinkles in the material are a pain in the but to smooth out, even though you'd think u could slop some more bondo in to smooth it out. the wripples will still be there and take forever to sand smooth. trust me.
word of advice when u stretch the material stretch it tight, any wrinkles in the material are a pain in the but to smooth out, even though you'd think u could slop some more bondo in to smooth it out. the wripples will still be there and take forever to sand smooth. trust me.
So I'm still not quite sure on what exact kind of finish I'm gonna go for, unfortunately, likely it's gonna be painted. SO yes, sand paper and me are gonna get to know eachother. But who knows... Yea I'll be stretching nice and tight, this brings up another issue for me, though, That being due to the design of my box, I'm gonna need to somehow put a "face plate" on top of my ring while I'm atleast beginning the process. because it will need to be stretched down towards the speaker. If that doesn't make sense, it will soon.
Didn't get much done today, but I DID get my wood pieces trimmed out. Bottom is 3/4" MDF, top, 1/2". I managed to use some scrap to make a piece to wedge in between them after I get the bottom and sides mostly glassed sothat I can glass around, up top and hopefully hold the top "plate" in place while my resin dries... I'm pretty sure I'll use some of my doweling and hot gluegun to support as well. With any luck, it'll hold itself in place by the time I take it out. At any rate, this gives an even better idea of the final shape. Hopefully tomorrow I'll at least get the back glassed and wind up with the top and bottom plates bonded to it nicely. FWIW, I'm likely going to put a chunk of cardboard between the bottomside of the "shelf" and the top piece of wood to ensure it'll fit once I've fleeced, and possibly carpeted over it all.
Didn't get much done today, but I DID get my wood pieces trimmed out. Bottom is 3/4" MDF, top, 1/2". I managed to use some scrap to make a piece to wedge in between them after I get the bottom and sides mostly glassed sothat I can glass around, up top and hopefully hold the top "plate" in place while my resin dries... I'm pretty sure I'll use some of my doweling and hot gluegun to support as well. With any luck, it'll hold itself in place by the time I take it out. At any rate, this gives an even better idea of the final shape. Hopefully tomorrow I'll at least get the back glassed and wind up with the top and bottom plates bonded to it nicely. FWIW, I'm likely going to put a chunk of cardboard between the bottomside of the "shelf" and the top piece of wood to ensure it'll fit once I've fleeced, and possibly carpeted over it all.
Attachments

Last edited:
what i did is put some cardboard on top of my sub cut to fit, then taped the hell out of it, then i made a trim ring and glued it down around the opening, then when i stretched the fleece, after it was stapled down. i pushed the sub down into the hole on top of the fleece and stuck two screws into the sub to hold it down and the fleece, then taped over the screw holes and laid my glass down. after my first two layers i unscrewed the sub, and carefully cut around the sub and pulled the speaker out.
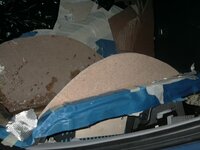
in the second pic it looks like the curve on the bottom piece isnt smooth looks like theres a hump near the back side of it. is it supposed to have this? if not i'd spend a little time shaping and sanding the piece a little better to get it perfect before you fiberglass it ans realise its a bit out of shape. it could just be the angle of the pic.
in the second pic it looks like the curve on the bottom piece isnt smooth looks like theres a hump near the back side of it. is it supposed to have this? if not i'd spend a little time shaping and sanding the piece a little better to get it perfect before you fiberglass it ans realise its a bit out of shape. it could just be the angle of the pic.
High on fumes....
Alright, so I atleast got started with getting messy today. This pic is after the first layer. it went on REDICULOUSLY easy. I discovered a trick when talking to boating buddy... spray-adhesive. Yep, good ol' 3-m stuff. Just spray your area, slap a bunch of patches of mat up there and you're set. By the time I was done, I'd managed to get about 5layers up allover the place. I did, however run into a couple problems. I noticed that as it was drying, some of the more inverted-ish areas that had a couple layers, and a bit toomuch resin in them managed to slide a bit which in a few cases brought some huge nasty bubbles with it. I'm not really too concerned at the moment. My main shape is good. I'm going to get my top piece set in place tomorrow, then when that dries, I'l pop the mold, demel off all the bad spots and do some patchwork while I'm doing the bottomsides of the wood anyway. (still skeptical of the bond, and be it warranted or not, I'd rather be redundant and not have this huge labor of a box explode)
Alright, so I atleast got started with getting messy today. This pic is after the first layer. it went on REDICULOUSLY easy. I discovered a trick when talking to boating buddy... spray-adhesive. Yep, good ol' 3-m stuff. Just spray your area, slap a bunch of patches of mat up there and you're set. By the time I was done, I'd managed to get about 5layers up allover the place. I did, however run into a couple problems. I noticed that as it was drying, some of the more inverted-ish areas that had a couple layers, and a bit toomuch resin in them managed to slide a bit which in a few cases brought some huge nasty bubbles with it. I'm not really too concerned at the moment. My main shape is good. I'm going to get my top piece set in place tomorrow, then when that dries, I'l pop the mold, demel off all the bad spots and do some patchwork while I'm doing the bottomsides of the wood anyway. (still skeptical of the bond, and be it warranted or not, I'd rather be redundant and not have this huge labor of a box explode)
Attachments
Last edited:
don't worry about the bond, ive taken a hammer to an old piece and the 3/4" mdf busted before the bonded area did, the resin seaps into the mdf and its stuck for good. i just get two mixing bowels and soon as i put the first layer on i mix up a batch in the second bowel and stick it right on and then go back to the first bowel. u can generally do all your layers at once once u get a good rythem down. and if you do get bubbles don't put any more layers on. let it dry then pop out the bubles and fill them in. bubbles will give you a seriously weak box.
ahh killing time while resin dries... trying to get my upper board inplace and rocking. unfortunately I've got to let one layer mildly setup before I can go layering it deep seeing as I'm kind of cheating and spanning a gap of sorts. oh well.. Everything's getting much more controlled the more I work with it, and learn how things work. Dremeled out alot of my bigger bubbles, and filled in some thin spots. Figure as logn as I'm waiting for my upper bond to setup I might as well slide some other stuff inthere as well. Fortunately the inside of a box doesn't have to be pretty, eH?
Finally feels like I'm getting somewhere...
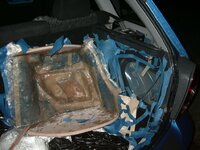
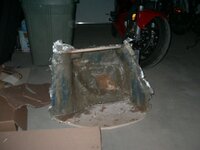
Okay so I managed to get my back piece finished, and out of my car! I've now been told by many that some form of release-agent would be a good idea, seeingas once everything was set, popping it out was, indeed QUITE a pain in the ass. Fortunately I used alot of blue painter's tape that doens't stick toowell so after wedging a couple paint stirrers and pool cues under the sides for awhile, it eventually came out without toomuch wrestling...
So here's some pics for anyone following my S-L-O-W progress (half of the problem's that I'm lazy, the other half is that I can't just dedicate a whole day to doing it, so I have to plan my curing schedues, etc...) Hopefully now that working on it doesn't tie up my transportation for a couplefew hours, I can get the rest done faster... Oh, and to answer my own initial question, the wood is indeed one with the fiberglass without a problem.
Attachments
Postwhore... *L* umm, yea, fun.. notreally. The nasty thing I jsut realized is that I've got little tiny fibers allover the back of my car. I'll be vacuuming for weeks te get all of the crap out.... ohwell, hopefully in the end it'll be worth it. I'll be really glad to be donw with this one..
finally out and starting to take shape. good job. that stuff is definately a b**** to get out. when i did mine the bottom, back, and sides were all molded to the car and it was a pain getting it to pop because the whole thing was stuck. i used some cheap ass 99cent masking tape, so thats probably why. i put two layers of tape and then taped up a layer of foil. next time ill spend the extra bucks for the blue tape and ill get some pam cooking spray. ive heard that works really well. but the rest is all a hell of a lot easier now that you dont have to work inside your car. should go pretty fast now. cant wait to see.
Umm, y'kno I don't recall the actual brand. The blue stuff is just from Lowe's in the paint Aisle. Actually one roll of it was 3m, and while it was sticker than the other stuff, it seemed to be the better stuff for the job, it also peeled off of the resin easier after I popped the mold out. But there's basically 4 different types of tape. wide blue thin blue, wide and thin tan. I found that having a roll of thin stuff is just about necessary to contour to the curvier areas. And the wide stuff saves time on bigger flatter panels, floor, etc. First thing I did was get a layer of blue stuff over all of the panel, then I used normal masking tape for the pocket (as can likely be seen) basically beacuse when it's hanging in the air, that stuff sticks to itself better and doesn't leave gaps like the blue stuff does. And besides, it's just hanging in the air, not really contacting anything that you'll need to be pulling off. Prettymuch after all of that I went through and made sure that I had atleast 2 layers of tape over everything. This was good beacuse I actually had acouple spots where the resin got through a crack, but only to be stopped by the next layer. It'da never came out if It were resined into place. That stuff's TENACIOUS..
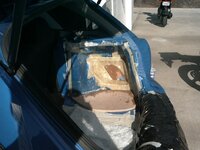
IN hindsight, I think the painter's tape method is indeed the way to go. For as easy as it made everything to use the sprayglue trick, I'd say it's worth the bit of frustration trying to pop. Basically all that took was patience... Oh, another little trick I used. If the idea of a top-plate of wood appeals to you, You can pop the cover off of the top of that panel and there's a "vent" looking section. No idea what it's for, but it makes life nice because you can then put a piece of wood on top ot it, and bolt through and hold a top-plate in place with it (pics below with a couple layers down, and the top plate bolted) Made things MUCH easier than my previous idea of bracing it in place with a couple scraps of wood. Glassing it into place is kinda a pain seeing as it's upside down and all but if you take your time and let each layer setup, you shoudl be able to get atleast 3 layers on the seam in not toolong. and that'll be enough to pop it with.
IN hindsight, I think the painter's tape method is indeed the way to go. For as easy as it made everything to use the sprayglue trick, I'd say it's worth the bit of frustration trying to pop. Basically all that took was patience... Oh, another little trick I used. If the idea of a top-plate of wood appeals to you, You can pop the cover off of the top of that panel and there's a "vent" looking section. No idea what it's for, but it makes life nice because you can then put a piece of wood on top ot it, and bolt through and hold a top-plate in place with it (pics below with a couple layers down, and the top plate bolted) Made things MUCH easier than my previous idea of bracing it in place with a couple scraps of wood. Glassing it into place is kinda a pain seeing as it's upside down and all but if you take your time and let each layer setup, you shoudl be able to get atleast 3 layers on the seam in not toolong. and that'll be enough to pop it with.
Attachments
Similar threads

- Replies
- 2
- Views
- 2K