What Have You Done To Your House Today?

The only one that we should be worried about is the white one. It's for the water heater and furnace. We positioned the trees directly between them. The others are air inlets for the furnace. The white ones far away are for the heat exchanger, no biggie.

What kind of bushes are those? Looks like they will probably not get much bigger? Very nice!
 
wildo said:
What kind of bushes are those? Looks like they will probably not get much bigger? Very nice!

5' to 20' Depending on where they are cut off.

http://images.google.ca/imgres?imgu...firefox-a&rls=org.mozilla:en-US:official&sa=N

thuja%20occidentalis%20pyramidalis%203.jpg
 
I get depressed looking at this thread ;(. I am a single E-6 but the house i want where i live costs apx 400,000. 3 Bedroom 2 bath apx 2500 sq feet with a 2 car garage. So i rent and can't upgrade like all of you!
I did add some nice lights along my front patio and a badmitten net :)
Rob
 
joka1 said:
I get depressed looking at this thread ;(. I am a single E-6 but the house i want where i live costs apx 400,000. 3 Bedroom 2 bath apx 2500 sq feet with a 2 car garage. So i rent and can't upgrade like all of you!
I did add some nice lights along my front patio and a badmitten net :)
Rob

Yeah, WA house prices suck. Least we aren't as bad a CA.........yet.
 
the suburb right next to me has house for about 250,000-400,000 just to be torn down, then they build a brand new one and want around 1.5 million(then add in the 18,000-25,000 in taxes a yr). how people can afford that and the wife stay home with 3 kids i will never know.
 
Gave my daughter's room a makeover: New bunk bed w/futon to replace her captain's bed, new dresser, curtains replaced (twice), single blind, TV moved for better viewing angle from futon, MP3 speakers placed above futon, butterfly fan, lavendar paint on three walls, custom beach mural w/butterfly on fourth wall, ceiling painted blue (sky), same blue as sky used to paint shelving for dance trophies and alarm clock, wire management

Before
KailasRoom-Jan2006001.jpg


Before: TV and MP3 Speakers
KailasRoom-Jan2006.jpg


Before: 2 Single Blinds
KailasRoom-2007005.jpg


After: 1 Blind
KailasRoom-2007013.jpg


After: New TV Placement
KailasRoom-2007015.jpg


After: Bunk Bed w/Futon1
KailasRoom3-2-20072.jpg


After: Bunk Bed w/Futon2
KailasRoom3-2-20071.jpg


After: MP3 Speakers Placed Above Futon
KailasRoom-2007018.jpg


After: Alarm Clock Shelf
KailasRoom-2007017.jpg


After: Shelves For Dance Trophies
KailasRoom-2007016.jpg


After: Beach Mural, Fence and Bridge
KailasRoom-2007011.jpg


After: Beach Mural, Chair and Butterly
KailasRoom-2007012.jpg


After: Beach Mural, Butterfly
KailasRoom-2007014.jpg
 
Last edited:
the suburb right next to me has house for about 250,000-400,000 just to be torn down, then they build a brand new one and want around 1.5 million(then add in the 18,000-25,000 in taxes a yr). how people can afford that and the wife stay home with 3 kids i will never know.

50 year mortgages :p
 
Gave my daughter's room a makeover: New bunk bed w/futon to replace her captain's bed, new dresser, curtains replaced (twice), single blind, TV moved for better viewing angle from futon, MP3 speakers placed above futon, butterfly fan, lavendar paint on three walls, custom beach mural w/butterfly on fourth wall, ceiling painted blue (sky), same blue as sky used to paint shelving for dance trophies and alarm clock, wire management

Before
KailasRoom-Jan2006001.jpg


Before: TV and MP3 Speakers
KailasRoom-Jan2006.jpg


Before: 2 Single Blinds
KailasRoom-2007005.jpg


After: 1 Blind
KailasRoom-2007013.jpg


After: New TV Placement
KailasRoom-2007015.jpg


After: Bunk Bed w/Futon1
KailasRoom3-2-20072.jpg


After: Bunk Bed w/Futon2
KailasRoom3-2-20071.jpg


After: MP3 Speakers Placed Above Futon
KailasRoom-2007018.jpg


After: Alarm Clock Shelf
KailasRoom-2007017.jpg


After: Shelves For Dance Trophies
KailasRoom-2007016.jpg


After: Beach Mural, Fence and Bridge
KailasRoom-2007011.jpg


After: Beach Mural, Chair and Butterly
KailasRoom-2007012.jpg


After: Beach Mural, Butterfly
KailasRoom-2007014.jpg

Hopefully you take this as constructive criticism...

1. I would get rid of the wire hiding things... they just look bad. Use the pillers of the bed to hide the wires by mount them closer to the pole.

A better option would be drilling into the wall by the speaker and by the floor. Then guide the through the wall, I would use hard metal wire, and then at the floor board run the wires sideways.

2. Learn how to install electrical wiring (there are so many good website and DIY books) and generally if you run them horzonital from another plug or switch its extremely easy.

3. When using those floating shelves you really need to stagger them on the wall. If you want to run something along that entire space above the closet you should buy a bigger shelf.


Good luck!

Thank you for the constructive criticism.

1) The speakers are actually computer speakers (sub is on the floor under the futon) and I have pretty much maxed out how far apart I can place them. Reason for the cable hider is it allows the speakers to remain "mobile" as well as replaceable if she decides to get something new..

2) Yes, I should learn more, can't hurt.

3) Not crazy about this either, but for now they get the trophies off of her dresser. We checked several stores but couldn't find any longer shelves that would 'fit'. All were too tall once you factored in the height of the trophies. Currently looking for the 'right' shelf.
 
We're gonna finsih up a 12 x 20 foot deck to the new house this weekend. Last weekend we worked on getting some new electroincs for the soon to be furnished loft, a samsung 32" LCD HTVD and a nice upconvert DVD player (old player from the living room) and we put a new HD-DVD player in the living room (it was on sale and the HD vrs blu-ray battle isn't over yet)
 
Oh you didn't mean him.....
sorry.

The house is lookin' good man.
do you do your own dental surgery too?
you seem to "DIY" everything.... very well mind you
 
I undertook two projects in the yard this week.

1. Combat the erosion problem in my side yard, which was made worse by my recent installation of a pallet of sod.

2. Do something along the garage side of my house to make it easier to mow and to keep the weeds from growing up around my A/C unit. Several wires run in/out of my house right around and behind the unit, and I'd like to keep it trimmed back there in case I ever need access to that stuff, but it's too tight for the weed wacker and I'm afraid I'll cut something important if I go in with the hedge clippers.

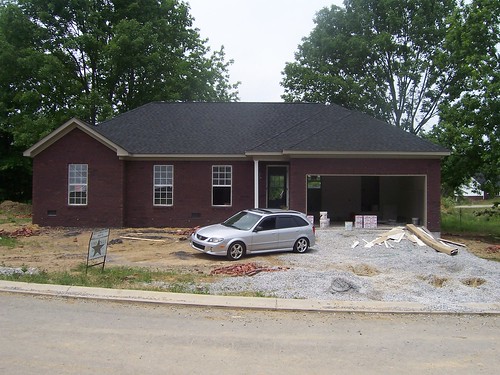
Starting with project #2, here we see the problem area, notice all the crap growing up behind the A/C:

185018089-M.jpg


So, I went to Home Despot, and installed the $20 MPV lowering kit:

185018057-M.jpg


Looking pretty good, here's the view of the actual "kit:"

185018108-M.jpg


20 yards of Decorative Cypress Mulch, $1/yard! Along with dropping the van, it also gave the van a lovely "woody" aroma, that lingers even yet!

After much careful clipping of vegitation and hours of battle with the rock-infested, rock-hard, nasty-ass dirt in my yard, I'd prepped the area and dug a trench for the edging. The final result is shown here:

185018146-M.jpg


Yes I know the edging isn't exactly straight. I don't exactly care! It looks way better than it did, and it will hopefully crush the life out of any additional plants that may think of growing up around my utilities. If not, I'll crack out the herbicides! Here's the former problem area:

185018177-M.jpg


Much better! Hopefully it will last.

As for project #1, my back yard and side yard keep sliding downhill into my neighbor's side yard. When it rains here in the summers, it tends to rain like hell, dumping a huge amount of water in a short time, and the flow of rain water down this side-hill has cut several ditches into the hill, 3 FEET deep and nearly a foot wide! The dirt run-off has killed my neighbor's grass.

The problem is two-part:
1. There's no grass in my back yard or the three uphill from me, and the yards of all my neighbors are so badly graded that all of the rain that falls on four back yards runs down to mine, around the corner of my house and (in theory) through the front yard to the street. This only ever kind of worked, as the hill/berm running from my back yard to my front yard was never high enough to keep some of that rain from running down the hill into my neighbor's yard.

2. I added a pallet of sod in the side yard about a month back. My other neighbor gave it to me, free, and I had dirt in most of the side yard, so I figured I'd lay it down, and it would extend the grass part of my yard, and maybe catch some of this rain water and help with the erosion problem. It actually made the erosion much worse! The back edge (yellow line) of the sod is raised above the surface of the dirt, and is working as a dam, stopping the water from flowing to/through the front yard, and causing it to all dump over the hill in one spot, digging the aforementioned trenches in less than a month!

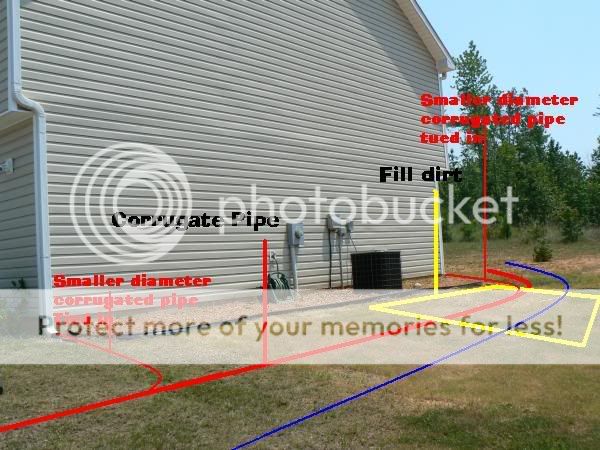
Here's a lovely diagram of the problem:

185029121-M.jpg


I don't have the money right now to have the entire yard re-graded and all-new sod planted, which would be the ultimate solution, so I devised a stop-gap measure. I used the same plastic edging material to create a waterbreak along the top of the hill that was sliding down into my neighbor's yard. This unfortunately meant digging another long trench to install the edging, but I discovered that the shovel cuts into the dirt much better, and the dirt behaves much better (less giant rock-hard dirt clods) if you soak it down and dig in the mud, instead!

I actually put the edging a couple of feet down from the top of the hill and cut it into the new sod, so that water coming down the hill will hit the edging, run the length of the edging and dump into the sod, slowing down the flow, soaking some of it up, and flowing out to the street, as intended. The dam-edge of the sod is still there, but the edging material is higher, so hopefully this will redirect the water where I want it.

It hasn't rained since the install. I'll post up again once I know if it worked!
 
Erosion sucks. How far down can you dig before solid clay or rock? Is there a way that you could bury a corrugated pipe with a few inches of gravel over it? It would shed the water in a specific direction underground.

Check this out.
185018146-M.jpg


If you could run the pipe to the street or to a low area away from both properties that should do the trick without having to pay for regrading.
 
The dirt is so hard and so rock-filled I can't even imagine digging 24" down in that crap! I could barely dig down the 4 inches or so that I needed to for the edging material!

It hasn't rained here since I did the work, so I don't know if it's going to do the job yet.
 
Back