505 V3 Billet Intake Manifold *GB*

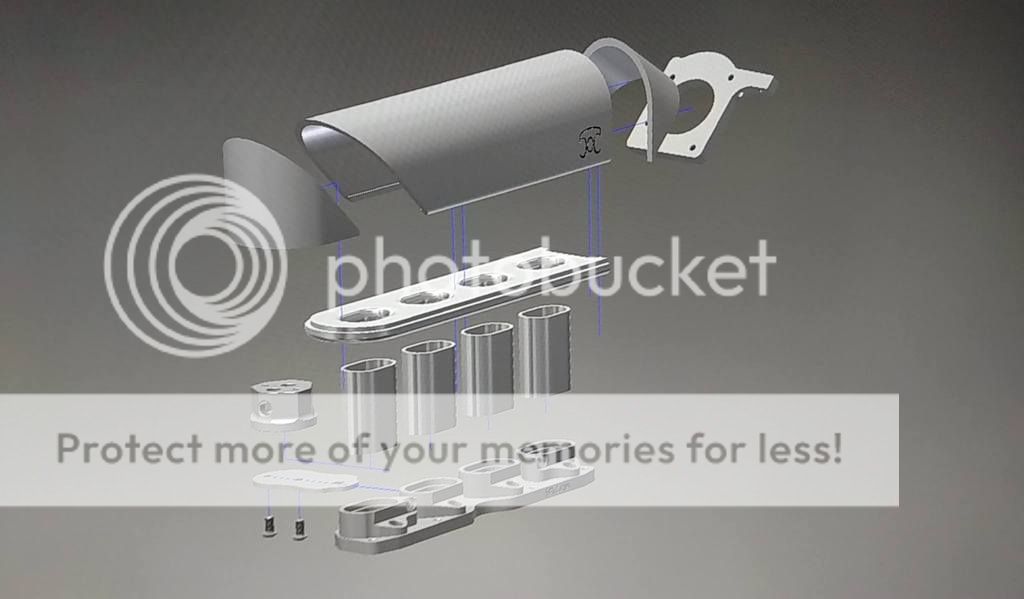
By far the finest part to ever come out of the 505 lab, the new V3 Billet Intake Manifold is the worthy successor to the original 505 Sheet Metal Intake Manifold. Over 2 years and thousands of dollars were spent reimagining and refining this piece from the ground up. The end result is a nearly bomb-proof evolution of the manifold that has been run on over 40 high power Protege's all over the world.

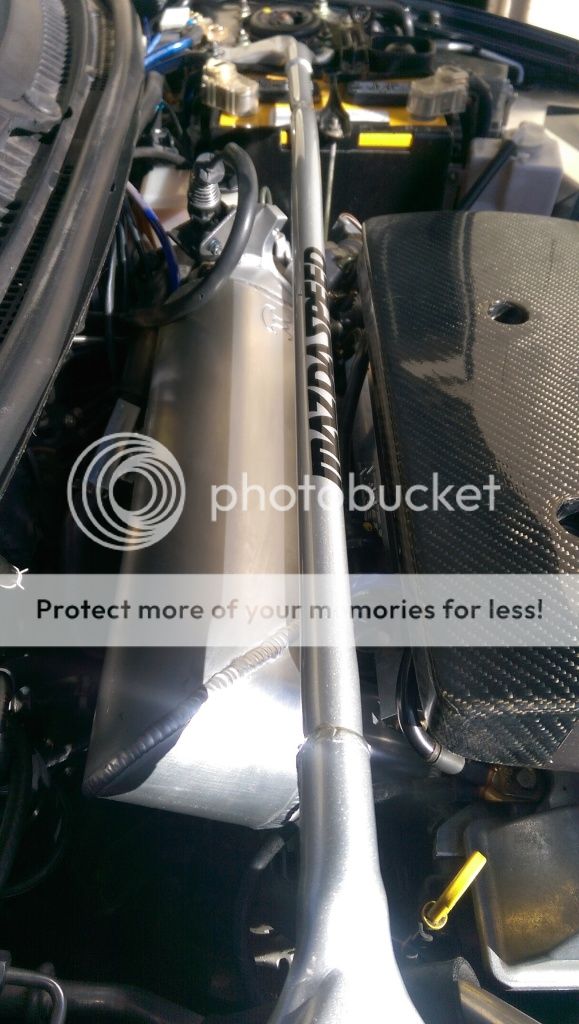
This part is designed for maximum peak horsepower, and makes obscenely large gains across the board over the OEM Protege and 626 manifolds. If you want your FS engine to BREATHE, this is definitely the manifold you're looking for!


12469876_1200057090022050_971243621_o.jpg


IMAG0522.jpg


IMAG0520.jpg


IMAG0519.jpg


IMAG0558.jpg


The Details:

Based on the same optimized internal dimensions as the original, the new V3 design incorporates the following improvements:

- 100% billet components
- 7/8" longer effective runner length for improved mid-range gains
- 3D milled funnel taper from runner to head port
- Perfected injector geometry
- Perfected throttle cable geometry
- Machined fuel rail mounts
- Half-round plenum
- Runner & plenum materials that are over twice as thick as the original
- Remote mounted EGR setup (optional)
- ~5% peak horsepower gain over original (~15% over stock manifold)


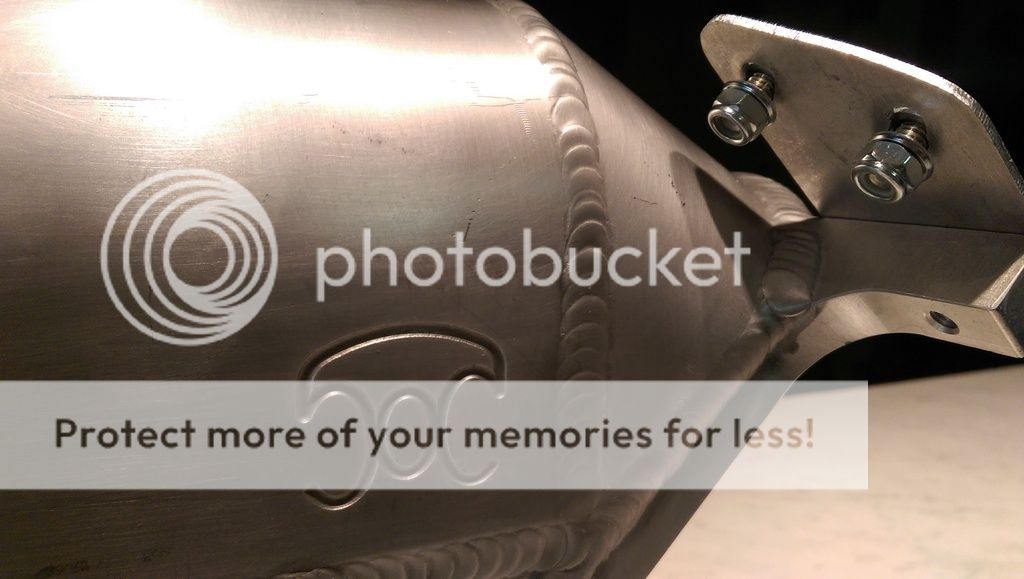
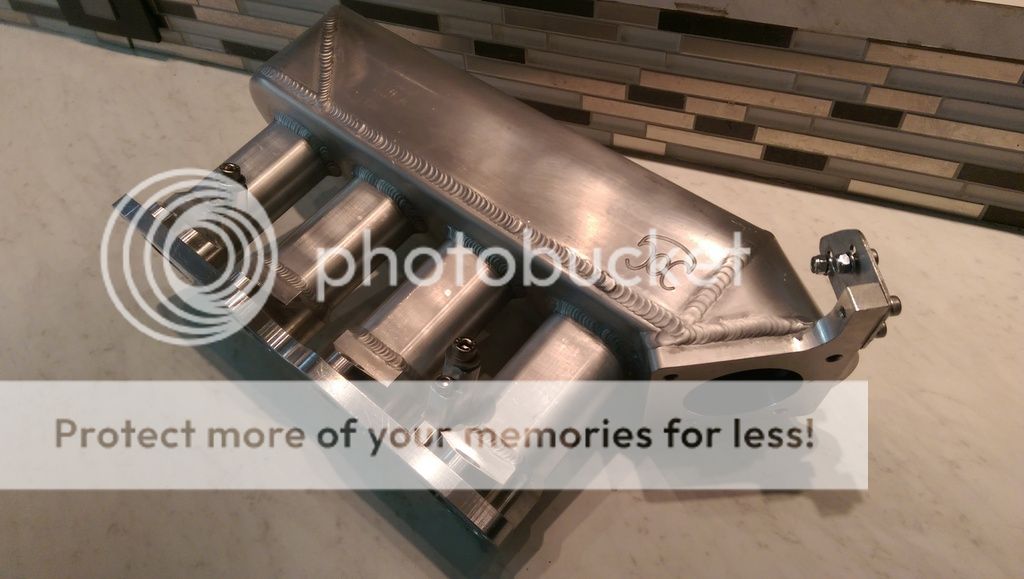
Standard finish is bare media blasted to show off the beauty of the billet components.
EGR Kit includes remote mounting bracket, valve flange, in/out hoses, fittings, and hardware.


Pricing & Options:

V3 Manifold - $1199* + ship**
Remote Mounted EGR - $100***
JayRacing Thermal Spacer Kit - $75
JayRacing Fuel Rail - $200

* Flexible payment plans are available with a deposit of $700. Deposits are only refundable if something goes wrong on my end, but can be transferred to another interested buyer if you need to back out for whatever reason.

** Actual shipping cost from 87111 (UPS for USA and USPS for international) will be calculated before final payment is made.

*** All manifolds are made with a hookup port for the EGR Kit, so the kit can be added later if needed.


Current Status:

Machining done.
Welding done.
Glass bead blasting done.
Packaging done.

Estimated shipping dates:

June 10th for USA orders with no fuel rail.
June 11th for International orders with no fuel rail.
June 20th for all orders with fuel rails.


Batch 3 is officially all sold out and all parts have shipped. Thanks for another great GB folks!

#UsernameEGR KitFuel RailThermal SpacersStatus
1.HammoYesSHIPPED
2.Marmas01SHIPPED
3.ZealoustheEnderYesSHIPPED
4.googoo1ooYesSHIPPED
5.Clement_ghostSHIPPED
6.paniaguae640YesYesSHIPPED
7.MSProtege(918)YesYesSHIPPED
8.greenspeedSHIPPED
9.destinealYesSHIPPED
10.mazdaastina1999SHIPPED
11.AnonymousYesYesYesSHIPPED
12.AnonymousYesSHIPPED
13.Turboj1YesSHIPPED
14.bwaltSHIPPED
15.jessemac19SHIPPED
16.NemosMP5YesSHIPPED
[tr]
 
Last edited:
#UsernameEGR KitFuel RailThermal SpacersStatus
1.HammoYesFULLY PAID
2.Marmas01FULLY PAID
3.ZealoustheEnderYesFULLY PAID
4.googoo1ooYesFULLY PAID
5.Clement_ghostFULLY PAID
6.paniaguae640YesYesFULLY PAID
7.MSProtege(918)YesYesFULLY PAID
8.greenspeedFULLY PAID
9.destinealYesFULLY PAID
10.mazdaastina1999FULLY PAID
11.ctb2024YesYesYesPART DEPOSIT PAID
12.AnonymousYesFULLY PAID
13.Turboj1YesPART DEPOSIT PAID
14.bwaltFULLY PAID
15.OPEN SPOT UP FOR GRABS
[tr]
 
Just to clarify so the 505zoom intake manifold with the jay racing fuel rail can not be installed with the thermal spacers that I bought a while back due to fitment issues? I am kind of confused. thank you.
 
He was talking about the black spacers that mount between the fuel rail and intake manifold. Thermal spacer between the intake manifold and cylinder head is ok.
 
Oh and I thankfully finally have an update. I'm pretty much ready to ship here... the reworked mounts will be ready on Wednesday and I'll start getting these babies on the bus before the weekend.


#UsernameEGR KitFuel RailThermal SpacersStatus
1.HammoYesFULLY PAID
2.Marmas01FULLY PAID
3.ZealoustheEnderYesFULLY PAID
4.googoo1ooYesFULLY PAID
5.Clement_ghostFULLY PAID
6.paniaguae640YesYesFULLY PAID
7.MSProtege(918)YesYesFULLY PAID
8.greenspeedFULLY PAID
9.destinealYesFULLY PAID
10.mazdaastina1999FULLY PAID
11.ctb2024YesYesYesPART DEPOSIT PAID
12.AnonymousYesFULLY PAID
13.Turboj1YesPART DEPOSIT PAID
14.bwaltFULLY PAID
15.jessemac19DEPOSIT PAID
[tr]
 
#UsernameEGR KitFuel RailThermal SpacersStatus
1.HammoYesFULLY PAID
2.Marmas01FULLY PAID
3.ZealoustheEnderYesSHIPPED
4.googoo1ooYesSHIPPED
5.Clement_ghostSHIPPED
6.paniaguae640YesYesFULLY PAID
7.MSProtege(918)YesYesFULLY PAID
8.greenspeedFULLY PAID
9.destinealYesSHIPPED
10.mazdaastina1999FULLY PAID
11.ctb2024YesYesYesPART DEPOSIT PAID
12.AnonymousYesFULLY PAID
13.Turboj1YesDEPOSIT PAID
14.bwaltFULLY PAID
15.jessemac19DEPOSIT PAID
[tr]
 
#UsernameEGR KitFuel RailThermal SpacersStatus
1.HammoYesFULLY PAID
2.Marmas01SHIPPED
3.ZealoustheEnderYesSHIPPED
4.googoo1ooYesSHIPPED
5.Clement_ghostSHIPPED
6.paniaguae640YesYesFULLY PAID
7.MSProtege(918)YesYesFULLY PAID
8.greenspeedSHIPPED
9.destinealYesSHIPPED
10.mazdaastina1999FULLY PAID
11.ctb2024YesYesYesPART DEPOSIT PAID
12.AnonymousYesFULLY PAID
13.Turboj1YesDEPOSIT PAID
14.bwaltFULLY PAID
15.jessemac19DEPOSIT PAID
[tr]
 
I'm gonna go ahead and just post up the install guide here in the thread instead of just PM'ing it to you guys... that way we can get any questions answered here publicly and everyone can see what's involved.
 
V3 MANIFOLD INSTALL GUIDE


As always, disconnect the negative battery terminal for safety. Those of you on the stock ECU or piggyback setups will want to reset the computer anyway.


Step 1

EGR Prep

*You can skip to step 2 if you are not installing the EGR Kit.

A. Install the provided flare/NPT fittings into both sides of the EGR block.
B. Using the provided hardware, mount the EGR valve to the EGR block.
C. Mount the EGR block to the remote mount bracket.
D. Also go ahead and attach the shorter hose to the outlet side of the EGR block as shown.

http://s291.photobucket.com/user/50...s/V3 Manifold Install Guide/CIMG6157.jpg.html

http://s291.photobucket.com/user/50...s/V3 Manifold Install Guide/CIMG6158.jpg.html


E. Using your stock EGR hose as a guide, bend the longer hose to match it. It is crucial to get the first few bends to match perfectly.

http://s291.photobucket.com/user/50...s/V3 Manifold Install Guide/CIMG6162.jpg.html


F. Install the longer hose. You can start from either side, but I like to start from the front and push it towards the firewall. Make sure that you are following the proper channel that the stock hose was running through, and it is SUPER IMPORTANT that you make sure the hose is not touching any other hoses. This thing gets HOT, and it WILL melt other hoses if it is touching them. Double and triple check and take your time here to get this right, as it will save you a lot of time and heartache later.

http://s291.photobucket.com/user/50...s/V3 Manifold Install Guide/CIMG6164.jpg.html

http://s291.photobucket.com/user/50...s/V3 Manifold Install Guide/CIMG6163.jpg.html

http://s291.photobucket.com/user/50...s/V3 Manifold Install Guide/CIMG6165.jpg.html


G. Hook the now installed longer hose up to the block/valve/bracket combo.

http://s291.photobucket.com/user/50...s/V3 Manifold Install Guide/CIMG6167.jpg.html


H. Hook up the wire harness.

http://s291.photobucket.com/user/50...s/V3 Manifold Install Guide/CIMG6168.jpg.html


I. (Not pictured) With everything now hooked up to the block, hold the bracket up to the lower center head/manifold bolt hole and check to make sure the wires let it reach. Take a quick look at the pic in step 3b if this makes no sense. The bracket holes are slotted, so make adjustments now and then tighten down the bracket/block bolts to finish up this step.


Step 2

Manifold Prep


A. Install the fuel rail mounts. Hand tight for now works.

http://s291.photobucket.com/user/50...s/V3 Manifold Install Guide/CIMG6156.jpg.html


B. If you are using the stock fuel rail, you'll need to slightly bend the upper mounting tabs away from the plenum.

http://s291.photobucket.com/user/50...s/V3 Manifold Install Guide/CIMG6159.jpg.html

http://s291.photobucket.com/user/50...s/V3 Manifold Install Guide/CIMG6160.jpg.html


C. Using your stock hardware, install the TB. Don't forget the gasket.

http://s291.photobucket.com/user/50...s/V3 Manifold Install Guide/CIMG6169.jpg.html


D. Install the vac fittings. Use teflon tape if you've got it. I used RTV since I didn't, and made a huge mess in the process. DO NOT OVERTIGHTEN THE FITTINGS! There isn't a lot of thread here, and since they are aluminum it doesn't take much to blow them out. Again, DO NOT OVERTIGHTEN!

http://s291.photobucket.com/user/50...s/V3 Manifold Install Guide/CIMG6170.jpg.html


Step 3

Mount the manifold. No not THAT kind of mounting. I know it's sexy but try and restrain yourself here.


A. Set it on the 2 outer studs, and hand tighten the nuts.

http://s291.photobucket.com/user/50...s/V3 Manifold Install Guide/CIMG6171.jpg.html


B. If installing the EGR Kit, line up the bracket with the lower center bolt hole and get that bolt started by hand.

http://s291.photobucket.com/user/50...s/V3 Manifold Install Guide/CIMG6175.jpg.html


C. Tighten the bottom center bolt. I like to use the gearwrench here on this one.

http://s291.photobucket.com/user/50...s/V3 Manifold Install Guide/CIMG6176.jpg.html


D. Next up are the 2 center uppers. Attack these ones with a simple 3" extension. Throw a swivel on there if you'd like.

http://s291.photobucket.com/user/50...s/V3 Manifold Install Guide/CIMG6181.jpg.html

http://s291.photobucket.com/user/50...s/V3 Manifold Install Guide/CIMG6182.jpg.html


E. Now hit the lower outers. Use the same 3" extension setup you just used.

http://s291.photobucket.com/user/50...s/V3 Manifold Install Guide/CIMG6180.jpg.html

http://s291.photobucket.com/user/50...s/V3 Manifold Install Guide/CIMG6183.jpg.html


F. Finish this up with the upper outers. 3" extension and swivel is the winning combo for these.

http://s291.photobucket.com/user/50...s/V3 Manifold Install Guide/CIMG6186.jpg.html

http://s291.photobucket.com/user/50...s/V3 Manifold Install Guide/CIMG6187.jpg.html


Step 4

Fuel Rail


A. Install the injector tip O-Rings. I like to use a fresh set here but your stock ones should work just fine. I also like to use a little bit of lithium grease on them.

http://s291.photobucket.com/user/50...s/V3 Manifold Install Guide/CIMG6188.jpg.html

http://s291.photobucket.com/user/50...s/V3 Manifold Install Guide/CIMG6189.jpg.html


B. Set the injectors and fuel rail combo on there. Use the provided fuel rail mounting bolts as a centering guide to get the mounts lined up properly, and then tighten down the mounts to the manifold.

http://s291.photobucket.com/user/50...s/V3 Manifold Install Guide/CIMG6190.jpg.html

http://s291.photobucket.com/user/50...s/V3 Manifold Install Guide/CIMG6191.jpg.html


C. If using the stock or Perrin rails, put your stock black dampers/spacers in between the rail and the mounts. If using the JayRacing rail, those are built in. Tighten down the rail bolts while putting downward pressure with your free hand on the rail. You want those injectors to fully seat when you tighten these up.

http://s291.photobucket.com/user/50...s/V3 Manifold Install Guide/CIMG6192.jpg.html

http://s291.photobucket.com/user/50...s/V3 Manifold Install Guide/CIMG6193.jpg.html


D. Plug in the VICS and VCTS solenoids to their harness and drop them between the center runners. They'll be fine just hanging out there. No need to hook up a vac signal to them.

http://s291.photobucket.com/user/50...s/V3 Manifold Install Guide/CIMG6195.jpg.html


E. Plug in the injector harnesses.

http://s291.photobucket.com/user/50...s/V3 Manifold Install Guide/CIMG6196.jpg.html

http://s291.photobucket.com/user/50...s/V3 Manifold Install Guide/CIMG6197.jpg.html


F. If using the stock PCV setup with no catch can, run a hose from the PCV valve in between the center runners. We'll hook that up later.

http://s291.photobucket.com/user/50...s/V3 Manifold Install Guide/CIMG6198.jpg.html


Step 5

Throttle


A. Mount the throttle cable bracket to the manifold. Hand tight for now.

http://s291.photobucket.com/user/50...s/V3 Manifold Install Guide/CIMG6201.jpg.html


B. Hook up the cable.

http://s291.photobucket.com/user/50...s/V3 Manifold Install Guide/CIMG6200.jpg.html


C. Mount the stock bracket to the now installed bracket, and use the provided bolts/washers/nuts to join them up. Adjust the tension so there is no slop, but not so tight that the throttle plate is sitting open. You can play with this after you fire up the car to get it perfect, but go ahead and snug those bolts all down now.

http://s291.photobucket.com/user/50...s/V3 Manifold Install Guide/CIMG6202.jpg.html

http://s291.photobucket.com/user/50...s/V3 Manifold Install Guide/CIMG6205.jpg.html

http://s291.photobucket.com/user/50...s/V3 Manifold Install Guide/CIMG6206.jpg.html


D. Install the charge piping to the throttle body. If you are running one of the rare few intercooler kits that has a metal 90* at the end, you need to cut that off and replace it with a silicone 45*. If you already have a silicone 90* there, you just need to swap it for a 45*. If you are running the stock MSP intercooler piping, those things suck and you shouldn't even think about running them with this nice of an intake manifold anyway. Get hardpipes. (rockon)

You're also going to start hooking up the wire harnesses here.

http://s291.photobucket.com/user/50...s/V3 Manifold Install Guide/CIMG6203.jpg.html

http://s291.photobucket.com/user/50...s/V3 Manifold Install Guide/CIMG6204.jpg.html


Step 6

Vac Lines


Congratulations. You are on the final step.

This one is hard for me to do a walkthrough on, as pretty much everybody does their lines differently. I have provided you with enough ports to run all of the stock systems, as well as dedicated lines for your waste gate or boost control, blow off valve or bypass valve, engine management, and boost gauge.

Get creative here and run the lines however you like. Cap/plug off any that you don't need.

It is definitely possible to do them from the top, but overall it is easier to jack the car up and hook everything up from the bottom.

http://s291.photobucket.com/user/50...s/V3 Manifold Install Guide/CIMG6208.jpg.html


Step 7

Fire it up, test it, and enjoy it


Assuming everything went right, the car should fire right up and you'll have zero issues.

If you are getting a vac leak, start with all of the lines first and then go from there. Injectors are the next most common spot. Then the throttle body and main flanges.

Adjust the throttle cable bracket if the idle is high or the pedal has play.

If you have no leaks and the idle speed is good, you're ready to rock. Go take it for a spin.


*** THIS PART WILL MASSIVELY INCREASE YOUR PEAK HP AND TOP END!!! LOWER YOUR BOOST IF YOU AREN'T ALREADY TUNED ON THE RICH SIDE, AND MONITOR YOUR AFR UNTIL YOU ARE CERTAIN THAT YOU AREN'T LEANING OUT!!! ***
 
Last edited:
#UsernameEGR KitFuel RailThermal SpacersStatus
1.HammoYesFULLY PAID
2.Marmas01SHIPPED
3.ZealoustheEnderYesSHIPPED
4.googoo1ooYesSHIPPED
5.Clement_ghostSHIPPED
6.paniaguae640YesYesFULLY PAID
7.MSProtege(918)YesYesFULLY PAID
8.greenspeedSHIPPED
9.destinealYesSHIPPED
10.mazdaastina1999FULLY PAID
11.ctb2024YesYesYesPART DEPOSIT PAID
12.AnonymousYesFULLY PAID
13.Turboj1YesDEPOSIT+ PAID
14.bwaltFULLY PAID
15.jessemac19FULLY PAID
[tr]
 
Back