
hollywood0027
Member
- :
- '08 Black Mica Mazda Speed 3
NOTE: I am not responsible for any damage done to your vehicle. Perform these steps at your own risk. If you do not feel you are capable of safely doing the following, do not attempt this project.
For all of those who don’t want to remove the seat to splice into a large cluster of BOSE wires there is another way. This can also be used with those who don’t have the BOSE stereo as the wires entering the door speakers should be color-coded the same. This will NOT affect the operation of your BOSE/stock stereo unless you are stupid and cut the wires in the wiring harness or short your bare wires together while the stereo is on. You will need the following for this procedure:
Speaker Wire (18-22 guage)
Wire Tap-In Squeeze Connectors (handy splicers) (18-22 guage)
Electrical Tape
Pliers
LOC (Line Output Converter - to convert the speaker wire inputs into RCA inputs for your amplifier)
Possibly a set of little fingers for attaching the handy splicers to the wiring harness, as my fingers are fairly large which seemed to make it a little difficult. I found it is easier if you place the splicers around the wire in the harness and then place your speaker wire in it and squeeze.
For those who haven’t run their power wire yet, I don’t have pictures of this but I ran my power wire from the battery compartment, across the firewall (behind the heat shield) to the rubber grommet on the passenger side. It was easily forced through the side of this grommet and enters the car just behind the glovebox (which can be removed as per the instructions in the how-to here http://www.mazdas247.com/forum/showthread.php?t=123698529 thanks jam asian85.) I then ran it along the passenger side below the step plates to the rear of the car. What I have written here is how to easily tap into either the stock OR the Bose stereo speaker wires for LOC inputs for the aftermarket subwoofer’s amplifier.
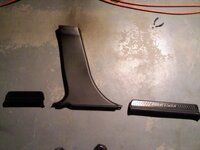
First Step: (First Picture)
Remove the front and rear door step plates (it will pull straight up and out along with the rear step plate. It will feel like you are breaking something, but you are not) and the plastic pillar cover in between the two.
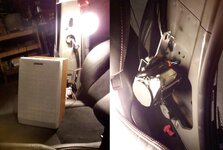
Second Step: (Pictures 2-4)
Locate the wiring harnesses that follow the pillar up to the rear door jam and into the rear door.
On the driver’s side locate:
Left Rear Speaker Positive Wire (+): White/Purple
Left Rear Speaker Negative Wire (-): Gray/White
On the passenger’s side locate:
Right Rear Speaker Positive Wire (+): White
Right Rear Speaker Negative Wire (-): Gray
These wires will be spliced to your speaker wire using the wire tap-in squeeze connectors and run to the back of the car into a LOC to convert it to RCA inputs for your amplifier. NOTE: Make sure you splice your speaker wire so that the white striped wire is connected to the Negative Speaker wire which will make it easy to remember which wire is positive and negative when connecting it to the LOC, otherwise your LOC will have trouble outputting a clean signal. I tested these wires by pushing the end of a spare piece of speaker wire into the harness and running it to a spare stereo speaker I had lying around, then turning on the stereo and making sure the speaker played music. (Picture 2) Another Note: If you happen to drop one of your handy wire splicers inside the pillar, it can be retrieved by carefully removing the seatbelt, which I believe took a 11mm socket for the small bolt and a 14mm socket for the larger bolt. Some people would say definitally stay away from these do to their CO2 pre-tensioner, but if you are very careful and don’t throw it around or cut wires you will be ok.
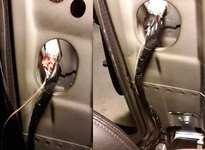
On the Drivers Side (Picture 3), after splicing in the wire and wrapping the connections in electrical tape, I ran the wire down and under the rear step plate and along the side behind the rear seats under the back floor panel.
On the Passenger Side (Picture 4) I ran the wire up and over the door (inside the rubber door surround) because I chose to run my power wire down the passenger side under the step plate, and didn’t want the stereo signal wire to be near it due to possible interference caused by the power surges along the power wire. I also unhooked the harness from the pillar by pushing the wings on the plastic rivet together and pulling it away from the pillar. This gave me more room to attach the splicing hardware.
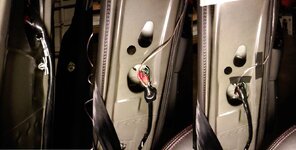
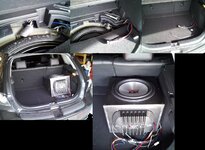
Third Step: (Picture 5)
After running the wires to the back, I connected them to my LOC below the rear floor and then ran the RCA cable around the side of the cover to my amplifier. I custom built my box to slant the subwoofer slightly towards the front of the car and wired my sub/amp setup so that it can be easily removed when I would like more room to carry larger luggage or my mtn bike.
Last Step:
Replace side panels, clean up your mess, and enjoy!
For all of those who don’t want to remove the seat to splice into a large cluster of BOSE wires there is another way. This can also be used with those who don’t have the BOSE stereo as the wires entering the door speakers should be color-coded the same. This will NOT affect the operation of your BOSE/stock stereo unless you are stupid and cut the wires in the wiring harness or short your bare wires together while the stereo is on. You will need the following for this procedure:
Speaker Wire (18-22 guage)
Wire Tap-In Squeeze Connectors (handy splicers) (18-22 guage)
Electrical Tape
Pliers
LOC (Line Output Converter - to convert the speaker wire inputs into RCA inputs for your amplifier)
Possibly a set of little fingers for attaching the handy splicers to the wiring harness, as my fingers are fairly large which seemed to make it a little difficult. I found it is easier if you place the splicers around the wire in the harness and then place your speaker wire in it and squeeze.
For those who haven’t run their power wire yet, I don’t have pictures of this but I ran my power wire from the battery compartment, across the firewall (behind the heat shield) to the rubber grommet on the passenger side. It was easily forced through the side of this grommet and enters the car just behind the glovebox (which can be removed as per the instructions in the how-to here http://www.mazdas247.com/forum/showthread.php?t=123698529 thanks jam asian85.) I then ran it along the passenger side below the step plates to the rear of the car. What I have written here is how to easily tap into either the stock OR the Bose stereo speaker wires for LOC inputs for the aftermarket subwoofer’s amplifier.
First Step: (First Picture)
Remove the front and rear door step plates (it will pull straight up and out along with the rear step plate. It will feel like you are breaking something, but you are not) and the plastic pillar cover in between the two.
Second Step: (Pictures 2-4)
Locate the wiring harnesses that follow the pillar up to the rear door jam and into the rear door.
On the driver’s side locate:
Left Rear Speaker Positive Wire (+): White/Purple
Left Rear Speaker Negative Wire (-): Gray/White
On the passenger’s side locate:
Right Rear Speaker Positive Wire (+): White
Right Rear Speaker Negative Wire (-): Gray
These wires will be spliced to your speaker wire using the wire tap-in squeeze connectors and run to the back of the car into a LOC to convert it to RCA inputs for your amplifier. NOTE: Make sure you splice your speaker wire so that the white striped wire is connected to the Negative Speaker wire which will make it easy to remember which wire is positive and negative when connecting it to the LOC, otherwise your LOC will have trouble outputting a clean signal. I tested these wires by pushing the end of a spare piece of speaker wire into the harness and running it to a spare stereo speaker I had lying around, then turning on the stereo and making sure the speaker played music. (Picture 2) Another Note: If you happen to drop one of your handy wire splicers inside the pillar, it can be retrieved by carefully removing the seatbelt, which I believe took a 11mm socket for the small bolt and a 14mm socket for the larger bolt. Some people would say definitally stay away from these do to their CO2 pre-tensioner, but if you are very careful and don’t throw it around or cut wires you will be ok.
On the Drivers Side (Picture 3), after splicing in the wire and wrapping the connections in electrical tape, I ran the wire down and under the rear step plate and along the side behind the rear seats under the back floor panel.
On the Passenger Side (Picture 4) I ran the wire up and over the door (inside the rubber door surround) because I chose to run my power wire down the passenger side under the step plate, and didn’t want the stereo signal wire to be near it due to possible interference caused by the power surges along the power wire. I also unhooked the harness from the pillar by pushing the wings on the plastic rivet together and pulling it away from the pillar. This gave me more room to attach the splicing hardware.
Third Step: (Picture 5)
After running the wires to the back, I connected them to my LOC below the rear floor and then ran the RCA cable around the side of the cover to my amplifier. I custom built my box to slant the subwoofer slightly towards the front of the car and wired my sub/amp setup so that it can be easily removed when I would like more room to carry larger luggage or my mtn bike.
Last Step:
Replace side panels, clean up your mess, and enjoy!
Attachments
Last edited: