
You are using an out of date browser. It may not display this or other websites correctly.
You should upgrade or use an alternative browser.
You should upgrade or use an alternative browser.
What have you done to your Miata today?
- Thread starter Antoine
- Start date
carrotsnax
Member
- :
- 91 miata le, 02 P5
I finally relocated my license plate!! ")
Wiper mod? explain please.Did the wiper mod and tried the WebElectric third brake light mod but wired it up wrong. Will try again tomorrow.
Wiper mod? explain please.
Replacing the wiper arm with one from another mazda vehicle that has a variable int speed and not a fixed one like the NC Miata has.
i'm assuming you mean the stalk on the steering column.Replacing the wiper arm with one from another mazda vehicle that has a variable int speed and not a fixed one like the NC Miata has.
I finished the downpipe (O2 sensor and 'bell mouthed'), and made the rest of the exhaust. The rest of the exhaust consists of a straight piece of 2.5" all the way back. 2 small angle adjustments, but less than 10* adjustment to clear the differential.
I think I'm going to get a 'flex' joint to make up for movements, but otherwise I'm back on the top of the car putting the rest back together.(2thumbs) I think i'm 2-3 weeks from getting mine running.Got 'er runnin!
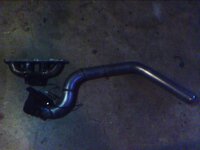
I didn't have a real camera with me last night during final assembly, and I never got a shot previously of the downpipe. but here you go, while everything is all shiney. Manifold and downpipe. It's not as easy as it looks with all the curves and bends and managing heat so stuff doesn't distort etc, but i learned a lot along the way. So next time I can do it better (after I swap in the 2.0l (evil) ):
Attachments
I decided to cut the rear bumper... and I'm going to have the tailpipe sticking straight out the center.
don't be that guy
the rear bumper is like a big parachute creating drag... I'll eventually make a diffuser out of it, but as it sits if I have the exhaust hang below the bumper, it drags when loading/unloading from the trailer. And I'm not going to the trouble to route it all the way to the passenger side just so it can go out the stock cut out... lol and I need it to exit past the body because sometimes I shoot flamesdon't be that guy
I already melted part of the bumper on the driver's side from where i had it last year.Don't worry man, it's not a street car. That's ghey on street cars. But this is GRM style egineering. don't worry, i'll make it look good
Nicely done, Fadi! I can't wait to see her finished
Lets see, today I scored:
4.10:1 Torsen with stub axles for $20
95 Rear subframe with all the bracing for $50
1.8L Driveshaft for $15
I'm satisfied. Junkyards rock!
Lets see, today I scored:
4.10:1 Torsen with stub axles for $20
95 Rear subframe with all the bracing for $50
1.8L Driveshaft for $15
I'm satisfied. Junkyards rock!
sumbitch I hate you. Which junkyard did you manage to find a somewhat intact miata in?!
In Charleston, SC. There is a 95 black/tan with a right front hit...enough to tweek the subframe. The entire driveline was intact until i arrived. The only things really missing were interior parts and the doors. I'd like to go back and salvage more, but I leave town tomorrow.
miata mark
Member
I replaced a valve stem cap
Last Saturday I went out and replaced a cracked valve stem cap..I feel a lot better knowing I no longer have a cracked valve stem cap on the car and now the car drives a whole lot better..
Clean dry hands and the correct finger tip torque is very important in the instillation of a valve stem cap and daily propper plastic cleaner application will give your caps a long and happy life span..
you should do a write up with pics. Did you use chrome caps, or OEM style black? Is it required to check pressure at the same time, or can you do it anytime? Also are the steps the same for the front -vs- back tires?Last Saturday I went out and replaced a cracked valve stem cap..I feel a lot better knowing I no longer have a cracked valve stem cap on the car and now the car drives a whole lot better..
Clean dry hands and the correct finger tip torque is very important in the instillation of a valve stem cap and daily propper plastic cleaner application will give your caps a long and happy life span..
Similar threads
- Replies
- 5
- Views
- 808