
I just spent the better part of a day (start to finish) doing a brake pad and rotor replacement on my 2006 Mazda5 sport. It had 54,252 miles on it. The front rotors were badly warped (another issue that I will not get into here). They had been turned once, and were okay for awhile after that, but then just got worse and worse. There was a lot of vibration in the steering wheel every time I applied the brakes. Not willing to shell out the $500 (or so) to have someone else do this, I decided to give it a go myself. I have done numerous brake jobs over the years, so I was pretty familiar with the basic procedure.
After a significant amount of research, I chose to use Centric PosiQuiet semi-metallic pads (P/Ns 104.10440 [front] 104.09730 [rear]) and Powerslot slotted rotors (P/Ns120.45069SR/L [front] 126.45065SR/L [rear]).
Here is a narrative of my experience.
What you will need for this job:
1) Patience
2) Jack Stands (4)
3) Good quality floor jack
4) Compressed air/impact wrench (great for removing stubborn caliper bolts)
5) Mighty vac for removing brake fluid from reservoir/bleeding procedure
6) Lots of shop towels
7) Socket wrench (1/2 and 3/8 inch drive)
8) 17 mm socket (to remove front calipers)
9) 9mm wrench (to bleed front calipers)
10) 14mm socket and wrench (to remove rear calipers)
11) 10 mm wrench (to bleed rear calipers)
12) 7 mm allen socket (to back out/remove caliper sliders/guide pins)
13) Torque wrench (preferably inch drive)
14) Something to tie up the calipers (zip ties or mechanics wire)
15) Needle nose pliers
16) Motivator (hefty drill hammer)
17) Large C-Clamp or specialty brake tool (for pushing in front caliper piston)
18) Specialty brake tools (for rear piston) [in this case Powerbuilt Master Brake Service Kit #48 (Part # 648622) borrowed from Advance Auto Parts]
19) Brake cleaner (spray can)
20) Lithium grease or other lubricant
21) At least one can of DOT 3/4 brake fluid
So I started with the front wheels. Broke the lugnuts on the front wheels and jacked up the car at the front jack point, which is conveniently marked with an X indentation on the front cross member. I then secured the front end on jack stands right inside the pinch weld on the frame rails. I put down newspaper under the front tires, as there was going to be plenty of debris falling from the calipers/wheel hubs as I completed this job, so having something under the tires that would catch most of the junk that fell would make clean-up much easier. I did the same for the rears. After everything was secure on the jack stands, I finished removing lugnuts and removed the tires.
Starting on the right side (passengers side) I used needle nosed pliers to remove the spring clip on the outside of the caliper and set it aside. Using an air nozzle, I blew everything off with high pressure air, to get some of the loose dust off the brake caliper. I removed the caliper bolts on the back side of the caliper (using an impact wrench which makes it SOOOO much easier). I then massaged the caliper off the rotors and tried to tie it up so it would rest out of the way, and not pull on the attached brake fluid line too much. I separated the old brake pads from the caliper, pulling the pads that were clipped into the piston out. Using a special tool I pressed the brake caliper piston in until it stopped to make room for the new pads. I removed the guide pin/slider frame from the main caliper assembly by sliding it out, and used a little grease and shop towels to clean the slider pins. I greased the pins and then slid them back into the main caliper assembly. Finally, I pressed the inner pad (the one that clips into the piston) first, and then lay in the outboard pad. The pads were in!
Next, the rotor had to come off. This is where the motivator came into play. Turning the rotor about a quarter turn each time, I gave several stout whacks to the back of the rotor to dislodge it from the hub. I had to do this several times and it eventually popped off. Dont be afraid to really whack it hard, but be careful not to hit anything besides the rotor. I cleaned up the hub with air and brake cleaner (using the shop towels) and the placed the new rotor on the hub. I carefully lowered the caliper and pads into place over the rotor, and then hand threaded the caliper bolts back in. With everything in place, I torqued the caliper bolts to about 70 ft-lbs.
An interesting note on the caliper bolts. The lower caliper bolt (on the passenger side) appeared to have anti-seize compound applied to the threads. NONE of the other caliper bolts, back or front, (as far as I could tell) had anti-seize compound on them. This was rather curious. I did not apply any to the bolts, but looking back I suppose I could have.
Finally I re-installed the spring clip on the outside of the caliper body. Then I took a break. It was in the mid 90s that day, and this was hot, sweaty work, especially without any shade (no garage). So copious amounts of water was consumed during this procedure.
Next I tackled the other side, following basically the same procedure, but this time with a little more rhythm since I had done it once before. After everything was put back together, it was time to bleed the front calipers.
First I used the trusty Mighty Vac vacuum pump to pump the old fluid out the reservoir, and then carefully filled it with new (Valvoline) DOT 4 synthetic brake fluid. Employing my son for assistance, we bled the front calipers. Basically I had him pump up the brakes and then I cracked the bleeder screw to let the fluid out. You should do this until the color of the fluid changes from that of the old to the new. In this case, the old fluid was light brown/yellow and the new synthetic fluid was basically clear. I think I did it about 8 times per caliper (on the front).
Then it was time to tackle the rear brakes. Here I almost met my match. I broke the lugnuts on the rear wheels and then carefully jacked up the rear, using a small piece of wood between the jack and the center of the rear suspension mounting point. Because of the stands I was using, there really wasnt a good place to rest the vehicle completely on the stands. I did not want to drop the pinch welds onto the flat jackstand foot as there was a possibility that it might roll under and bend the pinch weld, so I left the jack in place, and used one stand under the tow hitch mount, just to steady things, and the other on the side of the vehicle just outboard of the pinch weld, but with essentially no weight on itthis was just a precaution. Surprisingly the set up was pretty solid. I then completed removal of the rear tires. Given that I was going to be pushing the caliper pistons back in I decided that now was the time to bleed the rear calipers, so I had my son help me again and we bled the rear calipers. Left (drivers) side first then the right side. The fluid I was getting out was mostly clear, but not completely. I am not sure if it would be possible to get all of the old fluid out, but hopefully it was enough to suffice.
The first trick was to get the caliper off. I used air to blow all the loose dirt off, but using an air tool to remove the caliper bolts was not an option, as there was no way to get the tool onto the caliper bolts (at least not with the set-up that I had), so I went for hand tools. A ratchet for the lower bolt and a wrench (with help from a motivator) for the top bolt. Amazingly I was able to get them out without too much trouble. I secured the caliper body with zip ties so it wouldnt go anywhere, or unnecessarily bend or stretch the brake hoses.
Slipping the caliper off the rotor was tricky, as a little lip developed on the edges of the rotor due to rust and to some rotor wear. So I had to use the motivator to work the caliper loose. I was able to remove the guide pin/slider frame off and lube up the pins, and the old pads came off easy enough, but then the two most perplexing parts of the job reared their ugly heads. Screwing the piston back in to the caliper and seating the new pads. Here is what happened:
There is a special tool that you need to screw in the rear piston caliper. The face of the piston has two cylindrical indentations, one at the top and the bottom of the piston. The tool that I used came in the Master Brake Service Tool Kit that I borrowed from Advance Auto Parts. The tool has the ability to lock in to the indentations on the piston with two raised bosses in the head of the tool. The tool is threaded, and has a small T handle at the end of itit looks like this:
http://www.toolsmithonline.com/products/Powerbuilt®-Rear-Disc-Brake-Piston-Turning-Kit.html (the tool is on the right side of this kit)
When you use it, you are able to slip a small flat metal plate the approximate size and shape of a brake pad backing plate over the handle and with some manipulation of the threaded portion, you can align the head of the tool (with the raised bosses) into the indentations on the face of the caliper piston. By turning down on the T-handle, the tool braces against the metal plate and is able to turn the piston while exerting pressure on the piston at the same time, to screw it back down into place. The problem for me was that the bosses did not fit into the indentations on the face of the piston. This problem stymied me for awhile, but I finally ended up cleaning out (with compressed air, a wire brush, and even a dremel) the indentations then best I could, and then just lining everything up and cranking down onto it the best I could. There was enough friction between the face of the tool and the face of the piston, with the bosses just engaging the indentations (but not seating fully into the indentations), to do the job. (whew!)
The next problem that stymied me was trying to slip the inside brake pad onto the piston face, being sure that the clips on the back of the pad engaged with the cut-outs on the piston. At first I was trying to do this with the guide pin chassis still attached to the caliper. No go. Then I took the whole guide pin chassis off the caliper body, and then could insert the pad easy enough, but the chassis would not fit back on the caliper body. Finally, it dawned on me (duh) that I had to flip up the guide pin chassis by removing one of the guide pins in order to get the clips on the back of the pad to engage properly and then to be able to close everything back up correctly. So that is what I did. I removed the lower guide pin, flipped the assembly up, placed in the pad, and then closed it back up again. I was able to place the outboard pad in at that time. Keep in mind, this is DIFFERENT than the front caliper where you DO NOT need to remove or flip up the guide pin chassis in order to be able to insert the pads (if you have the caliper off the car).
With the caliper off and tied out of the way using zip ties, I motivated the rotor, both by punching it from the back as I rotated it, and by giving it several good whacks in the front (hub facing out) side in order to get it to come loose. With a good amount of pounding it came off. Be sure to avoid hitting the wheel studs!! Damaging the threads on one of those would be very bad.
With the old rotor off, I blew all the debris off with air and then sprayed everything down with brake cleaner and dried it off (more shop towels). I slipped on the new rotor, then lowered the caliper (with the new pads) down over the rotor and affixed the caliper bolts, bottom first, and then top. I tightened the top caliper bolt up to the appropriate spec (I believe it was ~50 ft-lbs), but had to hand tighten the top one by feel as I could not get a torque wrench on it. At this point I was running out of light, so it was time to pack it in and call it a day. Very early the next day, I went to the other (passenger) side, and carried out basically the same procedure, again, going a little smoother this time as I had already been through it once, and had had some sleep so I was reasonably awake.
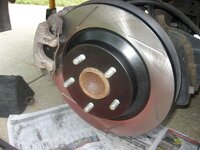
Over the next few days I got everything buttoned up, the tires rotated, and finally got out to bed in the brakes. Although these pads say that they are already scorched and therefore, did not need to be bed in, I am a creature of habit and always bed in a new set of pads. Something says to me that it is good to get the contact surfaces nice and intimate for maximum performance. I got out on the highway (very early in the morning) and made several very hard stops from about 70 mph down to 40 or so. Each time increasing the pressure that I put on the pedal. It did seem to me that the stopping power was about the same from the first stop to the last, so perhaps this scorching thing actually works. There was also no fade that I could notice, neither could I smell the cooked brakes smell that often comes off pads (especially new ones) when they get good and hot. Everything worked magnificently, stops were rock solid with no vibration at all (Hallelujah!!) but, to be honest, I was not overly impressed with the stopping forces produced by the pads. They were definitely better than stock, but did not have the eye popping deceleration of say a good set of Performance Friction race pads. I suppose I am somewhat biased, as I have had some track driving experience in the past in cars with much more robust braking systems and track brake pad compoundsso perhaps my expectations were too high. The pads were definitely quiet, with no squealing whatsoever, that is, until after I finished my bedding in procedure. While driving home on residential roads at lower speeds, the pads began to squeal quite a bit. I chalked it up to some glazing due to the high temperatures reached, and that squeal went away the next time I drove the vehicle. So all in all, it was a success, and while I know many will reply to this post and ask for pictures, I will apologize now for not having documented my efforts with photos. I just didnt have the time to stop and snap pictures while I was doing this. It was a job that needed to be done as quickly and efficiently as possible. Perhaps next time. The attached pics are of the finished product.
Thanks for sticking with me, and I am sorry to take up so much space to put this out there for public consumption. Hope it helps, as I made mistakes that I know others can learn from. With the right tools and a little luck (or better yet someone to help), this job could probably be completed in about 4 hours.
After a significant amount of research, I chose to use Centric PosiQuiet semi-metallic pads (P/Ns 104.10440 [front] 104.09730 [rear]) and Powerslot slotted rotors (P/Ns120.45069SR/L [front] 126.45065SR/L [rear]).
Here is a narrative of my experience.
What you will need for this job:
1) Patience
2) Jack Stands (4)
3) Good quality floor jack
4) Compressed air/impact wrench (great for removing stubborn caliper bolts)
5) Mighty vac for removing brake fluid from reservoir/bleeding procedure
6) Lots of shop towels
7) Socket wrench (1/2 and 3/8 inch drive)
8) 17 mm socket (to remove front calipers)
9) 9mm wrench (to bleed front calipers)
10) 14mm socket and wrench (to remove rear calipers)
11) 10 mm wrench (to bleed rear calipers)
12) 7 mm allen socket (to back out/remove caliper sliders/guide pins)
13) Torque wrench (preferably inch drive)
14) Something to tie up the calipers (zip ties or mechanics wire)
15) Needle nose pliers
16) Motivator (hefty drill hammer)
17) Large C-Clamp or specialty brake tool (for pushing in front caliper piston)
18) Specialty brake tools (for rear piston) [in this case Powerbuilt Master Brake Service Kit #48 (Part # 648622) borrowed from Advance Auto Parts]
19) Brake cleaner (spray can)
20) Lithium grease or other lubricant
21) At least one can of DOT 3/4 brake fluid
So I started with the front wheels. Broke the lugnuts on the front wheels and jacked up the car at the front jack point, which is conveniently marked with an X indentation on the front cross member. I then secured the front end on jack stands right inside the pinch weld on the frame rails. I put down newspaper under the front tires, as there was going to be plenty of debris falling from the calipers/wheel hubs as I completed this job, so having something under the tires that would catch most of the junk that fell would make clean-up much easier. I did the same for the rears. After everything was secure on the jack stands, I finished removing lugnuts and removed the tires.
Starting on the right side (passengers side) I used needle nosed pliers to remove the spring clip on the outside of the caliper and set it aside. Using an air nozzle, I blew everything off with high pressure air, to get some of the loose dust off the brake caliper. I removed the caliper bolts on the back side of the caliper (using an impact wrench which makes it SOOOO much easier). I then massaged the caliper off the rotors and tried to tie it up so it would rest out of the way, and not pull on the attached brake fluid line too much. I separated the old brake pads from the caliper, pulling the pads that were clipped into the piston out. Using a special tool I pressed the brake caliper piston in until it stopped to make room for the new pads. I removed the guide pin/slider frame from the main caliper assembly by sliding it out, and used a little grease and shop towels to clean the slider pins. I greased the pins and then slid them back into the main caliper assembly. Finally, I pressed the inner pad (the one that clips into the piston) first, and then lay in the outboard pad. The pads were in!
Next, the rotor had to come off. This is where the motivator came into play. Turning the rotor about a quarter turn each time, I gave several stout whacks to the back of the rotor to dislodge it from the hub. I had to do this several times and it eventually popped off. Dont be afraid to really whack it hard, but be careful not to hit anything besides the rotor. I cleaned up the hub with air and brake cleaner (using the shop towels) and the placed the new rotor on the hub. I carefully lowered the caliper and pads into place over the rotor, and then hand threaded the caliper bolts back in. With everything in place, I torqued the caliper bolts to about 70 ft-lbs.
An interesting note on the caliper bolts. The lower caliper bolt (on the passenger side) appeared to have anti-seize compound applied to the threads. NONE of the other caliper bolts, back or front, (as far as I could tell) had anti-seize compound on them. This was rather curious. I did not apply any to the bolts, but looking back I suppose I could have.
Finally I re-installed the spring clip on the outside of the caliper body. Then I took a break. It was in the mid 90s that day, and this was hot, sweaty work, especially without any shade (no garage). So copious amounts of water was consumed during this procedure.
Next I tackled the other side, following basically the same procedure, but this time with a little more rhythm since I had done it once before. After everything was put back together, it was time to bleed the front calipers.
First I used the trusty Mighty Vac vacuum pump to pump the old fluid out the reservoir, and then carefully filled it with new (Valvoline) DOT 4 synthetic brake fluid. Employing my son for assistance, we bled the front calipers. Basically I had him pump up the brakes and then I cracked the bleeder screw to let the fluid out. You should do this until the color of the fluid changes from that of the old to the new. In this case, the old fluid was light brown/yellow and the new synthetic fluid was basically clear. I think I did it about 8 times per caliper (on the front).
Then it was time to tackle the rear brakes. Here I almost met my match. I broke the lugnuts on the rear wheels and then carefully jacked up the rear, using a small piece of wood between the jack and the center of the rear suspension mounting point. Because of the stands I was using, there really wasnt a good place to rest the vehicle completely on the stands. I did not want to drop the pinch welds onto the flat jackstand foot as there was a possibility that it might roll under and bend the pinch weld, so I left the jack in place, and used one stand under the tow hitch mount, just to steady things, and the other on the side of the vehicle just outboard of the pinch weld, but with essentially no weight on itthis was just a precaution. Surprisingly the set up was pretty solid. I then completed removal of the rear tires. Given that I was going to be pushing the caliper pistons back in I decided that now was the time to bleed the rear calipers, so I had my son help me again and we bled the rear calipers. Left (drivers) side first then the right side. The fluid I was getting out was mostly clear, but not completely. I am not sure if it would be possible to get all of the old fluid out, but hopefully it was enough to suffice.
The first trick was to get the caliper off. I used air to blow all the loose dirt off, but using an air tool to remove the caliper bolts was not an option, as there was no way to get the tool onto the caliper bolts (at least not with the set-up that I had), so I went for hand tools. A ratchet for the lower bolt and a wrench (with help from a motivator) for the top bolt. Amazingly I was able to get them out without too much trouble. I secured the caliper body with zip ties so it wouldnt go anywhere, or unnecessarily bend or stretch the brake hoses.
Slipping the caliper off the rotor was tricky, as a little lip developed on the edges of the rotor due to rust and to some rotor wear. So I had to use the motivator to work the caliper loose. I was able to remove the guide pin/slider frame off and lube up the pins, and the old pads came off easy enough, but then the two most perplexing parts of the job reared their ugly heads. Screwing the piston back in to the caliper and seating the new pads. Here is what happened:
There is a special tool that you need to screw in the rear piston caliper. The face of the piston has two cylindrical indentations, one at the top and the bottom of the piston. The tool that I used came in the Master Brake Service Tool Kit that I borrowed from Advance Auto Parts. The tool has the ability to lock in to the indentations on the piston with two raised bosses in the head of the tool. The tool is threaded, and has a small T handle at the end of itit looks like this:
http://www.toolsmithonline.com/products/Powerbuilt®-Rear-Disc-Brake-Piston-Turning-Kit.html (the tool is on the right side of this kit)
When you use it, you are able to slip a small flat metal plate the approximate size and shape of a brake pad backing plate over the handle and with some manipulation of the threaded portion, you can align the head of the tool (with the raised bosses) into the indentations on the face of the caliper piston. By turning down on the T-handle, the tool braces against the metal plate and is able to turn the piston while exerting pressure on the piston at the same time, to screw it back down into place. The problem for me was that the bosses did not fit into the indentations on the face of the piston. This problem stymied me for awhile, but I finally ended up cleaning out (with compressed air, a wire brush, and even a dremel) the indentations then best I could, and then just lining everything up and cranking down onto it the best I could. There was enough friction between the face of the tool and the face of the piston, with the bosses just engaging the indentations (but not seating fully into the indentations), to do the job. (whew!)
The next problem that stymied me was trying to slip the inside brake pad onto the piston face, being sure that the clips on the back of the pad engaged with the cut-outs on the piston. At first I was trying to do this with the guide pin chassis still attached to the caliper. No go. Then I took the whole guide pin chassis off the caliper body, and then could insert the pad easy enough, but the chassis would not fit back on the caliper body. Finally, it dawned on me (duh) that I had to flip up the guide pin chassis by removing one of the guide pins in order to get the clips on the back of the pad to engage properly and then to be able to close everything back up correctly. So that is what I did. I removed the lower guide pin, flipped the assembly up, placed in the pad, and then closed it back up again. I was able to place the outboard pad in at that time. Keep in mind, this is DIFFERENT than the front caliper where you DO NOT need to remove or flip up the guide pin chassis in order to be able to insert the pads (if you have the caliper off the car).
With the caliper off and tied out of the way using zip ties, I motivated the rotor, both by punching it from the back as I rotated it, and by giving it several good whacks in the front (hub facing out) side in order to get it to come loose. With a good amount of pounding it came off. Be sure to avoid hitting the wheel studs!! Damaging the threads on one of those would be very bad.
With the old rotor off, I blew all the debris off with air and then sprayed everything down with brake cleaner and dried it off (more shop towels). I slipped on the new rotor, then lowered the caliper (with the new pads) down over the rotor and affixed the caliper bolts, bottom first, and then top. I tightened the top caliper bolt up to the appropriate spec (I believe it was ~50 ft-lbs), but had to hand tighten the top one by feel as I could not get a torque wrench on it. At this point I was running out of light, so it was time to pack it in and call it a day. Very early the next day, I went to the other (passenger) side, and carried out basically the same procedure, again, going a little smoother this time as I had already been through it once, and had had some sleep so I was reasonably awake.
Over the next few days I got everything buttoned up, the tires rotated, and finally got out to bed in the brakes. Although these pads say that they are already scorched and therefore, did not need to be bed in, I am a creature of habit and always bed in a new set of pads. Something says to me that it is good to get the contact surfaces nice and intimate for maximum performance. I got out on the highway (very early in the morning) and made several very hard stops from about 70 mph down to 40 or so. Each time increasing the pressure that I put on the pedal. It did seem to me that the stopping power was about the same from the first stop to the last, so perhaps this scorching thing actually works. There was also no fade that I could notice, neither could I smell the cooked brakes smell that often comes off pads (especially new ones) when they get good and hot. Everything worked magnificently, stops were rock solid with no vibration at all (Hallelujah!!) but, to be honest, I was not overly impressed with the stopping forces produced by the pads. They were definitely better than stock, but did not have the eye popping deceleration of say a good set of Performance Friction race pads. I suppose I am somewhat biased, as I have had some track driving experience in the past in cars with much more robust braking systems and track brake pad compoundsso perhaps my expectations were too high. The pads were definitely quiet, with no squealing whatsoever, that is, until after I finished my bedding in procedure. While driving home on residential roads at lower speeds, the pads began to squeal quite a bit. I chalked it up to some glazing due to the high temperatures reached, and that squeal went away the next time I drove the vehicle. So all in all, it was a success, and while I know many will reply to this post and ask for pictures, I will apologize now for not having documented my efforts with photos. I just didnt have the time to stop and snap pictures while I was doing this. It was a job that needed to be done as quickly and efficiently as possible. Perhaps next time. The attached pics are of the finished product.
Thanks for sticking with me, and I am sorry to take up so much space to put this out there for public consumption. Hope it helps, as I made mistakes that I know others can learn from. With the right tools and a little luck (or better yet someone to help), this job could probably be completed in about 4 hours.
Attachments

Last edited: