Prosport Boost Gauge Wiring Help. I actually have a headache from thinking about it.

StormTrooper6

Member
:
2006 Mazdaspeed6 Sport
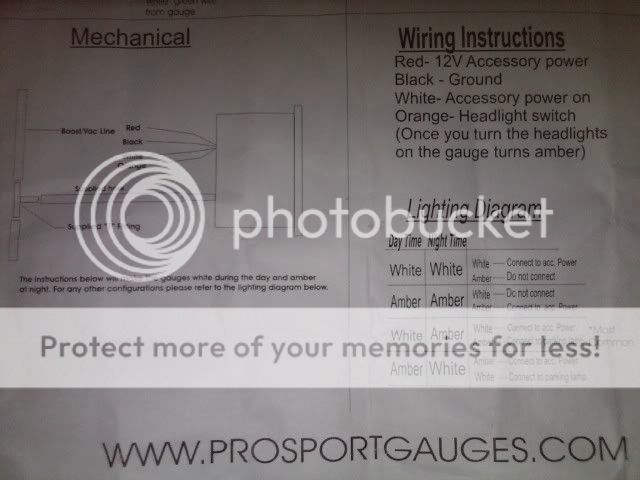
I've searched and searched site after site but nothing is really answering my questions completely. I've embedded the actual instruction sheet that was supplied with the gauge itself so that somebody, anybody can help. Okay so I want this boost gauge to be amber during the day and amber at night so that automatically cancels out the white wire and possibly the orange one as well. I know that the green wire connects to the white wire from the sender unit, and that black is ground. My question is that the red wire, which is indicated to be the amber color, connects to 12v accessory power and also needs to go to the sender unit. But how can it go to both, are we just adding another wire from the tapping point and running it to the red wire from the sender unit? Thanks for the help everybody, I dint want to add it to the other thread so that we don't have too many things bouncing around in there at once haha

IMG00042-20091025-1828.jpg


IMG00043-20091025-1830.jpg


-Nick
 
Last edited:
ahh how to explain this.. the red wire is ur 12v power source wire.. black is ur ground. white is if u want the gauge to be white in color, should u choose this u want to put it together with the red wire and then find ur 12v source, orange is the same way, but the color will match ur gauge cluster color pretty good, the green wire is for the sender that is provided in the box. hope that helps. depending on what u wire it too will depend on what the guages turn on with, mine turn on with the headlights but i had someone wire that part for me when i had my old Autometer gauges so i have no idea how they did it. ohh and once u choose the color u want dont hook up the other colored wire, unless u want a different color during the day time.

hooking up the vac line for the boost gauge is easy and there are how to's on it.. basically u T it off in the engine bay run the line through the firewall and then the line goes into that boost sender and ur done.
 
Last edited:
yea i'm going to do amber for night and day so this is how i see it.

From Gauge:
Red: connect to power (also run to sender????)
White: don't use
Orange: don't use
Black: ground
Green: connect to white sender unit wire

Sender unit:
Black: ground
White: Connect to green gauge wire
Red: ????

The only part that really throws me off is the also run to sender unit..which in turn confuses me on the red wire from the sender unit.

Any help there?
 
from gauge
red to 12v to power source and to the red wire on the sensor
White: dont use
Orange: splice into red 12v wire so that the gauge is amber in color all the time
Black: ground
Green: connect to white sender unit wire

Sender unit:
Black: ground
White: Connect to green gauge wire
Red: goes to the red 12v

u had it pretty much, if u use another piece of 18 gauge wire from ur power source up to the pod it makes everything easier, that way there all ur connections are in the are where i use to throw my phone and keys and stuff. but u may have had another use for it.
 
Last edited:
yea, i'm guessing that the red one just needs power since the green/white wire combo is used for the actual communication between the two, and black is of course ground lol. But it would help me out alot if you could check. I'm gonna try to get up in the morning and get it done so i can enjoy it the entire day, not to mention the only day off that i have this week :D
 
ok so i got it wired and working. Now i only have one problem. since i chose to have the amber color during the day and night, i decided it was unnecessary to wire that orange headlight switch wire. Does that wire only recognize when to switch between colors or does it make it brighter during the day and less light at night? because it is super dark.
 
yeah what makes the gauges super dark during the day is the lens cover on them..mine are dark but i can still make out what the gauge reads.. let me know how its looks at night because it should be just as bright or brighter then ur dash lights are.. i honestly have no idea what wire makes them switch betweeen color as i didnt do it, i just stuck with one color all the time like u.
 
based on the instructions, you'll want to connect your orange wire to the red. I would assume that will tell it to dim at night, like your dash lights do.

*note i do not have these gauges...
 
i tried that.. it wont work.. and i think tunersteve has tried it too.. as of right now my gauges wont work with the dimmer, so next time i get a chance i have to swing by auto audio and see what they can do to get them to work with the dimmer.. once i find out how ill post it up.. or maybe someone on here has gotten them to work with the dimmer.. which would be sweet!!!!!
 
the brightness is fine at night, it's just during the day it simply isn't bright enough at all. Somebody find out ahhhh (nervous)
 
i have white both during the day and at night as ive said.... and today i went and tried out seeing the amber color during the day and u just simply cant so my suggestion would be to change ur color and go for the white. it looks really nice!!..
 
i have white both during the day and at night as ive said.... and today i went and tried out seeing the amber color during the day and u just simply cant so my suggestion would be to change ur color and go for the white. it looks really nice!!..

uggghhh i just installed it today. Maybe i'll do the white during day and amber at night. i'll have to wait until the other gauges come in and do it all at once.
 
ok so i called them and got it figured out. If you want it to be amber during the day and night and actually want it to be bright you need to connect the orange wire to the 12V source as well. So the wiring combination for amber/amber is as follows:

White- DO NOT CONNECT (this activates the white lights)
Red- CONNECT TO 12V (this activates the red lights, what very few there are)
Orange- CONNECT TO 12V (this will make the lights bright and orange, matching the stock gauges at full brightness)
Black- GROUND
Green- CONNECT TO WHITE WIRE FROM SENDER UNIT (this allows the gauge and sender unit to talk to eachother so they can display PSI)

hope this helps anybody who is wanting to do amber/amber in the future :)
 
based on the instructions, you'll want to connect your orange wire to the red. I would assume that will tell it to dim at night, like your dash lights do.

*note i do not have these gauges...

ok so i called them and got it figured out. If you want it to be amber during the day and night and actually want it to be bright you need to connect the orange wire to the 12V source as well. So the wiring combination for amber/amber is as follows:

White- DO NOT CONNECT (this activates the white lights)
Red- CONNECT TO 12V (this activates the red lights, what very few there are)
Orange- CONNECT TO 12V (this will make the lights bright and orange, matching the stock gauges at full brightness)
Black- GROUND
Green- CONNECT TO WHITE WIRE FROM SENDER UNIT (this allows the gauge and sender unit to talk to eachother so they can display PSI)

hope this helps anybody who is wanting to do amber/amber in the future :)


yay! i read directions good!

(sorry, just a little "told you so")
 
yay! i read directions good!

(sorry, just a little "told you so")

Yea yea whatever i do appreciate your help though. I just wanted to check with them since the directions say to hook it up to the headlights and they are telling me to hook it up to power and never explained why lol. (scratch) but thank you though

glad u got it all figured out.. enjoy the gauges!!!

Thank you very much sir. Here is a picture of the boost installed and corrected :D

IMG00008-20091027-1751.jpg
 
looks sweet! thats the gauge I'm planning on getting one of these days.
 
looks sweet! thats the gauge I'm planning on getting one of these days.

You should do it. The lotek pod is only $48. And that's the electrical boost gauge for $57 :) the oil temp and oil pressure i'm getting are only $37 a piece :D
Definitely go for it

wow that looks good now u just have to fill those empty holes :)

THAT'S WHAT SHE SAID (rofl) Anyways, I'm getting oil temp and oil pressure gauge in next week. So shouldn't be too long and you'll have a completely updated picture :D
 
Back