Mud-Flaps and Antenna

Joker2

Member
:
2011 Mazda 2 Sport 5 MT
Mud-Flaps
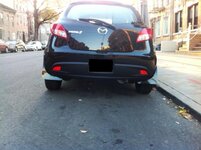
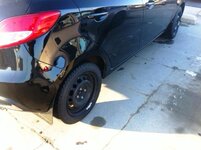
This is a bit of a teaser but: Rally Armor UR front flaps are installed. Rears need to be trimmed and then installed. At the advice of Rally Armor, I ordered the hardware that installs the Mazda 2 OEM mud-flaps about 39 bucks. I could have done a hack job for less. It looks pretty nice.

Antenna:
CX-7 Antenna fits like a glove. Small shortie. Courtesy of Finishline/Rosenthal Mazda and Tommy who is always of great help. I also got a case of Mazda Synthetic 0W-20 and another filter with washer. 2 days later at my door! Can't beat the service and prices.

Pictures:
Soon. Now I have to get ready for a little racing (unless they cancel).
MudflapsAntenna.jpg

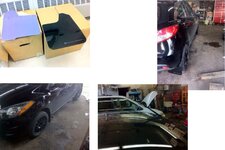
Note: In the pictures, the rear mud-flaps are only taped and blocked in place with wood for fitting. I have to trim them (narrower) and then fit them again before permanently attaching them.
 
Last edited:
Race cancelled.
So I went to my friend's garage and installed the rear mud-flaps as the snow was falling outside. I had to measure, cut, trim, install, repeat, repeat (about 6 times on one side) until I got it right. I did the right rear first and when it all fit, a trimmed the LR and then installed both. Both higher than fronts as I was not looking for that Mazdaspeed 3 street sweeper look. I just wanted to keep the crap off the rear bumper and have the flaps as high as possible to reduce the chance of dragging them in snow or slush. The fronts already slide on the inner rail at the local car wash. Pictures coming soon. In the front I was able to use existing holes with the Mazda longer screws (for installing OEM mud flaps) but in the rear I had to trim the flaps and drill 2 holes in each rear lower fender liner which was quite easy. I also resorted to some of my own hardware as I stripped 2 bolts out of the four that Mazda sent me.

Pictures soon.

Results: I washed the car last night and waxed her. I drove her home for some 10 miles through snow and slush and the sides are spotless! Great mod.
 
4 really cool plastic nut-clips (to attach to metal fenders) that I wanted to use in the rear but two of the four screws supplied stripped quite easy (urgh). I also god a bunch of various push/screw expanding thingies that are a bit longer than the ones they replace. Good kit but if you have time and patience you can raid a local parts store for items needed. Give me a bit more time and I'll post more details and pictures that will surely help. Meantime order the flaps and start mocking up locations and such switching back and forth between flaps and cardboard copies. All in all I received about 20 pieces for some 39 bucks and used just about all of them.
 
I figured that I could likely find alot of the hardware at Lowe's or Home Depot. My Mazda dealer is not convenient for me to get to. Thanks!
 
I figured that I could likely find alot of the hardware at Lowe's or Home Depot. My Mazda dealer is not convenient for me to get to. Thanks!

I mail-ordered from Finishline Rosenthal (do not know if they sponsor this forum but they do Miata.net) and they discount parts, sell our car juice (Mazda Synthetic oil and filters) and I get in 2-3 days from placing order. Tommy in parts is very knowledgeable.
 
joker do you have any better pics with the flaps on your car? (full car shots)
 
Race cancelled.
So I went to my friend's garage and installed the rear mud-flaps as the snow was falling outside. I had to measure, cut, trim, install, repeat, repeat (about 6 times on one side) until I got it right. I did the right rear first and when it all fit, a trimmed the LR and then installed both. Both higher than fronts as I was not looking for that Mazdaspeed 3 street sweeper look. I just wanted to keep the crap off the rear bumper and have the flaps as high as possible to reduce the chance of dragging them in snow or slush. The fronts already slide on the inner rail at the local car wash. Pictures coming soon. In the front I was able to use existing holes with the Mazda longer screws (for installing OEM mud flaps) but in the rear I had to trim the flaps and drill 2 holes in each rear lower fender liner which was quite easy. I also resorted to some of my own hardware as I stripped 2 bolts out of the four that Mazda sent me.

Pictures soon.

Results: I washed the car last night and waxed her. I drove her home for some 10 miles through snow and slush and the sides are spotless! Great mod.

How difficult was the install? Sounds like a lot of custom cutting and drilling.
 
The fronts are not too bad. Basically a lot of marking and measuring. The rears require trimming due to the Power-Bulge we have behind the rear tires. Overall not bad, but: I am detail oriented and that being said, next weekend I will run a bead of silicone between the flaps and the fender-liners as I am getting some streaks on the back side of the UR Flaps that make the Rally Armor logo unsightly!

It is all in the details.

Folks at work raved about the looks until they heard the price. I told them to join this forum. :)
 
Last edited:
The fronts are not too bad. Basically a lot of marking and measuring. The rears require trimming due to the Power-Bulge we have behind the rear tires. Overall not bad, but: I am detail oriented and that being said, next weekend I will run a bead of silicone between the flaps and the fender-liners as I am getting some streaks on the back side of the UR Flaps that make the Rally Armor logo unsightly!

It is all in the details.

Folks at work raved about the looks until they heard the price. I told them to join this forum. :)

is it just the rallyarmor kit for the 3 then trimmed and such?
 
Call them and ask for Tommy. Ask him what hardware is required to install the OEM mud-flaps. It is a couple of longer plastic screws, and a few screws with coated nut plates. About 30 bucks total if I recall. While at it you can throw in some filters and oil (Mazda Synthetic 0W-20) I buy it a case at a time. This is cheaper in shipping. They ship UPS and you get it in 2-3 days.
 
The OEM splash guards come with all the hardware needed and the instructions, which clearly state which hardware to reuse, and which to throw away. I don't have those instructions anymore, but it was pretty simple really.
 
The OEM splash guards come with all the hardware needed and the instructions, which clearly state which hardware to reuse, and which to throw away. I don't have those instructions anymore, but it was pretty simple really.

The question was related to what hardware is required to install the Rally Armor universal flaps on the M2. I called Rally Armor and they recommended that I buy the OEM mud flap hardware which I did, and that allowed me to install the Rally armor flaps.
 
Back