LOL, I always called them (angel) eyes, not (laugh) eyes, good to know")
i have heard it both ways.
LOL, I always called them (angel) eyes, not (laugh) eyes, good to know
i have heard it both ways.Hey sensinitas, how did you place the headlights in the oven, facing up, down or as if they were on the car facing sideways?
I read you put them in one by one for 20 mins. each but i don't recall reading how you placed them. I really don't want any plastic melting on the cookie pan...
Looks pretty straight forward.
I blacked out part of my VW Golf TDI headlights (like the VW R32 or VW 337 GTI).
Best part about this "how to" - it's nearly identical to the procedure I followed for my VW headlights.
michael.
In the VW world it's called the "Joey Mod."
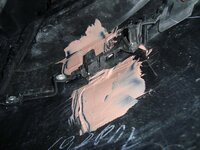
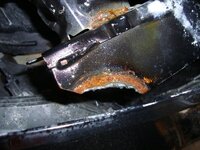
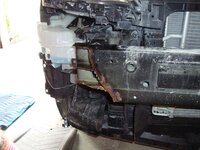
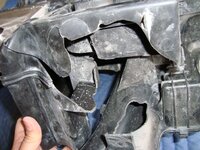
Thanks "sensinitas" for the step-by-step instructions. I was able to pull off my bumper today on about 10 minutes today.
...only to discover this...(pissed)...
Front bumper beam cut off with a plasma cutter on the left side. Also, a busted up airbox. I was doing this of course to see if I could repair the driver's side headlight. It Thought that if I followed "sensinitas" instructions and take apart the headlight and repair it, unfortunately, it is far from being repairable.
History: Bought the car off eBay, carfax was clean and had a friend look at it, but he missed the headlight. Brought it home noticed the hood was repainted and headlight was busted. Previous owner says the car is sound, but he obviously did not report the damage and took it to some backyard body shop for the repairs.
Oh well live and learn. Other than that the car runs flawlessly.
..by the way can anyone tell me where the airbag senors are...I want to make sure they are still there.
I'm not positive if it is the same, but on the Mazda3 I think it was located right under the hood release latch. I would check with a dealer or trusted mechanic on that, and have them fully check out your car, frame and all. When I was 16, I bought my first car with my hard earned money at an auction for "theft" recovered vehicles. The car was salvaged and the frame was not straight, causing my car to do right turns automatically if you catch my drift. The car spun out a few months later and crashed, only then did I discover there were no air bags installed on the car. They had just placed the horn cover over it and disconnected the warning light. Live and learn, since it was an auction and we signed a release, i guess my "mechanic" uncle missed the bent frame/airbag. Also check your state laws, because I think in certain states it might be illegal to sell a car without airbags and welded frames.
Step One: Bumper Removal
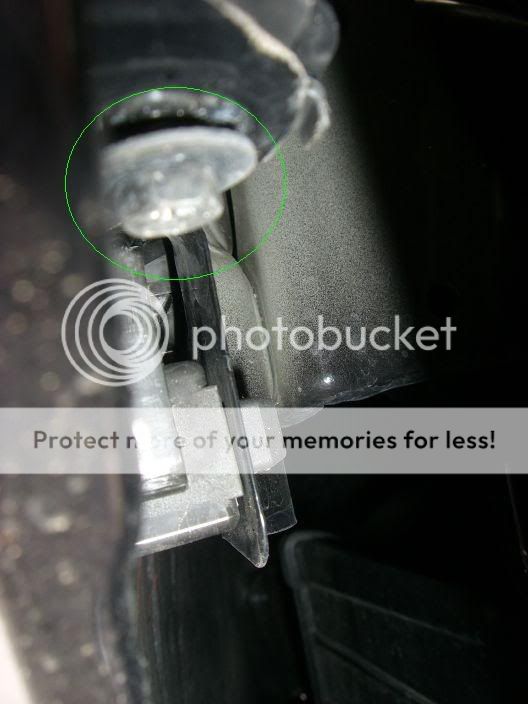
Park you car somewhere where you can get underneath it, and away from where you will be painting. Pop the hood and remove the two screws and rivets located in the green circles below.
Then get underneath and remove the 9 screws (? - can't remember if it was 8 or 9, but you'll see them (yes)).
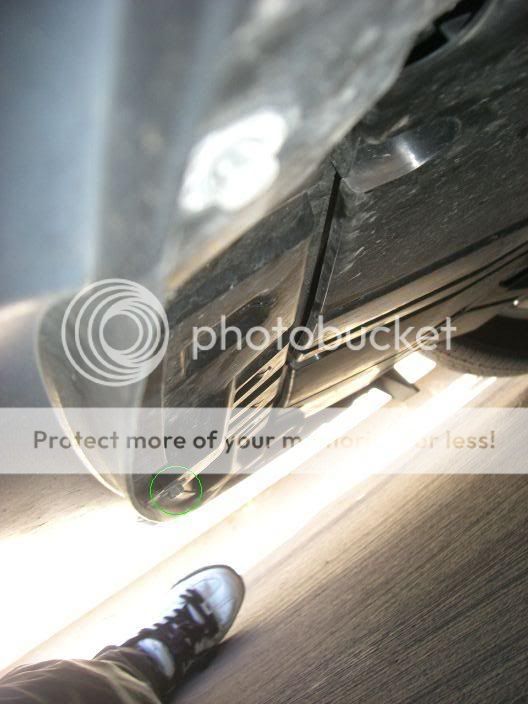
Next - depending on what side you start on, turn the wheels towards the car so you can easily reach the next set of rivets and screw. Use a philips to twist out the plug part of the rivet, then pop the whole thing out.
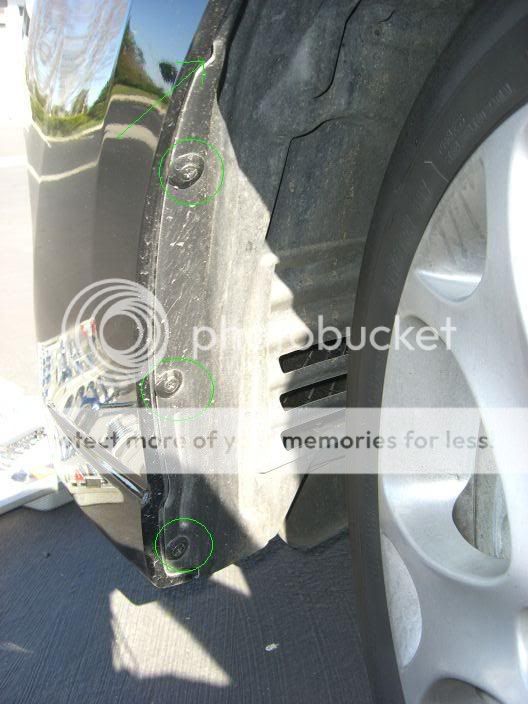
Once all three are removed, pull back the splash guard to get to the final screw.
Now that all the screws and rivets are removed, start by pulling out the sides of the bumper. These are held in by snaps. It shouldn't take too much force to do this.
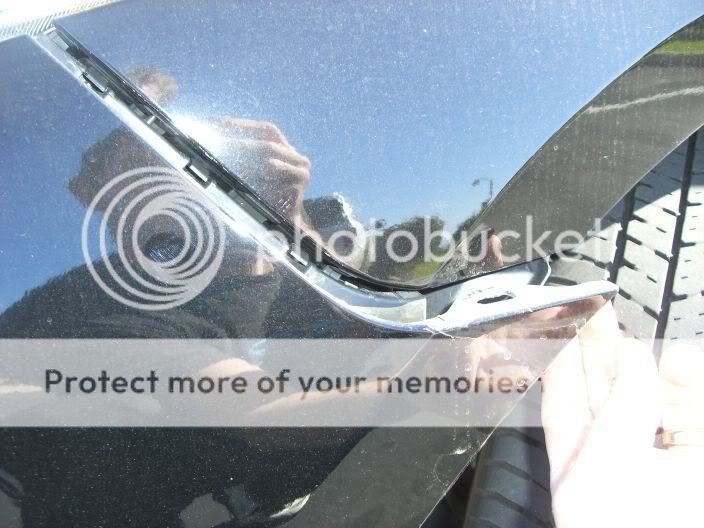
Then grab under the license plate holder, and in the middle of the top of the bumper, and shimmy the bumper off. DON'T YANK IT OFF. There are fog light connections to disconnect. I have a Sport with no fog lights, but the connections are still there from the factory. Reach down and squeeze the release part of the plug and seperate. On the driver's side, my harness ran through a clip that's plugged into the bumper. Just pop it out.

Congrats, your bumper is off! Go stash it somewhere safe and away from where you will be painting.
Wow, great job for the headlight. But I think what how-to would really help me is this "bumper-removal" section. Will have my 5 delivered in a few days and thinking about DIY this Parking Dynamics PD1 parking sensor (http://www.parkingdynamics.co.uk/). The biggest challenge to me is to remove the rear bumper if I go the DIY route. Ran into here when I tried to find the instructions of removing the bumper on 5. Hope removing the rear bumper is not much more difficult than the front one.
BTW, wonder if anyone here tried this parking sensor and if yes then what's your opinions -- I didn't mean to hijack the thread but there is not much information (reviews) on it.
The rear is pretty easy....I think it's a whole lot less complicated than the front.
Wish I had done a how to when I took it off, but honestly its pretty straight forward. I did it when my wife backed into our neighbors truck and basically indented our brand new 5! Literally she did it within 2 weeks of getting the 5. Luckily it was pretty hot out, and I was able to push the corner back out. Our neighbor was laughing at her luckily, he's cool, not a damn thing happened to his Toyota (gun) I guess the parking sensors would have been useful... But I think you could probably install them without removing the whole bumper. I think the rear is pretty hollow save for the support. But you may be able to work around it...Take a look underneath...
Nice...did you purchase this already?
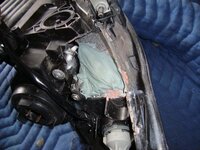
Thanks "sensinitas" for the step-by-step instructions. I was able to pull off my bumper today on about 10 minutes today.
...only to discover this...(pissed)...
Front bumper beam cut off with a plasma cutter on the left side. Also, a busted up airbox. I was doing this of course to see if I could repair the driver's side headlight. It Thought that if I followed "sensinitas" instructions and take apart the headlight and repair it, unfortunately, it is far from being repairable.
History: Bought the car off eBay, carfax was clean and had a friend look at it, but he missed the headlight. Brought it home noticed the hood was repainted and headlight was busted. Previous owner says the car is sound, but he obviously did not report the damage and took it to some backyard body shop for the repairs.
Oh well live and learn. Other than that the car runs flawlessly.
..by the way can anyone tell me where the airbag senors are...I want to make sure they are still there.