
ScorpioGTX1
Member
- :
- 2012 Mazda 2 GS M/T
I just finished installing the CorkSport SRI, and am so far very happy with it. It took me quite a bit longer to complete the install than I had anticipated, but I'm a pretty big noob when it comes to working on engines, so I took my time with it to make sure I didn't screw anything up. I figured that I'd make a list of little tips for those of you who haven't installed the SRI yet that might save you a bit of time and headache.
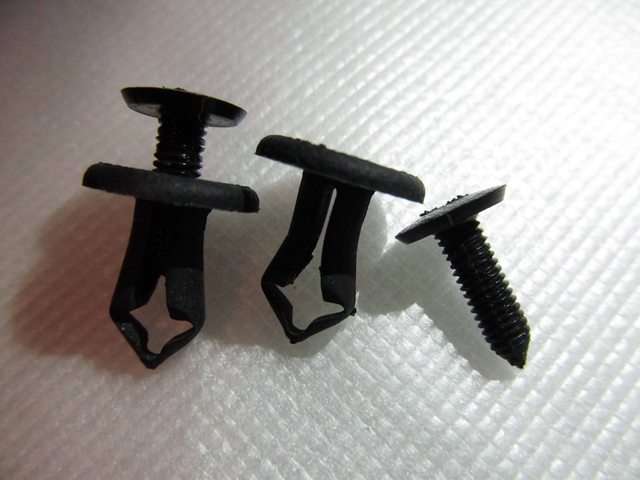
1. I ran into a roadblock early on while trying to remove the ECU wiring cover. The retarded little screws that hold it in place (pictured below) are made of plastic, and strip extremely easy. Not only that, but if you simply try to turn them with a screwdriver, they will just rotate endlessly and not back out. That's because they're accepted by these ultra retarded plastic housings. I had to call Derrick to figure this out, and of course he was extremely helpful in telling me what to do. Apparently you need to jam a screwdriver in the space below where the screw is seated and push up, so that the screw's threads can catch on inside of the housing and back out. For some reason it seems that Mazda really doesn't want you to get in here, but I have no clue why. When reassembling everything, I threw these f***ing things out and replaced them with zip ties, which work a thousand times better.
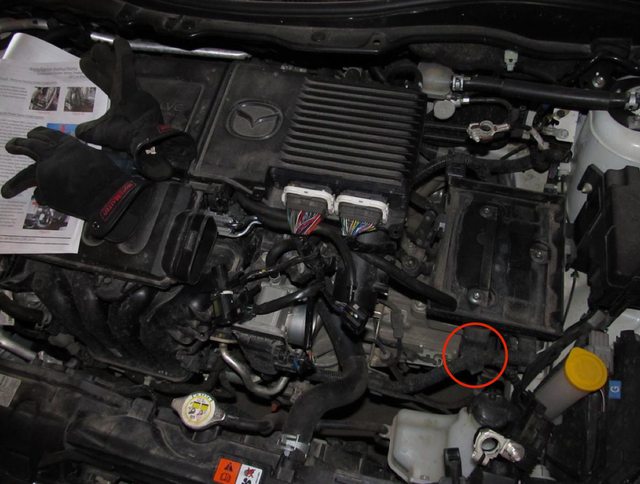
2. Before unscrewing the MAF sensor, I found it helpful to entirely remove the battery. Removing the foremost screw is easy with a small phillips screwdriver, but it's difficult to reach the other one, even with an L-shaped driver. I didn't want to risk stripping the screw, so removing the battery made everything much easier. It also gives you more space to work with and a nice little shelf to place your tools!
3. Use lube on the MAF sensor O ring when placing it in the CorkSport MAF. The instructions suggest doing this and there's a reason for it! Don't use lube and you risk pinching the O ring.
4. Pulling most of the stock hoses out takes a bit of muscle, but the breather hose that connects via that long black nipple [lol] is a royal pain in the ass. I suggest using a tiny flathead screwdriver to shimmy it under the hose to help break the deathgrip the hose has on the nipple.
5. Don't attach the filter to the CorkSport MAF until you're done fitting the silicone coupler to the throttle body (especially if you're also installing the duct). It takes some muscle to fit the coupler on, and it's much easier this way.
6. The instructions tell you to use the 2.75 inch clamp to connect the filter to the MAF, and the 3 inch clamp to connect the coupler to the throttle body, but it's actually the other way around.
6. Use silicone lube on the all nipples you need to connect the tiny air temperature sensor hoses to. It makes a nearly impossible task slightly less impossible.
7. I used a couple extra washers between the air duct and the bracket that attaches to the overflow reservoir for better fitment. Your mileage may vary.
I hope these little tips might help someone in the future. Overall the install wasn't too hard (even a noob), but knowing these little tips might accelerate the process.


1. I ran into a roadblock early on while trying to remove the ECU wiring cover. The retarded little screws that hold it in place (pictured below) are made of plastic, and strip extremely easy. Not only that, but if you simply try to turn them with a screwdriver, they will just rotate endlessly and not back out. That's because they're accepted by these ultra retarded plastic housings. I had to call Derrick to figure this out, and of course he was extremely helpful in telling me what to do. Apparently you need to jam a screwdriver in the space below where the screw is seated and push up, so that the screw's threads can catch on inside of the housing and back out. For some reason it seems that Mazda really doesn't want you to get in here, but I have no clue why. When reassembling everything, I threw these f***ing things out and replaced them with zip ties, which work a thousand times better.
2. Before unscrewing the MAF sensor, I found it helpful to entirely remove the battery. Removing the foremost screw is easy with a small phillips screwdriver, but it's difficult to reach the other one, even with an L-shaped driver. I didn't want to risk stripping the screw, so removing the battery made everything much easier. It also gives you more space to work with and a nice little shelf to place your tools!
3. Use lube on the MAF sensor O ring when placing it in the CorkSport MAF. The instructions suggest doing this and there's a reason for it! Don't use lube and you risk pinching the O ring.
4. Pulling most of the stock hoses out takes a bit of muscle, but the breather hose that connects via that long black nipple [lol] is a royal pain in the ass. I suggest using a tiny flathead screwdriver to shimmy it under the hose to help break the deathgrip the hose has on the nipple.
5. Don't attach the filter to the CorkSport MAF until you're done fitting the silicone coupler to the throttle body (especially if you're also installing the duct). It takes some muscle to fit the coupler on, and it's much easier this way.
6. The instructions tell you to use the 2.75 inch clamp to connect the filter to the MAF, and the 3 inch clamp to connect the coupler to the throttle body, but it's actually the other way around.
6. Use silicone lube on the all nipples you need to connect the tiny air temperature sensor hoses to. It makes a nearly impossible task slightly less impossible.
7. I used a couple extra washers between the air duct and the bracket that attaches to the overflow reservoir for better fitment. Your mileage may vary.
I hope these little tips might help someone in the future. Overall the install wasn't too hard (even a noob), but knowing these little tips might accelerate the process.
Last edited:
") You should post pictures of the positive cable touching
You should post pictures of the positive cable touching