
As promised here is the write up! I never had a car without heated mirrors before and frankly, it sucks! After finding out that heated mirrors are pre wired to the door and fairly simple to retrofit, I decided to do the install and post it here for the rest of you lucky owners.
What you will need:
Left and Right side heated mirror glass
T-25 torx driver
8mm socket or I used my klein 10 in 1 screwdriver shaft
Plug pins from computer power supply
18" of 18ga wire or similar
Soldering tool
Electrical tape or heat shrink
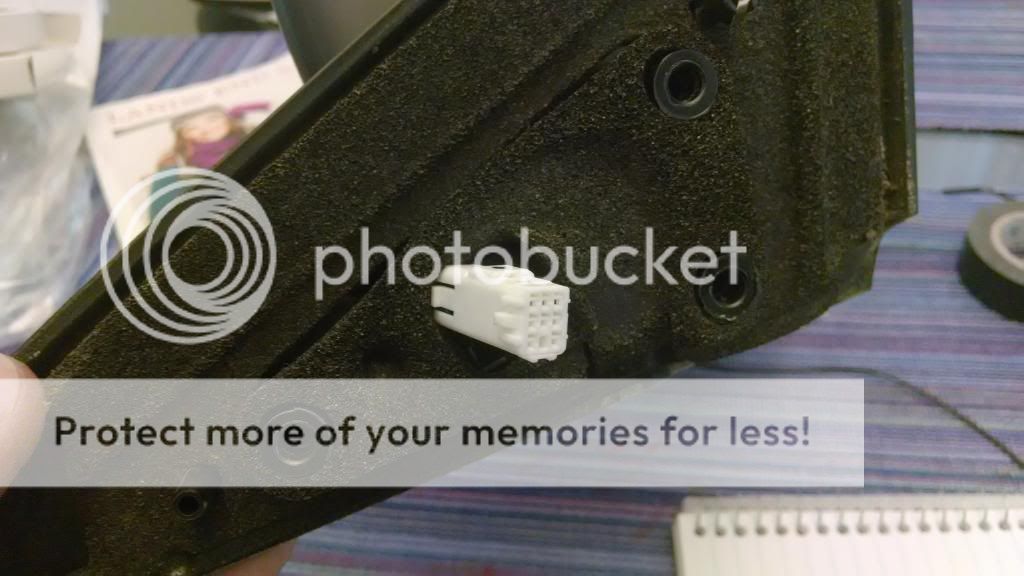
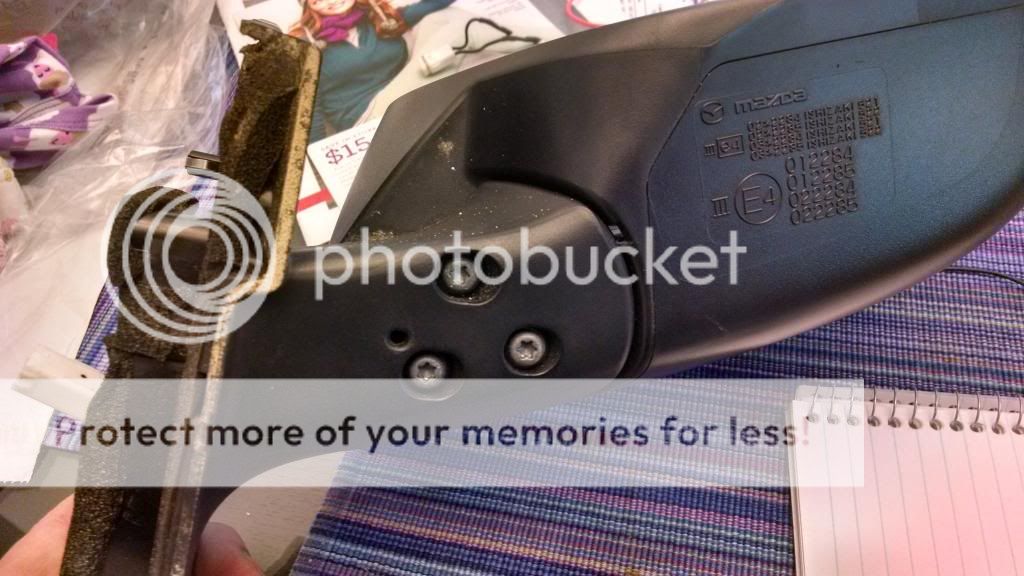
Step 1: Get the mirror off. The tweeter covers the mirror bolts so just pull it straight off. Make sure the 2 black plastic clips came out and are solidly in their holders so they dont fall back into the door later (sucked). There are 3 bolts that hold the mirror on so take those out while supporting the mirror from the outside. It wont fall off but better safe than sorry. Take the mirror off from outside and then unclip the harness connector. Make note of how the wires lay into the mirror housing so the clip can go back where it came from. I tried unplugging it before I unscrewed it but I couldn't get the clip to separate.
Step 2: Take it apart. Put the mirror on a nice soft towel and take it apart. Take note of where the attachment points are on the new glass so you know where to pull without snapping the old ones. Push the glass on the outside edge all the way in until you can get your fingers behind the glass on the inside edge. Try to feel where the smaller ball joint is and get fingers on either side and pull from that point. If you pull from the edge of the glass, IT WILL BREAK. Trust me from past experience, you cannot pull from anywhere but where the ball joints are. The glass WILL break 100%. Once the joint pops, you will need to pull the other 2 joints. You will be freaked out that the glass will break but follow my advice and it will be fine.
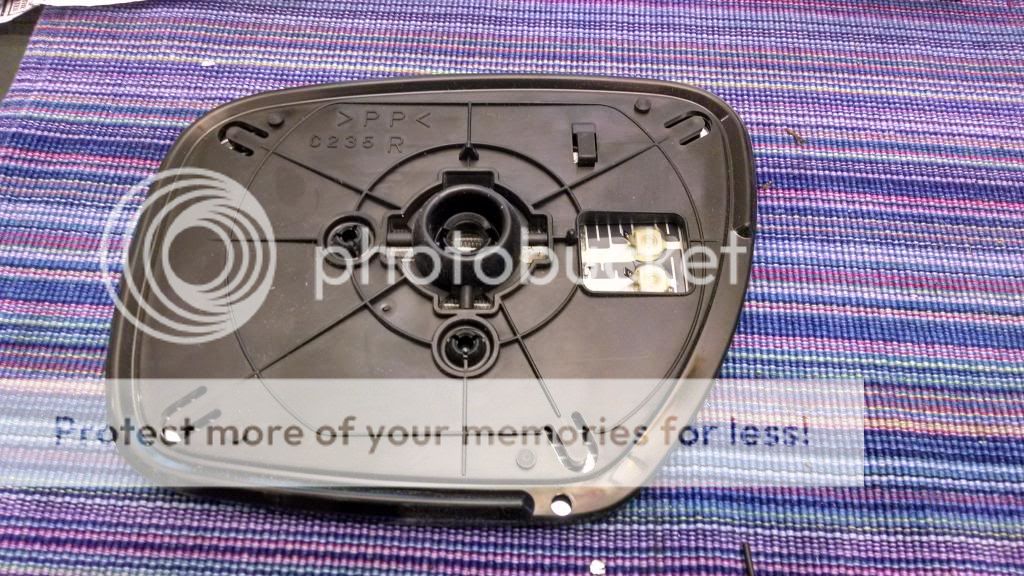
So you got the glass off and now you need to unscrew the 3 t-25 screws on the bottom of the mirror. There is enough slack to now separate the mirror and get the wiring through.
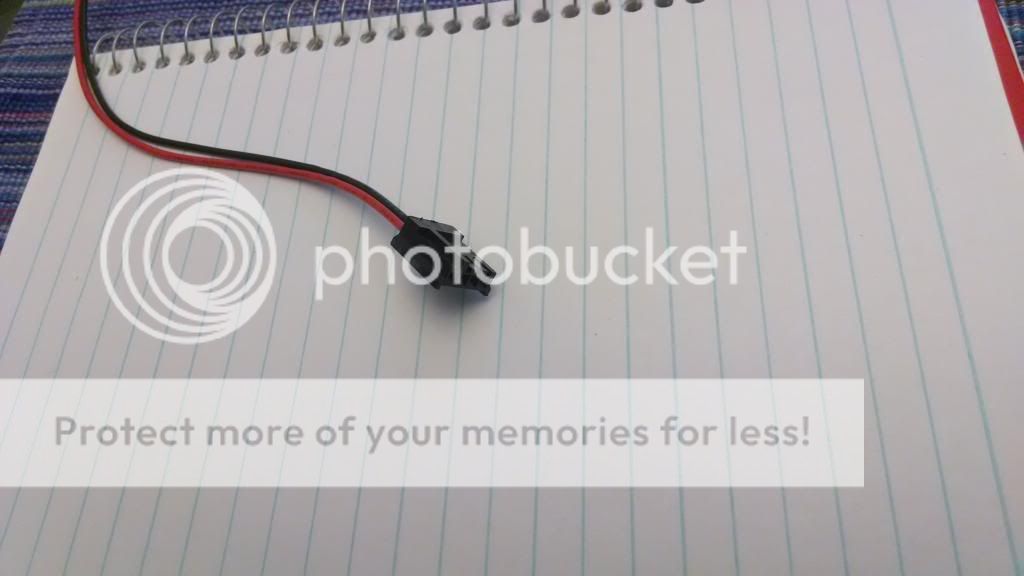
Step 3: New Pins. If you noticed, there are 5 wires that go to the mirror from the door but only 3 to the mirror. The 2 that are NOT used are the heater feeds. I found an old thread on doing this to a Mazda 3 but the plug seems to be reversed. Therefore there are male pins on the door side but females on the mirror side. Which sucks because its WAY harder to source the pins without knowing what they even look like. Fortunately I have a lot of electronic crap laying around being a tinkerer and electrician. I'm also a hell of a Macguyver if I do say so myself") So here is what I did, I took the plug from an old computer power supply I'm no longer using. I believe this particular plug was used to power the floppy drive. You might be able to cut this off your computer if you need to, odds are you will never need it if its not already in use. Due to its construction, they are a cinch to remove and slipped right into the harness plug.
So here is what I did, I took the plug from an old computer power supply I'm no longer using. I believe this particular plug was used to power the floppy drive. You might be able to cut this off your computer if you need to, odds are you will never need it if its not already in use. Due to its construction, they are a cinch to remove and slipped right into the harness plug.
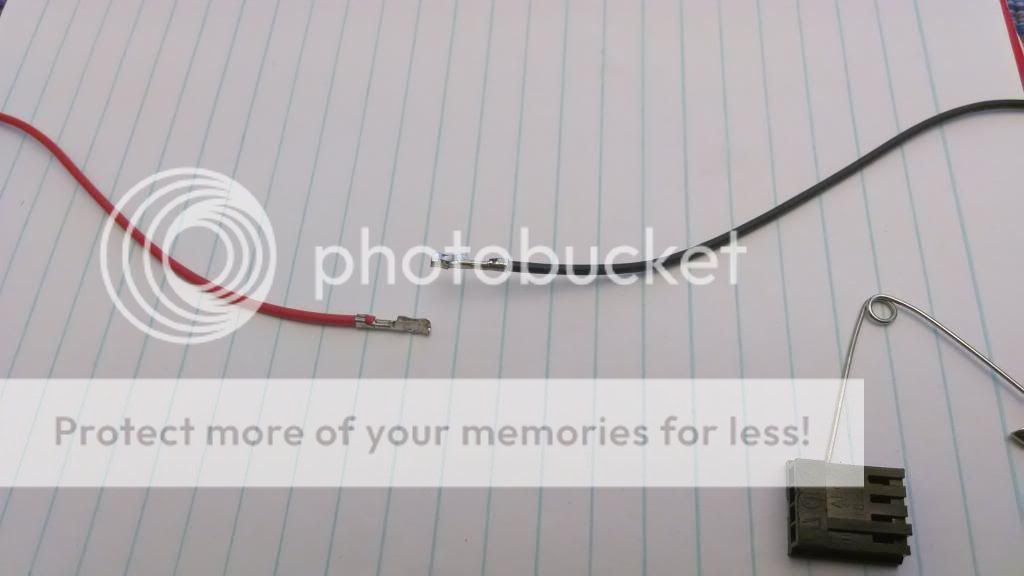
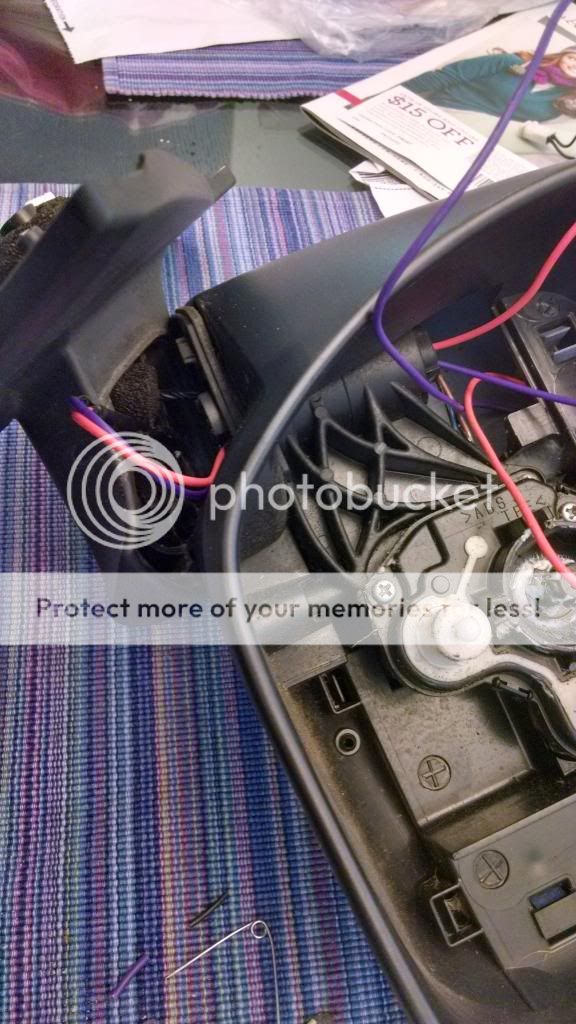
You must pry up this retention clip with the black dot when you slip the new pins in. The 2 pins on the other side of the connector that were not being used are your connections for the heating element. There is no polarity so it makes no difference which wire connects where as long as there is a loop. The retention clips on the pins themselves should be facing the existing wires when you slide them in. They should go about 80% of the way with no issue and then use a small flat screwdriver to press the rest of the way in. Be careful to push straight so the pins dont bend. The clip with the black dot will no longer go all the way back in but the plug still functions fine.

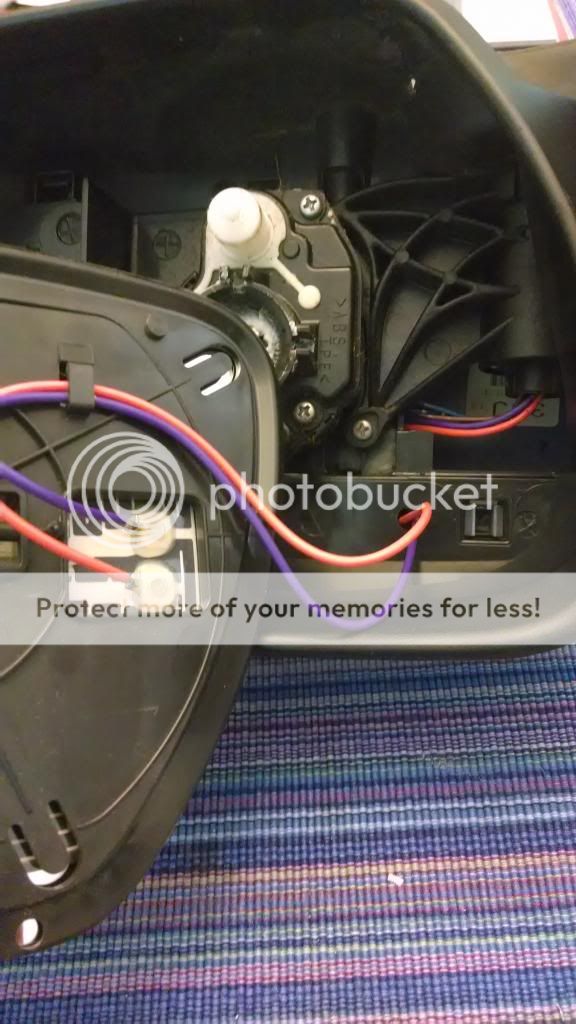
Step 4: Wiring it up. Rather than try to remove the wire from the pins and likely destroy them. I extended the pin wiring by soldering them and insulating the connections. Once the wires are fed through, this connection will be in a tube within the mirror and will not be exposed or even visible. Now fish the wires from the plug to the inside of the mirror housing. Just follow the route of the factory wiring and even up the lengths so it can easily be tucked back into the housing. The factory wiring is encased in foam but its easiest to just stay outside of it and not tamper with it. Once they are fished through you can reassemble the mirror. Now that its back together lets go to the final connection, the glass. The factory included small spade connectors so you could easily change the glass if damaged. I dont really see this as necessary plus I havent a clue where you would get these connectors easily. I figure if the mirror is ever busted, it would most likely require a full replacement and that solves that issue! lol There was a small existing hole that helps route the wires away from the motor and give room for slack behind it as well. I put about 2" behind the motor through that hole and made a loop through the molded in clip on the mirror frame to keep them out of the mechanism. At this point, I simply soldered the wires directly to the element without connectors. Be careful not to overheat this when you solder it. You must tin the mirror tab first, then the wire. Then you can easily join the two. I imagine its heat resistant to a good degree but still......You can also put some heat shrink on this connection if you are worried about corrosion.
Step 5: Reassembly. Now for the nerve wracking part, clipping the new glass on! It would be in your best interest to plug the mirrors in and test operation at this point, you dont want to have to remove the glass again to figure out why its not working. Plug it in, hang it loosely with one screw, start the car and put on the rear defroster. Within 10 seconds you should feel the glass getting warm. Its warm? Awesome!! Now, remember how the old glass had to be pulled off at the joints? You best find those points to push on the new glass. Take the mirror off again and go back to your table. Hold the housing in one hand, I used 4 fingers on the other hand to circle the area where the main joint was and pressed together, slowly and steadily increasing pressure until it popped on. Then you must work on the smaller of the 3 ball joints. Find those 2 locations from the outside and use your thumb to press until they pop on. Now go back outside and test them again to make absolutely certain they work before you bolt it on. Reinstall the 3 bolts, push the harness clip back in, pop the tweeter back on and admire the job no one else but another 5 owner would even care about lol.
What you will need:
Left and Right side heated mirror glass
T-25 torx driver
8mm socket or I used my klein 10 in 1 screwdriver shaft
Plug pins from computer power supply
18" of 18ga wire or similar
Soldering tool
Electrical tape or heat shrink
Step 1: Get the mirror off. The tweeter covers the mirror bolts so just pull it straight off. Make sure the 2 black plastic clips came out and are solidly in their holders so they dont fall back into the door later (sucked). There are 3 bolts that hold the mirror on so take those out while supporting the mirror from the outside. It wont fall off but better safe than sorry. Take the mirror off from outside and then unclip the harness connector. Make note of how the wires lay into the mirror housing so the clip can go back where it came from. I tried unplugging it before I unscrewed it but I couldn't get the clip to separate.

Step 2: Take it apart. Put the mirror on a nice soft towel and take it apart. Take note of where the attachment points are on the new glass so you know where to pull without snapping the old ones. Push the glass on the outside edge all the way in until you can get your fingers behind the glass on the inside edge. Try to feel where the smaller ball joint is and get fingers on either side and pull from that point. If you pull from the edge of the glass, IT WILL BREAK. Trust me from past experience, you cannot pull from anywhere but where the ball joints are. The glass WILL break 100%. Once the joint pops, you will need to pull the other 2 joints. You will be freaked out that the glass will break but follow my advice and it will be fine.

So you got the glass off and now you need to unscrew the 3 t-25 screws on the bottom of the mirror. There is enough slack to now separate the mirror and get the wiring through.


Step 3: New Pins. If you noticed, there are 5 wires that go to the mirror from the door but only 3 to the mirror. The 2 that are NOT used are the heater feeds. I found an old thread on doing this to a Mazda 3 but the plug seems to be reversed. Therefore there are male pins on the door side but females on the mirror side. Which sucks because its WAY harder to source the pins without knowing what they even look like. Fortunately I have a lot of electronic crap laying around being a tinkerer and electrician. I'm also a hell of a Macguyver if I do say so myself
So here is what I did, I took the plug from an old computer power supply I'm no longer using. I believe this particular plug was used to power the floppy drive. You might be able to cut this off your computer if you need to, odds are you will never need it if its not already in use. Due to its construction, they are a cinch to remove and slipped right into the harness plug.

You must pry up this retention clip with the black dot when you slip the new pins in. The 2 pins on the other side of the connector that were not being used are your connections for the heating element. There is no polarity so it makes no difference which wire connects where as long as there is a loop. The retention clips on the pins themselves should be facing the existing wires when you slide them in. They should go about 80% of the way with no issue and then use a small flat screwdriver to press the rest of the way in. Be careful to push straight so the pins dont bend. The clip with the black dot will no longer go all the way back in but the plug still functions fine.

Step 4: Wiring it up. Rather than try to remove the wire from the pins and likely destroy them. I extended the pin wiring by soldering them and insulating the connections. Once the wires are fed through, this connection will be in a tube within the mirror and will not be exposed or even visible. Now fish the wires from the plug to the inside of the mirror housing. Just follow the route of the factory wiring and even up the lengths so it can easily be tucked back into the housing. The factory wiring is encased in foam but its easiest to just stay outside of it and not tamper with it. Once they are fished through you can reassemble the mirror. Now that its back together lets go to the final connection, the glass. The factory included small spade connectors so you could easily change the glass if damaged. I dont really see this as necessary plus I havent a clue where you would get these connectors easily. I figure if the mirror is ever busted, it would most likely require a full replacement and that solves that issue! lol There was a small existing hole that helps route the wires away from the motor and give room for slack behind it as well. I put about 2" behind the motor through that hole and made a loop through the molded in clip on the mirror frame to keep them out of the mechanism. At this point, I simply soldered the wires directly to the element without connectors. Be careful not to overheat this when you solder it. You must tin the mirror tab first, then the wire. Then you can easily join the two. I imagine its heat resistant to a good degree but still......You can also put some heat shrink on this connection if you are worried about corrosion.

Step 5: Reassembly. Now for the nerve wracking part, clipping the new glass on! It would be in your best interest to plug the mirrors in and test operation at this point, you dont want to have to remove the glass again to figure out why its not working. Plug it in, hang it loosely with one screw, start the car and put on the rear defroster. Within 10 seconds you should feel the glass getting warm. Its warm? Awesome!! Now, remember how the old glass had to be pulled off at the joints? You best find those points to push on the new glass. Take the mirror off again and go back to your table. Hold the housing in one hand, I used 4 fingers on the other hand to circle the area where the main joint was and pressed together, slowly and steadily increasing pressure until it popped on. Then you must work on the smaller of the 3 ball joints. Find those 2 locations from the outside and use your thumb to press until they pop on. Now go back outside and test them again to make absolutely certain they work before you bolt it on. Reinstall the 3 bolts, push the harness clip back in, pop the tweeter back on and admire the job no one else but another 5 owner would even care about lol.
Last edited:

