Raise headlight on 2016 CX-5 with Tech and i-Activsense?

This was done at the Mazda factory? Inexcusable! Good headlights are important, I can only imagine the negligent person who installed that backwards had no idea the danger and risk their negligence caused. I spend a lot of time in areas with no houses, no streetlights, no traffic signals and plenty of winter darkness. In other words, if there are no clouds, when people from the city look up, they are blown away. People who have never left the 24/7 glow of the city may not realize just how important headlights are to those of us who travel in truly dark (and often rainy) environments.

If Mazda had even one employee who was installing 50% backwards, even if only for a week, they need to send out recall notices. At least the proper installation can be verified visually without needing to remove anything (or even without putting the car on a lift). I imagine this explains a number of people who have complained of a cut-off that was too low. Good thing it's a simple fix!

In my opinion, this is a design flaw. The arm and rheostat could easily be designed to fit only one way which would stop a faulty assembly instead of the current design which can easily be assembled wrong...
 
Self leveling needs a bit of explanation. Self leveling headlights adjust them selves to compensate for the car sitting level or being low or high in back (example, car full of people gas and luggage or car with only the driver). BUT They only adjust themselves with relation to where they were set or adjusted by you or the dealer. Put another way. The headlight brain doesn't know if the headlight assembly is level or if the light from them is lighting up the sky. All they know is they were set here and it has input to move them to there. There needs to be an initial setup to point them in the right direction just like any other headlight.

That makes sense, but how do I know if they are set up properly to begin with? My dealer just parked in front of a door on a slant and said, well they look about right. Kinda idiots if you ask me.

So is there an adjuster on the LED housings at all?
 
Headlight aiming on the HIDS in FSM states this.

HEADLIGHT AUTO LEVELING SYSTEM INITIALIZATION
NOTE:
The AFS control module records the vehicle height while it is unoccupied by performing the headlight auto leveling system initial setting.
Perform headlight auto leveling system initial setting if any of the following work is performed.
AFS control module replacement
Auto leveling sensor replacement, removal/installation
Work that can affect vehicle height such as suspension replacement or removal/installation.
There are two types of procedures for headlight auto leveling system initial setting, one which uses the M-MDS and the other which does not use it.
When using the M-MDS
1. Empty the vehicle by having all occupants leave the vehicle and remove all the cargo except for the spare tire, jack and tools equipped on the vehicle.
2. Adjust the air pressure of each tire to the specified value. (See WHEEL AND TIRE SPECIFICATION .)
3. Move the vehicle to level ground.
4. Connect the M-MDS to the DLC-2.
5. After vehicle identification, select in the following order from the M-MDS initial screen. NOTE:
The AFS OFF indicator light continues flashing during the first initial setting, however, continue the work because it does not indicate an improper procedure.
a. “Electrical”
b. “ExteriorLighting”
c. “Headlamp”
d. “Auto Leveling Sensor”
e. “Auto Leveling Sensors Calibration”
6. Verify that the AFS OFF indicator light flashes three times at 0.25 s intervals and turns off as shown in the figure.
7. Adjust the headlight aiming. (See HEADLIGHT AIMING.) When not using the M-MDS
CAUTION:
1. Empty the vehicle by having all occupants leave the vehicle and remove all the cargo except for the spare tire, jack and tools equipped on the vehicle.
Perform Steps 3-4 within 30 s.

2. Adjust the air pressure of each tire to the specified value. (See WHEEL AND TIRE SPECIFICATION .)
3. Switch the ignition ON (engine off or on).
NOTE:
4. Using a jumper wire, connect DLC-2 terminals B and J (ground) three times at 0.5 to 1.5 s intervals as shown in the figure.
CAUTION:
The AFS OFF indicator light continues flashing during the first initial setting, however, continue the work because it does not indicate an improper procedure.
If the terminals are mistakenly connected, vehicle damage or fire could occur. When connecting with the jumper wire, thoroughly verify what terminals are being connected to prevent a miss-connection.
MyManualDownload.com
5. Verify the AFS OFF indicator light.
If the AFS OFF indicator light flashes three times at 0.25 s intervals and turns off as shown in the figure, the initial setting is completed. Go to the next step.
If the AFS OFF indicator light continues flashing, the procedure may be performed incorrectly. Repeat the procedure from Step 1.
If the AFS OFF indicator light is illuminated, the headlight auto leveling system may have a malfunction. Perform the DTC inspection. (See DTC INSPECTION [ADAPTIVE FRONT LIGHTING SYSTEM (AFS)].)
Repair or replace the malfunctioning area, then repeat the procedure from Step 1.
6. Adjust the headlight aiming. (See HEADLIGHT AIMING.)

2015 - CX-5 - Body and Accessories
HEADLIGHT AIMING
NOTE:
1. Empty the vehicle by having all occupants leave the vehicle and remove all the cargo except for the spare tire, jack and tools equipped on the vehicle.
2. Adjust the air pressure of each tire to the specified value. (See WHEEL AND TIRE SPECIFICATION.) 3. Move the vehicle to level ground.
4. Make a screen shown in the figure using double-weight, white paper.

5. Line up the vehicle with the wall so that the distance to the headlights is 3 m {9.8 ft} from the wall.

6. Measure the height at the center point of the headlight.

7. Align the center of the headlight with the center of the screen.
Measure the height at the center point of the headlight in which the aiming is being adjusted because the vehicle height differs depending on vehicle conditions.

8. Set a partition in front of the headlight which is not being adjusted to block the light.
9. Start the engine and charge the battery.
10. Turn on the headlight low beams.
11. Verify that the elbow point of the headlight is at the position indicated on the adjustment screen.
If the elbow point of the headlight is not at the position indicated on the adjustment screen, perform the following adjustment.
a. Rotate the adjustment screw to adjust the headlight.

Screen%20Shot%202015-12-12%20at%204.52.06%20PM.png

Screen%20Shot%202015-12-12%20at%204.52.12%20PM.png


No idea if aiming is the same on LEDs as HIDs.
 
I assume this is the same on the '16. Here is the load sensing adjuster on my '15. This is on the left rear suspension.

IMG_54561.JPG

Yes. my 2016 looks the same. The position of the 10mm connection to the rheostat is what I changed to fix mine. When you take is loose you can turn the rheostat by hand and make the light cutoff go up and down. The rheostat seems to go over center and reverse direction of the light cutoff which is what mine did while continuing to turn it. You want to put it back so that when the arm connected to the rheostat moves up with added weight on the rear of the car the cutoff line goes down the wall. The cutoff line on mine was hitting the ground about 5 car lengths ahead and ended up about the same height as the headlight or slightly lower at distance. See my post 11 above...
 
Kedis, thanks for posting the official headlight aiming procedure but that has got to be the most obtuse set of instructions I've ever seen!

It's no wonder no one seems to know how to do it by the book!
 
Just checked my wife's 2015 GT, purchased in Nov 2014, direct order from Japan. Compensation works perfectly. Should have got the production date, too late for tonight...
 
Last edited:
Ride92 I finally figured out what was wrong with my low beam 2016 Tech lights. The load sensing adjustment that lowers the lights when the rear is pressed down with a load was installed 180 degrees out of phase and was lowering the lights when empty and raising them when loaded.
In my opinion, this is a design flaw. The arm and rheostat could easily be designed to fit only one way which would stop a faulty assembly instead of the current design which can easily be assembled wrong...
This makes me losing confidence on the quality from Mazda's. The design team didn't do a good job to prevent easy errors for parts installation; the assembly line workers didn't follow proper procedures to install arm and rheostat for the load sensing unit; and the final QC and QA team didn't do their job to catch the error! Mind you headlight aim and wheel alignment are two major items to check after the final assembly!

Yes. my 2016 looks the same. The position of the 10mm connection to the rheostat is what I changed to fix mine.
Apparently you'd rather trust yourself to fix the warranty issues instead of going to dealers. Based on Ride92's experience the tech at Mazda dealer had no clue on AFS and I really don't know how did he/she get certified by Mazda North American Operations!

We appreciate your effort finding the cause of this issue and explaining to us how to fix it! It seems many CX-5's with AFS got affected by this assembly error!
 
I was able to determine the problem and fix it in the time it would take me to take it to a dealer for a fix. I grew up on a small struggling farm an we could not afford new equipment so spent a lot of time repairing/restoring engines and equipment. Then, got an engineering degree and have always fixed my autos and house stuff, kind of enjoy doing it now as being retired I have time. I have always purchased the shop manuals on my autos and enjoy reading the theory of operations...
 
I was able to determine the problem and fix it in the time it would take me to take it to a dealer for a fix. I grew up on a small struggling farm an we could not afford new equipment so spent a lot of time repairing/restoring engines and equipment. Then, got an engineering degree and have always fixed my autos and house stuff, kind of enjoy doing it now as being retired I have time. I have always purchased the shop manuals on my autos and enjoy reading the theory of operations...

Do you have the 2016 service manual?
 
On my FWD there is a 10 mm nut on a variable resistor just above the left rear lower wheel arm with a small link to the lower arm. As the car is loaded the arms go up towards the body and turn the resistor. I took the small arm off the resistor with a 10mm socket and turned the resistor to make it fit the arm in a position that it would lower the lights under load instead of raising them so that at the empty position the light cutoff is almost level with the lights ahead instead of dropping towards the ground at distance.

What is the build date of your 2016??
 
Do you have the 2016 service manual?
Don't think it's available yet. Normally the factory service manual is available after a year or two the car is coming out. I'm waiting for a paperback one as I've always been getting a service manual for the car we have owned.
 
Rotate the adjustment screw to adjust the headlight.

This was the last line in the instructions from page two on how to adjust the headlights. The question still stands, does anyone know if the 2016 LED lights have such and adjusting screw? I know about the sensors and can check those, I understand the distance from wall or screen and all that but I just want to know if anyone has found an adjusting screw on the headlight
 
This was the last line in the instructions from page two on how to adjust the headlights. The question still stands, does anyone know if the 2016 LED lights have such and adjusting screw? I know about the sensors and can check those, I understand the distance from wall or screen and all that but I just want to know if anyone has found an adjusting screw on the headlight

I don't have i-activesense so would your headlights be different than mine with just tech? If it's the same as mine I have pictures at home of where to adjust the headlights. I can post them later.
 
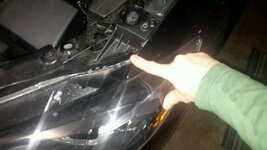
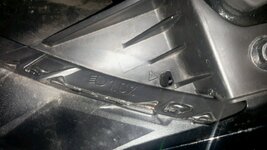
I don't know if this helps anyone but here are the headlight adjust points on my car. They are just in-board of the headlights, you can see the general area in the first pic. The second shows the little arrow and hole to insert screw driver into. Look down into it to see the gear to turn, same thing on other side.

Each light has another adjuster in-board of those that are covered by a white plastic cover. I believe these are for the side-to-side adjustments. At least that is how it's been on every other car I've had and not really meant to be used.

I had to adjust mine as they were way too far down. Also adjusted fogs to run more horizontal with ground (but not up into anyone's eyes ) as a low and wide filler. Makes an incredible difference this way for me. Love these lights.

attachment.php

attachment.php
 

Attachments

  • 20151212_220808-1280x720.jpg
    20151212_220808-1280x720.jpg
    93.1 KB · Views: 2,588
  • 20151212_220816-1280x720.jpg
    20151212_220816-1280x720.jpg
    114.6 KB · Views: 2,157
I don't have i-activesense so would your headlights be different than mine with just tech? If it's the same as mine I have pictures at home of where to adjust the headlights. I can post them later.

Looking at your pictures my headlights look the same. I think the LED headlights are part of Teck not Isense. Thanks for pointing out the adjustment points, I have not adjusted those as I improved mine by changing the load sensor rheostat (post 11 above) and will drive a while to "see how it goes"...
 
My headlights are too low too. I'm thinking of checking the load sensor by jacking the rear of the car up as opposed to putting weight down. I'm just light to make any difference, haha. Thanks for posting the adjustment screw. I will try that as well.
 
My headlights are too low too. I'm thinking of checking the load sensor by jacking the rear of the car up as opposed to putting weight down. I'm just light to make any difference, haha. Thanks for posting the adjustment screw. I will try that as well.

Start off with the gas tank full and some weight in the hatch so that you are in the working range of the load sensor.
 
Back