mazdaspeedjay
Member
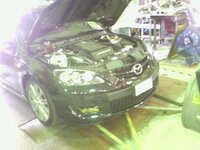
Well i dyno'd my car this past weekend and i was very happy with the numbers i put down for the only performance mods i have are a cobb SRi, Turbo X's test pipe and BOV, Thats it for any mods that you'd notice and yes the BOV is one because the stock BOV leaks like a siv so you hold boost hella better with a upgraded unit. Best run of the day was 270 Wheel horse power and 305 wheel torque this was with the mod done i'm about to tell you. We made 10 pulls all together and and all pulls were with in 4-6 HP and 5-6 Trq of each other on a dynojet 240 something i forgot the numbers parts but whatever.
I was at the race track about a month ago and some guys walked up to me and saw i had ice bag on my i/c i went to go remove the ice and put my ic cover back on and they said ishould leave it off. it's dyno proven 7-10 whp. I called their bulls*** never thinkig removing a cover would make that big a difference. Well when we were dynoing my car i figured i'd try it. this was after 6 pulls so the car was nice and hot and the i/c was already getting heat soaked. To my suprise every pull after removing the i/c cover and modding it got me no less then 10 WHP and no greater then 15WHP. 15 was the best and 10 was the worst out of the last 4 pulls. This is a free mod you just have to be brve enough to cut your stock cover. DO NOT JUST REMOVE IT. First this is stupid cause the factory hood seal no longer works as well and also i've seen countless people melt the rubber seal on the hood from when the stock i/c gets too hot. so do it right and cut it. here's how and pcs of mine.
Tools Needed :
-Air saw, hand saw ( will work just may take for ever ), wizard wheel, etc. basicly something that can cut plastic and also will allow you to cut certain angles. I'm a mechanic so i used my little air saw it worked perfect
-Misc. drill bits. No special size just one big enough to make a starter hole for your saw to start and then also will help you in cutting the corners.
-File, sand paper, wizard wheel with scotch brite pads, etc. basicly something to file down and make the left over plastic smooth since it will melt when cutting and just peeling it off looks like crap.
-10m Socketor 10mm wrench, wrench will work but will take longer this is needed to remove the two 10mm bolts holding down the cover.
-Striaght edge or ruler and a sharpie.
How-To
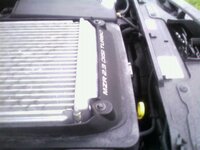
Basicly the easiest way i found is i wanted to keep the lettering in the front of the cover. you can cut it how you like but i liked the engine letters in the front so i cut around it. Take your straight edge or ruler and sharpie and for the sides you want to cut just alittle was down from the top i think i measured like 1 1/4 -1 3/4 " i believe but basicly you still want some of the side of the cover left to give the rubber seal on the hood a good seal. if you cut too low the hood will loose some effect. for the front i drew a line with my sharpie and ruler just above the letters and connected the line to the ones i already drew on the sides. NOW PAY CLOSE ATTENTION. IF you cut the rear and don't heed my warraning your cover won't fit right anymore cause there is a little plastic tab in the back that slides onto the I/C to help keep it still. You want to draw your line the same distance from the bottom of the cover as the front BUT when you get to the center where the plastic tab is you want to cleanly cut around making a hump so to say.
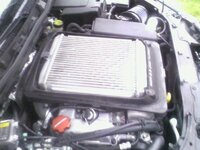
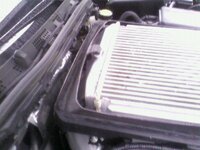
Now that all your lines are drawn you can start cutting. the corners are a little tricky and if you used a air saw like me the plastic can clog up and cause the saw to stall but all in all it took me from start to finish about 30-45 minutes with clean up time where you have to clean the edges so it looks good. Here's my pictures below sorry i only have a cell phone camera but they should give you a idea of what it's suppose to look like.
Final Thoughts :
You may not or probally won't notice a BIG difference but it's on 10-15 HP not 30. But this is dyno proven before and now i'm clearing things up and telling you they're right. The factory cover like everything else on the car is super restrictive and block air from gettting to the whole intercooler and because of the style of the stock I/C you need as much air there as possible. I noticed a big difference in heat soaking. Where before after alittle harsh driving the cold side of my i/c would be hot as balls. Now afterwards not the case anymore. I drove it hard at 80MPH on the highway for about 30 minutes then 15-20 around my house on the streets ( NO i wasn't doing 80MPH anymore once i got off the highway ) so all in all about 45-50 minutes of some good WOT driving and when i pope my hood my cool side of my i/c was nice and cool like it's suppose to be not hot anymore so your engine will thank you. here's some pics of how mine looks
I was at the race track about a month ago and some guys walked up to me and saw i had ice bag on my i/c i went to go remove the ice and put my ic cover back on and they said ishould leave it off. it's dyno proven 7-10 whp. I called their bulls*** never thinkig removing a cover would make that big a difference. Well when we were dynoing my car i figured i'd try it. this was after 6 pulls so the car was nice and hot and the i/c was already getting heat soaked. To my suprise every pull after removing the i/c cover and modding it got me no less then 10 WHP and no greater then 15WHP. 15 was the best and 10 was the worst out of the last 4 pulls. This is a free mod you just have to be brve enough to cut your stock cover. DO NOT JUST REMOVE IT. First this is stupid cause the factory hood seal no longer works as well and also i've seen countless people melt the rubber seal on the hood from when the stock i/c gets too hot. so do it right and cut it. here's how and pcs of mine.
Tools Needed :
-Air saw, hand saw ( will work just may take for ever ), wizard wheel, etc. basicly something that can cut plastic and also will allow you to cut certain angles. I'm a mechanic so i used my little air saw it worked perfect
-Misc. drill bits. No special size just one big enough to make a starter hole for your saw to start and then also will help you in cutting the corners.
-File, sand paper, wizard wheel with scotch brite pads, etc. basicly something to file down and make the left over plastic smooth since it will melt when cutting and just peeling it off looks like crap.
-10m Socketor 10mm wrench, wrench will work but will take longer this is needed to remove the two 10mm bolts holding down the cover.
-Striaght edge or ruler and a sharpie.
How-To
Basicly the easiest way i found is i wanted to keep the lettering in the front of the cover. you can cut it how you like but i liked the engine letters in the front so i cut around it. Take your straight edge or ruler and sharpie and for the sides you want to cut just alittle was down from the top i think i measured like 1 1/4 -1 3/4 " i believe but basicly you still want some of the side of the cover left to give the rubber seal on the hood a good seal. if you cut too low the hood will loose some effect. for the front i drew a line with my sharpie and ruler just above the letters and connected the line to the ones i already drew on the sides. NOW PAY CLOSE ATTENTION. IF you cut the rear and don't heed my warraning your cover won't fit right anymore cause there is a little plastic tab in the back that slides onto the I/C to help keep it still. You want to draw your line the same distance from the bottom of the cover as the front BUT when you get to the center where the plastic tab is you want to cleanly cut around making a hump so to say.
Now that all your lines are drawn you can start cutting. the corners are a little tricky and if you used a air saw like me the plastic can clog up and cause the saw to stall but all in all it took me from start to finish about 30-45 minutes with clean up time where you have to clean the edges so it looks good. Here's my pictures below sorry i only have a cell phone camera but they should give you a idea of what it's suppose to look like.
Final Thoughts :
You may not or probally won't notice a BIG difference but it's on 10-15 HP not 30. But this is dyno proven before and now i'm clearing things up and telling you they're right. The factory cover like everything else on the car is super restrictive and block air from gettting to the whole intercooler and because of the style of the stock I/C you need as much air there as possible. I noticed a big difference in heat soaking. Where before after alittle harsh driving the cold side of my i/c would be hot as balls. Now afterwards not the case anymore. I drove it hard at 80MPH on the highway for about 30 minutes then 15-20 around my house on the streets ( NO i wasn't doing 80MPH anymore once i got off the highway ) so all in all about 45-50 minutes of some good WOT driving and when i pope my hood my cool side of my i/c was nice and cool like it's suppose to be not hot anymore so your engine will thank you. here's some pics of how mine looks