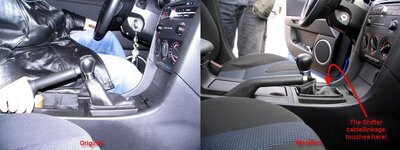
Today I modified my shifter for shorter travel. On the Speed3, the way the shifter is built the cable attachment is about as high as you can make it without interfering with the console and making a bump in the boot. So the alternative is to shorten the lever on the transmission. This is not for the faint of heart! It requires a significant, but not difficult, disassembly of the transmission. It's not really very hard but does require a few tools. It took me a couple of hours. I suggest carefully reading through the whole thing before starting to be sure you have all the tools and materials and are sure you want to do it. I take no responsibility for munched parts or disabled cars. Here goes.
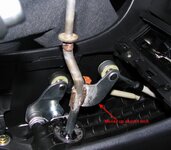
First, remove the intercooler cover, 2 bolts, to improve access. Now remove the air box. To remove the air box, remove the MAF cable connector by pushing the release down and pull. Loosen the clamp on the big rubber hose on the air box lid, release the two lid catches, and remove the lid, twisting a bit to get the rubber hose to let go. Remove the filter. Remove the bottom part of the box by releasing the rubber loop on the passenger side and releasing the rubber mount on the driver's side - you pull the white plastic clip out then slide the rubber towards the back of the car. You can now remove the box by pulling hard to release two rubber mounts on the bottom. The transmission shift linkage is now revealed and looks like this.

Pop off the two cable ends with a couple of screwdrivers.

Shift the transmission through all seven gears to famailarize yourself with how it works. You can move the big weight forward and back, and lift up or push down on the main pivot. It goes up one step, and down two steps with the last one for reverse.
This is the point to stop if you are not sure of yourself. After this you start to take apart the real bits that could be difficult if you make a mistake. You have been warned.
Remove this bolt. This picture shows it after a couple of steps but it is best to do it now. This is a funny bolt with a pin sticking out that is the shifter guide.

Remove the two bolts that hold the shifter cross bell crank onto the transmission. Remove the bell crank - keep it clean, it's kind of greasy.

Remove the three remaining bolts that hold the shifter in. Pull the shifter mechanism out. You may have to tap on it a bit to break the sealant free. Also, you have to wiggle it around a bit to get it out, but it will come. It will be a bit drippy so have a rag handy to avoid slopping transmision oil around.

You should now see this (Eek!). Don't drop anything in the hole!

This is the shifter mechanism.

Wrap the shifter mechanism in a plastic bag with the lever sticking out so it doesn't get crap in it. Close up the end with some tape.

Here's the part of the lever we are going to modify. The idea is to move the ball where the cable attaches, closer to the main pivot, making the amount of cable movement required less to make it shift. Remove the big weight with two bolts - remember where it goes so you can put it back later.

Put the lever in a vise.

and grind off the peened end of the pivot ball.

Use a hammer and punch and drive the pivot ball out of the lever.

Drill a hole for the new position of the pivot ball. Use a letter size drill, size "O". The size of the hole is important so only use this size drill and be sure it is in good condition and sharp. Position the center of the hole at the edge of the mark where the original pivot base was, and just far enough away from the edge so there is no possibility of the hole breaking out. The hole should be about 1.8" away from the main pivot. This gives about a 20% reduction in throw. Center punch and carefully drill. Chamfer the top of the hole slightly.
[Edit: After living with the modification for a week, I think putting this hole closer to the middle of the lever might be a good idea. Where I put the hole, the neutral position of the shifter is a bit to the rear of center so a bit more forward won't hurt unless you have really short arms") . Putting the hole further away from the edge would be a little stronger.]
. Putting the hole further away from the edge would be a little stronger.]

Clean up the nub on the bottom of the pivot ball. Drill and tap the nub for a #10-32 screw. Drill with a #21 drill, about 3/4" deep.

Insert the pivot ball into the new hole. The letter O drill will result in a slight interference fit so it will have to be pressed into the hole. It can be done in a vice if you are careful.

Put some loctite on a #10-32 1/2" long screw with a washer and screw it into the back of the ball mount to be sure it never comes out.

Put the big weight back on the end of the shifter lever. Remove the plastic bag from the shifter mechanism. Clean up the surfaces on the bottom of the shifter cap and the mating transmission surface. Smear on a thin layer of high temperature silicone.

Jocky the shifter back into the transmission. It will require a bit of jiggling and fiddling, but it will go in. Put in the three bolts you removed last with some loctite. Verify that you can shift the transmission by moving the lever like you did before taking it apart. You should be able to shift to all seven positions of the pattern. If it won't, take out the bolts and try again. (When I did it, it went right in and there didn't seem to be any way to get it wrong, but I am sure it is possible.)

Put the bell crank back and install the last two bolts with loctite.

Attach the cables by pushing them onto their respective balls.
Put the guide pin bolt back in; use some thread sealant on it because it threads into the oily part of the transmission. You don't have to make it super tight, it isn't holding anything but just has to stay there.
Reassemble the air box and intercooler cover and you are done.
By the way, if you hate the way it feels, it is reversable. Take it all apart, push the pivot ball out after removing the screw and press it back into the original hole and replace the screw.
[Edit: If you like the way it feels after driving it for a few weeks, you could pull it out and weld the pivot ball to the lever. This will alleviate any fear that it will come apart.]
First, remove the intercooler cover, 2 bolts, to improve access. Now remove the air box. To remove the air box, remove the MAF cable connector by pushing the release down and pull. Loosen the clamp on the big rubber hose on the air box lid, release the two lid catches, and remove the lid, twisting a bit to get the rubber hose to let go. Remove the filter. Remove the bottom part of the box by releasing the rubber loop on the passenger side and releasing the rubber mount on the driver's side - you pull the white plastic clip out then slide the rubber towards the back of the car. You can now remove the box by pulling hard to release two rubber mounts on the bottom. The transmission shift linkage is now revealed and looks like this.
Pop off the two cable ends with a couple of screwdrivers.
Shift the transmission through all seven gears to famailarize yourself with how it works. You can move the big weight forward and back, and lift up or push down on the main pivot. It goes up one step, and down two steps with the last one for reverse.
This is the point to stop if you are not sure of yourself. After this you start to take apart the real bits that could be difficult if you make a mistake. You have been warned.
Remove this bolt. This picture shows it after a couple of steps but it is best to do it now. This is a funny bolt with a pin sticking out that is the shifter guide.
Remove the two bolts that hold the shifter cross bell crank onto the transmission. Remove the bell crank - keep it clean, it's kind of greasy.
Remove the three remaining bolts that hold the shifter in. Pull the shifter mechanism out. You may have to tap on it a bit to break the sealant free. Also, you have to wiggle it around a bit to get it out, but it will come. It will be a bit drippy so have a rag handy to avoid slopping transmision oil around.
You should now see this (Eek!). Don't drop anything in the hole!
This is the shifter mechanism.
Wrap the shifter mechanism in a plastic bag with the lever sticking out so it doesn't get crap in it. Close up the end with some tape.
Here's the part of the lever we are going to modify. The idea is to move the ball where the cable attaches, closer to the main pivot, making the amount of cable movement required less to make it shift. Remove the big weight with two bolts - remember where it goes so you can put it back later.
Put the lever in a vise.
and grind off the peened end of the pivot ball.
Use a hammer and punch and drive the pivot ball out of the lever.
Drill a hole for the new position of the pivot ball. Use a letter size drill, size "O". The size of the hole is important so only use this size drill and be sure it is in good condition and sharp. Position the center of the hole at the edge of the mark where the original pivot base was, and just far enough away from the edge so there is no possibility of the hole breaking out. The hole should be about 1.8" away from the main pivot. This gives about a 20% reduction in throw. Center punch and carefully drill. Chamfer the top of the hole slightly.
[Edit: After living with the modification for a week, I think putting this hole closer to the middle of the lever might be a good idea. Where I put the hole, the neutral position of the shifter is a bit to the rear of center so a bit more forward won't hurt unless you have really short arms
. Putting the hole further away from the edge would be a little stronger.]
Clean up the nub on the bottom of the pivot ball. Drill and tap the nub for a #10-32 screw. Drill with a #21 drill, about 3/4" deep.
Insert the pivot ball into the new hole. The letter O drill will result in a slight interference fit so it will have to be pressed into the hole. It can be done in a vice if you are careful.
Put some loctite on a #10-32 1/2" long screw with a washer and screw it into the back of the ball mount to be sure it never comes out.
Put the big weight back on the end of the shifter lever. Remove the plastic bag from the shifter mechanism. Clean up the surfaces on the bottom of the shifter cap and the mating transmission surface. Smear on a thin layer of high temperature silicone.
Jocky the shifter back into the transmission. It will require a bit of jiggling and fiddling, but it will go in. Put in the three bolts you removed last with some loctite. Verify that you can shift the transmission by moving the lever like you did before taking it apart. You should be able to shift to all seven positions of the pattern. If it won't, take out the bolts and try again. (When I did it, it went right in and there didn't seem to be any way to get it wrong, but I am sure it is possible.)
Put the bell crank back and install the last two bolts with loctite.
Attach the cables by pushing them onto their respective balls.
Put the guide pin bolt back in; use some thread sealant on it because it threads into the oily part of the transmission. You don't have to make it super tight, it isn't holding anything but just has to stay there.
Reassemble the air box and intercooler cover and you are done.
By the way, if you hate the way it feels, it is reversable. Take it all apart, push the pivot ball out after removing the screw and press it back into the original hole and replace the screw.
[Edit: If you like the way it feels after driving it for a few weeks, you could pull it out and weld the pivot ball to the lever. This will alleviate any fear that it will come apart.]
Last edited: