Baseline Dyno and more!
I had the car dynoed today to set up a baseline.
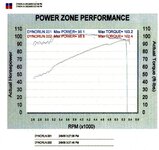
It was done at a shop called PowerZone with a dynojet. Temp was about 70 degrees (warm for the season!), with a typical humidity for the area. This should favor comparably with conditions in the future when the install is complete. The image looks a little funny, as the print out was very light, and I had to modify it to get visible dyno lines.
My 1999 Mazda Protege ES 1.8L with ~83K miles on it.
WHP: ~98
Torque: ~102
The attachment is 367k, 1024x768.
Update #1 - 10 Feb 05 - change 1
HALTECH E6X (from
HiBoost TS,
www.hiboost.com, Juan):
On Beau's recommendation, I am sourcing this with HiBoost. That also makes sense considering how much Juan has supported users on this forum. In the process of determining what I need for the Haltech E6X setup, Juan has been quite helpful in identifying exactly what I need. Apparently a 1.8L does not have the same igniter set up that you younger 2.0L's have. I sent him a pic of my engine bay. That means I need to get an extra igniter. On another note, the crank pulley has the same number of teeth (35) as the 2.0L. I had to pull off the right-front wheel and remove the plastic to be able to count the teeth. I will be getting the boost controller as well.
*CHANGE 1* SEE ATTACHMENT 2- Juan told me today of another option. He suggested it would be better to get the 01-03 protege coils which will serve in place of the igniter kit. These coils burn hotter and longer for a more efficient burn (plus they're newer). My local dealer sells them (I need two) for $30.75 ea. For those of you that are familiar, these bolt directly into the valve cover. Problem is that the 01-03 valve covers have bungs for this. Mine doesn't. Juan already knew about this and suggested the Nology Hotwires ignition kit which relocates the coils, meaning I don't have to worry about it. Luckily I am getting in on the tail end of the group buy on Pro-Tuner.com. I will be ordering the coils and the nology wires tomorrow from
SPDRacing.com.
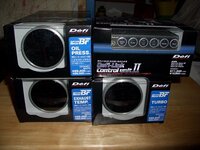
DEFI Link Meter BF White GAUGES (from Ravspec, a vendor here,
www.ravspec.com):
-Boost
-EGT
-Oil Pressure
-Link Meter Control Unit II
First let me point out that RavSpec priced out the gauges at a better price than I was able to find online. On some recommendations of people on this board and others, I have decided to go with Defi gauges. I was torn between the extra features of the Link Meter BF gauges and the simple, much cheaper, D-gauge line. My tendency to spend a little more now to avoid more work and problems down the line has led me to the BF Whites. Also, they are the newest line meaning support will be around a bit longer. I was originally planning on the Ambers, but I figure the whites will allow me to customize the color, as I am not a big fan of having a ton of different colors in my lighting. I will be changing the instrument cluster to a blue to match the stereo I have, and will be replacing interior lighting with LEDs as well. This is a pricey, but necessary expense. Now I just how to determine the best way to mount them. These gauges are not the typical 2-1/16" size, but are 2-3/8". Do I go pillar pod? Or find some other way to make it happen? Leadfoot (a user on this board) was selling some great looking and intelligent dash bezels that incorporated a couple of gauge pods, but the manufacturing process is on hold. See this thread .
AEM Wideband Gauge Type UEGO Controller (from Beau at MAM):
On Beau's recommendation I will need a Wideband Air Fuel Ratio meter, and the AEM is apparently the best one on the market. He recommended that as well. I am getting this at his
sale price.
Update #2 - 14 Feb 05 - Change 1
I spent the weekend cleaning out my garage to park the car there for a while and make room for the work area. I also picked up a compressor that came with air tools from Home Depot, and a set of gear wrenches. Putting some money down, but those will be usable for the foreseeable future no matter what I'm working on. I drove my car again today and patted it lovingly, as I plan on parking it in the garage tonight and start removing panels either tonight or tomorrow. I probably won't be driving it too much once that starts. I am sure I will be sent out before the install is done. The gauges are supposed to be here today, and the turbo kit should be here today or tomorrow. Juan told me the Haltech and coils should be shipped tomorrow (13th). I still have to figure out what I am going to do with the gauges; though it will be easier once I have them in hand.
NOTE: If you are buying a compressor to use with air tools, it should be at least 26 gallons! Big surprise after I already bought an 11 gallon compressor. That will go back, as my new 32 gallon setup (with air tools) will do me nicely. The compressor/tools kit cost $300 at Home Depot. A 26 gallon with no tools was $250.
-Change 1-
HeHe, the gauges just arrived! I like UPS! Check out attachment #3.
In the last couple days I have been working on removing my bumper. I have also removed my coil pack and plugs, all the plastic under body parts (including the wheel wells) and started on removing the heat shield. I also put some time into setting up the garage with my new compressor, air tools, lighting, music, and workspace. Definitely gotta have my music!
Issues/Lessons Learned:
- Don't try to leave the wheels on. Just jack it up to begin with and remove them. It makes it
MUCH easier to remove the plastic parts that you have to remove to take the bumper off.
- Go slowly and take your time. Those little plastic pop-rivets are a pain and the ass and can be easily broken. I learned this the hard way long ago when I was removing my door panels.
-The pop-rivets with a philips screwdriver spot on em twist and pop out, but you have to hold the outer ring while you twist the screwdriver with VERY light pressure on the inner disc. This will allow the inner disc to pop out, you can then use your fingers to pull them out. There are two on each side that are not pop rivets but screw all the way out. They are on the rear bottom edge of the wheel well covers.
-Scan all the way around the edge of the bumper to see what you need to remove to take it out. You also need to take out your blinker lights (with the 99 at least). There is one more pop-rivet that has a screwdriver slot, but is NOT a twist-out; this is in the center under the main bulge of the bumper. You have to use something to force it out, and it is rather difficult. You also need to be careful, as this is a painted part (on mine at least when some damage was fixed at a shop.
I received the first of the three boxes from MAM today. This is the intercooler and I believe the majority of the piping. It also has the wastegate, some bolts, hoses, silicone couplings, air filter, and BOV. I may be leaving some stuff out. This is nice! Since i have my bumper off, here comes the intercooler! Whee!
Oh yeah, there were a LOT of pink packing peanuts! Too much pink! Be careful unpacking as there are some small items that could easily get missed. I was digging in there with my hands and never saw them until I started using a dustpan to scoop out the peanuts. Small amounts of peanuts at a time once I found the first small item. Now to clean all the "peanut-dust" off the parts.
Hosting pictures off-site now for easier management.
A few pics:
-Contents of the first box from MAM.
-Autometer
Boost Gauge (forgot to put in contents pic)
-First box of the
Haltech. Main unit and harness built by Juan. I received this today. The dude shipped it from Colombia and it got here the next day. He rocks.
-
Old parts. You'll notice the broken gasket on my cat, and the sheared bolt. The nut had rusted to it enough that the air ratchet sheared off the bolt. That nut is still stuck in my socket. Can't get it out. Not the first time something like this has happened on my car. My exhaust manifold was showing the same level of rust, and was showing what looked like fracture lines.
-The
Holethat is my engine bay, now.
-My bare
front bumper .
Last night before I called it quits, I was able to remove the exhaust manifold and the primary cat. I used a vacuum to remove all the debris and rust that came off of the manifold. I also cleaned up where the coils drop in, and put them back in to keep debris out of the engine.
I spent the day (when not working) researching as much as I could about stuff I will have to worry about. I also ordered some more stuff online:
- Timing belt, tensioner, idler from
www.mazdaformance.com (beat my dealer's price big time). Might as well change them out while I have everything torn open.
- New valve cover gasket from local dealer
- New engine side mounts also from
mazdaformance (mine are shot, they saved me big money on this compared to my dealer. Like half price)
- AWR Engine Side Mount
polyurethane inserts (I have the AWR
front/rear mounts already)
- Kartboy short shifter
bushings to go with my soon to be incoming
Megan shortshifter
- Kartboy
exhaust hangers in preparation for my custom exhaust
- More sockets (I found I didn't have a few that I need) from Lowe's
I also plan on installing an Optima battery, due to a couple of odd starts I have had over the last couple weeks. Not to mention it's higher resistance to vibration, as my mounts will all be the AWR versions. I have most of the exhaust removed, I just have to get the bolts off the rear end of the mid-pipe. That's where I found I needed some different sockets. In fact, you can see my secondary cat on the ground underneath the bumper shot. You can probably also tell that my garage is quite cramped.
Back to work!
Update #5 - 19 Feb 05 - Change 1
The other two turbo kit boxes have not yet arrived. C'mon FedEx! In the meantime, I am working on some other mods that I have been planning for a long time.
- I picked up all the parts necessary for the electrical mods on
www.zapwizard.com (ZapWizard is a member of this community, you may have seen his how-to's).
- I started modifying my gauge cluster to make it all blue. Here's a
post on that with pictures of what I have done so far. I decided against the two-tone. I broke my fuel gauge pin, so I ordered a replacement gauge using
www.car-part.com
- In pulling out my gauge cluster, I removed a few of the panels under the steering well since I had to trace the security light path to the alarm box. I unplugged the red and blue sockets, and pulled the wire out (there's about 10 feet of it!) so I could get the LED out of my gauge cluster. I would love to change that to blue also, but I'm afraid I'll mess up my alarm if I do that. Still not entirely out of the question. More research to do.
- I pulled out every light in my car except the headlights, as I am changing them all to LEDs. I have the Osram Silverstars coming in from
www.powerbulbs.co.uk for the headlights. (Maps, Dome, trunk, all tail-lights, window brake light, blinkers). I will be ordering what LEDs I can from
www.lsdiodes.com, any I can't get from there will be from
www.superbrightleds.com
- I pulled apart the environmental control panel to change the LEDs to blue and to disable the auto AC function of the defrost. It appears that 99's are simpler to disable this function. There is a switch in there that just needs to remove the power socket. I haven't yet ops-checked it yet.
- I have the entire center dash console pulled apart to help me decide where to mount the gauges and it's controller. The controller will likely end up in the cd-pocket circuit city put in place of my tape deck when I got a new CD-player.
- I have the red-top Optima battery. I got it from Autozone for $118. It was $130 across the street at Advance.
- While there, I also bought Denso Iridium spark plugs for $12.99 each. According to some threads I have read here, the iridiums will help with the turbo.
- I have been planning on doing some more silencing to my car. I have already pasted Tsunami material all over the front doors and rear deck to help the stereo system. Apparently Tsunami has gone up in price at Circuit City to $5 per sq ft. Hell no! I orderd some edead from
www.elementaldesigns.com for $1.50 per sq ft. I will also use that in the XTerra. A thread I read a while back on
www.clubprotege.com led me to check out the local carpet store for some undercarpet padding. I picked up a 12' x 6' roll for $20. This will help silence road noise. I got enough for my car floors and doors, and for my wife's XTerra (vibration from her stereo is killing my drive, I can't believe she doesn't notice!)
Issue:
- There may be a problem mounting the Intercooler. Apparently a 99's
bumper is different from a 01-03
bumper. On the 01's there is a bit of frame that sticks out to mount the IC to. Mine doesn't have this. The only thing I have available is the actual
plastic bumper underneath the body bumper. I discussed this with my neighbor, and I will likely have to drill through the plastic and secure it that way. Since I question the stability (over time with vibration cycles and stress) of the plastic, I will likely have to add some metal straps (much like hose clamps); and a bushing to where the bolts go through the plastic to hold the IC. This is still in the works.
Stuff left on my to-buy list:
- LEDs
- gauge pods (still waiting for Leadfoot's)
- Stainless Steel bolts to replace the rusted ones that hold on my hood.
- Order billet aluminum door-lock bezel from MAM to go with...
- a new door lock switch for the passenger side. My wife always wants to lock the doors...
That's all for now, but plenty to fill my time until the rest of the turbo kit comes in.
Oh yeah, forgot to mention that I ordered the replacement under engine plastic parts ($20 each from
www.mazdaformance.com) as well as new glass runs for the front and rear windows. Since my exhaust manifold gasket was looking pretty bad, I am replacing that too ($10)


")