
You are using an out of date browser. It may not display this or other websites correctly.
You should upgrade or use an alternative browser.
You should upgrade or use an alternative browser.
What have you done to your P5 today?
- Thread starter Tg5
- Start date
marcs_sp20
Member
- :
- 02 Mazda 323 Astina SP20 (P5)
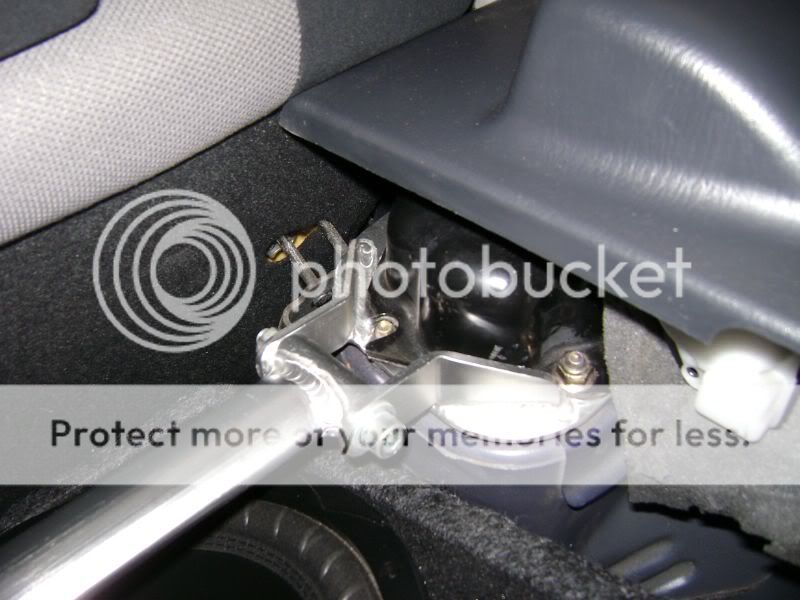
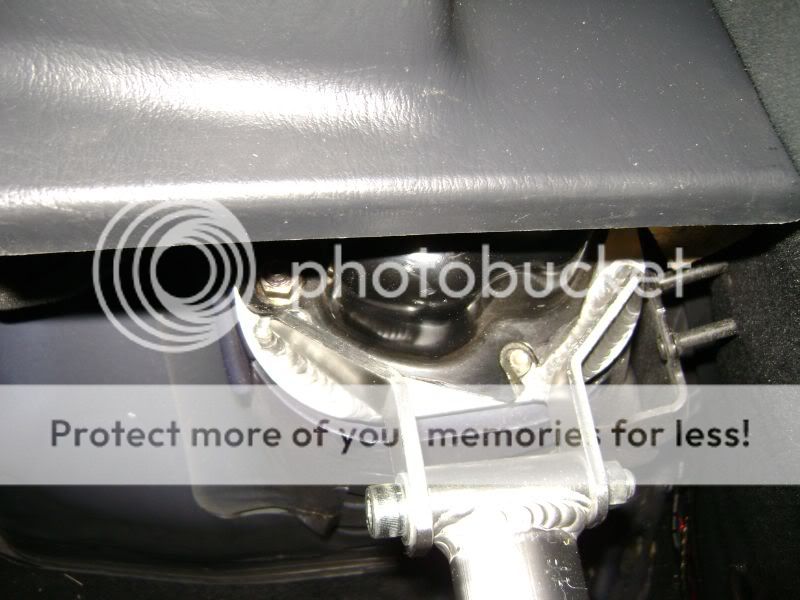
Bit the bullet & installed the strut brace this afternoon, took no longer then 15mins to disassemble the interior plastics, and another hour marking & cutting the seat belt towers to fit. Due to the beaded weld of the AutoExe's bracket construction, cutting was the only option.
Verdict? $140 well spent makes a substantial difference in cornering at 60km/h, makes it a lot more rigid...
Pics:
from the back

RHS bracket
LHS bracket
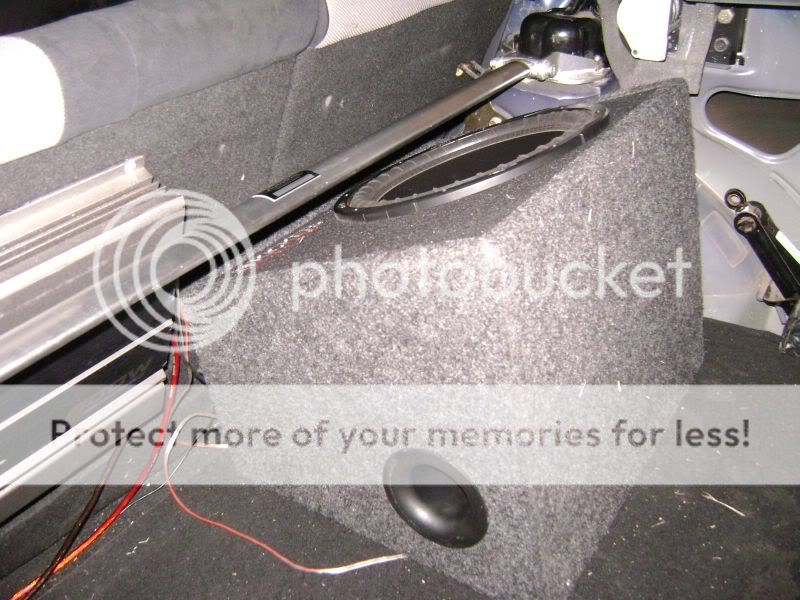
how the sub sits now
Going to be cutting the interior plastics on Monday afternoon, didnt have time this afternoon. Will update once done.
Verdict? $140 well spent
makes a substantial difference in cornering at 60km/h, makes it a lot more rigid...Pics:
from the back
RHS bracket
LHS bracket
how the sub sits now
Going to be cutting the interior plastics on Monday afternoon, didnt have time this afternoon. Will update once done.
ill be doing a full suspension install today (springs, strust, endlinks, rear sway bar) so wish me luck. with my history of me installing things on my car, i will need it.
by yourself?
I've been there done that,
will offer beer to strangers,
to help me next time.
Rockin03mp5
Member
- :
- '13 Mazda3 / '13 Edge / Your Mom
Yea I do. I'm off to the midnight showing of District 9 though so I'll do it tomorrow. Or maybe post it in the photoshop request thread and someone gets to it before me.
?
or should i just go to the photoshop thread... i just dont know if they will have the right idea
Fixed medieval crank pulley
Fixed my medieval crank pulley today. It is the V1 that had the bad little screws holding the crank timing plate on. They sheered off under load, and I found out just how well the FS-DE runs when it doesn't know where the crank is (it doesn't...). So today, I fixed it.
This is what it looked like with the screws sheered:

I drilled out one of the holes, and tapped it:

Inserted a helicoil for more even thread pressue distribution, and better bite into the aluminum:

A 1/4 x 20 grade 8 bolt fits nicely now:

I was going to reuse all four holes, but had a hard time drilling out those little screws. So instead I went to a triangular pattern and braised in some aluminum to fill the little holes:

Another shot of the fixed pulley:

With the timing plate bolted back on. I don't think my engine has enough torque to bust three 1/4 x 20 grade 8 bolts:

I will probably have to either switch to a pan head bolt, or grind down the top of these bolts for clearance issues, though. Anyway- I can't wait to get it installed back on the engine...
Fixed my medieval crank pulley today. It is the V1 that had the bad little screws holding the crank timing plate on. They sheered off under load, and I found out just how well the FS-DE runs when it doesn't know where the crank is (it doesn't...). So today, I fixed it.
This is what it looked like with the screws sheered:
I drilled out one of the holes, and tapped it:
Inserted a helicoil for more even thread pressue distribution, and better bite into the aluminum:
A 1/4 x 20 grade 8 bolt fits nicely now:
I was going to reuse all four holes, but had a hard time drilling out those little screws. So instead I went to a triangular pattern and braised in some aluminum to fill the little holes:
Another shot of the fixed pulley:
With the timing plate bolted back on. I don't think my engine has enough torque to bust three 1/4 x 20 grade 8 bolts:
I will probably have to either switch to a pan head bolt, or grind down the top of these bolts for clearance issues, though. Anyway- I can't wait to get it installed back on the engine...
Fixed my medieval crank pulley today. It is the V1 that had the bad little screws holding the crank timing plate on. They sheered off under load, and I found out just how well the FS-DE runs when it doesn't know where the crank is (it doesn't...). So today, I fixed it.
Nice job on the DIY fix, looks better than the original for sure
- :
- 92 & 16 Meyatas
+1 on the fix!
- :
- 03.5 YLW MSP
Nice fix man! How did you ensure that it stayed balanced? I would be afriad of getting that s*** out of balance and tear something up once installed.
found out my steering creaking is because of the front sway bar
Do you know why its creaking? I have the same thing going on right now thats why.
^^ im not exactly sure why... prob because of the bushings... but i hit a bad bump while driving and it was after that... but its either i bent the sway bar or the bushings went out...all i did to make sure it was the sway is dissconnect the endlinks from the front and rotate the wheel around...no sounds...
'
no only did i do that today... i tried to do a compression test... i do the first two 180 for both... but when trying to get the hose out from the cylinder..it got stuck.. and the hose came off.. so i was left with a fitting stuck in my engine...couldnt get it out..cause it was so far down.. pliers didnt work...nothing did... so i put super glue on the hose and put it back on the fitting...let it sit... and was able to screw out the fitting... took 4 hours... and i was freakin out the whole time... piece of shyt compressor tester from autozone loan tolls... shyt broke in my car man!!
no i didnt finish the compressor tets.. i just assume its 180 across the board...(prob do one later)
- :
- 03.5 YLW MSP
lol @ loaner tool breaking. That sucks that it broke off in your car. Thankfully you got it out with super glue!
Edit: How did you do the compression test... obvious you took out the spark plugs and put the tester in.
Edit: How did you do the compression test... obvious you took out the spark plugs and put the tester in.
Nice job on the DIY fix, looks better than the original for sure
Thank you! I can't believe how small the original screws were. Then again, I also can't believe that our little engines (omitting yours, aMaff) had enough acceleration to put that kind of stress on those little screws. Goes to show that over engineering is always better, I guess...
Nice fix man! How did you ensure that it stayed balanced? I would be afriad of getting that s*** out of balance and tear something up once installed.
For the most part, I'm not able to ensure that it stayed balanced. To be honest though, I remember looking at the original (before it broke) and thinking that the timing plate wasn't perfectly centered... For me, I centered the plate and measured at three locations to check how far the teeth were sticking out. That's about the best I could think to do. Also, since it was really tough to drill out the broken steel bolts in an aluminum pulley (the drill bit kept creeping) I was left with odd sized holes. Not that big of holes- 5/64", but big enough that I felt like it might affect the balance. This is why I filled them with alumaweld.
I'll be installing it tomorrow morning!
I did just realize, though, that a Craftsman 22mm socket just happens to fit in the hole on the pulley. So using a large fender washer, a long carriage bolt, and the socket- I was able to chuck the pulley into my drill and spin it up to 2500rpm. Seemed very stable and balanced all the way up to that speed...
I did record a video of the test, and uploaded to youtube:
http://www.youtube.com/watch?v=UVkp-I0XsSk
I did record a video of the test, and uploaded to youtube:
http://www.youtube.com/watch?v=UVkp-I0XsSk
- :
- 03.5 YLW MSP
i traded in the Failibure in since it's front tires were totally bald, in for whatever was on the lot.
So, i'm rollin in a new Sebring convertable.
eww a sebring....traitor!
I did just realize, though, that a Craftsman 22mm socket just happens to fit in the hole on the pulley. So using a large fender washer, a long carriage bolt, and the socket- I was able to chuck the pulley into my drill and spin it up to 2500rpm. Seemed very stable and balanced all the way up to that speed...
I did record a video of the test, and uploaded to youtube:
http://www.youtube.com/watch?v=UVkp-I0XsSk
remind me to watch after the video has been processed.(nervous)
remind me to watch after the video has been processed.(nervous)
Yeah, it's taking a while. Could be because it was uploaded to YT in 720p... ha!
Similar threads
- Replies
- 28
- Views
- 9K