
You are using an out of date browser. It may not display this or other websites correctly.
You should upgrade or use an alternative browser.
You should upgrade or use an alternative browser.
New AA \ ACP Thread (with Poll)
- Thread starter 7eregrine
- Start date
- Status
- Not open for further replies.
Someone here in Oz land posted this on Facebook - New Zealand pricing for full install of either Android Auto or Apple Car Play:

Converted to Australian dollars is $451.72
Converted to United States dollars is $321.39
Let's see if Mazda Australia's official pricing is close to this mark
Converted to Australian dollars is $451.72
Converted to United States dollars is $321.39
Let's see if Mazda Australia's official pricing is close to this mark
- :
- 2017 CX-5 GT AWD
I believe with CP it*s still supposed to work when stopped.
Yeah, you may be right on that. That would fit with the rest of Mazda Connect. Sorry if i got off track.
7eregrine
The man, the myth, the legend
- :
- Land of Cleve
- :
- 2016.5 CX5
When the 19s are released.Any update on when dealerships in the USA will start installing? I hear later 2018 but just hoping somebody knows a date.
For the 10th time.
And that's just a good guess. No one knows for sure.
[emoji16]
another CP-AA successful installation
Forum newbie (but have been reading about CP/AA threads for awhile))...first post detailing my recent successful installation of CP/AA on my 2018 CX-5 GT...just this past Friday night (into Saturday morning)
Ordering parts and Firmware update
- I got the kit in record time. I ordered it at 10:50am this past Wednesday, quickly got a response from MazdaPartsTaxi (https://www.mazdapartstaxi.com) asking for a VIN and shortly after I provided them with one, they processed and shipped my order. I received it via UPS ground this past Friday early afternoon.
- I found MazdaPartsTaxi by Googling for the kit model number (0000-8F-Z34). Actually, I first ordered one with them on October 5th but my credit card thought it was a fraudulent transaction and prevented that first try from succeeding. I then found another site with another great price, RussellSmith & Parts, and proceeded to order it from them. Unfortunately, this outfit had terrible customer service and, similar to others experience in the forum with various dealerships, was only met with silence (until I contacted them days later). I re-ordered with MazdaPartsTaxi when I saw that the pending transaction with RussellSmith in my cc disappeared and was ecstatic they came through and very quickly at that! The best part is that it cost around ONLY $160 !!!
The firmware update completed for me within 25/26 minutes...was pleasantly surprised (vs. 40-min guidance). I installed cmu150_NA_70.00.100A.
- For all Mac users, it is FINE using a Mac to prepare the USB stick. Just make sure you secure erase the flash drive (got this tip from https://www.quora.com/How-can-I-check-the-health-of-my-USB-key-on-Mac). I did a 3-pass erase in MacOS Mojave and performed a checksum using the Terminal on both the copies of the .up files after I downloaded it AND after I copied it to the USB stick.
- I ordered an $8 trim kit (Anyyion Auto Panels Trim Removal Tool for Door Panel Removal Tools 8PCS(Red) ) from Amazon which helped in removing parts easily.
AUX Hub installation
- Ive never ever done anything like this and so I reviewed all the posts, videos, PDFs thoroughly and multiple times over the past couple of weeks. In fact, when I first read the post by ASH8 (Mazda3Revolution forum), I thought I would never do this. Also without the 23-min video (by Corbin) and other trim removal videos, I would have never had the guts to attempt this upgrade. However, the delay from Mazda was just getting too frustrating so I decided to take the plunge!
- My biggest fear did surface but, fortunately, I got through it. I was leery of getting all the parts put back properly. All the trims that had clips were removed and reassembled easily...just like Lego. BUT, I had trouble with the CMU/display because the left side didnt come off cleanly and, sure enough, I had a hell of a time putting it back. In between the 10mm bolt and the screw below it is a cylindrical plastic guide that is supposed to go in a hole. That guide wouldnt go in cleanly because there is a part in the way (part of the instrument cluster trim). I finally figured that I have to insert it at an angle but that took quite some time and several tries. All in all, It took me 2.5 hours to perform the AUX Hub installation (slow and steady") )..and thats without the silly wrapping of the USB cables with foam tape which took forever (Mazda should have prepped the cables IMO).
)..and thats without the silly wrapping of the USB cables with foam tape which took forever (Mazda should have prepped the cables IMO).
- With regards to removing the negative terminal for the battery, the nut is the same size, 10mm, as the CMU/Display bolt so might as well remove it to be risk free.
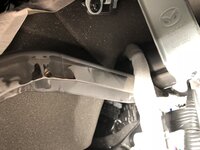
- As for snaking in the USB cable, I found it easier to start from the lower right-hand panel and pull the cable towards the console panel where it hooks up to the hub. Then, I took the other end (green & blue) and inserted them through a narrow hole (see pic) going up the CMU cables. The hole is so narrow that I had to insert them one at a time.
Forum newbie (but have been reading about CP/AA threads for awhile))...first post detailing my recent successful installation of CP/AA on my 2018 CX-5 GT...just this past Friday night (into Saturday morning)
Ordering parts and Firmware update
- I got the kit in record time. I ordered it at 10:50am this past Wednesday, quickly got a response from MazdaPartsTaxi (https://www.mazdapartstaxi.com) asking for a VIN and shortly after I provided them with one, they processed and shipped my order. I received it via UPS ground this past Friday early afternoon.
- I found MazdaPartsTaxi by Googling for the kit model number (0000-8F-Z34). Actually, I first ordered one with them on October 5th but my credit card thought it was a fraudulent transaction and prevented that first try from succeeding. I then found another site with another great price, RussellSmith & Parts, and proceeded to order it from them. Unfortunately, this outfit had terrible customer service and, similar to others experience in the forum with various dealerships, was only met with silence (until I contacted them days later). I re-ordered with MazdaPartsTaxi when I saw that the pending transaction with RussellSmith in my cc disappeared and was ecstatic they came through and very quickly at that! The best part is that it cost around ONLY $160 !!!
The firmware update completed for me within 25/26 minutes...was pleasantly surprised (vs. 40-min guidance). I installed cmu150_NA_70.00.100A.
- For all Mac users, it is FINE using a Mac to prepare the USB stick. Just make sure you secure erase the flash drive (got this tip from https://www.quora.com/How-can-I-check-the-health-of-my-USB-key-on-Mac). I did a 3-pass erase in MacOS Mojave and performed a checksum using the Terminal on both the copies of the .up files after I downloaded it AND after I copied it to the USB stick.
- I ordered an $8 trim kit (Anyyion Auto Panels Trim Removal Tool for Door Panel Removal Tools 8PCS(Red) ) from Amazon which helped in removing parts easily.
AUX Hub installation
- Ive never ever done anything like this and so I reviewed all the posts, videos, PDFs thoroughly and multiple times over the past couple of weeks. In fact, when I first read the post by ASH8 (Mazda3Revolution forum), I thought I would never do this. Also without the 23-min video (by Corbin) and other trim removal videos, I would have never had the guts to attempt this upgrade. However, the delay from Mazda was just getting too frustrating so I decided to take the plunge!
- My biggest fear did surface but, fortunately, I got through it. I was leery of getting all the parts put back properly. All the trims that had clips were removed and reassembled easily...just like Lego. BUT, I had trouble with the CMU/display because the left side didnt come off cleanly and, sure enough, I had a hell of a time putting it back. In between the 10mm bolt and the screw below it is a cylindrical plastic guide that is supposed to go in a hole. That guide wouldnt go in cleanly because there is a part in the way (part of the instrument cluster trim). I finally figured that I have to insert it at an angle but that took quite some time and several tries. All in all, It took me 2.5 hours to perform the AUX Hub installation (slow and steady
)..and thats without the silly wrapping of the USB cables with foam tape which took forever (Mazda should have prepped the cables IMO).- With regards to removing the negative terminal for the battery, the nut is the same size, 10mm, as the CMU/Display bolt so might as well remove it to be risk free.
- As for snaking in the USB cable, I found it easier to start from the lower right-hand panel and pull the cable towards the console panel where it hooks up to the hub. Then, I took the other end (green & blue) and inserted them through a narrow hole (see pic) going up the CMU cables. The hole is so narrow that I had to insert them one at a time.
Attachments
Last edited:
- :
- 18 CX-5
What apps are included as part of carplay? Google Maps? Spotify?
- :
- 2017 CX-5 GT AWD
What apps are included as part of carplay? Google Maps? Spotify?
Carplay has no apps - basically it mirrors what is on the phone in a car friendly format. Not all apps, only ones approved by apple or Android to be available in the car.
New version of Apple IOS supports google maps and waze in carplay, but you install on the phone. I am not sure about spotify or other streaming apps as i don't use them.
- :
- Canada
ACP and AA are interfaces. They allow compatible apps to be mirrored to your infotainment system, as alphadog00 explained. Apps that are not compatible will not be available via the interface, but you can still use them on your phone.
Is there a list or so where you can see what apps are compatible?
Mainly interested to see if there is any Geocaching app that works with ACP. (probably the only reason why I would get ACP installed)
Here ya go, all the apps which work with Android Auto: https://play.google.com/store/apps/collection/promotion_3001303_android_auto_all
Is there a list or so where you can see what apps are compatible?
Mainly interested to see if there is any Geocaching app that works with ACP. (probably the only reason why I would get ACP installed)
https://www.digitaltrends.com/mobile/best-carplay-apps/
All you have to do is google list of CarPlay compatible apps
Bingo.
Thanks sjtilney.
As I expected... mainly music apps but no geocaching apps.
True, but there are Geocaching apps on Android as well and since they don't show up on the list sjtilney presented, it gives me a good indication that they will probably not be on the ACP list either.
Have no fear, I know how to Google.
Problem is there seem to be different lists. A lot of "best apps for ACP" sort of lists and no real complete ones.
As an example... The website in your link mentions Deezer as an app.
Looking at a list on the Apple website https://www.apple.com/ios/carplay/ I don't see Deezer in the list they have.
As I expected... mainly music apps but no geocaching apps.
He wants an ACP list.
True, but there are Geocaching apps on Android as well and since they don't show up on the list sjtilney presented, it gives me a good indication that they will probably not be on the ACP list either.
https://www.digitaltrends.com/mobile/best-carplay-apps/
All you have to do is google *list of CarPlay compatible apps*
Bingo.
Have no fear, I know how to Google.
Problem is there seem to be different lists. A lot of "best apps for ACP" sort of lists and no real complete ones.
As an example... The website in your link mentions Deezer as an app.
Looking at a list on the Apple website https://www.apple.com/ios/carplay/ I don't see Deezer in the list they have.
- Status
- Not open for further replies.
Similar threads
- Replies
- 7
- Views
- 3K