I agree. Im betting its a vacuum leak. Just bring it back. I wouldnt have left the parking lot without having it addressed myself.

You are using an out of date browser. It may not display this or other websites correctly.
You should upgrade or use an alternative browser.
You should upgrade or use an alternative browser.
2007~2015 How to get to the CX-9 spark plugs?
- Thread starter chumanji9
- Start date
Man, I got to tell you reading about how this engine is shoe-horned in, really bothers me. I just got a 2014 CX9 but also have a 2005 ML350 which is not really none for their reliability, but with a conventional north to south engine design, repairs are pretty easy. I did the water pump at about 80K in about 2 hours and $25 dollars for an autozone type part. Havent done the plus yet (with 120,000), but no manifold removal will be necessary...
Oh and by the way, I'm pretty sure you HAVE to do the plugs on the CX9 yourself. I guarantee 90 of the crooks out there will just do the ones they can access and be done with them...how are you going to know?
Watch them (boom03)
While changing oil, I decided to tackle the spark plugs. Our 2007 is at 102350 miles. The plug gaps had eroded down to almost double the factory spec. But besides being worn the plugs showed normal wear, so that was a plus. Thanks to everyone who helped with this thread, it helped! I'm glad I took the time to change them.
Just to add to this. I did my wife's CX9 last night. Took about 2.5hrs total including a wipe down of the engine compartment. The plugs looked good, just old @ ~110K miles. I did find that the dealer that my wife had the car at a few months back didn't re-install the air filter correctly or install the cover correctly either. The filter was installed with some of the pleats bent over, which prevented the filter from fully seating. This, in turn, prevented the cover from being installed and they never latched the cover on either. I knew the engine sounded different(intake "drone") when she got it back, now I know why.
I just did the spark plug change today using the instructions posted here - thanks to all previous posters. In the spirit of paying it forward, here is my contribution.
I have a 2009 CX-9 with the 3.7L Duratec, 90k miles and original plugs. For the last 10k miles, the car has been occasionally stuttering at low rpm (1500 rpm) in higher gears, but I wasn’t sure if it was a transmission issue or engine issue. Last week however I started more regularly getting a steady blinking CEL, indicating a misfire.
Job took about 2.5 hrs start to finish, with a helper. First time doing plugs for either of us, but I am generally comfortable doing regular maintenance myself (oil changes, brakes, etc). The old plugs were evenly worn to about 0.075”, so definitely overdue for a change, but did not have any specific defects/issues. No further misfire issues with new plugs installed.
Not a very challenging job, even for a first timer, as long as you have the right tools and are somewhat methodical and careful in your procedure. You just need to keep track of what you disconnect from i) the air intake tube and ii) intake manifold before each section is removed, so you know what to reconnect. It also helps to have a helper to help you keep track of stuff and for some extra hands when working, especially to jimmy the intake out.
Here are the parts/tools I would recommend you have on hand to do this job:
Parts:
- 6 spark plugs: I used OEM motorcraft platinum plugs (part # ZZJ1-18-110, about $6 each). Pootietang above says they don’t come pre-gapped, but each of mine were close to ~.055, so I didn't need to adjust them.
- 3 intake plenum gaskets: Part # CY01-13-135, about $2 each. My old ones were in good shape, but I changed anyway.
- Dielectric grease to squeeze into ignition coils before reinstalling on top of new plugs.
Tools necessary/recommended:
- Sockets: obviously you need a socket wrench with 8mm and 10mm sockets, and very helpful to have a couple of extension and joints for some of the lengths/angles involved. If you don’t have this already you can pick up a small set like this: http://www.sears.com/craftsman-10-pc-accessory-set/p-00942351000P?prdNo=24&blockNo=24&blockType=G24
- Spark plug socket: Standard ⅝”” size
- Cat claw: This is very helpful for removing the pins/clips holding down the hoses across the intake, and for removing the ignition coils from the plugs (the tool slides into the horizontal slits on the coil). Something like this works: http://www.sears.com/unique-bargain...-SPM7784242923?prdNo=6&blockNo=6&blockType=G6
- Torque wrench that measures in inch-lbs. This will likely run you at least $50 if you don’t have one, so try to borrow one from a friend to save $$.
Basic steps:
Davicho’s directions above are the official steps, but you don’t need to actually know what any of those things actually are to do this job. There are 4 main goals in this job, and it’s mostly common sense as you work through it, especially if you’ve read pootietang’s tips above:
1) Disconnect and remove battery
- This isn’t in Davicho’s steps, but will help future steps to give you better access (see Pootietang’s note above)
- Note that removing the battery requires reprogramming memory seats, radio settings, and automatic windows. Automatic windows are reprogrammed by lowering the window, then raising the window and continuing to hold the button for a few seconds longer (there will be a small click noise).
2) Remove air intake tube
- Basically you want to remove the entire section between the air filter and the throttle body, in one piece
- This involves disconnecting a couple of hoses, one electrical connector, unfastening the two metal clips near the air filter, and loosening the bolt for the circular clamp on the throttle body
- I marked any hose or connector I removed with a large piece of blue painter’s tape, to ensure I didn’t forget to reinstall it later
- Side note: With the throttle body now exposed, you can use a throttle body cleaner to clean any carbon on it. Since the CX-9 has an electronic TB, I didn’t manually open the TB butterfly, in case it would throw off the electronic settings. Instead I just had a helper press down the gas pedal with the ignition “ON” (engine off), which opens the butterfly so you can spray it with the cleaner.
3) Remove intake plenum
- Remove any electrical connectors (e.g. on throttle body) and hoses noted above that connect to the plenum (I used painter’s tape here as well to not forget any hoses)
- Above the throttle body is a black part attached to the firewall that looks like a sprinkler head, with two hoses going into it (red and blue clips). Remove both hoses, then loosen the bolt that attaches the part to the firewall to move it out of the way. This gives the necessary clearance for the throttle body when removing the intake plenum+throttle body combo.
- Carefully pry up 3 plastic clips for the hose running across the plenum, using cat claw
- Remove 6 bolts holding down the plenum, and 2 additional support bracket bolts (one under throttle body, the other behind the plenum towards passenger compartment. The support bolt in the back loosens but isn’t fully removable.)
- Agree with the pootietang’s suggestions on back two hoses: 1) Driver’s side one (fishnet) should be tackled from other end near battery using his tip, and 2) Passenger’s side one should be disconnected (also from other end, not where it connects to intake plenum) at the end once you have the intake partially off and have more space
- As mentioned, blow away any loose debris before removing plenum and make sure to cover the intake manifold as soon as you can
4) Remove ignition coils and replace plugs
- Blow away any debris
- Use cat claw to remove coils
- Use dielectric grease between coils and plugs
Make sure to torque spark plugs and bolts for coils/plenum correctly when reinstalling, per Davicho’s post.
I reviewed the following reference videos/guides of this job on similar Duratec engines to orient myself before diving in:
http://www.bobistheoilguy.com/forums/ubbthreads.php/topics/2979127/DIY:_How_to_spark_plugs_2009_M
https://www.youtube.com/watch?v=FXuvVqOGwbU
https://www.youtube.com/watch?v=QES9mgex8cw
Hope this helps
Last edited:
I've been reading this thread with great interest since my wife's CX-9 hit 85K miles. My question to you guys is, did you notice a drop in throttle performance or gas mileage before you changed out the spark plugs? My wife's CX-9 just doesn't seem as peppy as it was when we bought it brand new, and the gas mileage has been declining...currently 14mpg in the city and 20mpg on the highway.
rollingstones
Member
- :
- 2011 Mazda CX-9 Grand Touring FWD
I've been reading this thread with great interest since my wife's CX-9 hit 85K miles. My question to you guys is, did you notice a drop in throttle performance or gas mileage before you changed out the spark plugs? My wife's CX-9 just doesn't seem as peppy as it was when we bought it brand new, and the gas mileage has been declining...currently 14mpg in the city and 20mpg on the highway.
I'm in the same boat. My wife's 2011 CX-9 is at about 88k miles, and the MPGs have been steadily dropping. I plan to do the plugs in the next month or so, as well as start a change of the transmission fluid as outlined in another thread.
I've been reading this thread with great interest since my wife's CX-9 hit 85K miles. My question to you guys is, did you notice a drop in throttle performance or gas mileage before you changed out the spark plugs? My wife's CX-9 just doesn't seem as peppy as it was when we bought it brand new, and the gas mileage has been declining...currently 14mpg in the city and 20mpg on the highway.
Yes, throttle performance had deteriorated significantly prior to spark plug change (even when engine wasn't misfiring). Much improved once spark plugs replaced. This is definitely your issue.
Changed Out my Spark Plugs
I really appreciate the information you guys provided on this thread. I changed the spark plugs on my wife's CX-9 this past weekend and took a little longer than expected. Just FYI, I purchased my replacement spark plugs from O'Reilly's (Motorcraft SP478) and here is my contribution to this thread. The SP478 that the O'Reilly's and Auto Zone's website spec for this SUV will not work. It sits about 2cm higher in the head vs. the OEM plugs because of the unthreaded portion bottoming out in the head (see circled portion of my picture). My ignition coil would not sit flush so I returned them for a set of NGKs, which were threaded all the way like the OEM plugs. Now my ignition coil sat flush with the top of the valve cover.
 View attachment 212459
Excluding the time spent figuring that out, it took my about 2.5 hours to complete the work. It wasn't all that difficult thanks to the inputs from several members here. My biggest issues were brittle plastic parts that cracked/broke during the removal process. Heck, even the flex loom on the wire harness that ran over the engine was disintegrating. My OEM plugs all looked good, color-wise, but the gap was around 0.070, which was beyond the .054 specified for this SUV.
So did changing the plugs help with throttle response and gas mileage? My seat-of-the-pants meter says it helped throttle response at the higher gears. Prior to the spark plug change, the CX-9 lugged a little and forced me to downshift to get going. Now it doesn't do that. Gas mileage didn't seem to improve but will check it at the next fill-up.
I really appreciate the information you guys provided on this thread. I changed the spark plugs on my wife's CX-9 this past weekend and took a little longer than expected. Just FYI, I purchased my replacement spark plugs from O'Reilly's (Motorcraft SP478) and here is my contribution to this thread. The SP478 that the O'Reilly's and Auto Zone's website spec for this SUV will not work. It sits about 2cm higher in the head vs. the OEM plugs because of the unthreaded portion bottoming out in the head (see circled portion of my picture). My ignition coil would not sit flush so I returned them for a set of NGKs, which were threaded all the way like the OEM plugs. Now my ignition coil sat flush with the top of the valve cover.
View attachment 212459Excluding the time spent figuring that out, it took my about 2.5 hours to complete the work. It wasn't all that difficult thanks to the inputs from several members here. My biggest issues were brittle plastic parts that cracked/broke during the removal process. Heck, even the flex loom on the wire harness that ran over the engine was disintegrating. My OEM plugs all looked good, color-wise, but the gap was around 0.070, which was beyond the .054 specified for this SUV.
So did changing the plugs help with throttle response and gas mileage? My seat-of-the-pants meter says it helped throttle response at the higher gears. Prior to the spark plug change, the CX-9 lugged a little and forced me to downshift to get going. Now it doesn't do that. Gas mileage didn't seem to improve but will check it at the next fill-up.
Last edited:
I really appreciate the information you guys provided on this thread. I changed the spark plugs on my wife's CX-9 this past weekend and took a little longer than expected. Just FYI, I purchased my replacement spark plugs from O'Reilly's (Motorcraft SP478) and here is my contribution to this thread. The SP478 that the O'Reilly's and Auto Zone's website spec for this SUV will not work. It sits about 2cm higher in the head vs. the OEM plugs because of the unthreaded portion bottoming out in the head (see circled portion of my picture). My ignition coil would not sit flush so I returned them for a set of NGKs, which were threaded all the way like the OEM plugs. Now my ignition coil sat flush with the top of the valve cover.
View attachment 212458View attachment 212459
Excluding the time spent figuring that out, it took my about 2.5 hours to complete the work. It wasn't all that difficult thanks to the inputs from several members here. My biggest issues were brittle plastic parts that cracked/broke during the removal process. Heck, even the flex loom on the wire harness that ran over the engine was disintegrating. My OEM plugs all looked good, color-wise, but the gap was around 0.070, which was beyond the .054 specified for this SUV.
So did changing the plugs help with throttle response and gas mileage? My seat-of-the-pants meter says it helped throttle response at the higher gears. Prior to the spark plug change, the CX-9 lugged a little and forced me to downshift to get going. Now it doesn't do that. Gas mileage didn't seem to improve but will check it at the next fill-up.
You know, that Motorcraft PN showed up in a few of my searches, but in the end, I went with the SP411. The SP478 I think is the double platinum, whereas the SP411 is just called platinum. For some reason, I avoided the SP478, but I cannot remember if that was due to the availability or if I found conflicting information about fit. At any rate, good to hear you accomplished the task despite the hiccup.
Regarding performance increase, I wasn’t able to tell the difference between old and new and I’m pretty sure my wife doesn’t. Just to brag(not really), my daily driver is a ’14 Explorer Sport with the 3.5 Ecoboost(365hp) so the 270hp CX9 doesn’t quite have the “pep” that I’ve gotten used to and I rarely drive her CX9 anyway, so performance changes aren’t obvious to me(unless it’s a wheel bearing or suspension related).
Regarding performance increase, I wasn’t able to tell the difference between old and new and I’m pretty sure my wife doesn’t. Just to brag(not really), my daily driver is a ’14 Explorer Sport with the 3.5 Ecoboost(365hp) so the 270hp CX9 doesn’t quite have the “pep” that I’ve gotten used to and I rarely drive her CX9 anyway, so performance changes aren’t obvious to me(unless it’s a wheel bearing or suspension related).
My wife and I will be in the market for an SUV replacement to the CX-9 in a couple of years and have been looking at the Audi SQ5 simply for its smaller size and more powerful engine. That is good to know about the Ecoboost Explorer and another data point to explore (no pun intended!).
Just replaced all spark plugs on my CX-9, NGK Iridium IX plugs.
Using the info on this forum, I replaced out my spark plugs on my 2009 CX-9 @ 110,161miles.
This was what I did...
1. Disconnect and remove battery. Put aside.
2. Undo oil filler cap. Put aside.
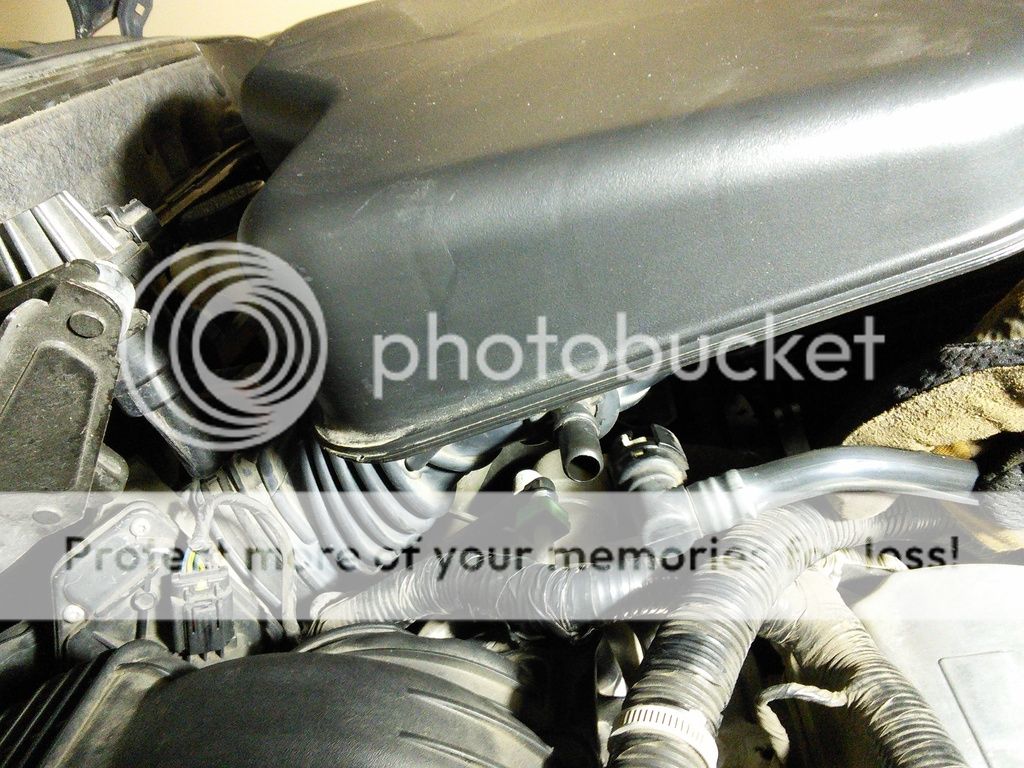
3. Holding engine cover on the top center position with one hand and near the oil filler with another hand, slowly pull out the cover – which is held by 2 rubber grommets at the top and the rubber ring at the oil filler pipe.

4. Place cover aside and re-secure oil filler cap.
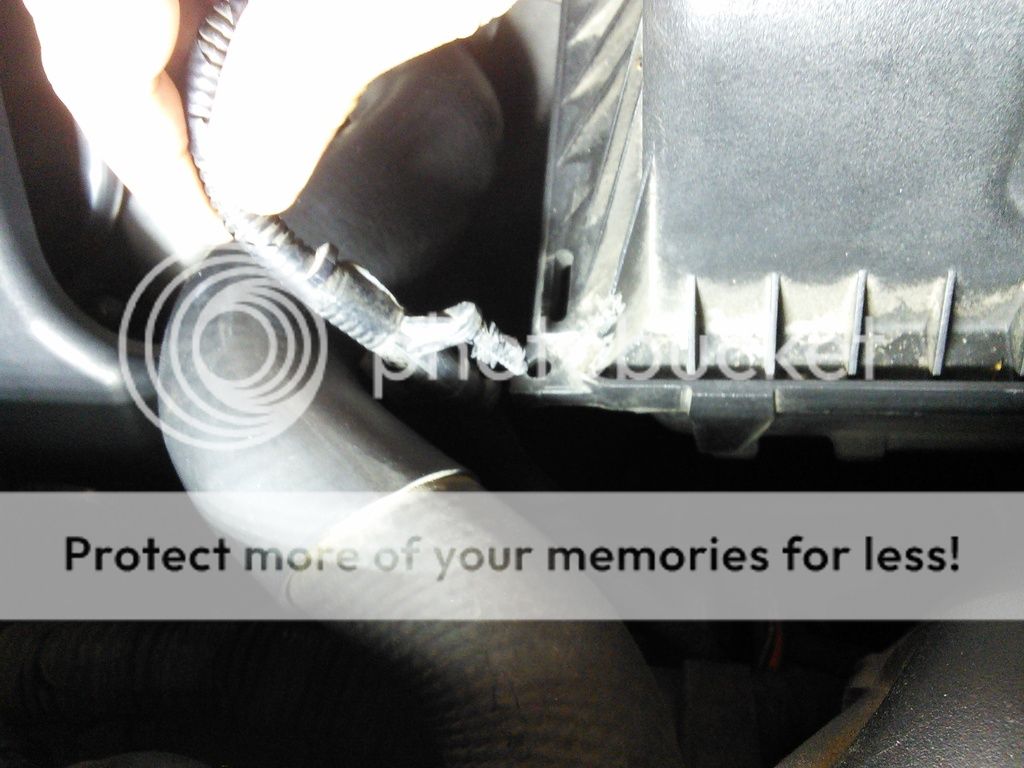
5. There is a rigid hose running next to the oil filler to the air filter housing assembly. Remove by pushing on white tabs sideways (identical on both ends of the hose). Put aside.

6. You may now start on the front bank of spark plug removal.
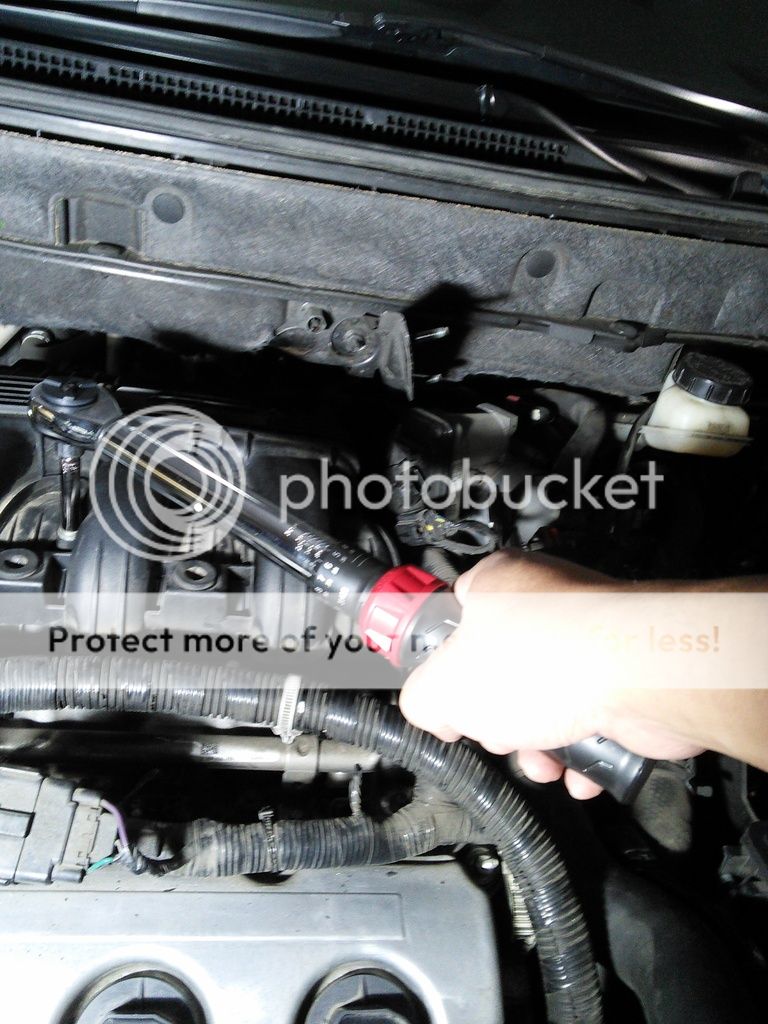
7. Use compressed air (or canned air if you don’t have a compressor) to blow away any loose dust/sand. If necessary, use a slightly damp rag to wipe down and blow again. This is to prevent any loose debris/dirt falling into the spark plug holes.
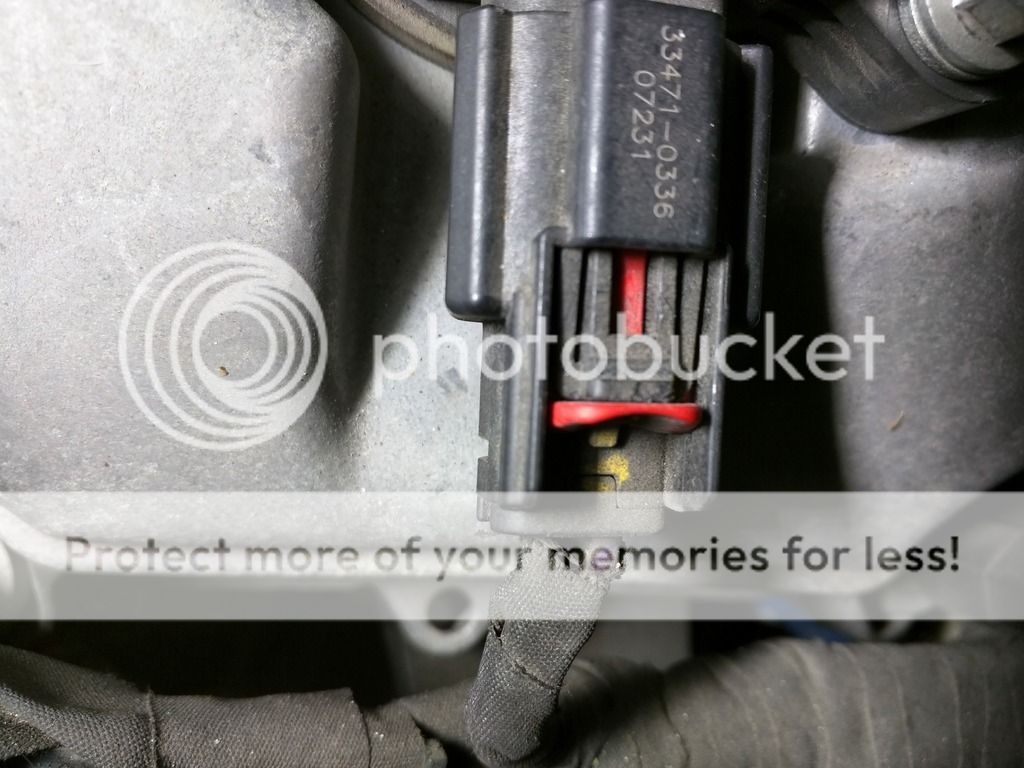
8. Undo spark plug electrical connectors. These are really fussy ones with double-locking feature. Slide out red tabs (these are easily broken, especially with age, take extra care). Once out, press down on black tabs and pull plugs out. I used a light tapping motion with a wide flat blade screwdriver to assist. This is a very important “learning” step because you will need to be good at this when you work on the rear bank of plugs.
9. Undo bolts on each coil. Slowly yank out the coils, use a big flat blade screw driver to assist in levering out gently.
10. Undo and remove spark plugs. (I remove one and immediately replaced it with a new one to minimize “exposure time” on each cylinder).
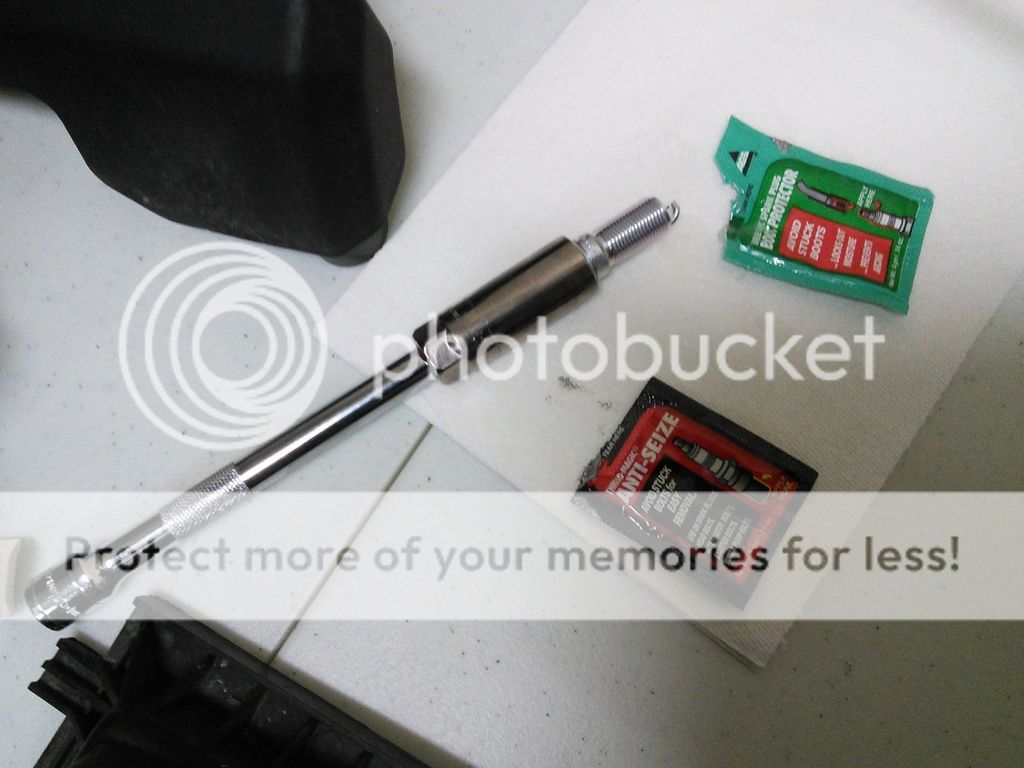
11. Lightly coat new spark plug body end with boot protector grease, and thread with anti-seize.
12. Screw in spark plug hand tight.
13. Use torque wrench, set to 133 pound-inch, tighten plug.
14. Reinstall coil, and bolt holding coil, at 89 pound-inch torque.
15. Repeat 2 more times for other 2 front plugs.
16. Now for the rear bank (complicated part)…
17. Removing air filter box cover:
a. Open air filter box, remove air filter, put aside.
b. Undo MAF sensor connector on air filter cover. Again, use extra care with those red tabs. If you break one, not the end of the world, it’s just a secondary lock.

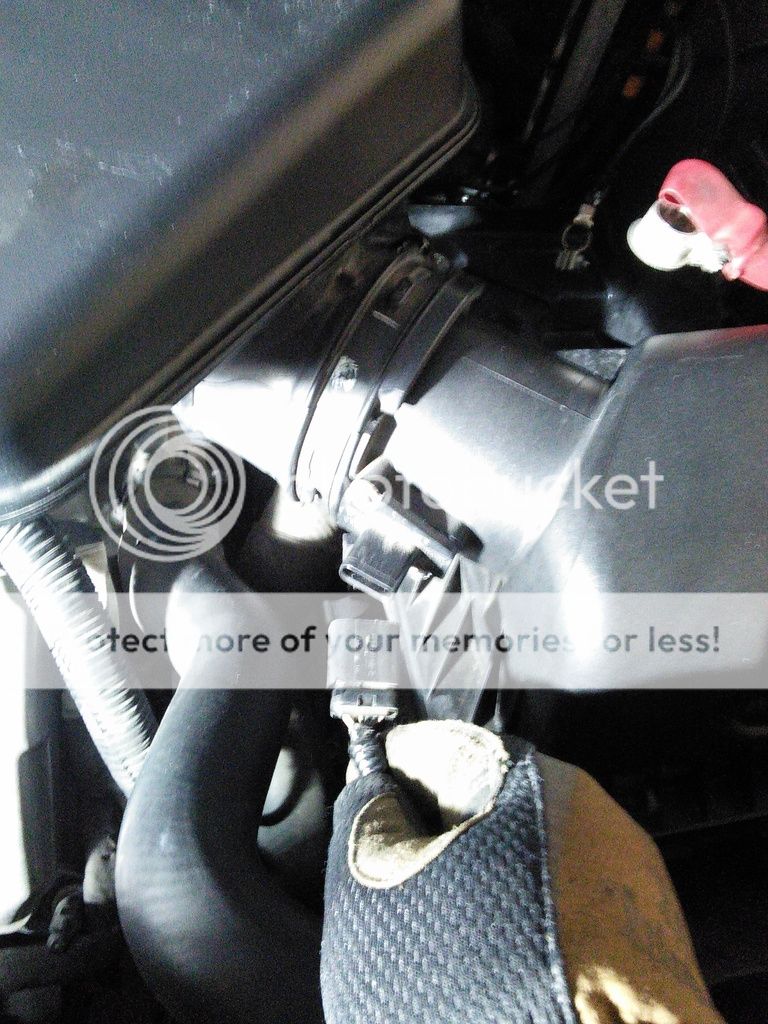
c. Undo jubilee clips that secures the big rubber air hose to the upper air intake assembly.
d. Undo wire harness clip on left corner of air box cover.
e. Slowly rotate out the filter box cover (back and forth motion). Put aside.
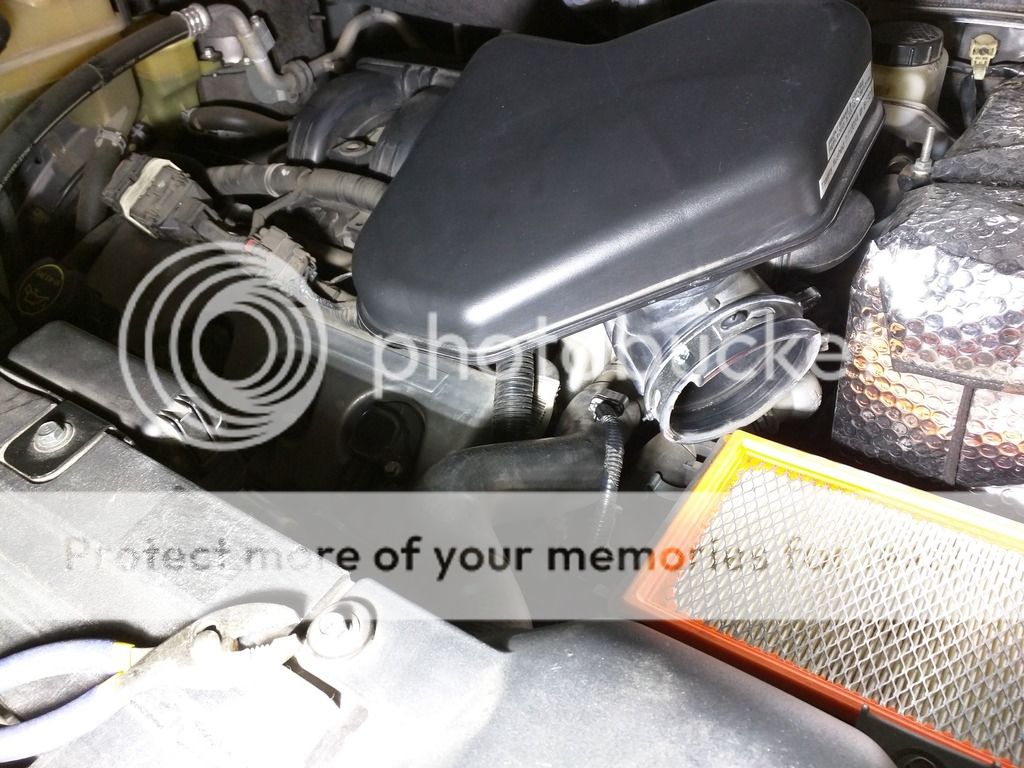
18. Removing air intake resonance chamber assembly (the one with the big triangular box).
a. Pull out small vacuum hose that attaches (just by friction) to the right side (with you facing engine) of the air filter upper assembly.

b. Undo jubilee clip securing big rubber upper air hose.
c. Slowly rotate out upper air intake assembly (back and forth motion). Put aside.
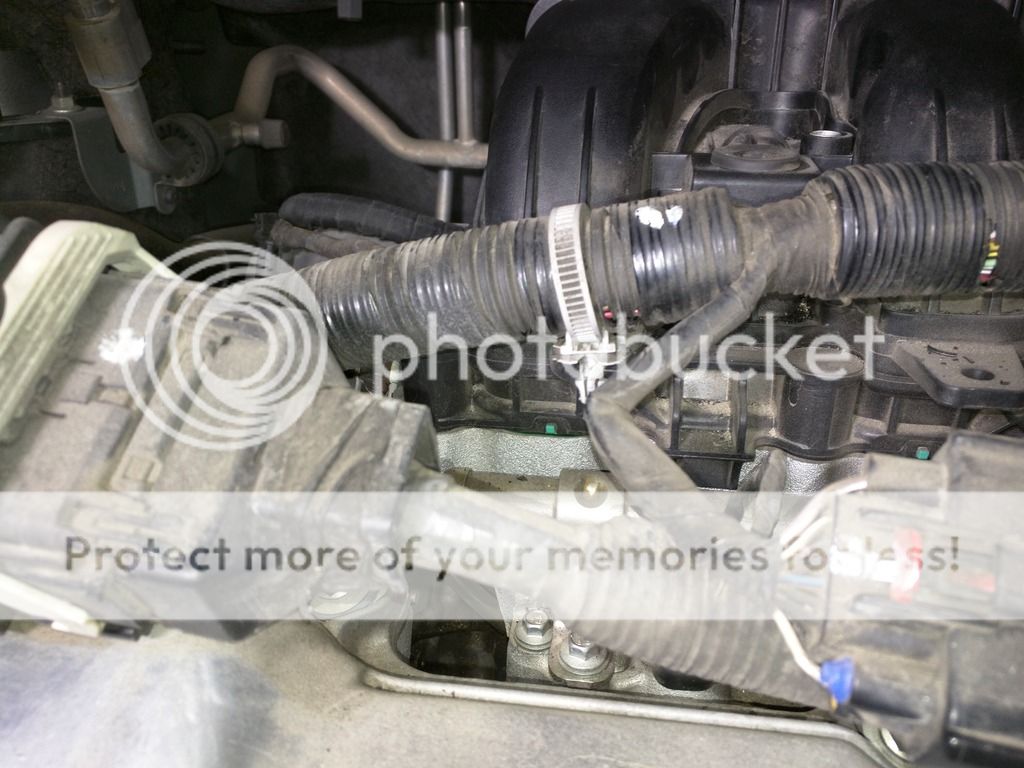
19. Undo bolt under throttle body.
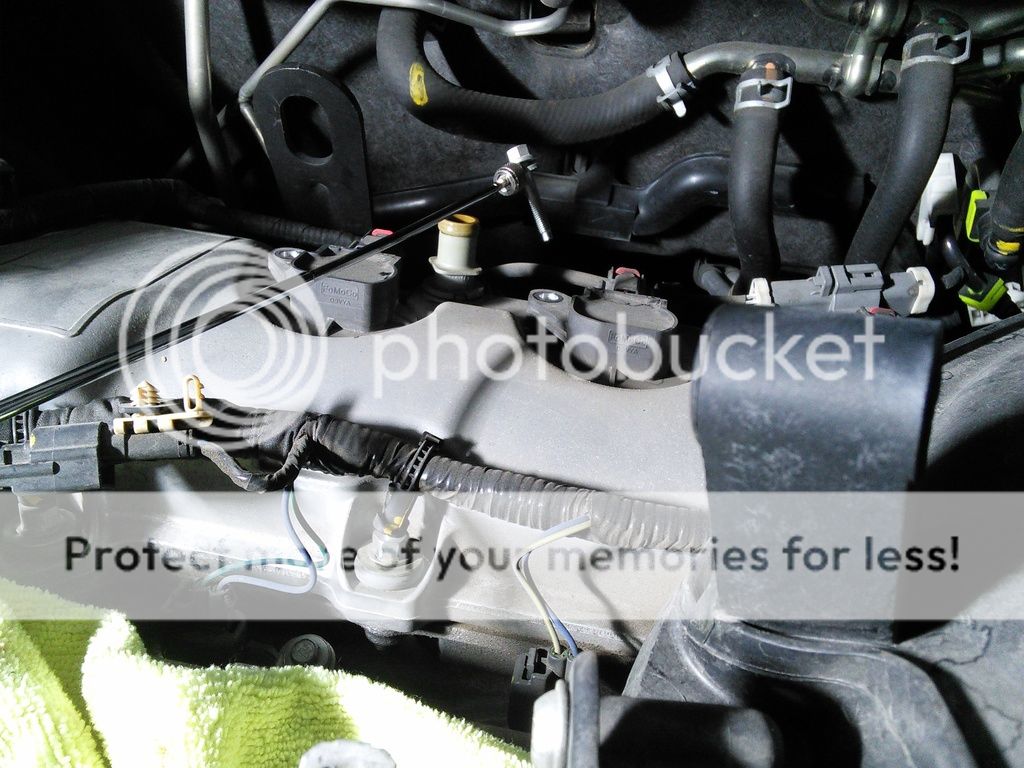
20. Undo valve sitting on top of engine (for access purposes) by undoing 2 nuts – due to the location of these nuts, be careful not to drop it down the engine, put magnetic pick up tool next to nut as you undo the nuts. Put nuts aside, take valve off brackets.
21. Undo bracket holding hose (with “fishnet stocking”) located on the firewall behind the battery:
a. Use a plier, pull out cable holder.
b. Undo black nut securing bracket. Put aside nut.
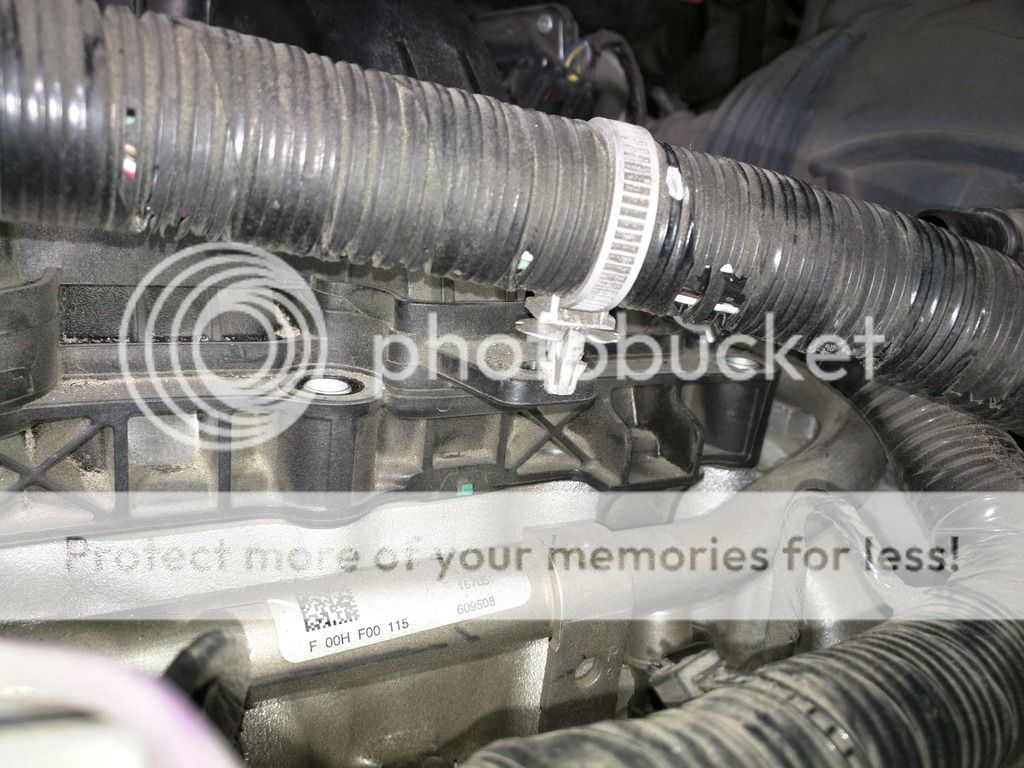
22. Undoing “fishnet stocking hose”.
a. Using a pair of pliers, grab spring hose clip (on the backside of bracket) that holds the “fishnet stocking hose” connected to intake manifold. Slide clip back by an inch or so.
b. Using a pair of pliers, grab on to hose gently and rotate out hose (back and forth motion).
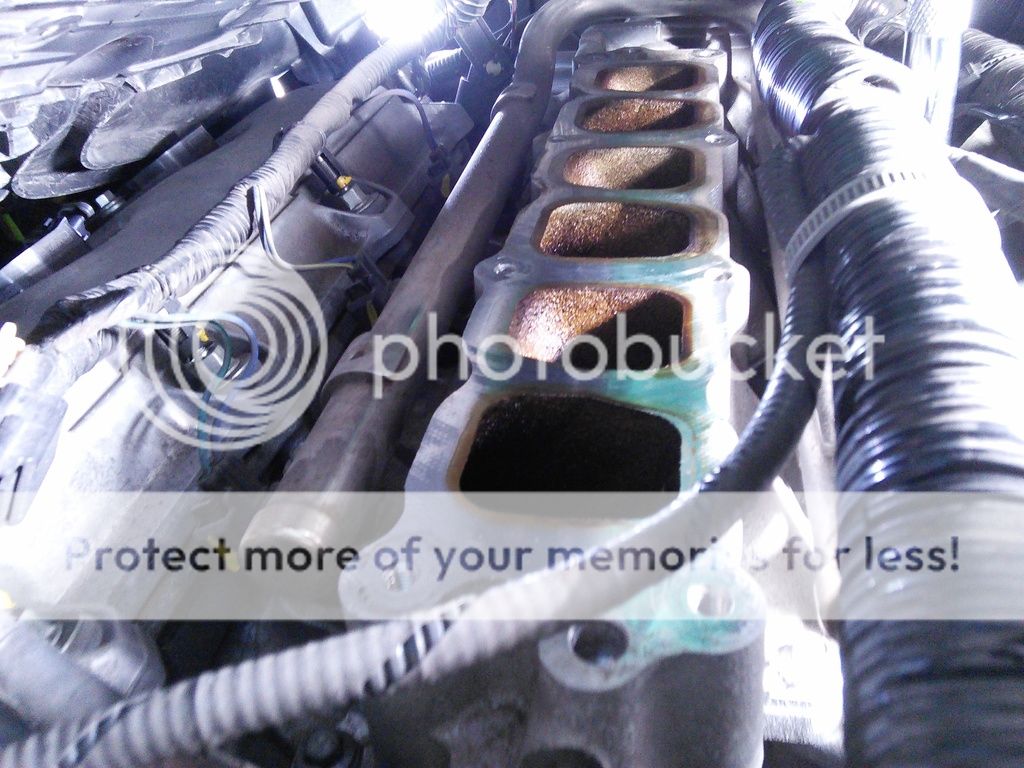
23. Undoing manifold:
a. Using a pair of needle nose plier, grab and compress 2 plastic expansion rivets that secures a wire harness to 2 points on the manifold. Pop them out.
b. Using a box cutter, slide under and cut electrical tape that secures a wire harness to the right corner of the manifold (you will need to re-tape this with new electrical tape later).

c. Undo 6 bolts holding the manifold. They are not all the same length, so put them aside in an orderly fashion so you know which is which.
d. Undo another electrical plug that connects to the throttle body – be careful not to break the red tabs.

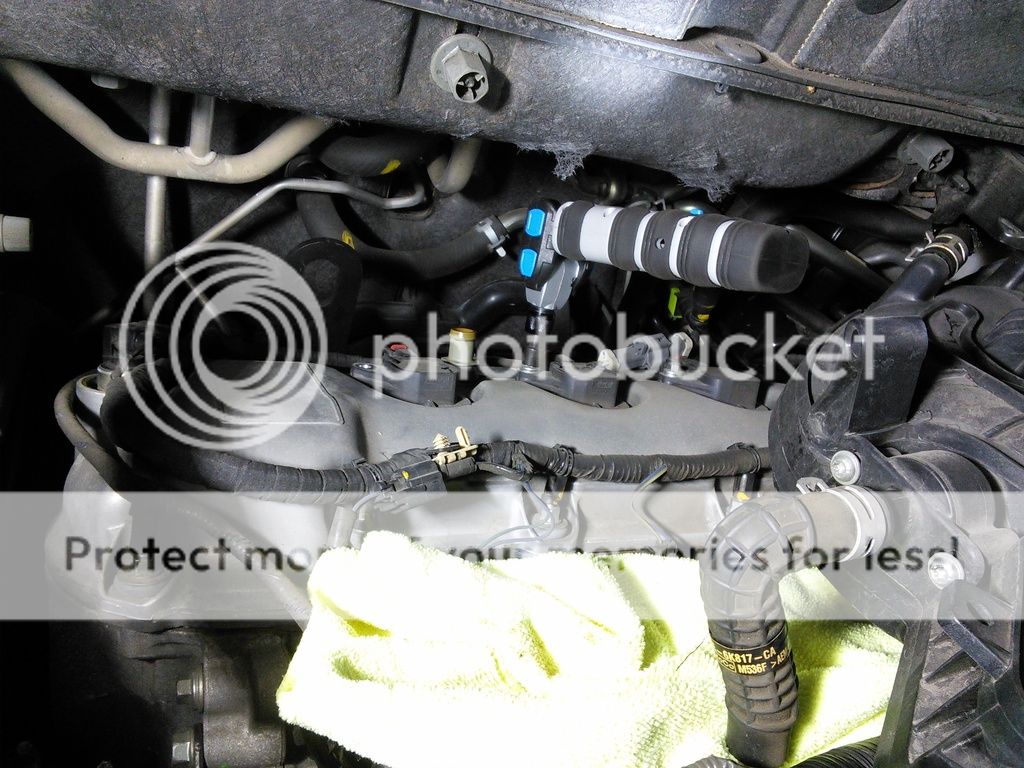
e. Grab manifold on the left side and with a quick yank, break the seal. You should now be able to partially lift up the manifold.
f. Take a clean microfiber towel, slide UNDER the manifold to cover the now exposed air intake channels. This is a safety step to prevent things accidentally dropping in.
g. Pulling on the left side of the manifold, slightly rotate assembly towards you, exposing a rubber hose at the back of the manifold that is connected to the engine.
h. With manifold partially rotated out, grab on to the rear hose and slowly disconnect it on the engine side.
i. Rear bank of spark plugs are now accessible.
24. Repeat steps 7-14 for rear bank of spark plugs. Your newly acquired knowledge from removing the front bank of plugs will be tested here as you need to lean into the engine to reach the rear bank. Be careful NOT to lean on the AC pipe that is located on the left side of the engine.

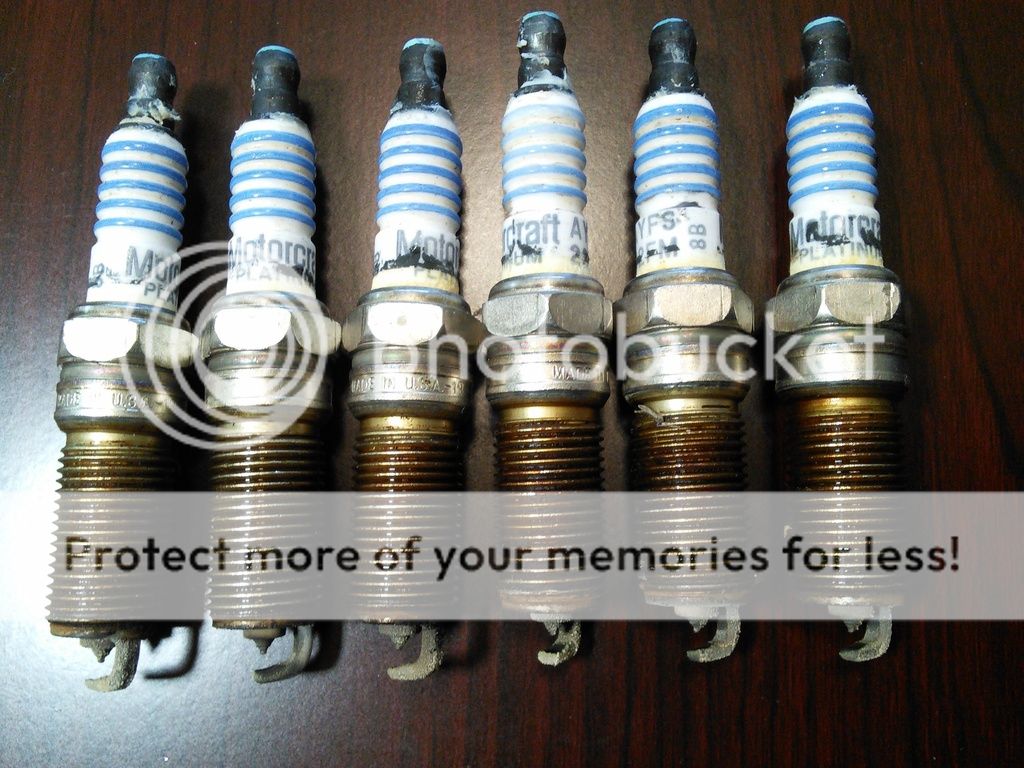
Your biggest challenge will be the plug on the rear right side. Use the magnetic pickup tool trick to avoid accidentally dropping the bolts.
My old plugs - they actually look okay for 110,161 miles!
25. Installing new gaskets:
a. Without the need to remove the upper manifold from the engine, prop up the manifold with a tool – I used a socket extension tool with a spark plug socket.
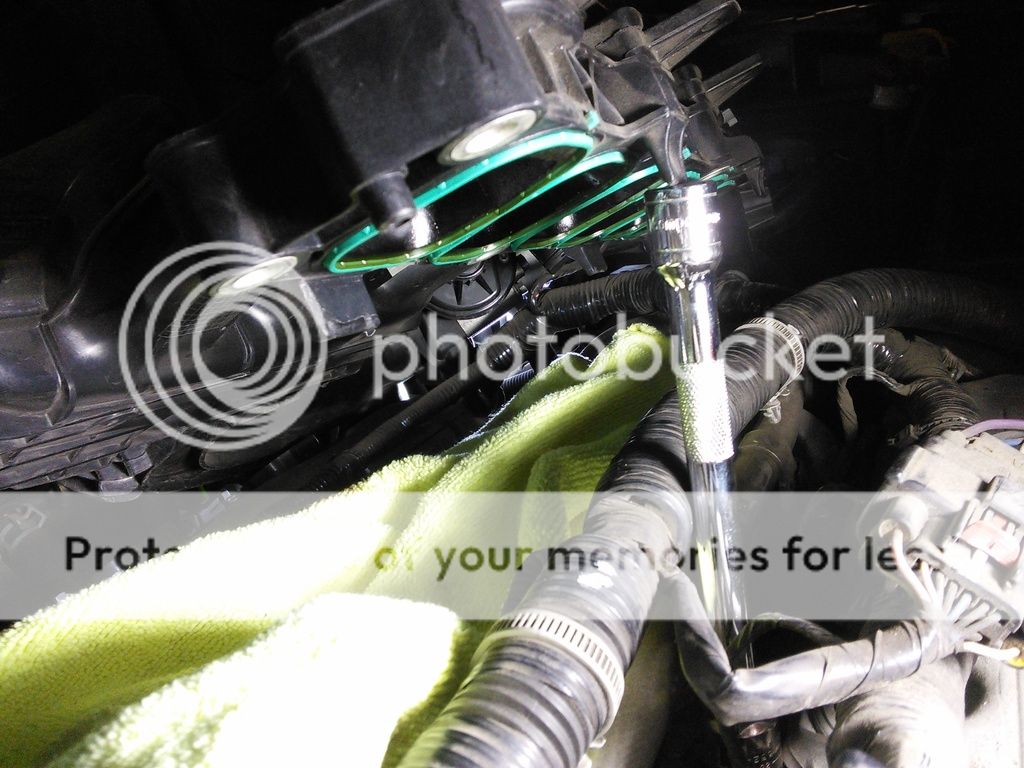
b. Using a pick, slowly remove old gaskets being careful not to scratch or damage other surfaces.
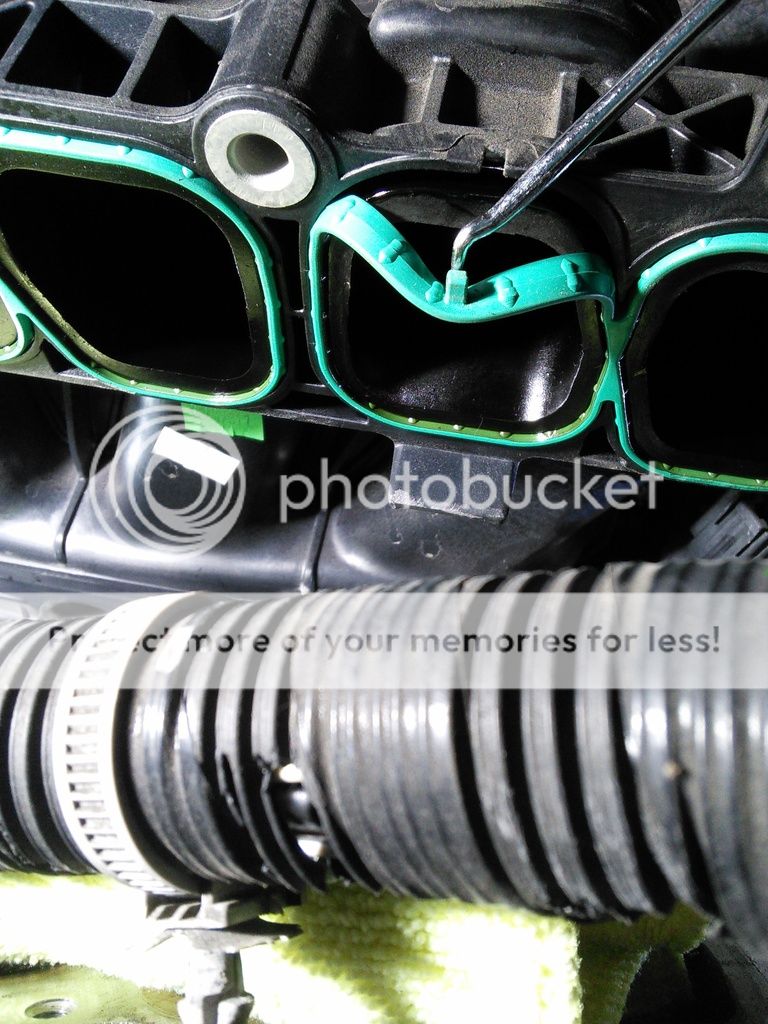

c. Using your bare fingers, install new gaskets, starting with the rubber “tab”, working slowly around the “8” figure.
d. Repeat 2 more times for the other gaskets.

26. Reinstall manifold:
a. Remove cloth covering the air inlet holes. Observe the mating surface (where the gaskets fit). I took the opportunity to clean it up a little by wiping with WD-40 and a microfiber towel.
b. Slowly rotate manifold back, but before rotating back fully, grab hold of the rear hose and re-insert to the hose fitting on the engine side.
c. Reposition “fishnet stocking hose” back to the original position.
d. Seat manifold properly, hand-tight screw in all 6 manifold bolts – paying attention which bolts goes to which hole.
e. Tighten bolts to 89 pound-inch – in the order: middle front, middle rear, left rear, left front, right rear, right front.
f. Reverse steps 20b to 17.
27. Finishing off
a. Reverse steps 5 to 1.
Hope this helps!
My car had no negative symptoms before, old spark plugs looked fine. I haven't pushed the car hard since putting the new plugs in. But it appears I'm the only one here opting to use NGK IridiumIX plugs. Will come back to report on performance differences (if any).
Thanks to other contributors on this forum for the info I've incorporated into this post.
Update: although I have no instruments to confirm this, but the CX-9 seemed more responsive now, especially going from 2800rpm-4000rpm. Might be psychological; who knows...
Using the info on this forum, I replaced out my spark plugs on my 2009 CX-9 @ 110,161miles.
This was what I did...
1. Disconnect and remove battery. Put aside.
2. Undo oil filler cap. Put aside.
3. Holding engine cover on the top center position with one hand and near the oil filler with another hand, slowly pull out the cover – which is held by 2 rubber grommets at the top and the rubber ring at the oil filler pipe.
4. Place cover aside and re-secure oil filler cap.
5. There is a rigid hose running next to the oil filler to the air filter housing assembly. Remove by pushing on white tabs sideways (identical on both ends of the hose). Put aside.
6. You may now start on the front bank of spark plug removal.
7. Use compressed air (or canned air if you don’t have a compressor) to blow away any loose dust/sand. If necessary, use a slightly damp rag to wipe down and blow again. This is to prevent any loose debris/dirt falling into the spark plug holes.
8. Undo spark plug electrical connectors. These are really fussy ones with double-locking feature. Slide out red tabs (these are easily broken, especially with age, take extra care). Once out, press down on black tabs and pull plugs out. I used a light tapping motion with a wide flat blade screwdriver to assist. This is a very important “learning” step because you will need to be good at this when you work on the rear bank of plugs.
9. Undo bolts on each coil. Slowly yank out the coils, use a big flat blade screw driver to assist in levering out gently.
10. Undo and remove spark plugs. (I remove one and immediately replaced it with a new one to minimize “exposure time” on each cylinder).
11. Lightly coat new spark plug body end with boot protector grease, and thread with anti-seize.
12. Screw in spark plug hand tight.
13. Use torque wrench, set to 133 pound-inch, tighten plug.
14. Reinstall coil, and bolt holding coil, at 89 pound-inch torque.
15. Repeat 2 more times for other 2 front plugs.
16. Now for the rear bank (complicated part)…
17. Removing air filter box cover:
a. Open air filter box, remove air filter, put aside.
b. Undo MAF sensor connector on air filter cover. Again, use extra care with those red tabs. If you break one, not the end of the world, it’s just a secondary lock.
c. Undo jubilee clips that secures the big rubber air hose to the upper air intake assembly.
d. Undo wire harness clip on left corner of air box cover.
e. Slowly rotate out the filter box cover (back and forth motion). Put aside.
18. Removing air intake resonance chamber assembly (the one with the big triangular box).
a. Pull out small vacuum hose that attaches (just by friction) to the right side (with you facing engine) of the air filter upper assembly.
b. Undo jubilee clip securing big rubber upper air hose.
c. Slowly rotate out upper air intake assembly (back and forth motion). Put aside.
19. Undo bolt under throttle body.
20. Undo valve sitting on top of engine (for access purposes) by undoing 2 nuts – due to the location of these nuts, be careful not to drop it down the engine, put magnetic pick up tool next to nut as you undo the nuts. Put nuts aside, take valve off brackets.
21. Undo bracket holding hose (with “fishnet stocking”) located on the firewall behind the battery:
a. Use a plier, pull out cable holder.
b. Undo black nut securing bracket. Put aside nut.
22. Undoing “fishnet stocking hose”.
a. Using a pair of pliers, grab spring hose clip (on the backside of bracket) that holds the “fishnet stocking hose” connected to intake manifold. Slide clip back by an inch or so.
b. Using a pair of pliers, grab on to hose gently and rotate out hose (back and forth motion).
23. Undoing manifold:
a. Using a pair of needle nose plier, grab and compress 2 plastic expansion rivets that secures a wire harness to 2 points on the manifold. Pop them out.
b. Using a box cutter, slide under and cut electrical tape that secures a wire harness to the right corner of the manifold (you will need to re-tape this with new electrical tape later).
c. Undo 6 bolts holding the manifold. They are not all the same length, so put them aside in an orderly fashion so you know which is which.
d. Undo another electrical plug that connects to the throttle body – be careful not to break the red tabs.
e. Grab manifold on the left side and with a quick yank, break the seal. You should now be able to partially lift up the manifold.
f. Take a clean microfiber towel, slide UNDER the manifold to cover the now exposed air intake channels. This is a safety step to prevent things accidentally dropping in.
g. Pulling on the left side of the manifold, slightly rotate assembly towards you, exposing a rubber hose at the back of the manifold that is connected to the engine.
h. With manifold partially rotated out, grab on to the rear hose and slowly disconnect it on the engine side.
i. Rear bank of spark plugs are now accessible.
24. Repeat steps 7-14 for rear bank of spark plugs. Your newly acquired knowledge from removing the front bank of plugs will be tested here as you need to lean into the engine to reach the rear bank. Be careful NOT to lean on the AC pipe that is located on the left side of the engine.
Your biggest challenge will be the plug on the rear right side. Use the magnetic pickup tool trick to avoid accidentally dropping the bolts.
My old plugs - they actually look okay for 110,161 miles!
25. Installing new gaskets:
a. Without the need to remove the upper manifold from the engine, prop up the manifold with a tool – I used a socket extension tool with a spark plug socket.
b. Using a pick, slowly remove old gaskets being careful not to scratch or damage other surfaces.
c. Using your bare fingers, install new gaskets, starting with the rubber “tab”, working slowly around the “8” figure.
d. Repeat 2 more times for the other gaskets.
26. Reinstall manifold:
a. Remove cloth covering the air inlet holes. Observe the mating surface (where the gaskets fit). I took the opportunity to clean it up a little by wiping with WD-40 and a microfiber towel.
b. Slowly rotate manifold back, but before rotating back fully, grab hold of the rear hose and re-insert to the hose fitting on the engine side.
c. Reposition “fishnet stocking hose” back to the original position.
d. Seat manifold properly, hand-tight screw in all 6 manifold bolts – paying attention which bolts goes to which hole.
e. Tighten bolts to 89 pound-inch – in the order: middle front, middle rear, left rear, left front, right rear, right front.
f. Reverse steps 20b to 17.
27. Finishing off
a. Reverse steps 5 to 1.
Hope this helps!
My car had no negative symptoms before, old spark plugs looked fine. I haven't pushed the car hard since putting the new plugs in. But it appears I'm the only one here opting to use NGK IridiumIX plugs. Will come back to report on performance differences (if any).
Thanks to other contributors on this forum for the info I've incorporated into this post.
Update: although I have no instruments to confirm this, but the CX-9 seemed more responsive now, especially going from 2800rpm-4000rpm. Might be psychological; who knows...
Last edited:
I just changed mine 2 weeks ago, at 60,000 Km spark plugs gaps over 1.6 mm (factory manual specs between 1.35 to 1.45 mm).
-If you experienced high fuel comsumption usage and lack of torque, you better check your spark plugs gap and replace them if their gaps bigger than 1.45mm.
-It's not as hard you though, compared to Toyota Camry V6 this much more easier.
-If you experienced high fuel comsumption usage and lack of torque, you better check your spark plugs gap and replace them if their gaps bigger than 1.45mm.
-It's not as hard you though, compared to Toyota Camry V6 this much more easier.

Pootie Tang
Member
GREAT pics! Thanks for contributing!
Similar threads
- Replies
- 1
- Views
- 368