What have you done to your Mazda5 today?

Today I received most of another RockAuto order full of yet more suspension/steering junk - minus of course the bits I think I most particularly need, which are coming tomorrow. Probably won't actually work on it tomorrow, anyway. Once I'm done with this pile of stuff, there should be no more possibility of bad underpinnings unless the rack and/or rag joint have gone bad. (I assume these cars have rag joints like previous-gen American cars? I haven't yet moved the battery tray to find out.)

I'm getting ready to mount up new tires on the TPMS-less steel wheels I've been running, and remembered after the tires arrived that I'd thought of adding TPMS valvestems. Since the "5" never came with steel wheels that I'm aware, what's the correct procedure for finding out which rubber TPMS stems will work with the vehicle's computer? Is it only about the signal frequency in MHz?
 
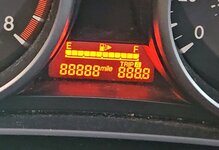
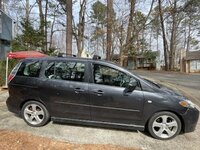
New tires are on! The MZ3 iSport-original Bridgestone Ecopias fought me coming off, though it may be more the fact that the OE steel wheels have such a pronounced ridge in the bead seat area. One of the new tires gave me a little bit of grief to seat, also. I ended up leaving the standard rubber valve stems for now, replacing only the one that proved to be damaged, but will likely continue to seek info on replacement rubber TMPS thingies sometime in the future. Of course I couldn't locate my homemade bead breaker, so it was back to the extremely tedious bumper jack routine (the more so since I had to run it up and down several times for each bead instead of just once like it should have been).

The new tires are Kelly Edge HP in 225/55/16 (same height as the tires I've been running in 205/60/16, which in turn I liked better than the 205/55/16 that was the first "-1" size I tried), V rated apparently, that I found for $77/each on Amazon with free shipping. One advantage to the odd size was that it came with a slightly higher load rating, which seemed like a good idea on a 3500# vehicle. This is probably my second time voluntarily buying an "off brand" tire, the first being a set of Kumho Venture light truck tires many years ago. I don't really count the pair of Cooper Lifeliners a shop sold me in the '90s, since they didn't give me a choice. They drove well enough on a test drive, and one balanced out on my new bubble balancer with no weight added (I do recommend the balancer mod some guys on YouTube are talking about where you drill the pin hole in the head out so it makes contact where it's supposed to and greatly reduces friction). It will be interesting to see how they do over the winter, but they should be better than Baldinis. :)

I did end up clearancing the gigantic bump stop looking thing depending from the swaybar endlink attachment point, since it was dragging heavily on the sidewalls the first time I pulled into the street. Since these tires are only slightly wider than stock, I'm thinking those blocks must have been extremely close to the tires originally, but I never noticed since it wasn't a problem. Interesting that we didn't have clearance problems I'm aware of when we put 225/50/17 tires on the "3".


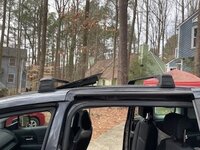
I did do a few other things with this car recently. One was that I discovered if you remove the center row seats entirely, there's just enough clearance to move a Hammond A100 series organ. I may have posted about figuring out how to make a roof rack for about $10 out of old 2x4s and four m6 bolts from the hardware store - this allowed me to transport my extension ladder to my church's old building so I could take down the outdoor sign. Also, I removed the rear seats and trim panels to troubleshoot the fuel door not wanting to stay closed - turns out the remote cable, even though it looks fine, just won't move freely anymore. I've left it off for now since with the panels out you can just reach in and release the fuel door manually with the built in little hook thing (that for some reason Mazda didn't provide a way to access without disassembly like they apparently did on other models), but I'll need to fix it better eventually. The cable isn't actually that expensive to replace, just doesn't seem like a high priority with the whole suspension wanting to be rebuilt!
 
Replace inner and outer tie rods. The ball joins on the inner tie rods were completely toast with zero friction (165K is a bit overdue). 2nd time redoing outer tie rods.

To folks who have done the inner tie rod, did you leave it with zip ties or was there space to use a metal clamp via clamp plyers? Debating on putting a proper metal clamp on but space seems tight.
 
Wow, your car has a lot of miles! Mine's just over 90k, but it does see mostly town miles, and that on fairly nasty roads.

I now have on the shelf:

Inner and outer tie rod ends
Front lower control arms
Rear lateral links
Rear swaybar endlinks
Second rear LCA for the other side because something's clunking from over there!
Also trailing arm bushings, to be used if I can figure out how to press them in and out without buying an expensive bushing press tool. Then I think everything under the car will be new.

Hoping to be able to tear into it very soon - I think it's to the point where any alignment adjustment is of questionable value just because of every wear point being unconscionably trashed. I once took my Colony Park to a truly competent alignment guy in another state, and he insisted on replacing my pitman arm before actually performing the alignment. Though, as I've groused about elsewhere, on that car the 20 year old original rubber control arm bushings were still OK. :)
 
Finally got all of the new rear suspension parts installed minus the trailing arm bushings; going to move to the front hopefully today. From videos, it looks like the forward inner mount on the front LCAs has non-captured nuts up inside the subframe, so that will be interesting.

Had the strangest situation after replacing the LCA and toe arm on the driver's side - I just couldn't get it aligned! Had both available adjustments maxed out, too (toe, and adjustable UCA). Then I wondered if my problem might be that the suspension wasn't loaded properly, as I was trying to do it with the car on jackstands and a floor jack under the LCA. Dropped the back of the car on ramps and I was able to get it adjusted easily. Go figure!

Also rolled the rear wheel arches while I was at it. Turns out a plastic-faced hammer is a perfectly adequate tool for the job, even pulled them a little without meaning to. I used a heat gun to avoid cracking the paint, but either not enough in one spot or else the paint was already little loose from a rust spot starting nearby and then getting hit by the tire at full jounce. I've been needing to get some touchup paint anyway ....
 
I’m replacing the valve cover gasket on my ‘13 Mazda5 and I remove the bolts without taking note of where they came from since there are 3 different lengths. Can anybody help???
 
Suspension rebuild a success! Car drives nice and straight and tight, better than when it was new. It's just taking a couple of tries to get the steering wheel right where I'd like it.

There is some undesirable jiggling and noise from the rear that I attribute to having gotten the cheapest shocks available. If I can't live with it long-term, at least R&R of rear shocks has become so routine even my 8 year old can do it, and paying money for better shocks won't seem so bad when I don't need everything else at the same time.

The really weird behaviours I'd been seeing over the summer must have been from the wheels migrating in and out of alignment as I drove. I got to thinking about it, and my older cars that just didn't care about their rear control arm bushings were all live-axle, so any shift in rear alignment over rough roads would have been to thrust angle only. Makes sense that I wouldn't know to expect different wear symptoms on a car with IRS.

Still have a bit of a shake, but now I'm 99.9% sure it's just a wheel balance issue and not a terrible one at that. I just scrounged several weights off of old wheels, which may get me closer, and I can always buy more.
 
When I did the rear shocks on my 2012 5, I went back with OEM. Because the OEM's come with the upper mounts.already installed, they came out cheaper than KYB's!
I want to say they were $80 each? That seems right.
Keep that thought on your back burner.
 
When I did the rear shocks on my 2012 5, I went back with OEM. Because the OEM's come with the upper mounts.already installed, they came out cheaper than KYB's!
I want to say they were $80 each? That seems right.
Keep that thought on your back burner.

Good info, thanks! $15 was the right price this go-round, but yours probably rides better. :)
 
I know it's a silly coincidence, but today (January 8th), my baby finally hit the eights - 88888.8!
 

Attachments

  • VideoCapture_20240108-180547.jpg
    VideoCapture_20240108-180547.jpg
    25.9 KB · Views: 30
Last edited:
Just bought our new-to-us, old-to-the-world, little zoomer this Friday. Restored the headlight lenses today. Nothing big, but really satisfying.
 

Attachments

  • front before.jpg
    front before.jpg
    57.3 KB · Views: 28
  • front after.jpg
    front after.jpg
    63 KB · Views: 26
  • passenger before.jpg
    passenger before.jpg
    35.8 KB · Views: 29
  • passenger after.jpg
    passenger after.jpg
    44.6 KB · Views: 26
  • driver before.jpg
    driver before.jpg
    33 KB · Views: 28
  • driver after.jpg
    driver after.jpg
    47.1 KB · Views: 29
What did you use to restore the headlights? Looks great!
Cerakote's headlight restoration kit: https://a.co/d/5gGSYto

It's pretty straightforward to use. I actually only used one of the two ceramic clearcoat strips (I had it left over from doing the headlights on my Rav) that come with the packet, so you can probably do two cars with one kit. That's what I did, and it looks fine, though I don't know if using one wipe for two lights will jeopardize the longevity of the treatment. Time will tell.
 
Replaced the front stabilizer bar end links (they were shot) with a greasable pair from Moog. Removing the nuts on the bottom bolts was a bit of hassle (but not too bad). Other than that it was pretty smooth sailing (so nice dealing with rust-free southern cars). The Moog sway bar end links look substantially beefier than the old ones (12.75 mm diameter vs 9 mm diameter, see pics).

I also installed roofracks (actually a few days ago, but forgot to post). They're some cheapo ones from Ebay, but hopefully they'll serve their purpose well enough. They were supposed to have a clearance/height of 4.25 inches (from their description on Ebay) but are closer to 3.5 or 3.75 inches (see pics). This is an issue because my lil zoomer has a sunroof which extends ~4 inches above the roof of when open (see pic). Due to the location of the roofracks, the sunroof can still open (just barely) with them on (see pic). However, if I attach a roofbasket to the racks (which I plan on doing since I have one leftover from our deceased Rav4), then the sunroof will definitely hit it. I think I'm gonna try and raise them up a little bit by adding some rubber footings below them.
 

Attachments

  • moog end link diameter.jpg
    moog end link diameter.jpg
    10.1 KB · Views: 24
  • old end link diameter.jpg
    old end link diameter.jpg
    10.1 KB · Views: 21
  • height of roofrack c.jpg
    height of roofrack c.jpg
    8.9 KB · Views: 25
  • height of roofrack b.jpg
    height of roofrack b.jpg
    9.6 KB · Views: 21
  • height of roofrack a.jpg
    height of roofrack a.jpg
    10.8 KB · Views: 25
  • height of open sunroof.jpg
    height of open sunroof.jpg
    11.5 KB · Views: 21
  • roof racks and open sunroof.jpg
    roof racks and open sunroof.jpg
    15.1 KB · Views: 26
  • roof racks.jpg
    roof racks.jpg
    16.8 KB · Views: 30
Back