
Start with clear lens housings (preferable plastic lenses as the glass tends to blur and distort the cutoff of the projector)
Parts all from The Retrofit Source
BI-XENON MORIMOTO MINI STAGE III KIT (H1)
This kit includes everything you'll need
Projectors, bulbs, ballasts, wiring harness, and shroud (although I opted to upgrade the shroud to an E55 shroud)
Note: i disassembled and painted the projector foreground limiter and shield black so the projector lens itself doesn't reflect back silver
I sourced mine from Amazon for $30 with free shipping through Amazon Prime

Place the lights in the oven IN THE MIDDLE EVENLY SPACED BETWEEN HEATING ELEMENTS - too close to top or bottom may result in melting
Set oven to 200 degrees and let bake for 10-15 minutes
Once lights are hot, carefully pry the lens off the reflector bucket. The set i had came off like butter once warm
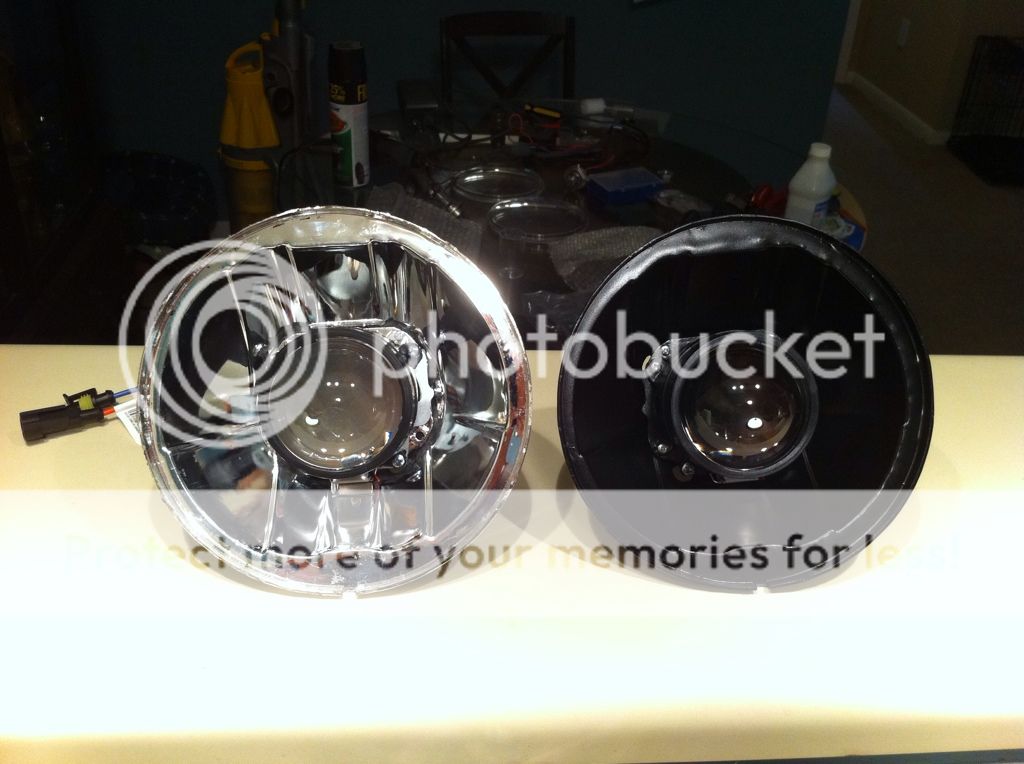
Now that the lights are apart, let's see how much cutting we'll need to do to get the projector lens inside of the headlight
oh wow. . . quite a bit

Break out the dremel (I suggest getting a rotozip bit, i did not have one so i used drill bits and cutoff wheels)
initial cuts


test fit the projector to see if we'll clear the lens

getting close but not quite there
inspect around the base of the projector where it comes in contact with the reflector to see where you need to trim a little more to get the lens inside the housing
Final cuts made, primed, and painted

Once you think you've got it, slip the projector back in and place the plastic lens on. Should have a little clearance between the projectors lens and the housing lens

Now comes the fun part, aiming and epoxy time
Normally, i'd clamp the reflector bucket down to a solid surface aimed at a wall to mark the cutoff
but due to these being round, it was hard to do, so i ended up having to do them on the car
So once you've got both housings cut out and test fit so that the lens will fit over the projector it's time to aim
I parked along side a local supermarket which had a large flat wall and level parking lot
Using your current lights, mark out the current horizontal location as well as the location of the step for each headlight (I didn't get a picture of them lined up)
*These are the Bosch E-codes with hella 80/100 bulbs so the output was great but i want HIDs)

Now, remove the stock headlights and place in one of the cutup buckets and slip the projector into the housing
Now align the projector to the marks you've made on the wall

Take a quick setting epoxy and just tac the lights into the reflector bucket while making sure you keep horizontal and vertical alignments the same and hold the projector in place for about 5 minutes while the lights are on, the heat will help cure the epoxy
Now repeat for the other side
Now that they're taced in, time to go back home and JB weld
I mixed up some JB weld and applied generously around the projector and headlight housing sealing up any holes made during the cutting process
Next is to JB weld the shroud on, place the concentric ring (included with the shroud) into the projector and apply a dab of JB weld to the inside so they dont' come apart
Next apply a few dabs around the black projector lens holder along the cylinder wall and slip the shroud on (JB weld cures pretty quick so test fit first for your rotational alignment of the shroud)
Now have a beer and let em cure
Now that the projectors are cured into the reflectors, time to apply the outer lens back on. Place the lens on pressing fairly firmly to get it seated then pop the assembly black in the oven at 200 for 10 minutes
Once hot press the lens on further verifying a complete seal.
Now, TADA you're done

Now go out and install them on the car and get your headlights aimed right

any questions feel free to ask!
Parts all from The Retrofit Source
BI-XENON MORIMOTO MINI STAGE III KIT (H1)
This kit includes everything you'll need
Projectors, bulbs, ballasts, wiring harness, and shroud (although I opted to upgrade the shroud to an E55 shroud)
Note: i disassembled and painted the projector foreground limiter and shield black so the projector lens itself doesn't reflect back silver
I sourced mine from Amazon for $30 with free shipping through Amazon Prime
Place the lights in the oven IN THE MIDDLE EVENLY SPACED BETWEEN HEATING ELEMENTS - too close to top or bottom may result in melting
Set oven to 200 degrees and let bake for 10-15 minutes
Once lights are hot, carefully pry the lens off the reflector bucket. The set i had came off like butter once warm
Now that the lights are apart, let's see how much cutting we'll need to do to get the projector lens inside of the headlight
oh wow. . . quite a bit
Break out the dremel (I suggest getting a rotozip bit, i did not have one so i used drill bits and cutoff wheels)
initial cuts
test fit the projector to see if we'll clear the lens
getting close but not quite there
inspect around the base of the projector where it comes in contact with the reflector to see where you need to trim a little more to get the lens inside the housing
Final cuts made, primed, and painted
Once you think you've got it, slip the projector back in and place the plastic lens on. Should have a little clearance between the projectors lens and the housing lens
Now comes the fun part, aiming and epoxy time
Normally, i'd clamp the reflector bucket down to a solid surface aimed at a wall to mark the cutoff
but due to these being round, it was hard to do, so i ended up having to do them on the car
So once you've got both housings cut out and test fit so that the lens will fit over the projector it's time to aim
I parked along side a local supermarket which had a large flat wall and level parking lot
Using your current lights, mark out the current horizontal location as well as the location of the step for each headlight (I didn't get a picture of them lined up)
*These are the Bosch E-codes with hella 80/100 bulbs so the output was great but i want HIDs)
Now, remove the stock headlights and place in one of the cutup buckets and slip the projector into the housing
Now align the projector to the marks you've made on the wall
Take a quick setting epoxy and just tac the lights into the reflector bucket while making sure you keep horizontal and vertical alignments the same and hold the projector in place for about 5 minutes while the lights are on, the heat will help cure the epoxy
Now repeat for the other side
Now that they're taced in, time to go back home and JB weld
I mixed up some JB weld and applied generously around the projector and headlight housing sealing up any holes made during the cutting process
Next is to JB weld the shroud on, place the concentric ring (included with the shroud) into the projector and apply a dab of JB weld to the inside so they dont' come apart
Next apply a few dabs around the black projector lens holder along the cylinder wall and slip the shroud on (JB weld cures pretty quick so test fit first for your rotational alignment of the shroud)
Now have a beer and let em cure
Now that the projectors are cured into the reflectors, time to apply the outer lens back on. Place the lens on pressing fairly firmly to get it seated then pop the assembly black in the oven at 200 for 10 minutes
Once hot press the lens on further verifying a complete seal.
Now, TADA you're done
Now go out and install them on the car and get your headlights aimed right
any questions feel free to ask!