MP5T Rebuild Photo Journal

Brian MP5T

Banned
Contributor
:
MP5T / 944
I'm starting this thread to document the rebuild of the MP5T in a cleaner way than the Boom thread which is up to over 20 Pages. I'm going to reserve 10 or so posts near the beginning. Each will have another step in the process until the rebuild. Please feel free to post questions or discussion after the 10 Reserved.

The Critical Failure... (boom06)
Boom%206.jpg
 
Last edited:
On the 14th Of November, A FS-20 was dropped off in my backyard. It is out of a 2003 P5 that was rear ended at 51,000Km. It came as you can see from Valve cover to Oil Pan, what a steal at $900.00 CDN!

http://www.car-part.com/

Special thanks to YP5TO (Jason) for helping me with this link!

NEW%20BLOCK.jpg
 
Last edited:
(PISTONS FROM BEAU!!!)

Stock Length Rods with 8.5:1 CP pistons...
ARP STUDS
Copper Gasket

Jesus.. I Wonder which one is the new one?

PISTON%20-%20%281%29.jpg


The New Hotness!
PISTON%20-%20%282%29.jpg


Old And Busted!
PISTON%20-%20%283%29.jpg


PISTON%20-%20%284%29.jpg


PISTON%20-%20%285%29.jpg


PISTON%20-%20%286%29.jpg


Ladies and Gentelmen! I give you ARP Head Studs. Possibly the best Studs in the World, If anyting will hold the head together.... This is It. 80 Ft/Lb is the torque for those who might do this in the fututre...

ARP%201.jpg


ARP%202.jpg


Last edited:
(Crank Balancing)


Feb 14th is the day. The engine is off the stand and upstairs, the Manifold, Head, Cams, Lifters, Pistons, Rods, Bearings. s***. It's all in three boxes ready for Monday..

I'm heading to renfrew for...Deck, Head, Alignhoning, Extrudehoneing & Port, Crank Balance, De-Glaze, Assembley.

Feb 15th Today the Engine Was Tanked and the Deck Was brought level again.

The Pistons are going to be placed in the cylinder to check for clearance. If there is too much room, the pistons are being sent to Toronto that day to get 2 Thou of ceramic coating added to the piston head and skirt.

The Boys at Renco are used to much larger engines. He was surprised that the whole thing could be picked up by one person (Me), they had the hoist and everything... Oh, well, I hope this starts a new line of possibel work for this big block wonder shop. They smiled when they saw how small the pistons were and then giggled when the remembered that there were only 4 of them.
.

ENGINE%202005%20-%20%281%29.jpg

 
Last edited:
(Drivers Side A Pillar)

Parts Arrived, the second Double pod is going above the first one, then the entire pillar is being bondoed and sanded down, primed, painted whit and clear coated, just like the last one. The Guys at Terry's Collision in Pembroke will be painting it along with the CF Hood. I don't have the skills to do it the way it should be done.

Got it all together... I guess it really is that high up...

POD%20NEW5.jpg

HVAC.jpg

HVAC3.jpg


I got the Manifold Back after getting the EGT Probe welded in the collector. The Header wrap was ordered in Black this time and the Proper Stainless Steel DEI Straps came in just today. Here are some Pictures of the Manifold with the Wraping and the manifold when it was new...

Header%203.jpg

Header%202.jpg

Header%201.jpg

mazda%20mp5t%20-%20%286%29.jpg


Just as a Note. I also picked up a set of Sparco seats from a Fellow Toronto Protege Forum member.. SWEET!


MY%20Seats.jpg


Got the Wiring Done and the seats in today!!

Here is a picture of the Tinting as well...

SEATS%202.jpg

SEATS%201.jpg

TINT.jpg
 
Last edited:
(Parts From Tony at AWR)

Here are some Pictures of the Prototype Protege 5 Triple Pass T6 Aluminium Radiator. The first picture is just that, the second one is for anyone who does not really know what Triple Pass means...

Rather than one big rad core, the coolant is forced to pass down 1/3rd of the core, up the middle 1/3rd and then down the last 1/3rd to the outlet. Normally a radiator is much hotter in the middle between the two connections and the sides are rather "UNUSED".

Path of least resistance would let the hot coolant flow directly as possible, This rad forces the coolant to travel the entire surface area of the radiator, plus the radiators design is much more effecient. The end result is much more consistent temperature, much better ability to remove excess heat from the coolant and yes a slightly higher pressure rating to allow the temp to get higher without boiling.<!-- / message --><!-- sig -->


RADIATOR1.jpg


RADIATOR2.jpg


More Stuff From AWR came also. The Famous 21mm anti sway bar with adjustable end links front and rear, but I also picked up his stiffer trailing arm for the Protege. As you can see it's alot stronger than the stock one, plus it has Poly-U inserts to geep everything aligned during cornering. Result, A Rock solid rear end. All That plus the Tein-ss should make the car like a giant Go-Kart!

Trailing%20Arm1.jpg


Thanks for your help Maclum! The Job of rear suspension is done... 2 Hours from start to finish and no unexpected problems...

Here is the new "Firm Planted" Rear end for MP5T...

AWR%20-%20%285%29.jpg

AWR%20-%20%282%29.jpg

AWR%20-%20%283%29.jpg

AWR%20-%20%284%29.jpg
 
Last edited:
(Hood Stuff!)

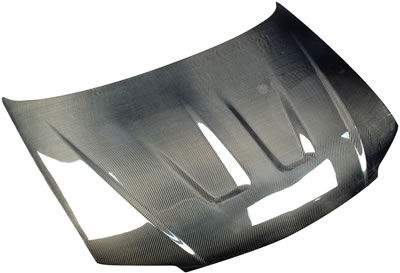
Here is what the hood looks like when it's made...

amc-101026_w.jpg


Extractor Hood Almost Done! It's being painted white with the exception of 1" by where the windshield is...To Avoid that ghetto look of a black hood on a white car...
Hood%20Holes%201.jpg

Hood%20Holes%202.jpg


The CF Hood, A-Pillar etc are all painted white to match the car...

(thought) IMO CF is Ghetto on a White car...

HOOD2.jpg


HOOD3.jpg


Im Picking up The Hood Today (DONE)

Ok, Carbon with 4 Layers of White, 4 Layers of Clear.

MS In Carbon and a 1" Strip near the Window.. ENJOY.. I will.


HOOD1.jpg

HOOD%205.jpg

HOOD%204.jpg
 
Last edited:
(VALVE COVER STUFF)

It's really quite minor and has not much to do with the "REBUILD" but, detail under the hood is what I'm working on as the engine is completely apart and I'm waiting on parts to continue...

Valve Cover and Intake Manifold are being polished on the outside then the intake manifold is going away for a week to get Extrudehoned. Here is the new bolts...

NEW%20NUTS.jpg


These were taken before the writing was removed...
Cover%202.jpg

Cover%201.jpg

After removal... Still a work in progress...
Cover%204.jpg
 
Last edited:
(Timing)
TRI-POINT Adjustable Cam Gears...

GEAR%20-%206.jpg


The One on the Left has been polished. It's steel and looks alot better in person than the picture...It took about 3 Hours as it's Steel...
GEAR%20-%20%284%29.jpg


GEAR%20-%20%285%29.jpg


GEAR%20-%20%281%29.jpg
 
Last edited:
UPDATE!!

Engine%20In%201.jpg


Engine%20In%202.jpg


It's 7 am and this is how the day is starting...

FMIC and Hardpipes, CF Hood Fitment (4 Hr, GD APC!!!) and the inner fender plastic s***. Then drop it off the hoists. Zoom!

17%20April%202005%20-%20(1).jpg

17%20April%202005%20-%20(2).jpg

17%20April%202005%20-%20(3).jpg
 
Last edited:
Nothing you feel like changing in the valve train?? I have never done an engine rebuild but I'm just curious about why you arn't touching anything in that area.
 
EvilMSP said:
Nothing you feel like changing in the valve train?? I have never done an engine rebuild but I'm just curious about why you arn't touching anything in that area.
The valve train is rock solid for what I'm planning for this car. As long as the fuel management stays balanced, it will push 20Psi. I'm not planning to go that high, I want a really fast street car, not a really bare bones drag car...
 
Last edited:
Back