
You are using an out of date browser. It may not display this or other websites correctly.
You should upgrade or use an alternative browser.
You should upgrade or use an alternative browser.
PCB's Unbuild Thread
- Thread starter pcb
- Start date

- :
- Mazda protege5
Ya I feel that, I'm too cheap to buy good tools. I get harbor freight coupons every week, gotta love those 20% super coupons haha
Speaking of Vise-Grips,... These things are awesome !!

I think they're called nut grabbers and it pinches down on three sides to grab a rounded nut or bolt.
As long as you have room for the handles.
I've pinched them closed with all my might and had to use pliers to release the handles.
They're great for brake lines so you don't have to cut them to put a socket on.
- :
- Mazda protege5
That nut grabber looks handy as hell, I'm prone to rounding bolts
I started working on the passenger side bearing today and everything went smoothly. (although it still took me forever.)
Everything was coated with anti-seize from last time and just popped apart .
The tie rod end came out with a tap and I could even push the axle out of the hub by hand !!
I got the hub/spindle off and of course the inner race stayed with it.
I decided to grind it off this time thinking it might be easier and not damage the hub.
I used my angle grinder then tried the chisel.
(you can see the nicks in the hub... I ground them off)

That didn't work so I got out my rotary tool and tried to grind off more.
Then it made a small popping sound and it split open.

After I pounded the rest of the bearing out of the knuckle I cleaned it up and ground the drain notch deeper.
You can see how the drain plugged up with rust.


With the cleaned up hub and bearing in the freezer, I put the knuckle in the oven.
When I went to drop the bearing in, it did the same as the other side. It went in 1/2" then stopped so I smacked with my hand and it fell right in.
With the bearing in the knuckle I put it back in the oven but after 20 minutes I realized I forgot the big c-clip so I pulled it out of the oven and installed it.
After 10 more minutes in the oven, I pulled it out and got the hub out of the freezer and it just fell right in !!
The hub got all frosty.

I'm done for the day and got into the booze so I'll finish up tomorrow.
pb4ugotobed had both bearings installed in 2 hours and I'm at about 12 hours so far and 3/4's done but I did save some pretty big $$ doing it myself so I'm happy.
Here's to getting 5 more years out of my car !!
Cheers !!
Everything was coated with anti-seize from last time and just popped apart .
The tie rod end came out with a tap and I could even push the axle out of the hub by hand !!
I got the hub/spindle off and of course the inner race stayed with it.
I decided to grind it off this time thinking it might be easier and not damage the hub.
I used my angle grinder then tried the chisel.
(you can see the nicks in the hub... I ground them off)
That didn't work so I got out my rotary tool and tried to grind off more.
Then it made a small popping sound and it split open.
After I pounded the rest of the bearing out of the knuckle I cleaned it up and ground the drain notch deeper.
You can see how the drain plugged up with rust.
With the cleaned up hub and bearing in the freezer, I put the knuckle in the oven.
When I went to drop the bearing in, it did the same as the other side. It went in 1/2" then stopped so I smacked with my hand and it fell right in.
With the bearing in the knuckle I put it back in the oven but after 20 minutes I realized I forgot the big c-clip so I pulled it out of the oven and installed it.
After 10 more minutes in the oven, I pulled it out and got the hub out of the freezer and it just fell right in !!
The hub got all frosty.
I'm done for the day and got into the booze so I'll finish up tomorrow.
pb4ugotobed had both bearings installed in 2 hours and I'm at about 12 hours so far and 3/4's done but I did save some pretty big $$ doing it myself so I'm happy.
Here's to getting 5 more years out of my car !!
Cheers !!
Last edited:
Well, I fčķ'ď Up.
I went for another 10 minute drive and my passenger side bearing started to quietly roar again.
I don't have a torque wrench and figured I must have over tightened the axle nut.
So I went to loosen it a bit and stripped the damn nut.
I've been using a 1 1/4" SAE 12 point socket and I really cranked the nut on tight. I have very limited powers of guestimation.
So now my car is parked, waiting for a proper 6 point 32mm socket to arrive from Amazon.
I should be able to hammer it on and hopefully back the nut off a bit.
I hope I didn't wreck my new bearing with less than 10 miles on it but we'll see.
JazzySP20
Madaz
- :
- AUSTRALIA
- :
- BJII Astina SP20
I would not put a wheel bearing in an oven. I doubt the grease inside the wheel bearing is designed to handle that much heat. I've read the best quality wheel bearings (Japanese) use a high temp grease that have a max temp of approx. 356F (180c) before it start to break down. And that is the top quality bearings. The SKF bearings are Korean made.
Well, I guess 300F would have been hot enough and a bit safer for the bearing but I also read that rotors reach 200C during normal operation and up to 500C on track day.
I went with the best bearing that RockAuto had, specifically because they are properly sealed.
My old bearings were cheap no-name Chinese bearings and lasted 6 years before they rusted and failed.
They were in the oven too when I instaĺled them.
The only part where I might go OEM is ignition coils.
Bear in mind that my car is worth $250 as scrap.
I don't want to put a fancy new saddle on a old dead horse. lol
JazzySP20
Madaz
- :
- AUSTRALIA
- :
- BJII Astina SP20
Bear in mind that my car is worth $250 as scrap.
I don't want to put a fancy new saddle on a old dead horse. lol
LOL, true that. I know what you're saying. (yes)
But I'd press the bearing in if it was me. I see no issue with the first part with the bearing in the freezer and knuckle in the oven, but I wouldn't be putting the bearing in the oven for the second part. You can get a good quality 8-10 tone hydraulic press off eBay for less than a $100 these days.
... You can get a good quality 8-10 tone hydraulic press off eBay for less than a $100 these days.
To do it properly myself, I would need this...

And this...
(cheapest one...)

And this... which comes to ~$90 with shipping and tax.
(all the ones on Ebay that would go past 150 ft. pounds started at $160 plus shipping (one of them was $1200. WTF ?) plus they're a 3/4" drive and the socket coming is 1/2" drive so I would need a down sizer, so $10 more + $10 for shipping and tax.)

So around $400 for tools that I will (hopefully) never need again.
But, what I could have done is remove my knuckle and hop on my bicycle along with my new bearing and take it to the machine shop a few miles away and have them press in the new bearing for about $20 each side.
But as far as my situation now goes,.. I should'nt have reefed my damn axle nut on so fricken tight !!
And I knew better too !!
Just because you may need a 6' extender bar that you have to jump on to break it free doesn't mean you jump on it to tighten it back on.
200 ft/pds.. no two tonnes...
I've improvised before for my rear axle nut..

If I mark my breaker bar at 12"-13" and stand right on that point with my 185 pounds I should be pretty damn close. (maybe 14").

JazzySP20
Madaz
- :
- AUSTRALIA
- :
- BJII Astina SP20
So around $400 for tools that I will (hopefully) never need again.
No you wouldn't need $400 worth of tools my friend.
If you don't have a hydraulic press, then all you'll need to remove and replace the wheel bearing is this...
Here's how...
JazzySP20
Madaz
- :
- AUSTRALIA
- :
- BJII Astina SP20
But, what I could have done is remove my knuckle and hop on my bicycle along with my new bearing and take it to the machine shop a few miles away and have them press in the new bearing for about $20 each side.
Yep, that is the cheapest and best method I'd say. (drinks)
I watched the video and realized I can use my socket set instead of buying the bearing press kit and can even install the new bearing without any fire or ice !!!
This is the socket I used to press (or more like hammer) the hub out of the bearing... It fit perfectly.
Note the dents in it suggesting that it's not Chromium-vanadium steel but cheap Chinese Chromed metal.... which is a good thing because it bends as opposed to exploding.

Then I used this socket to pound the outer race out of the knuckle... It clears the knuckle shoulder without any grinding down for clearance.
It doesn't actually push on the outer race. It pushes on the inner race instead and the ball bearings but they won't push through the outer race.
The ball bearings will be bashed to hell but it's the old bearing anyway...

Then, instead of putting the knuckle in the oven, you grease up your new bearing, set it in the well supported knuckle and gently tap around the outer race in a circle to slowly tap the bearing into the knuckle (old school method my brother-in-law told me about).
Once your bearing gets flush with the knuckle, you place your old bearing on top of the new one to push it all the way in.
Then you install your big c-clip.
Then, you use this socket which fits perfectly into the inner race along with the inverted extender bar, so you don't mash your new bearing.


Or this extension if you need more clearance.

Then, when the spindle is close to hitting the socket but well seated in the inner race, you use this socket to finish pushing the hub in.
It's a bit wobbly but the spindle is almost in.


Then your knuckle is finished and you saved $40 and two trips to the machine shop !!
I wish I would have seen that video and thought of this earlier but who knows?? Maybe I already wrecked my new bearings and will need to do this all over again ?!!?
A great thing about pressing in the bearing is that you can cake the whole thing with grease, including the knuckle, to help feed the bearing in and prevent rust.
Another good pointer from the video is to cut the old race off the hub with a cut-off disc at an angle.
That way you can wedge your chisel into the crack to break it open.
I was hammering the point of my chisel into flat metal and took the edge off it. (it's was a brand new wood chisel)

Another thing of note from the video is the nice clean rust free components he was working with and the tiny ass little hammer he was using.
That just wouldn't cut it up here in the North East salt belt...
This is what I'm dealing with...
It adds a whole new layer of difficulty to the project. (usually about a 1/4" thick layer)

This is the hammer I use...

This is the socket I used to press (or more like hammer) the hub out of the bearing... It fit perfectly.
Note the dents in it suggesting that it's not Chromium-vanadium steel but cheap Chinese Chromed metal.... which is a good thing because it bends as opposed to exploding.
Then I used this socket to pound the outer race out of the knuckle... It clears the knuckle shoulder without any grinding down for clearance.
It doesn't actually push on the outer race. It pushes on the inner race instead and the ball bearings but they won't push through the outer race.
The ball bearings will be bashed to hell but it's the old bearing anyway...
Then, instead of putting the knuckle in the oven, you grease up your new bearing, set it in the well supported knuckle and gently tap around the outer race in a circle to slowly tap the bearing into the knuckle (old school method my brother-in-law told me about).
Once your bearing gets flush with the knuckle, you place your old bearing on top of the new one to push it all the way in.
Then you install your big c-clip.
Then, you use this socket which fits perfectly into the inner race along with the inverted extender bar, so you don't mash your new bearing.
Or this extension if you need more clearance.
Then, when the spindle is close to hitting the socket but well seated in the inner race, you use this socket to finish pushing the hub in.
It's a bit wobbly but the spindle is almost in.
Then your knuckle is finished and you saved $40 and two trips to the machine shop !!
I wish I would have seen that video and thought of this earlier but who knows?? Maybe I already wrecked my new bearings and will need to do this all over again ?!!?
A great thing about pressing in the bearing is that you can cake the whole thing with grease, including the knuckle, to help feed the bearing in and prevent rust.
Another good pointer from the video is to cut the old race off the hub with a cut-off disc at an angle.
That way you can wedge your chisel into the crack to break it open.
I was hammering the point of my chisel into flat metal and took the edge off it. (it's was a brand new wood chisel)
Another thing of note from the video is the nice clean rust free components he was working with and the tiny ass little hammer he was using.
That just wouldn't cut it up here in the North East salt belt...
This is what I'm dealing with...
It adds a whole new layer of difficulty to the project. (usually about a 1/4" thick layer)
This is the hammer I use...
I took apart my old bearings to inspect them and found this on one of the races.

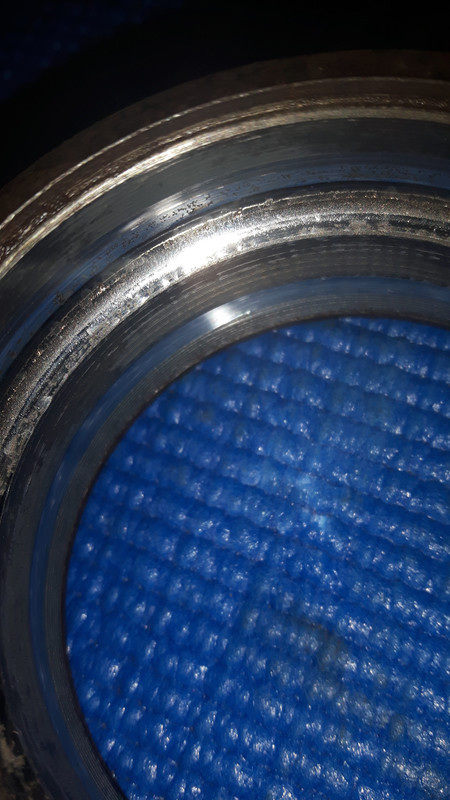
That's rusted but surprisingly took 6 years to happen to my unsealed no-name bearing.
The other three races looked like this.

I remember I replaced the left side first then went out for a quick test drive and the sound was 95% gone so I figured once the other side was done, it would be 100% gone.
I think what actually happened was that I fixed the noisy bearing first but over torqued the new one and it started to quietly roar.
Then I did the other side and really over torqued it and it got pretty pissed off at me. lol
Let's hope loosening and re-torquing my axle nuts fixes everything.
The stupid part is that if I would have spent the extra $30 six years ago to get the sealed SKF bearing, I wouldn't be dealing with any of this now.
Oh well... live and learn... then forget and have to do it all over again. lol
That's rusted but surprisingly took 6 years to happen to my unsealed no-name bearing.
The other three races looked like this.
I remember I replaced the left side first then went out for a quick test drive and the sound was 95% gone so I figured once the other side was done, it would be 100% gone.
I think what actually happened was that I fixed the noisy bearing first but over torqued the new one and it started to quietly roar.
Then I did the other side and really over torqued it and it got pretty pissed off at me. lol
Let's hope loosening and re-torquing my axle nuts fixes everything.
The stupid part is that if I would have spent the extra $30 six years ago to get the sealed SKF bearing, I wouldn't be dealing with any of this now.
Oh well... live and learn... then forget and have to do it all over again. lol
Last edited:
JazzySP20
Madaz
- :
- AUSTRALIA
- :
- BJII Astina SP20
A great thing about pressing in the bearing is that you can cake the whole thing with grease, including the knuckle, to help feed the bearing in and prevent rust.
No, do NOT cake the bearing and/or the knuckle. Too much grease will stop the bearing from seating properly in the knuckle, and you probably won't get the circlip back on. Just a light skim of grease on the bearing only. So as when the bearing is being pushed in, the grease is being pushed out from the top.
")
OK.
Hopefully I won't have to worry about it.
My socket hasn't arrived yet and I'm not driving my car until I retorque my axle nuts.
If I have to redo everything, I intend to press the bearings in and put a coating of grease on all the bare metal after the c-clip is in.
I didn't want to grease anything with the oven/freezer method because I thought it might actually make things bind with a bearing or spindle covered with grease and frost.