
- :
- Canada
This is a DIY How-To for an aftermarket oil catch can installation on the 2nd Generation Mazda CX-9. I decided to document this process because, while a few others have successfully installed their own catch cans and provided some detail, I wanted to improve on their experience and also include some photos of the install.
This process was documented/photographed by myself, using my crappy cellphone camera and my 2018 Mazda CX-9 Signature as the "demo" vehicle. This DIY is provided as a learning aid and reference guide. I assume no responsibility for any warranties this process may void, or damages you may inflict on yourself or your vehicle.
First and foremost, I want to credit users RATTL3R and Silly Wabbit for taking the first steps in documenting the oil catch can installation. Without their insight, I might still be trying to figure out where the PCV valve is, haha.
Here is RATTL3R's post: LINK
And here's the thread that Silly Wabbit posted in: LINK
Here's some background info:
Wiki description: What is an Oil Catch Can?
A PDF explaining where the OCC should be mounted (Page 13): View attachment p-2273-arrington_ccv_bible.pdf
CorkSport's OCC article: Why do you need an OCC?
The CX-9 comes factory equipped with an oil separator that does a good job of keeping blow-by to a minimum. That said, the system can still be improved upon, which is part of the reason I chose to install an oil catch can on my own CX-9.
I've had an unbranded oil catch can in my possession for a couple of months now, and was dragging my feet with the install. At first, this was due to bad weather, but most recently I've been preoccupied with moving to a different province. After seeing CorkSport's recent article about oil catch cans, I decided to get off my ass and install the one I had.
You can use these instructions with virtually any oil catch can available for the CX-9, and there are plenty to choose from. CorkSport makes one for $240 (and also offers a drain plug kit for their OCC for an additional $33). There are also branded (Cusco, Mishimoto, etc.) and unbranded universal oil catch cans all over amazon, eBay, and various online resellers - all with varying levels of fit, finish, size/capacity, and bling factor. I chose to go with a cheap, unbranded catch can that I found on eBay for $40.
*** NOTE: 08/14/2020 - The PCV hose identified in this guide is the same hose that CorkSport identifies as the PCV hose in their installation instructions (see here), but they use a different method of installation that involves capping the intake manifold port and tapping the valve cover hose near the turbo intake pipe. Since CorkSport's installation involves the removal of two "permanent" clamps from the valve cover hose, I chose to install it in a different way. Removal of those "permanent" clamps on the valve cover hose could result in some headaches (or a flat out denial of warranty) if I ever had any engine issues that would normally have been covered under warranty.
The cons of going with the unbranded can:
- Took a while to get to me (about a month)
- Fluid indicator is just a dipstick
- No drain plug feature
- Finish inside the can was poor
- Came with crappy tubing that is not suitable for OCC use
The pros:
- Price
- Same basic function as an expensive can
- Bottom of the can screws on/off (don't need to unhook any lines to drain)
- Small and inconspicuous
- Came with mounting hardware and fittings
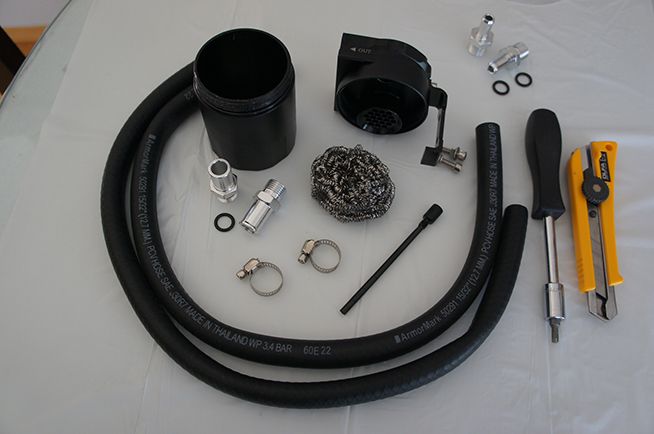
What you'll need:
- Aftermarket oil catch can (mounting kit is optional)
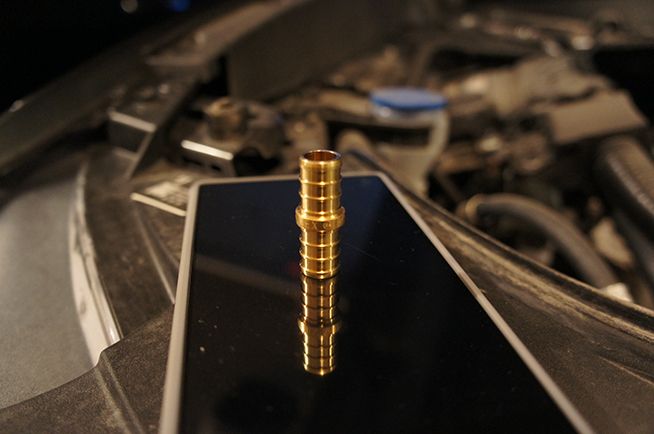
- One 1/2" brass PEX barb coupling (male/male)
- Pliers (preferably narrow, like needle-nose pliers)
- Utility knife
The following materials will vary depending on where you choose to mount the can, what came with your can, and personal preference. I estimated that my installation would require three feet of tubing, but I got four feet just in case.
- At least four feet of 15/32" crankcase vent tubing (or 1/2" rubber fuel line. You can also use braided SS line, but fuel line is cheaper and works well enough)
- Steel wool (optional - I just cut a portion from a steel wool dish scrubber)
- Flathead or Phillips screwdriver (if using worm-gear clamps)
- Rotary tool or drill to mount the catch can
- Old rag
*Pliers and rotary tool not shown


Now then, let's get on with the installation.
This process was documented/photographed by myself, using my crappy cellphone camera and my 2018 Mazda CX-9 Signature as the "demo" vehicle. This DIY is provided as a learning aid and reference guide. I assume no responsibility for any warranties this process may void, or damages you may inflict on yourself or your vehicle.
First and foremost, I want to credit users RATTL3R and Silly Wabbit for taking the first steps in documenting the oil catch can installation. Without their insight, I might still be trying to figure out where the PCV valve is, haha.
Here is RATTL3R's post: LINK
And here's the thread that Silly Wabbit posted in: LINK
Here's some background info:
Wiki description: What is an Oil Catch Can?
A PDF explaining where the OCC should be mounted (Page 13): View attachment p-2273-arrington_ccv_bible.pdf
CorkSport's OCC article: Why do you need an OCC?
The CX-9 comes factory equipped with an oil separator that does a good job of keeping blow-by to a minimum. That said, the system can still be improved upon, which is part of the reason I chose to install an oil catch can on my own CX-9.
I've had an unbranded oil catch can in my possession for a couple of months now, and was dragging my feet with the install. At first, this was due to bad weather, but most recently I've been preoccupied with moving to a different province. After seeing CorkSport's recent article about oil catch cans, I decided to get off my ass and install the one I had.
You can use these instructions with virtually any oil catch can available for the CX-9, and there are plenty to choose from. CorkSport makes one for $240 (and also offers a drain plug kit for their OCC for an additional $33). There are also branded (Cusco, Mishimoto, etc.) and unbranded universal oil catch cans all over amazon, eBay, and various online resellers - all with varying levels of fit, finish, size/capacity, and bling factor. I chose to go with a cheap, unbranded catch can that I found on eBay for $40.
*** NOTE: 08/14/2020 - The PCV hose identified in this guide is the same hose that CorkSport identifies as the PCV hose in their installation instructions (see here), but they use a different method of installation that involves capping the intake manifold port and tapping the valve cover hose near the turbo intake pipe. Since CorkSport's installation involves the removal of two "permanent" clamps from the valve cover hose, I chose to install it in a different way. Removal of those "permanent" clamps on the valve cover hose could result in some headaches (or a flat out denial of warranty) if I ever had any engine issues that would normally have been covered under warranty.
The cons of going with the unbranded can:
- Took a while to get to me (about a month)
- Fluid indicator is just a dipstick
- No drain plug feature
- Finish inside the can was poor
- Came with crappy tubing that is not suitable for OCC use
The pros:
- Price
- Same basic function as an expensive can
- Bottom of the can screws on/off (don't need to unhook any lines to drain)
- Small and inconspicuous
- Came with mounting hardware and fittings
What you'll need:
- Aftermarket oil catch can (mounting kit is optional)
- One 1/2" brass PEX barb coupling (male/male)
- Pliers (preferably narrow, like needle-nose pliers)
- Utility knife
The following materials will vary depending on where you choose to mount the can, what came with your can, and personal preference. I estimated that my installation would require three feet of tubing, but I got four feet just in case.
- At least four feet of 15/32" crankcase vent tubing (or 1/2" rubber fuel line. You can also use braided SS line, but fuel line is cheaper and works well enough)
- Steel wool (optional - I just cut a portion from a steel wool dish scrubber)
- Flathead or Phillips screwdriver (if using worm-gear clamps)
- Rotary tool or drill to mount the catch can
- Old rag
*Pliers and rotary tool not shown
Now then, let's get on with the installation.
Last edited:


")