
- :
- 2008 Mazda5 GT
I have older versions of these sitting around for +2 years. Figure I make use of them to help with resale of car. I must say, I should have done this a long time ago...
https://www.amazon.com/dp/ (commissions earned)
https://www.amazon.com/dp/ (commissions earned)
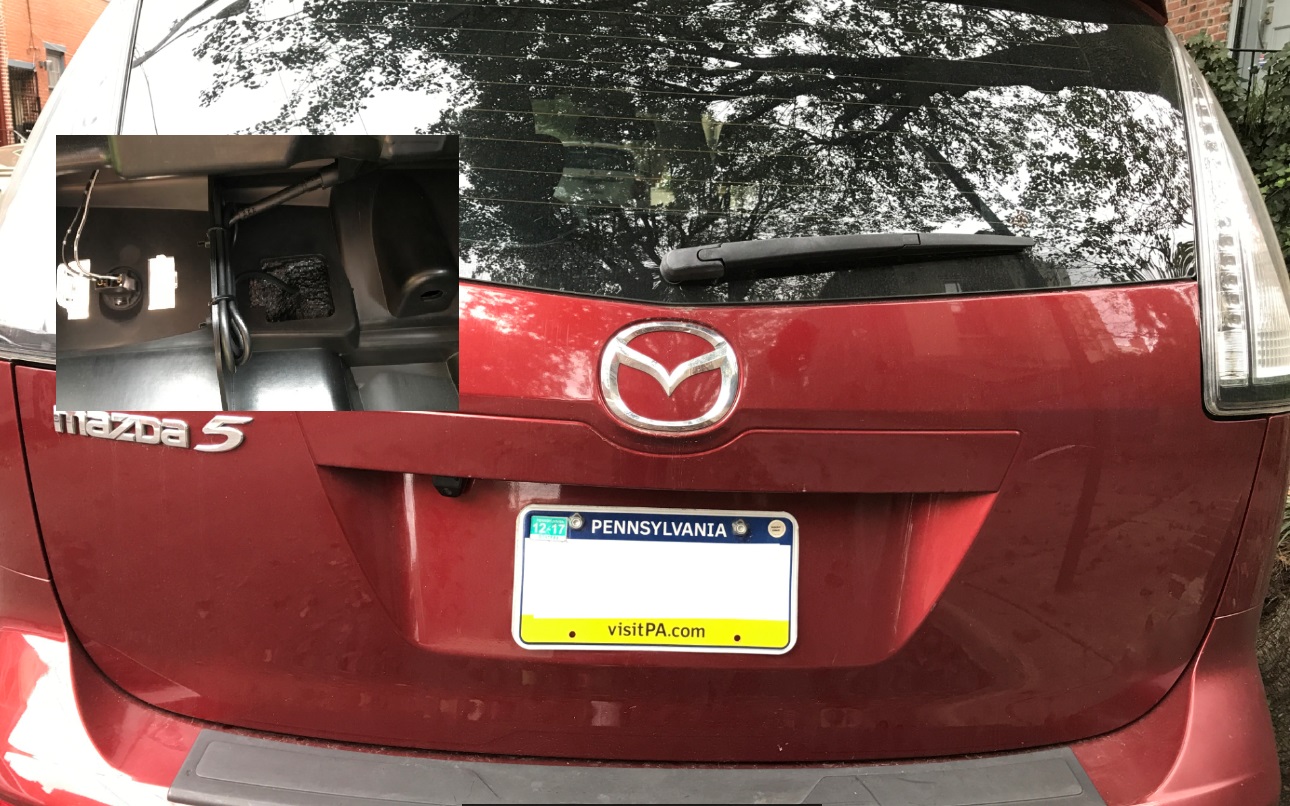
Camera on hatch. OEM placement b/c the backside has access and weather covering.
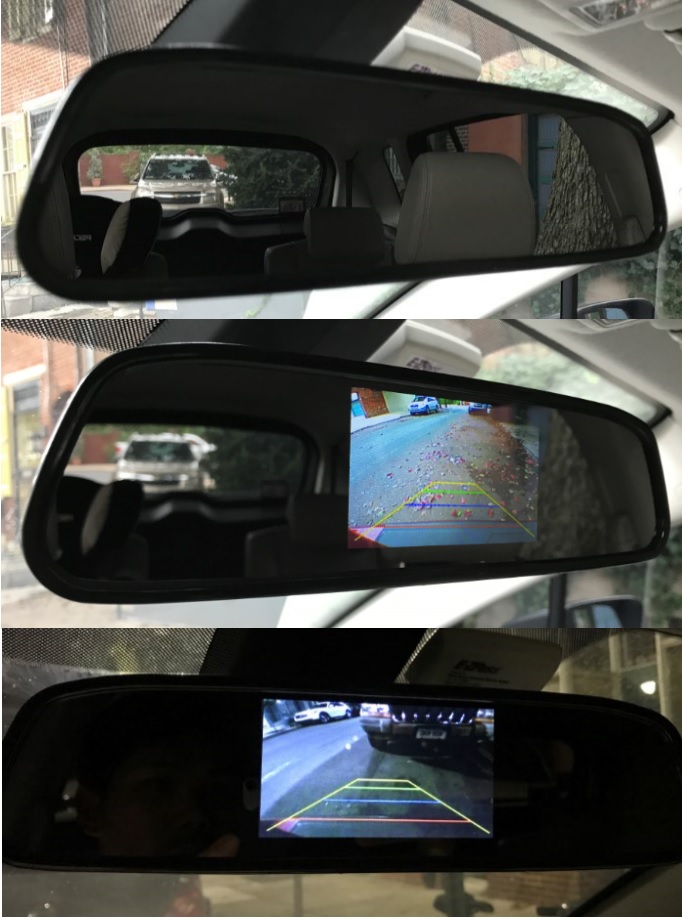
You cannot see the lines separating the screen from the glass when the LCD mirror is off (unless you look REALLY close, can see a hint of a faint hairline).
At first, I thought the back-up lines are useless unless they turn with the steering wheel. But when dark/low light, it becomes very useful to gauge "my" bumper line! Reverse light lights up the car behind you but my bumper can be hard to see so the lines help me gauge. Instead of using the standard (weak) spring loaded clip on (can fall of or shift in the event of a big bump), I use 4 self tapping screws. Note that the screen is significantly wider than the OEM mirror, which is great for interior wide angle view (can see 2nd row kids heads). It is also tinted and on top of my 35% 3M tint, it is perfectly visible during day and night (glare reduction). You need to be mindful not to obstruct the sun visors from open/close when you hard mount it. This mirror now comes with blue tint for those who don't have tint (or want to be kewl).
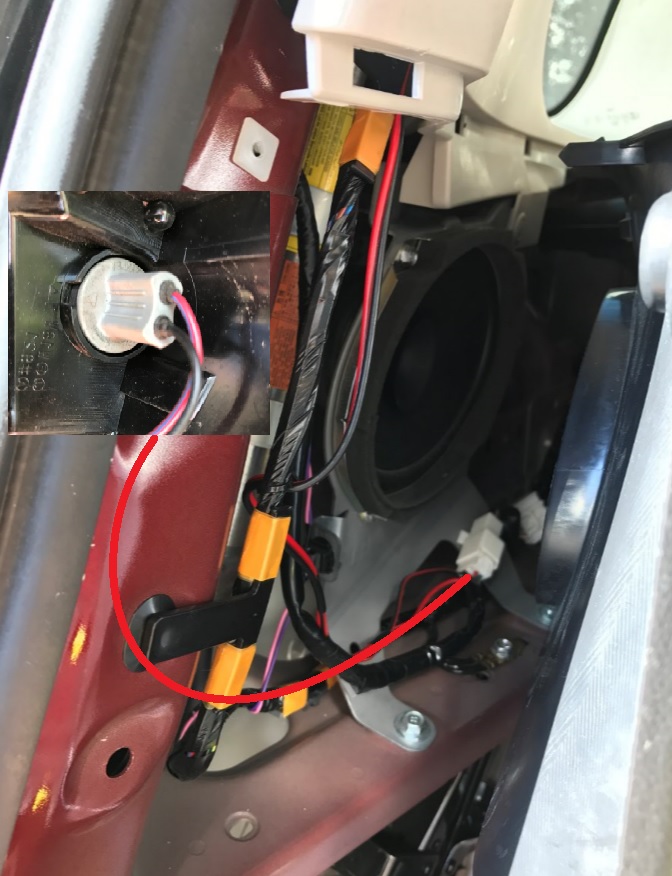
If you want to use the reverse light to power the camera, the wire is "Red with Blue stripe". When you remove the top rear hatch door trim, you will find one just like it - expect it is NOT. I had to take out a tail light to confirm wiring and trace it back. I tap right at the harness, right below the rear speaker. I rant the ground there too to keep it consistent instead of short ground to chassis.
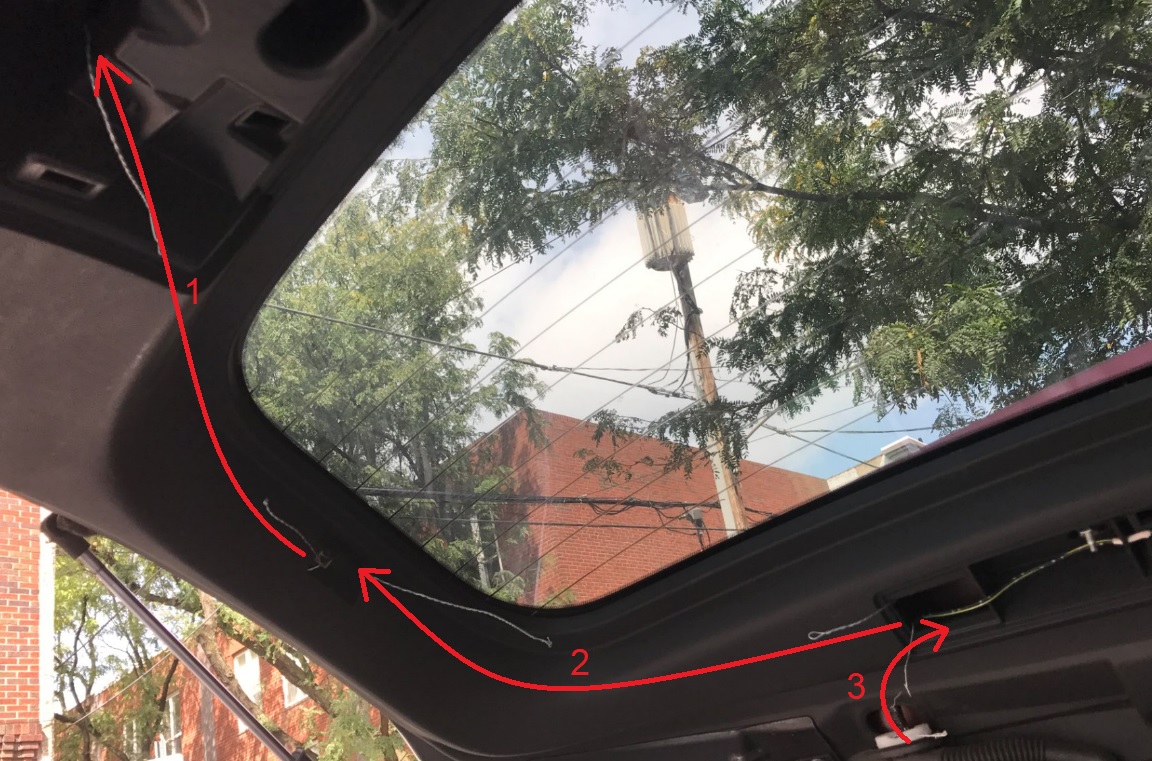
I find it easiest to fish the wires following this path. You need to fish them individually, then tie (figuratively, I mean one section at a time) them together to pull the wire through. Pre-bending the fishing wire to rough path helps to feed it.
All in all, this is not bad at all for under $35 total cost (+ some scrap wires b/c the kit wires are not long enough). I would have preferred a camera with wider than 170* or fisheye lens but I didn't want to spend more than necessary. Also these cheap screens have dual inputs: AV2 (master) and AV1 (slave). When the screen is powered but no video source, it draws about .3 amps b/c it is constantly auto detecting video source and resolution (PAL vs NTSC). Draws about 1.1 amp when screen is on. If both AV1 and AV2 were plugged in, AV2 (master) gets preference. Now I need to shop for a equally cheap front cam and find a suitable place to mount it in the front. Anyone have front cam install? Any good place to mount it and what are you using as trigger? Quick glance says there really isn't any ideal place unless deep/recessed into bumper, towards radiator frame.
https://www.amazon.com/dp/ (commissions earned)
https://www.amazon.com/dp/ (commissions earned)
Camera on hatch. OEM placement b/c the backside has access and weather covering.
You cannot see the lines separating the screen from the glass when the LCD mirror is off (unless you look REALLY close, can see a hint of a faint hairline).
At first, I thought the back-up lines are useless unless they turn with the steering wheel. But when dark/low light, it becomes very useful to gauge "my" bumper line! Reverse light lights up the car behind you but my bumper can be hard to see so the lines help me gauge. Instead of using the standard (weak) spring loaded clip on (can fall of or shift in the event of a big bump), I use 4 self tapping screws. Note that the screen is significantly wider than the OEM mirror, which is great for interior wide angle view (can see 2nd row kids heads). It is also tinted and on top of my 35% 3M tint, it is perfectly visible during day and night (glare reduction). You need to be mindful not to obstruct the sun visors from open/close when you hard mount it. This mirror now comes with blue tint for those who don't have tint (or want to be kewl).
If you want to use the reverse light to power the camera, the wire is "Red with Blue stripe". When you remove the top rear hatch door trim, you will find one just like it - expect it is NOT. I had to take out a tail light to confirm wiring and trace it back. I tap right at the harness, right below the rear speaker. I rant the ground there too to keep it consistent instead of short ground to chassis.
I find it easiest to fish the wires following this path. You need to fish them individually, then tie (figuratively, I mean one section at a time) them together to pull the wire through. Pre-bending the fishing wire to rough path helps to feed it.
All in all, this is not bad at all for under $35 total cost (+ some scrap wires b/c the kit wires are not long enough). I would have preferred a camera with wider than 170* or fisheye lens but I didn't want to spend more than necessary. Also these cheap screens have dual inputs: AV2 (master) and AV1 (slave). When the screen is powered but no video source, it draws about .3 amps b/c it is constantly auto detecting video source and resolution (PAL vs NTSC). Draws about 1.1 amp when screen is on. If both AV1 and AV2 were plugged in, AV2 (master) gets preference. Now I need to shop for a equally cheap front cam and find a suitable place to mount it in the front. Anyone have front cam install? Any good place to mount it and what are you using as trigger? Quick glance says there really isn't any ideal place unless deep/recessed into bumper, towards radiator frame.
")