2017 Tow Hitch

Another vote for the Draw Tite. Just finished installing on my 2019. Took about 1.5 hours, but that's because I did it myself and it would have gone much faster with another person. No problems, just small frustrations. I didn't have to jack the car or use the ramps I own. Used a ratchet strap to hold the exhaust after removal from the rubber hangers. Everything lined up perfectly. Pain points were using something to hold the hitch somewhat in place so I could get the nuts on the bolts, and worse, getting the exhaust off the hangers. Using lubricant as suggested is a must. I had bought a tool designed specifically for pushing off the hangers, but the Mazda hangers are concave on the end and so is the tool so it kept slipping. What finally worked was using a vise grip to pull the hanger away, and once it was beyond the nipple of the hook, the tool I bought worked perfectly as the slot in the rubber hanger kept the tool in place. Hint: don't forget to center your exhausts after your install is done and before you put everything away. (wink)

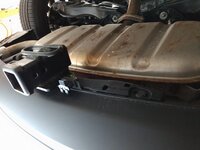
Some photos (no idea why the one posted sideways!). Doesn't stick out past the bumper's largest point at all. I bought a simple rubber cap for it when not in use.

attachment.php

attachment.php

attachment.php
 
Another vote for the Draw Tite. Just finished installing on my 2019. Took about 1.5 hours, but that's because I did it myself and it would have gone much faster with another person. No problems, just small frustrations. I didn't have to jack the car or use the ramps I own. Used a ratchet strap to hold the exhaust after removal from the rubber hangers. Everything lined up perfectly. Pain points were using something to hold the hitch somewhat in place so I could get the nuts on the bolts, and worse, getting the exhaust off the hangers. Using lubricant as suggested is a must. I had bought a tool designed specifically for pushing off the hangers, but the Mazda hangers are concave on the end and so is the tool so it kept slipping. What finally worked was using a vise grip to pull the hanger away, and once it was beyond the nipple of the hook, the tool I bought worked perfectly as the slot in the rubber hanger kept the tool in place. Hint: don't forget to center your exhausts after your install is done and before you put everything away. (wink)

Some photos (no idea why the one posted sideways!). Doesn't stick out past the bumper's largest point at all. I bought a simple rubber cap for it when not in use.

Looks good!
 
Looks good!

Thank you! Forgot to mention that the exhaust shield is razor sharp on the edges, and you won't even realize your hands have been cut until you see blood dripping. Be careful around it.

Quick follow up question for anyone who knows--the Canadian OEM hitch harness also routes through a grommet to the outside like the US version? Did anyone locate an online copy of the instructions specific to the CAN version?

I agree with whomever stated that the harnesses which keep the wiring inside until needed could mean a longer life, but I also know my kinda OCD side would shudder a bit every time I'd see wiring just hanging out the back gate. (eek) LOL
 
Canadian version does go through a grommet from interior to exterior. You could leave it inside if you wanted to I suppose. I think my grommet was fixed on the harness already, you'd just need to remove it (or not) if you wanted to do it that way. Since it was such a nice neat package I ran it outside. Plenty of di-electric grease and the connector cover installed when not in use.

When installing I realized that if there was ever an issue I could chop off the original exterior harness and splice in a new vehicle side harness from any parts store to the module and leave it inside the car with the spare.
 
Another vote for the Draw Tite. Just finished installing on my 2019. Took about 1.5 hours, but that's because I did it myself and it would have gone much faster with another person. No problems, just small frustrations. I didn't have to jack the car or use the ramps I own. Used a ratchet strap to hold the exhaust after removal from the rubber hangers. Everything lined up perfectly. Pain points were using something to hold the hitch somewhat in place so I could get the nuts on the bolts, and worse, getting the exhaust off the hangers. Using lubricant as suggested is a must. I had bought a tool designed specifically for pushing off the hangers, but the Mazda hangers are concave on the end and so is the tool so it kept slipping. What finally worked was using a vise grip to pull the hanger away, and once it was beyond the nipple of the hook, the tool I bought worked perfectly as the slot in the rubber hanger kept the tool in place. Hint: don't forget to center your exhausts after your install is done and before you put everything away. (wink)

I'm curious about which tool you used on the exhaust hangers. When I installed the Draw-Tite on my 2018, I used a Lisle 38350 Exhaust Hanger Removal Pliers that I purchased from amazon. My experience was that the end of the tool fit perfectly into the recess on the ends of the hanger brackets. After shooting some silicone lube on the hanger brackets, the tool removed each rubber hanger in a matter of seconds. I may never have a need to use it again, but it made that troublesome part of the project so effortless that I'd recommend it to anyone installing a hitch themselves.
 
When I installed the Draw-Tite on my 2018, I used a Lisle 38350 Exhaust Hanger Removal Pliers that I purchased from amazon. My experience was that the end of the tool fit perfectly into the recess on the ends of the hanger brackets.

Yes, I ordered and used the exact same tool, but it just wouldn't sit properly on my hanger brackets--just kept slipping off to the side. Not sure where the problem was, but the brackets seemed to have a ring around the circumference of the face that didn't let the tool seat properly. It worked after I got the bracket recessed into the hanger itself so the tool was held in place by the channel in the hanger. If you mentioned the use of that tool previously, it may have been your post that inspired me to buy it. I have had historical issues with more than one vehicle around those damn exhaust hangers.
 
Relatedly: Kinda on an accessories binge. :) Bothered a bit by the expanse of unfinished plastic on the back lower bumper. I'm thinking about the OEM rear under garnish, which has an option when the OEM hitch is installed. Pictures of the OEM accessories are kinda poor, but it appears that the difference is a simple wedge bump-out at the lower center for the hitch tube.

Does anyone have any idea if non-Mazda hitches would require the same? Photos I've seen of the OEM hitch and my Draw Tite seems to show a similar placement of the hitch tube under the bumper. Furthermore, the Draw Tite is a larger 2", while the OEM is 1 1/4". On the other hand, the Mazda hitch requires a cutout in the bumper, but the aftermarket hitches do not. Probably safest to get the hitch option for the garnish, but I'd visually prefer the regular one if it will work.
 
I'm curious about which tool you used on the exhaust hangers. When I installed the Draw-Tite on my 2018, I used a Lisle 38350 Exhaust Hanger Removal Pliers that I purchased from amazon. My experience was that the end of the tool fit perfectly into the recess on the ends of the hanger brackets. After shooting some silicone lube on the hanger brackets, the tool removed each rubber hanger in a matter of seconds. I may never have a need to use it again, but it made that troublesome part of the project so effortless that I'd recommend it to anyone installing a hitch themselves.

I also purchased the same Lisle Muffler Removal tool quite some time ago and it worked perfectly on 2 different vehicles.

Perfect for when I installed an after market exhaust on my 2016 MX-5 GT.

Perfect for when I removed the exhaust to install a Draw-Tite on my 2018 CX-5 GT.

The hanger brackets are identical on both my MX-5 and CX-5.

I am also curious about which tool he purchased. It seems as though the Lisle 38350 is the most common removal tool as far as I could find.
 
It is possible that I used too much lubricant and the tool was simply slipping as a result, but I swear the face of the tool and the hanger bracket didn't seem to mesh together well. I had the problem on all 4.

EDIT: Just looked again. I know the reason now. Based upon the etrailer.com install video warning about having enough space to reattach after the hitch is installed, I removed the hangers from the exhaust and left all 4 attached to the car bracket. The car bracket and the exhaust bracket faces are different. The tool fits perfectly on the car's.
 
Last edited:
It is possible that I used too much lubricant and the tool was simply slipping as a result, but I swear the face of the tool and the hanger bracket didn't seem to mesh together well. I had the problem on all 4.

EDIT: Just looked again. I know the reason now. Based upon the etrailer.com install video warning about having enough space to reattach after the hitch is installed, I removed the hangers from the exhaust and left all 4 attached to the car bracket. The car bracket and the exhaust bracket faces are different. The tool fits perfectly on the car's.

As Inspector Clouseau would say, "The mystery is now solve ed".
 
Relatedly: Kinda on an accessories binge. :) Bothered a bit by the expanse of unfinished plastic on the back lower bumper. I'm thinking about the OEM rear under garnish, which has an option when the OEM hitch is installed. Pictures of the OEM accessories are kinda poor, but it appears that the difference is a simple wedge bump-out at the lower center for the hitch tube.

Does anyone have any idea if non-Mazda hitches would require the same? Photos I've seen of the OEM hitch and my Draw Tite seems to show a similar placement of the hitch tube under the bumper. Furthermore, the Draw Tite is a larger 2", while the OEM is 1 1/4". On the other hand, the Mazda hitch requires a cutout in the bumper, but the aftermarket hitches do not. Probably safest to get the hitch option for the garnish, but I'd visually prefer the regular one if it will work.

The OEM hitch sits higher and requires the bumper to be cut out. I don't know if the non-hitch garnish will cover in the way you want.

I actually notched and reinstalled the trim piece that the instructions say to remove.

asset.php


IMG_20190327_111427802.jpg
 
The OEM hitch sits higher and requires the bumper to be cut out. I don't know if the non-hitch garnish will cover in the way you want.

I actually notched and reinstalled the trim piece that the instructions say to remove.

asset.php


View attachment 220600

Looks good! Was very confused why that trim piece exists, other than just as a finishing piece. Perhaps it adds some stability to the lower part of the rear bumper cover. Dunno.

Is that the Draw Tite hitch? I wasn't confident I could still fit the trim piece into place even with it notched out given how close the Draw Tite sits in that center part. Will take another look if that indeed is what you did.
 
The OEM hitch sits higher and requires the bumper to be cut out. I don't know if the non-hitch garnish will cover in the way you want.

I actually notched and reinstalled the trim piece that the instructions say to remove.

asset.php


View attachment 220600

Thanks much for that idea. I knew there was a reason I was saving that piece. :)
 
Yes, that is the Draw Tite hitch. The notch in the plastic piece was quite large, but I figured i had nothing to lose when trying this. I was conservative in the depth of the notch and kept fitting until i got it right so it wasn't twisting or binding.

I also made a bracket with some 16 gauge metal for my harness plug and then attached it to the hitch with some stainless band clamps.

Thank you....I saved that piece so will tackle that task in the near future.
 
I used the mounting hole for that time piece to mount the harness holder that came with my curt. The trim is on a shelf in my garage somewhere.
 
I used the mounting hole for that time piece to mount the harness holder that came with my curt. The trim is on a shelf in my garage somewhere.

Me too, I think. Probably copied you if you posted pictures. But I got the Drawtite hitch and Canadian OEM wire harness so I wouldn't have to pierce any insulation or run power from the battery.
 
Me too, I think. Probably copied you if you posted pictures. But I got the Drawtite hitch and Canadian OEM wire harness so I wouldn't have to pierce any insulation or run power from the battery.

I just ordered the Canadian harness. Does it come with the bracket for the harness plug?
 
Back