I have a 2016 CX-5 Grand Touring with Bose Audio. I'm wrapping up replacing the head unit with a Pioneer AVIC-8200NEX and am using the Metra 95-7522B Dash Installation Kit. I am find that the factory trim piece that surrounds the radio will not fit around the Metra dash kit. The opening is slightly smaller on both sides. The part number etched on the trim piece reads: KA0G-55231. I don't get too many hits for this part number on the Internet. I do however, get hits for KA0G-55-230C-02. For anyone that has successfully replaced their 2016 head unit using Metra 95-7522B confirm the part number etched on their trim piece to see if it says something different? I'm guessing that KA0G-55-230C-02 is a different part that should work with the Metra dash kit, but was hoping someone out there can confirm before I drop about 70 bucks on it. Thanks!

You are using an out of date browser. It may not display this or other websites correctly.
You should upgrade or use an alternative browser.
You should upgrade or use an alternative browser.
Question for anyone using Metra 95-7522B Dash Installation Kit on their 2016 CX-5
- Thread starter bgibson
- Start date
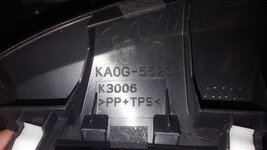
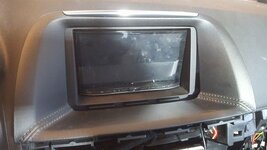
The bezel for the Grand Touring w/Bose was incompatible with the Metra 95-7552B. To my knowledge, that is the only dash kit made for the CX-5. I've read some having success with the Sport trim using that dash kit, so I'm guessing the two radios have different dimensions. It was pretty hard tracking down the right bezel that will work because not many part descriptions will tell you what trim model the bezel was intended for. I did find the following part number: KD45-55-230D-02 it was the cheapest I could find for around $50. It is a smooth black finish that matches the metra kit well. Not the grain like texture that originally came with the car. Those were around $100 and I figured if I was going to take my chances not knowing whether it will work, I'd rather drop $50 vs. $100 on it. It did work, see pics.
I'll try to do a complete write up of my install this week. I've been a bit busy. So far, I got everything working except the CAN-BUS outputs (Vehicle Speed Sensor, Parking Break, Reverse, & Illumination) off the PAC RP4-MZ11. Quick hint on that, the harness plugs into the the Tuner Amplifier Unit (TAU) behind the glove box, not in the dash. I need to email PAC support to hopefully get those working. Also there were 2 thing I needed to hardware to harnesses behind the dash: Reverse Camera and Steering Wheel remote. Don't waste your money on "AXXESS AX-MAZCAM", the CX-5 GT does not have a matching harness behind the dash. You should still get a AXXESS AX-CAM6V 12-VOLT TO 6-VOLT STEP-DOWN CONVERTER. I'll follow up with more detail later.

I'll try to do a complete write up of my install this week. I've been a bit busy. So far, I got everything working except the CAN-BUS outputs (Vehicle Speed Sensor, Parking Break, Reverse, & Illumination) off the PAC RP4-MZ11. Quick hint on that, the harness plugs into the the Tuner Amplifier Unit (TAU) behind the glove box, not in the dash. I need to email PAC support to hopefully get those working. Also there were 2 thing I needed to hardware to harnesses behind the dash: Reverse Camera and Steering Wheel remote. Don't waste your money on "AXXESS AX-MAZCAM", the CX-5 GT does not have a matching harness behind the dash. You should still get a AXXESS AX-CAM6V 12-VOLT TO 6-VOLT STEP-DOWN CONVERTER. I'll follow up with more detail later.
2016 Mazda CX-5 Install w/Bose
This is specific to 2016 CX-5 Grand Touring w/Bose audio. Other trims may vary.
Part List:
<tbody>
</tbody>
Useful Links:
<tbody>
</tbody>
I'm going to cover this install over multiple post with in this thread. So more to come.
This is specific to 2016 CX-5 Grand Touring w/Bose audio. Other trims may vary.
Part List:
| Part | Name | Comments |
| Head-Unit | Pioneer AVIC-8200NEX | |
| Dash Kit | Metra 95-7522B | |
| Replacement Bezel | KA0G-55-230C-02 | This is a Mazda OEM part. Search online for it. I paid about $50 for mine. You will need to use a new trim bezel as the one that comes with the GT (Bose) will not fit with the Metra 95-7522B. |
| Factory Antenna Adapter | Metra 40-HD10 | |
| 72-Inch Universal Antenna Extension Cable | Metra 44-EC72 | |
| Wiring Harness/SWC Interface | PAC RP4-MZ11 | In addition to factory harness, and remote controls, it is supposed to provide output for: Reverse, E-Brake, Speed Sensor, & Illumination output. |
| HDMI Panel Flush Mount Cable | Round, single HDMI port. You can also get a combination (USB, Line-In, etc). What is your preference. | |
| USB Panel Flush Mount Cable | Round, Dual USB 3.0 ports. | |
| 12-VOLT TO 6-VOLT STEP-DOWN CONVERTER | AXXESS AX-CAM6V | |
| OPTIONAL: | ||
| XM Antenna Adapter | ADS-HRN-ANT-SAT1 | Any FAKRA-to-SMB adapter cable should do. |
| SiriusXM Tuner | SXV300v1 | |
| Gauge Displays/SWC Interface | iDatalink Maestro RR ADS-MRR | An alternative Steering wheel control Interface. It also provides Gauges by tapping into the OBD-II interface. I was hopeful that they would provide more OEM integration, such as being able to set vehicle preferences that the original radio does or output from the CAN-BUS. Unfortunately they do not and when I asked, there doesn't seem to be any plans to. |
| Wiring Harness | Metra Electronics 70-7903 | If you do not use PAC RP4-MZ11, you're going to need a wiring harness. You will also need RCA to speaker wire adapters. More explained below. |
<tbody>
</tbody>
Useful Links:
| Links | Comments |
| https://euroesi.mazda.co.jp/esicont/eu_eng/cx-3/20150107140637/html/id0920zz010000.html and https://euroesi.mazda.co.jp/esicont/eu_eng/cx-3/20150107140637/html/id0920zz113500.html | I stumbled upon this via Google search. Useful information to understand about the TAU. |
| https://www.mazdas247.com/forum/sho...-5-Speaker-Schematics-ALL-MODELS-and-VARIANTS and https://www.mazdas247.com/forum/showthread.php?123851522-2016-CX5-Audio-upgrade-thread | Very useful to how everything is all wired. |
| http://www.mcx5.org/mazda_cx_5_service_repair_manual-197.html | Even though it is for an older model, this is useful on learning how to tear a part your trim properly. |
<tbody>
</tbody>
I'm going to cover this install over multiple post with in this thread. So more to come.
Last edited:
Existing Stereo Configuration
The factory radio is made up of 3 major components:
The factory radio is made up of 3 major components:
- Connectivity Master Unit (CMU - Includes Display+ CD player). Connections to: Rear Camera, Steering wheel switch (SW1 and SW2), outputs its audio to the TAU. Location is top center dash.
- Tuner Amplifier Unit (TAU). Receives audio from CD, Aux Input from center dash. Outputs audio (un-amplified/line-level) to the Amplifier. Also has connections to the AM/FM and XM antenna. Location, passenger side (for LHD vehicles) behind glove box.
- Amplifier. Location under seat.
Last edited:
Connections near the Glove Box area
It took me 4 days to do all this. Mostly because I was running extra wires for rear seat entertainment and learning the layout and such. You should come in under that, but set some time aside just in case.
1st thing is to remove all of the trim. This include the Glove Box area, and center dash trim. See the link I provided on removing dash pieces.
- Aftermarket Head Unit to PAC RP4-MZ11. Here is the list of connections used. You will need to run some wire from the center dash to the TAU location which isn't too difficult to do.
- Unplug the lower harness coming out of the TAU. You will be plugging the PAC harness into the wiring harness of the vehicle (leaving the TAU unconnected).
- Speaker Outputs - not used. Tuck these away as you don't want amplified signals going into the amplifier.
- Front/Rear RCA outputs - My PAC had RCA connections. I heard some have wired connection. If that is the case, you'll need RCA to wire adapters.
- Accessory, +12v, Ground, Amp Turn-On - You'll need extra wire so you can run from H/U harness to PAC harness. I found, Stinger SGW9920 9 Conductor Speedwire 20ft Roll Blue, useful since it kept the wires bundles together (I used out of of the 9 wires). The only downside is the colors won't match, so you'll need to keep track of what color connects to what.
- Parking Brake, Vehicle Speed Output, Illumination, Reverse - With the new Mazda's, these connections are no longer analog. The signals are sent digitally over the CAN-BUS (CAN-H/CAN-L). The PAC has CAN-H/CAN-L connections that should be going to the correct CAN outputs on the TAU harness. But I am unable to get a signal for these connections and so far I've just been living without them connected. I don't know too much about the CAN-BUS, but I do know there are CAN-H/CAN-L wires in the TAU and CMU. My plan is to contact PAC support, but I just haven't had the time lately. I suspect that it is possible there are different signals coming out of each CAN-H/CAN-L and I will need to tap into the connections in the CMU harness.
- If you need the connections but don't plan to use the PAC harness, you're going to have to tap into the old fashion way. Running wire to reverse light (or switch if you can find it), E-brake, etc. I think there is an analog output for illumination in the CD play harness behind the dash, but I'm not going to bother until I can figure out the PAC harness.
- Not Used (Steering wheel output) - This is where the PAC harness is off. The SW outputs are not located in the TAU harness. They are in the CMU harness behind the dash. You may have to cut and re-run connections to the CMU harness. Also, the PAC has a 3.5MM output for remote to stereo, you'll need to get an extension cable to run to the dash. I did not use this connection because I already purchased the iDatalink Maestro RR ADS-MRR. Long story short, I was hoping it would provide the CAN-BUS outputs I needed. When I found it that it did not (after I purchased it), I decided to hold on to it for Steering wheel output and gauges.
- Aftermarket Head Unit to FM/AM antenna. You'll need an extension cable to run from adapter to head unit. Connection is self-explanatory. I combined the blue wire from the antenna adapter to the Amp Turn-on from the head unit and Amp-Turn-on from the PAC harness.
- XM Antenna - Connect head unit to SXV300v1 is self explanatory. You will need an satellite antenna adapter to convert FAKRA-to-SMB. You shouldn't need an extension cable if you unstrap the antenna cables that are mounted to the TAU. Doing this gave me extra slack and I was able to mount the satellite tuner behind the glove box area closest to the head unit. If you don't want to, then you'll need to get an extension cable.
Last edited:
Connections near the Dash area
In addition to connecting to the PAC harness, and FM and XM antenna...
I couldn't find any harnesses designed to connect to the CMU harness behind the dash, so I had to tap into the harness for the Reverse Camera and Steering Wheel connections. If you don't like soldering, cutting wire, or crimping, I recommend using Posi-tap Connectors, 20-22 Gauge Wire. They're easy to use and re-usable. Make sure you get 20-22 Guage (red). The factory harness wires are thin. My first mistake was using the blue kind, and I think the taps would miss the wire when trying to tap into them. Both connections are in the 0920-301A harness. See links I provided earlier for a picture. It will be a lot easier to look for the colored wires vs. pin number. I believe the diagrams showing the pin numbers are from the point of view of behind the harness instead of steering at the front of it.
I think this should cover it. I took pictures and I will try to add them this weekend. I need to get them off my phone and re-size them and such.
In addition to connecting to the PAC harness, and FM and XM antenna...
I couldn't find any harnesses designed to connect to the CMU harness behind the dash, so I had to tap into the harness for the Reverse Camera and Steering Wheel connections. If you don't like soldering, cutting wire, or crimping, I recommend using Posi-tap Connectors, 20-22 Gauge Wire. They're easy to use and re-usable. Make sure you get 20-22 Guage (red). The factory harness wires are thin. My first mistake was using the blue kind, and I think the taps would miss the wire when trying to tap into them. Both connections are in the 0920-301A harness. See links I provided earlier for a picture. It will be a lot easier to look for the colored wires vs. pin number. I believe the diagrams showing the pin numbers are from the point of view of behind the harness instead of steering at the front of it.
- Reverse Camera - 4 connections. You should use an RCA to speaker wire connector. At minimum you'll need 12" but a little extra would give you more to play with as you place things back into the dash.
- Black (1A) -> RCA input
- Red (1B) -> RCA ground
- White (1C) -> Power Supply (6v). Connect this to the 12-VOLT TO 6-VOLT STEP-DOWN CONVERTER.
- Bare Wire (1D) -> Splice/Jumper this with your other ground wire connections.
- Steering Wheel connections - 3 connections. I connected this to the iDatalink Maestro RR ADS-MRR, but there is no reason why you couldn't hardware to the PAC harness. You just need to be able to identify the proper connections.
- Pink/Blue (1M) -> ST-SW1
- Brown/White (1N) -> ST-SW Feed
- Green/Orange (1O) -> ST-SW2
- GPS - Use the one that came with you head unit. The connector for the factor GPS most likely won't fit. The good news is, it is super easy to install. Just remove the factory GPS antenna and mount the new one in its place. The location is right in front of the center speaker on the dash. Just pop the grill off.
- USB/HDMI in - I decided not to use the factory USB ports. Instead, I removed the factory USB/Aux-In/SD-Nav box. In its place, I used the standard round (about 1" diameter) adapters you see everywhere on Amazon/e-Bay. I also bought some sheets of ABS plastic (12 x 12 x 1/16-inch). I cut it to the proper dimensions, added a couple more sheets slightly smaller for added strength, drilled out holes. I had to remove the lower center dash, which isn't too easy and not for the faint of heart. In the end I think it came out nice.
- Misc (Aux In/Audio out) - Self-explanatory. Just run these wherever you need them to end up.
I think this should cover it. I took pictures and I will try to add them this weekend. I need to get them off my phone and re-size them and such.
Similar threads

- Replies
- 3
- Views
- 2K
- Replies
- 15
- Views
- 6K