Genuine Foot Illumination Kit NEED HELP!

:
2016 CX-5
Hi All,

I recently bought a genuine foot lamp for mazda cx-5 from japanparts and didn't came with any installation manual or diagrams. It's been a week searching the web for any installation instructions but i could not find any.

Does anyone know how to? Please help.

I'll try to add photos if i know how.

Kit details:
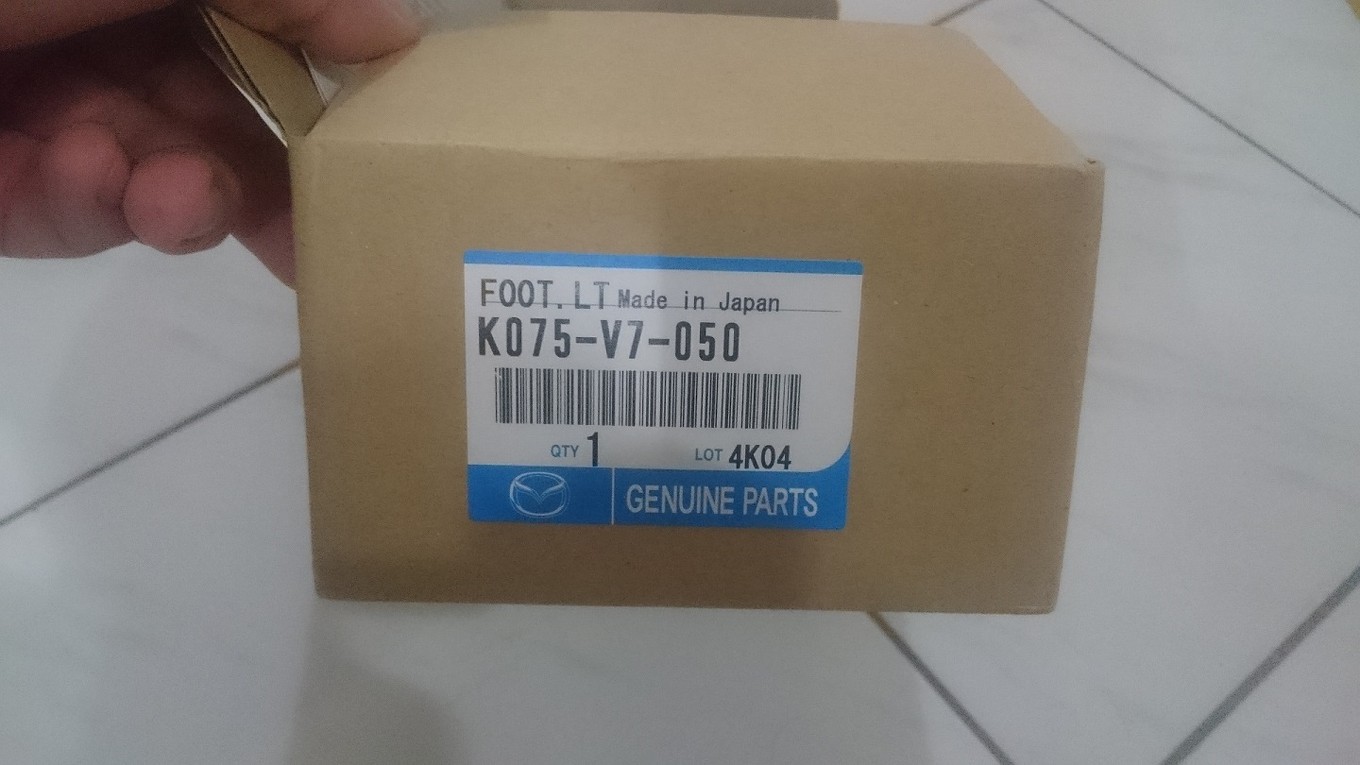
K075 V7 050 same as K070 V7 050
1x wiring harness
1x controller
1x switch
1x purple wire(open ended)
2x led lamps
3x electrotaps (scotchlock)
1 set foam pads, stickers, cable tie

pl5X8F8dj

pndi5Pksj

pmNBAnXlj

plKQBumGj

pn4IVjGBj

pn9sM7OEj

plefo7mLj

podaOokLj

plIwnNEoj

pmSEgWH7j

pnXdl20rj


HELP HELP HELP
 
I think it's different 1cx5, already read that last week but it seems joaks might have the foot illumination aswell i dunno.. maybe i'll message him later
 
There was a "Mazda MX-5 Genuine Interior Lighting Kit Installation Instructions" online which is very similar to your CX-5 Genuine Foot Illumination Kit. Unfortunately the document has been taken off by the vender. You can try to search this parcitular instruction online, or go to Mazda dealer and see if you can borrow the instruction from the kit. There's similar footwell light kit for CX-9 too and you may try that route. Mazda USA website may have those instructions posted under accessory section for the kits they sell.

Found Mazda MX-5 Genuine Interior Lighting Kit Installation Instructions and here is schematic diagram which should be similar to CX-5's footwell courtesy light kit:
attachment.php

Instructions don't say anything about how do these footwell courtesy lights work. But based on the schematic they seem to be on in full brightness whenever the door is open independently from the interior light OFF/DOOR/ON 3-position switch. They also should be on in dim fashion when the instrument cluster lights (parking lights or headlights) are on. There's a switch in the kit which is used for turning the dim footwell curtersy lights off during the night when the instrument cluster lights are on.

I'm not sure if Mazda in the US offers Interior Lighting Kit as an accessory for CX-5 like they offer for Madza3、MX-5、and CX-9, but this OEM Interior Lighting Kit Installation Instructions for MX-5 have 30 pages. They also provide some information of connection point (the one with the switch) to power any LED lightings when instrument cluster lights (parking lights or headlights) are on for this JDM LED ambient light, glove compartment light, and front console cubby light.
 
Talked to Yuki from Japanparts before i bought this, sweared there will be a installation guide but in japanese and said they'll translate for 1000jpy.

Now they are telling me that there's no manual as it's dealer installed. I nagged Yuki about 4 times if she could check if it is with installation manual before i bought it, said yes yes yes.

Rather not waste my time on them anymore.

and few days ago took this to our local dealer, they had zero idea how to.
 
Last edited:
Hi kiln,

That's helpful, saw that last week while researching. What i can't figure out is the two white 8pin male and female connector, because the only 8pin connector in 2016 cx-5 wiring diagram i could find is at the back at RBCM, there's no way this harness could reach to the back of the car.

I'll post a diagram of the harness which goes where, did multi-tester in every connection
 
Driver 1

I'd be interested in this kit too. So if you could let us know how you make out?

You're pics aren't showing up for me at all.

You need to copy the URL of your pic then click on the Insert Image icon above the message box then paste it into the dialog box.

Thusly.

5X8F8d.jpg
 
Last edited:
Hi DRiver 1,

Perhaps you can contact the person that had a very much similar OEM kit installed in his Miata, by a dealership: https://forum.miata.net/vb/showthread.php?t=366064


Hi kiln,

That's helpful, saw that last week while researching. What i can't figure out is the two white 8pin male and female connector, because the only 8pin connector in 2016 cx-5 wiring diagram i could find is at the back at RBCM, there's no way this harness could reach to the back of the car.

I'll post a diagram of the harness which goes where, did multi-tester in every connection
 
Last edited:
Hi all finally had the time to do this haha

So sorry didn't log it or took a video on how to but I'll explain it as much as possible and maybe I'll attach later some service manual images.

Ok this is what I did: BEFORE YOU DO ANYTHING UNHOOK YOUR BATTERY (NEGATIVE CABLE)

1. Remove the A pillar cover, just pull until you detach all clips after there will be a grommet - strap thing, you may cut it or shove a flat screw driver to undo the strap thingy.
2. Remove the driver's side sun visor, remove one screw on the left and detach the connector for vanity mirror light. on the left side two flat screw driver to remove it. very simple and always wrap your screw driver in masking tape!
3. Remove map light console, open the sunglass holder unscrew two screws, pull down gently. I recommend cable tie the three harness 'cause the map light console will be hanging quite a long while or you could detach all connectors.
4. Remove glove box and passenger side lower plastic panel, very simple two clips.
5. Remove cluster switch (istop, lane departure, tire pressure, etc. switches) left side of steering wheel. I recommend you first remove the cubby compartment below it then you could easily unclip the cluster switch with ease.
6. Now wiring the harness which will need some modification as it's japanese so right hand drive the switch will on the right.

The lavender/ red wire on the foot lamp harness will be tap to map light connector 0918-801 (see attachments) on lavender/ white wire. (this will be the positive)
The gray/ black wire on the foot lamp harness will be tap to map light connector 0918-801 on voilet wire. (negative)

The yellow/ black wire on the foot lamp harness will be tap to the cluster switch connector 0922-106 on yellow/ green wire (positive)
The black ground wire with eyelet will be connect to any ground point on the car, I suggest you attached it to the rear cargo area grounding point LOL

That's all the connection. The excess pin/ wires on the foot lamp harness connector will be cut and burried 6 feet below the ground.

Note: The lavender/ red wire is too long needs to be shorten.
The gray/ black wire needs to be extended.
The yellow/ black wire also needs to be extended.
The switch wire (orange and yellow) needs to be shorten as well if you plan to place it on the driver side.

Operation goes:
Door open, unlocking the car = Bright
If foot lamp switched on and auto headlamp on or headlamp switch on = dim
 

Attachments

  • mazda cx-5 0918-801.JPG
    mazda cx-5 0918-801.JPG
    13.9 KB · Views: 315
  • mazda cx-5 0922-106.JPG
    mazda cx-5 0922-106.JPG
    14.9 KB · Views: 332
Last edited:
Glove box removal
28uih6g.jpg

28s7rt.jpg


Passenger side under cover
a3l7oo.jpg


A Pillar Trim and sunvisor
5x1ks1.jpg

2jcdj04.jpg

2w4iwb4.jpg


Map light console
io3fhk.jpg


Cant find any instructions with images on the cluster switch but i assure you it's easy.
 
I ordered the US version of the kit and it came with instructions, but it seems ridiculously involved. There is a section that requires some sort of tap into the sub (Bose sound system) harness. Which I find to be insane, so other than tearing up the dash it appears that you have to do the same to the trunk/spare tire area just to get these installed. I have a paper version but plan to head in to work to scan these in.
Have you installed yours yet?

Yes installed it last December. Yeah scan it and post it here I may be of help.

Connection is simple 2 positive and 2 negative you could test it out on any 12v battery to understand the principle of the kit. the 1 set of + and - wire will be the bright and the other will be the dim. The dim will be connected to any source once the headlight is on. The bright will be connected to the map light controlled by the rbcm (that's why your instruction leads you to your trunk cargo area)

What does rbcm stand for? It seem like such a pain to not only tear up the entire dash, but to also tear up the entire hatch/cargo area to do this install. But I'm betting the light effect is worth it once it's finished. I was wondering if I should wait until I get a trailer hitch harness I'm planning on getting. I think you have to tear up the cargo area to out that in as well, so it might be smart to do it all at once.
I have slacked off and haven't taken the instructions in to get scanned, but I'll upload them once I do!

Rear body control module.
I dont advise removing the whole dash board as it may cause squeaks or rattles.
There should be a access panel for the brake lights and reverse light to tap wires for the trailer, removing some plastic panels yes but removing the entire trunk panels maybe.
 
Rear body control module.
I dont advise removing the whole dash board as it may cause squeaks or rattles.
There should be a access panel for the brake lights and reverse light to tap wires for the trailer, removing some plastic panels yes but removing the entire trunk panels maybe.

The 17 and 18 require removal of the entire drivers side rear panel - one big panel that runs from liftgate to rear door. I did it, not that hard.

I am curious about the footwell lights on the 17/18 - does it require some dumb dash switch or does it work as part of the interior lighting? Looking forward to seeing printed instructions before i decide to buy.

Alpha,
There is a switch with the kit. But I believe that's just to give you the option of turning them off independently of the door switch, so that the switch can be left alone and they will work when you open and close the door. Or at least that's what I gather from the instructions, will be uploading soon!

So you had the LEDs installed? I've read in a couple places that the dash gets all rattly after removal and replacement for the install. That's really not something I want to have as a side effect.
 
Yes installed it last December. Yeah scan it and post it here I may be of help.

Connection is simple 2 positive and 2 negative you could test it out on any 12v battery to understand the principle of the kit. the 1 set of + and - wire will be the bright and the other will be the dim. The dim will be connected to any source once the headlight is on. The bright will be connected to the map light controlled by the rbcm (that's why your instruction leads you to your trunk cargo area)

Driver,
How is it exactly that we are able to share files on here? I have the pdf scanned instructions ready to share, thanks.
 
Back