Guide CX-5 Factory Remote Starter - Install and Program

TreyP

2018 Soul Red AWD Touring CX-5
UPDATE: Sorry, but Photobucket sux and have started charging to host images. For that reason, the photos in this thread no longer worked. However, I have now added all of the images back in!

EDIT: And...the pictures are gone again, wtf? I'm adding them in a 3rd time, maybe they'll be here for you, maybe not, who knows at this point?


This will cover a complete factory remote starter install, including the hood switch and programming the remote to the car.

The Disclaimer: This is for informational purposes only. I am not responsible for any damage you may do to your car, yourself, or your property should you choose to attempt this on your own. When in doubt, hire a professional!

Ok, first things first. There is much discussion on this forum about the size of the RS fob. The car fob is 3" tall, and the remote fob is just under 3.75" and they are both the same width and depth. The size of the key ring on the remote fob should have been smaller, as that adds a good percentage of the additional 3/4" length. That being said, it would have been awesome if they would have combined the two fobs into one, because the two fobs do make for a bulky key chain. But to be fair, that goes for any remote starter fob.
Here are a few pics for comparison:

IMG_1249.JPG


Remote fob on bottom:

IMG_1250.JPG


And these compare it to a standard CompuStar remote starter fob:

IMG_1247.JPG


IMG_1248.JPG


The install took a total of 3 hours, but I blame most of that time on really bad pictures in the instructions. Now that I've done it, I could probably do the whole thing in around one hour.

Also, the #%*#! programming instructions are not written very well, IMO. It took me 75 minutes to program it, but once I figured out what they were saying, I could now do it in around 1 minute. More on that later.

I recommend you follow the factory instructions for all of this because it will have the technical details you need, but hopefully this thread will help to clarify some things.

Here are a few pics of some of the parts fresh out of the box for reference.
This is the ECU and the wiring that goes with it.

a.JPG


This is the temperature sensor.

b.JPG


And this is the hood switch. If you have a factory alarm you will not need to install the hood switch (according to mazdagear.com - I can neither confirm nor deny this since I do not have the factory alarm).

c.JPG


You should disconnect the battery negative cable and leave it disconnected during this entire process. I didn't, but I'm just crazy like that.

Begin by removing the two push pins to take off this panel. Be sure to pop up the center pin first with a screwdriver or you will damage the pins. You will need them for reassembly. Once the pins are removed, slide the panel towards the front of the car to remove it.

d.JPG


e.JPG


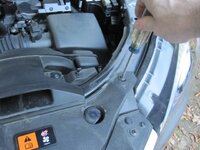
Remove this plastic cover piece by pulling up and gently outward on each side until you feel it disengage from the hidden clips and then carefully remove it, avoiding the parts it wants to snag on in the back. Also try to make a mental note of exactly how it looks when installed, it will help you when putting it back later.

f.JPG


g.JPG


Removing the fuse panel cover is the first place that the instructions will lead you astray. They tell you to detach the tab at the front and then lift the rear. DO NOT DO IT THIS WAY or you WILL BREAK THE FRONT TAB!! The front 'tab' is actually just a hooked over piece. You need to push the clip in the back and lift first, then work the entire cover off of the front tab/hook.

h.JPG


The panel cover now makes an excellent place to keep track of all your pins, bolts, and screws.
For those of you following closely, yes this picture is out of sequence, we haven't removed all this stuff yet.

l.JPG


Remove the two bolts holding the air duct. The duct will not be removed, but you do need the bolts out.

i.JPG


This panel will not be totally removed either, just remove this push pin and one phillips screw on the other side.

j.JPG


Continued...
 

Attachments

  • k.JPG
    k.JPG
    38.9 KB · Views: 180
Last edited:
This is the next place that the factory instructions may frustrate you. Well, for one thing, they jump to removing the glove box next, which is ridiculous because the under hood part is not done yet. But also, the drawing of how to install the actual hood switch is virtually indecipherable (to me anyway). This will help...

Looking at the front of the hood latch makes it very clear where the one screw goes, but the actual positioning of the switch is as clear as mud.
If you look at the switch, you will notice a tab protruding from both sides. I suspect this switch works on other Mazda models, because the CX-5 only makes use of one of the two tabs. This picture of the backside of the hood latch shows where that tab will go into.

m.JPG


The entire switch sits at a random awkward angle, but when you blindly try to put the switch into the right place, you will feel it when it pops into place. The thin metal switch prong goes towards the fuse panel side of the car, and the wires will go into the groove at the top of the image. Use the provided screw to mount the switch.

n.JPG


Next, you want to clean the metal panel behind the latch thoroughly and then stick on two of the three wire-tie tabs provided in the kit. Run the wire bundle as shown. Make the wire ties snug, but do not over tighten them. Clip off the excess from the wire ties.

o.JPG


p.JPG


Run the wiring bundle under the duct and panel we loosened earlier. Make sure that when everything is fastened down that the wire bundle is not pinched. You should be able to grasp the bundle from each side of the duct and tug it back and forth slightly.

q.JPG


The bundle will come out here, not at the far end of the panel. Clean the area and mount the 3rd wire-tie tab as shown, then tie the wires into place.

r.JPG


This is a picture of everything tucked back in. It should look very clean with only a tiny peek at the wire before the duct, and the bundle will also show over by the hood prop holder.

s.JPG


Run the wiring bundle around the factory wiring harness as shown.

t.JPG


Run the wiring bundle down along the factory harness, using zip ties in a few places to keep it in place.

u.JPG


As you start to come around to the fuse panel, do not zip tie the bundle in yet as this will make it harder to work with the fuse panel connector. Do make a note though to not block the air filter cover from being removed in the future.

v.JPG


I removed both of these connectors to make my life easier, but I only used the connector with a lot of wires, not the one with only three (or more, depending on your fuse panel model) wires.
*** NOTE: This will vary depending on which model of CX-5 you have. The factory instructions clarify this, so please reference them as needed.

w1.JPG


Regardless of which fuse panel your car has, the white wire from the hood switch will go into this empty slot I am pointing at. It is behind the red wire in my car, but the red wire may be a different color on yours. Again, refer to the factory instructions here to be sure.

w2.JPG


Gently push the wire as far as it will go into the slot without forcing it at all. This will just help set it up for the next steps.

w3.JPG


Use a tiny screwdriver or other tool to loosen the retainer clip using the two small slots on this side of the connector. It only needs to be loosened a tiny bit, not removed.

w4.JPG


Now push the white wire in until it bottoms out. You may hear a small click, but make sure it is all the way in with no metal showing. Then push the retainer clip back into place; it should take only a small amount of pressure to get the clip back in. If it feels hard, then your wire is probably not in the right position yet.

w5.JPG


Now, if you see the black wire shown here, then you have the same fuse panel model that I have (Type A) and this is the black wire that you want to tap into using the provided red 'electro tap'. If you do not see the black wire and that slot is empty, then you have a Type B and you need to refer to the factory instructions for the correct black wire to use from the other connector. Either way, the next steps will be the same, except the black wire you use may vary.

w6.JPG


Remove the factory black tape that holds the wires of the two connectors together. Then separate the black wire to make it easier to work with.

w7.JPG


Attach the black wire from the hood switch to the factory black wire using the electro-tap. The factory wire goes all the way through on one side, and the hood switch wire goes into the other side, all the way until it stops. Use pliers to push the metal tab in firmly until you can close the plastic flap all the way. It may not stay closed though, so be sure to use black tape to wrap the whole thing up.

w8.JPG


You can now put the connectors back in, replace the fuse panel cover (taking care of the new wires) and finish adding zip ties to the wiring bundle as needed in a few places to secure it.


Continued...
 

Attachments

  • x1.JPG
    x1.JPG
    33.2 KB · Views: 175
Last edited:
Now we can move on to the inside of the car. Surprisingly to me, this part of the procedure proved to have more snags than the part under the hood. There is nothing overly hard here, but the instructions were not clear at all, and you are working in tight places in awkward positions that the human body was never meant to be in. Have fun. :)

Remove this panel from beneath the glove box by using the two push tabs. Then guide it off of the one hook on the other side'

x1.JPG


Open the glove box and push in the sides to release the pins from their holes on each side. Lower the glove box some more and then pull the bottom from the clips. There is a damper shock that needs to be unclipped as shown. You can now put the entire glove box in the back for safe keeping.

x2.JPG


Use the provided foam to wrap the antenna of the ECU and cut off the excess. You will need the extra later, so don't discard it. Also, attached to 2-sided tape to the ECU as shown.

y1.JPG


Clip the temperature sensor into here. Do not take off the black tape that is on this bundle.

y2.JPG


Mounting the ECU is the next place that the factory instructions failed for me. It took me forever to figure out the spot where they wanted it to be mounted. Even with real pictures though, it is hard to describe exactly where it should be. The picture with my hand shows it the best though. Mount the ECU up and inside of the dash where my hand is, just above the black trim panel, with the antenna lightly touching the area by the head unit. Picture the antenna coming off of my lower thumb joint. The connector will be towards the passenger door side.

y3.JPG


y4.JPG


y4b.JPG


**Phew!**

Use the remaining foam to wrap the temp sensor as shown, leaving the actual sensor portion exposed.

y5.JPG


In this picture, I am pointing with my middle finger (coincidence, I promise) to the factory connector where the 2-pin ECU bundle will plug in. Ignore the ECU bundle in this picture though. The bundle will be zip tied up where the pink tape is along the top of the glove box opening, and then run the connector behind the metal rail and plug it into the factory connector. Then run the other end of the bundle around and plug it into the ECU.
The bundle seems a bit short, and I had to use a zip tie to loosely attach the bundle to the factory wiring harness on the upper right side of the glove box opening. I didn't get a picture, but you should be able to make it work. Just make sure the bundle is up high enough to not interfere with glove box movement.

z1.JPG


At this point in the festivities, I thought I was hallucinating because I started hearing random quiet beeps and boops. Turns out every time the ground wire touched ground somewhere the ECU was 'waking up' and giving a little beep to let me know. Not a big deal, but if I had disconnected the battery cable before I started this wouldn't have happened.


This was the NEXT place that the factory instructions sucked. There is a factory wire grounded to a bolt up behind the bottom of the panels, where I am pointing in this blurry picture.

z2.JPG


Mount the ground from the ECU bundle to this factory ground by removing the bolt and putting the ECU ground wire onto the bolt, along with the factory ground wire. Make sure that the ECU wire will not interfere with the normal glove box operation.
This image shows the factory ground. Imagine your head on the floor mat, looking straight up where the missing glove box would be. Well, you won't have to imagine it, because soon that is what you will be doing (possibly cursing at the time)

z3.JPG


You are now done!! Well, except for reassembling all the factory panels and programming the remote, of course.

Continued...
 
Last edited:
And now, for the programming portion of the install...

Looking back now, the factory instructions don't seem that bad, but at the time I couldn't seem to follow them to save my life, so I will try to smooth things out here. Be sure to have both factory fobs, the RS fob, and the factory instructions within easy reach. The factory instructions include helpful columns of what will happen along the way if the step was successful or failed.

Parts of this instruction will seem overly detailed, but I purposely did that to avoid any confusion over which button to push and also so it is clear what you need to do in case of a failure along the way.

Study the buttons on your new RS fob to become familiar with the buttons.
- The Registration button has 3 dots on it.
- The Stop button is the only other one we'll need for this procedure

Here's my take on it:

** Despite what someone mentioned on this forum somewhere, You DO want the ignition status to be OFF before you begin, just as it says on the instructions.

1) Press the registration button once, then press it again while the LCD display is shown, and hold it until it beeps.
The ECU will now reply with 2 long beeps. If not, start over. (Also, the RS fob will chirp again, the factory instructions don't mention this, and it left me a bit disoriented each time since I wasn't expecting it)

2) Hold the first factory fob up to the car's round start button and press the car's round start button twice to the ON position. Leave your foot off the brake so that the car does not start. The red security indicator (a car behind a lock) on the car's dash panel should come on solid for a few seconds and then shut off. If it blinks, you need to shut the car off and start over from step one of the programming process.

3) After the security indicator shuts off, move the factory fob away from the car's round start button and press the car's round start button once to shut the car power off. The red security indicator should flash. If the ECU makes 2 long beeps and a short one, you need to start over from step one of the programming process..

4) (This is where I got mixed up, so...) Without touching the RS fob, hold your second factory fob up to the start button and press the car's round start button twice to the ON position. Leave your foot off the brake so that the car does not start. The red security indicator should come on solid for a few seconds and then shut off. If it blinks, you need to shut the car off and start over from step one of the programming process, including the part with the first factory fob.

5) After the security indicator shuts off, move the factory fob away from the the car's round start button and press the car's round start button once to shut the car power off. The red security indicator should flash. If the ECU makes 2 long beeps and a short one, you need to start over from step one of the programming process., including the part with the first factory fob..

6) Press the Stop button on the RS Fob until it beeps. The car ignition status should be automatically set to ON at this point. If not, you need to start over from step one of the programming process., including the part with the first factory fob.

7) Test the remote starter according to the owners manual instructions.

That is all. Hopefully this helps you out with the install and programming of the factory remote starter.

-Trey
 
Last edited:
Great job! I just did mine and its pretty much same as yours (i couldn't wait for your upload and took my chances) :D

I've ended up placing RS ECU right where you put it, which i had doubts about, but after seeing that you did it the same way, i'm sure that its Mazda's illustrations that are not precise. There was just no place for it under the black stripe as was shown.

Hood switch illustrations sucked almost as much, and i also placed it same way as yours, so i'm relieved about that too. Other than that --- i couldn't finish programming because my dear wife had driven off with the second fob, but if all is good, this was a piece of cake.

Thanks for your help!
 
cofirming that when you remote start the car, and open the door, it turns off. this is what happens on the new mz6.
 
Yes, it doesn't bother me at all. You just get in and start the car the same as you would any other day, except now it is already warmed up for you when you get there so you can just drive away with no worries of the engine not being ready.

And every after market starter you get is going to cause you to have 2 fobs, so no difference there.

This OEM remote starter also lets you turn on the rear defroster, has a 'car finder' feature for when you forget where you parked, and it has a timer function for letting you know when the car is warmed up. I know I'll never use that last function, but I can see the value in it. There is also something to be said for having an OEM accessory as opposed to a random aftermarket one.

All that being said, I may play with it someday to see if I can find a way to stop it from shutting off when the door is opened, since that seems to bother a lot of people.
 
Last edited:
I am very disappointed with the remote starter. The remote starter for my 2008 CX-9 was much smaller. It would have been ok if the RS fob replaced the original key fob, but there's no way I'm going to carry both fobs around with me. That means I'll only use the RS to start my car in the morning at home.
 
Went to my dealer yesterday to get a quote for parts. Apparently there is a new C930-V7-620 module, called C930-V7-620A.

The quote states that C930-V7-620A replaces C930-V7-620.

Anyone aware of this and what changes it brings?
 
The part is listed on the MazdaUSA site under accessories, not much description about what it does different compare to the other part. I just ordered my so if the C930-V7-620A replaces the older C930-V7-620, I may get the newer part.
 
After a search on this, I would say that the "A" at the end indicates that it is for automatic transmissions only.
 
hi, TreyP, my 2014 Mazda CX-5 GS come with a factory installed Alarm System and can you show me which step I can start to install this OEM remote start kit? From there "I removed both of these connectors to make my life easier, but I only used the connector with a lot of wires, not the one with only three (or more, depending on your fuse panel model) wires.
*** NOTE: This will vary depending on which model of CX-5 you have. The factory instruction clarify this, so please reference them as needed." is right? thanks
I'm not sure I understand the question, but if you have the factory alarm then you shouldn't need to do anything under the hood other than disconnecting the battery before you start. The hood switch part of the install is only for cars without the factory alarm installed.
 
Last edited:
After a search on this, I would say that the "A" at the end indicates that it is for automatic transmissions only.

I doubt it.... because as far as I know, Mazda does not produce remote start for MT CX-5.

They did produce a new module, that's for sure, but what has been changed is unknown.
 
I really can not understand why this remote starter needs "temp sensor" ?

Dealer told me it needs 700CAD+tax include installing. If I buy it from ebay or mazdagear, it maybe cost me 520USD+7% duty +14.5% tax.

I don't know which way I can choose....

I have 2014 CX-5 GS and I am in Montreal.
 
I really can not understand why this remote starter needs "temp sensor" ?
If it is below 41*F, the rear defroster (and heated mirrors if equipped) will turn on automatically with the remote starter. Its actually a very nice feature. You also have the option to turn on these items manually regardless of the temp.

One thing to note, which took me awhile to figure out, is that when the rear defrost in engaged via either of the above methods the rear defrost indicator light in the car will NOT be on. I figured this out by feeling the mirrors and could tell they were warming up. I later researched online and found out about the light not coming on being normal.
 
I really can not understand why this remote starter needs "temp sensor" ?

Dealer told me it needs 700CAD+tax include installing. If I buy it from ebay or mazdagear, it maybe cost me 520USD+7% duty +14.5% tax.

I don't know which way I can choose....

I have 2014 CX-5 GS and I am in Montreal.

I ordered my in the US and have them ship to the border so I can drive over and pick them up and don't have to declare anything to save me the tax. In your case it still cheaper to order the unit in the US because it would cost you $800 at the dealer in Canada and about $630 order from the US factor in the exchange rate and all the tax at $520USD, almost $200 saving but you would have to install it yourself which TreyP did a great step by step instructions.

If you could go over the border to pickup the unit I find this place is cheapest http://onlinemazdaparts.com and if you want them to ship to your door this place has good price http://www.parkmazdaoemparts.com compare to mazdagear.
 
hi, TreyP, my 2014 Mazda CX-5 GS come with a factory installed Alarm System and can you show me which step I can start to install this OEM remote start kit? From there "I removed both of these connectors to make my life easier, but I only used the connector with a lot of wires, not the one with only three (or more, depending on your fuse panel model) wires.
*** NOTE: This will vary depending on which model of CX-5 you have. The factory instruction clarify this, so please reference them as needed." is right? thanks

Just installed mine today, For Canadians, with GS or GT don't need hood switch and you can start inside the vehicle, Only underhood work is to remove the negative battery cable.

The registration took me about 30 tries. Holy Hell it is finicky. It matters how you hold the fobs to the start button. Also when you are ready to test the remote starter, Make sure there are no key fobs in the car and hood and all doors are shut.

One trick during registration is if it fails, open the drivers door to end the process and close the door and start registration from the start again.
 
Back