
mtnbiker26
Bike Geek
The Protege5 was smelling like gas so I thought my fuel pump housing was leaking again but it turned out that the bottom of the tank was "sweating" gas through some pinholes near the drivers side control arm. It was a tiny leak but it was dripping onto the shield and creating a lot of surface area to evaporate from and really stink up the area around the car. I decided to do a write up or "How to" as a companion piece to my post about replacing the fuel pump housing from a few years back. I was one of the first to get the fuel pump leak so maybe I'm one of the first of a bunch of rotted tanks.
Tools and Equipment Needed:
Jack
4 jack stands or two jack stands and two ramps
Creeper
2 small flathead screwdrivers
Medium phillips screwdriver
Pliers
Wire clippers
10mm wrench
13mm socket and ratchet
Electric or Pneumatic Impact wrench
Sawzall or 4" or 6" diameter cut-off tool or cutting torch
Droplight
Prybars (Harbor Freight #1654 worked well)
Empty gas cans
Siphon
Safety glasses
Optional: Radiator hose pick to help disconnect hoses. I say optional because I don't own one but it seems like it would help a ton but I'm not sure if I could have gotten the tool in there, anyways. (Harbor Freight #96572 or #95379)
Materials Needed:
New fuel tank (I used a Spectra Premium MZ17A)
Fuel pump housing gasket (Included with the MZ17A)
Acetone/Alcohol to clean off the rust preventative oil and Primer/Paint for new tank (optional)
PB Blast or similar
1-1/2" to 1-3/4" hose clamp if you have to cut the fuel filler hose clamp
Cost:
$200-$400
Time:
8-10 hours
Before you start:
The Spectra Premium MZ17A tank I bought comes raw...not stainless, not galvanized, not painted...just bare steel with a light layer of viscous rust preventative oil so if your choice of tank is the same then you might want to pick up some primer and underbody coating in rattle cans from Home Depot and get the tank painted a few days beforehand. Also, plan to let the tank in the car get VERY empty to reduce the amount of fuel you'll need to siphon out of it.
You'll also need to cut out the exhaust mid-pipe so call some exhaust shops and find out the cost (Should be around $100) and make an appointment to have it welded back up. If you're in the MA, RI, NH area check out Lou's Custom Exhaust. You also might be able to convince the muffler shop to take the old tank for their scrap metal pile and save yourself a trip to the scrapyard.
Removing the 8 tiny phillips head screws that fasten the fuel pump housing can be quite challenging and is actually a job in itself. Check out the link in step 6 to view my post about this. Fortunately, you're replacing the tank anyways so you'll have the freedom to chisel, drill or grind off the screw heads without having to deal with extracting the screws cleanly. I previously had replaced the housing and buttoned it back up with stainless Allen head screws coated with anti-seize in case I ever had to remove them again so my fuel pump unit came out pretty easily this time. You might want to consider thoroughly reading the other post and having the tools and replacement hardware on hand.
1 Disconnect negative battery cable.
2 Remove driver side rear seat cushion by yanking upward on the tab.
3 Expose hatch and remove 4 phillips head screws.
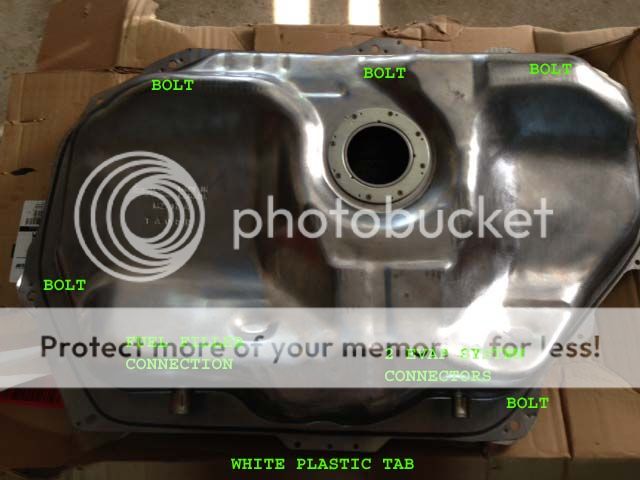
4 Use 2 small flathead screwdrivers to disconnect 2 fuel lines by prying the 2 green tabs outward (very difficult).
5 Disconnect 2 electrical connectors. One is taped to the tank so be careful later when you drop the tank.
6 Remove 8 phillips head screws (This could suck. See my post here: http://www.mazdas247.com/forum/show...highlight=has+anyone+had+thier+fuel+pump+leak)
7 Carefully lift out fuel pump unit without damaging the float or intake screen. Keep a rag under it so you don't pour gas all over the carpet.
8 Siphon fuel into appropriate container and then cover the tank hole with a plastic bag to reduce the fumes.
9 Crack rear wheel lug nuts loose but do not remove.
10 Jack up all four corners and set the car on jack stands. Get the car up pretty high since you'll need the room to drop the tank onto your chest later. It will also help save your back by getting things up closer to eye level when you're sitting on the floor reaching in to disconnect the hoses in steps 15-22.
11 Remove rear wheels.
12 Get under the car and spray PB Blast liberally on the 5 13mm bolts that secure the tank and shield.
13 While under the car, locate the tangs on the little white plastic clip that fastens the vapor recovery hoses to the tank. It's on the center of the rear edge. Pinch it with pliers and push it up. Mine was brittle and just snapped.
14 If you're indoors, now would be a good time to air out any excessive gas fumes. It wouldn't be a bad idea to have a fire extinguisher or garden hose handy, too. Use a Sawzall (best way) or cut off tool or torch to cut out the exhaust mid-pipe. If you use a Sawzall be sure to have a helper hold the front pipe/resonator steady so it won't violently shake the pipe back and forth and cause a crack in the manifold/cat/down-pipe. It's stainless so plan on burning through a blade and maybe needing a fresh one. I chose to cut a few inches to the REAR OF THE FRONT flange and a few inches to the FRONT OF THE REAR flange (which leaves the flanges on the car) because there are no hangers on the mid-pipe and it made sense to take the whole section down. I also chose to cut it there because there was a lot of room around the flanges to get my 4-1/2" grinder with a cutting blade in there and allow the muffler shop to get a MIG gun in there later on. Throw a few zip-ties on the muffler and snug it up against the underbody to keep it from swinging around when you drive to the muffler shop, as well. If you have the stock system, as I do, plan to have the muffler shop cut out the two flanges and weld in short pieces of tubing because the flanges will eventually fail so you might as well take care of them while you're there.
15 Get a light, PB Blast, wire clippers, phillips head screwdrivers, pry bars and the hose pick tool if you have one and sit at the rear drivers wheel well like you're working on the brakes.
16 Peer in through the wheel well and locate the black 1-1/2" fuel filler hose connector and clamp on the rear of the tank. Spray it with PB Blast. This is the part where you're psyched you jacked up the car nice and high.
17 Take a deep breath and get ready for some suck!
18 Loosen the clamp or use wire cutters to nip it off if it's rotted like mine was.
19 Use the pry bars to lever against the tank and carefully work the hose off of the connector or try using the radiator hose picks if you can get them in there. This was the hardest part of the whole job and it took me quite a while to get done. I wasted a lot of time pulling and twisting with my hands before I tried the pry bars.
20 Spray another round of PB Blast on the 5 13mm tank bolts.
21 Go around to the passenger side of the car and peer in through the wheel well to locate the 2 vapor recovery hoses on the back of the tank.
22 Use pliers to pinch the 2 clamps and slide them back.
23 Use the pry bars or hose pick tool to work the hoses off of the connectors.
24 Go get a beer because you deserve it! Everything should be disconnected from the tank at this point.
25 Loosen the 5 bolts holding in the tank and shield and leave them threaded about 1/4 of the way in so you can easily turn them with your fingers. My car has been rolling around Massachusetts roads for 11 years and it's pretty rusted up but I got lucky and they spun right out with my pneumatic impact gun. I'm pretty sure that trying to loosen them with a wrench or ratchet would snap them. Beware that they thread into the body so if they snap or strip they're going to be quite a headache to extract.
26 Remove the bolts one at a time and reinstall them loosely so they hold up only the tank and not the shield. Drop the shield.
27 Get a capable helper and remove the 5 bolts (keep them handy in case you need to put the tank back up in a hurry) and GENTLY/SLOWLY lower the tank by dropping the front edge down and sliding it towards the front of the car. Note that the rear edge of the tank has a lip that sits up on top of the control arm center pivot. Have your helper check for any hoses or wires that you missed and watch for the fuel pump electrical connector from step 5 that is taped to the top of the tank. Drop the tank.
28 Install in the reverse order of removal. Remember to use a new gasket between the fuel pump and tank. The MZ17A tank came with a new gasket.
29 Add fuel and check for leaks.
30 Take your mid-pipe to the muffler shop and ask them to cut out the flanges and weld it back up.
Notes:
If anyone has any feedback on using the radiator hose picks, please post about whether they helped or not.
I believe the MZ17A tank has slightly more capacity than the stock because my range has gone from about 320 miles to about 370 miles.
If anyone has any feedback, tips or corrections, please contribute.
~Greg
Tools and Equipment Needed:
Jack
4 jack stands or two jack stands and two ramps
Creeper
2 small flathead screwdrivers
Medium phillips screwdriver
Pliers
Wire clippers
10mm wrench
13mm socket and ratchet
Electric or Pneumatic Impact wrench
Sawzall or 4" or 6" diameter cut-off tool or cutting torch
Droplight
Prybars (Harbor Freight #1654 worked well)
Empty gas cans
Siphon
Safety glasses
Optional: Radiator hose pick to help disconnect hoses. I say optional because I don't own one but it seems like it would help a ton but I'm not sure if I could have gotten the tool in there, anyways. (Harbor Freight #96572 or #95379)
Materials Needed:
New fuel tank (I used a Spectra Premium MZ17A)
Fuel pump housing gasket (Included with the MZ17A)
Acetone/Alcohol to clean off the rust preventative oil and Primer/Paint for new tank (optional)
PB Blast or similar
1-1/2" to 1-3/4" hose clamp if you have to cut the fuel filler hose clamp
Cost:
$200-$400
Time:
8-10 hours
Before you start:
The Spectra Premium MZ17A tank I bought comes raw...not stainless, not galvanized, not painted...just bare steel with a light layer of viscous rust preventative oil so if your choice of tank is the same then you might want to pick up some primer and underbody coating in rattle cans from Home Depot and get the tank painted a few days beforehand. Also, plan to let the tank in the car get VERY empty to reduce the amount of fuel you'll need to siphon out of it.
You'll also need to cut out the exhaust mid-pipe so call some exhaust shops and find out the cost (Should be around $100) and make an appointment to have it welded back up. If you're in the MA, RI, NH area check out Lou's Custom Exhaust. You also might be able to convince the muffler shop to take the old tank for their scrap metal pile and save yourself a trip to the scrapyard.
Removing the 8 tiny phillips head screws that fasten the fuel pump housing can be quite challenging and is actually a job in itself. Check out the link in step 6 to view my post about this. Fortunately, you're replacing the tank anyways so you'll have the freedom to chisel, drill or grind off the screw heads without having to deal with extracting the screws cleanly. I previously had replaced the housing and buttoned it back up with stainless Allen head screws coated with anti-seize in case I ever had to remove them again so my fuel pump unit came out pretty easily this time. You might want to consider thoroughly reading the other post and having the tools and replacement hardware on hand.
1 Disconnect negative battery cable.
2 Remove driver side rear seat cushion by yanking upward on the tab.
3 Expose hatch and remove 4 phillips head screws.
4 Use 2 small flathead screwdrivers to disconnect 2 fuel lines by prying the 2 green tabs outward (very difficult).
5 Disconnect 2 electrical connectors. One is taped to the tank so be careful later when you drop the tank.
6 Remove 8 phillips head screws (This could suck. See my post here: http://www.mazdas247.com/forum/show...highlight=has+anyone+had+thier+fuel+pump+leak)
7 Carefully lift out fuel pump unit without damaging the float or intake screen. Keep a rag under it so you don't pour gas all over the carpet.
8 Siphon fuel into appropriate container and then cover the tank hole with a plastic bag to reduce the fumes.
9 Crack rear wheel lug nuts loose but do not remove.
10 Jack up all four corners and set the car on jack stands. Get the car up pretty high since you'll need the room to drop the tank onto your chest later. It will also help save your back by getting things up closer to eye level when you're sitting on the floor reaching in to disconnect the hoses in steps 15-22.
11 Remove rear wheels.
12 Get under the car and spray PB Blast liberally on the 5 13mm bolts that secure the tank and shield.
13 While under the car, locate the tangs on the little white plastic clip that fastens the vapor recovery hoses to the tank. It's on the center of the rear edge. Pinch it with pliers and push it up. Mine was brittle and just snapped.
14 If you're indoors, now would be a good time to air out any excessive gas fumes. It wouldn't be a bad idea to have a fire extinguisher or garden hose handy, too. Use a Sawzall (best way) or cut off tool or torch to cut out the exhaust mid-pipe. If you use a Sawzall be sure to have a helper hold the front pipe/resonator steady so it won't violently shake the pipe back and forth and cause a crack in the manifold/cat/down-pipe. It's stainless so plan on burning through a blade and maybe needing a fresh one. I chose to cut a few inches to the REAR OF THE FRONT flange and a few inches to the FRONT OF THE REAR flange (which leaves the flanges on the car) because there are no hangers on the mid-pipe and it made sense to take the whole section down. I also chose to cut it there because there was a lot of room around the flanges to get my 4-1/2" grinder with a cutting blade in there and allow the muffler shop to get a MIG gun in there later on. Throw a few zip-ties on the muffler and snug it up against the underbody to keep it from swinging around when you drive to the muffler shop, as well. If you have the stock system, as I do, plan to have the muffler shop cut out the two flanges and weld in short pieces of tubing because the flanges will eventually fail so you might as well take care of them while you're there.
15 Get a light, PB Blast, wire clippers, phillips head screwdrivers, pry bars and the hose pick tool if you have one and sit at the rear drivers wheel well like you're working on the brakes.
16 Peer in through the wheel well and locate the black 1-1/2" fuel filler hose connector and clamp on the rear of the tank. Spray it with PB Blast. This is the part where you're psyched you jacked up the car nice and high.
17 Take a deep breath and get ready for some suck!
18 Loosen the clamp or use wire cutters to nip it off if it's rotted like mine was.
19 Use the pry bars to lever against the tank and carefully work the hose off of the connector or try using the radiator hose picks if you can get them in there. This was the hardest part of the whole job and it took me quite a while to get done. I wasted a lot of time pulling and twisting with my hands before I tried the pry bars.
20 Spray another round of PB Blast on the 5 13mm tank bolts.
21 Go around to the passenger side of the car and peer in through the wheel well to locate the 2 vapor recovery hoses on the back of the tank.
22 Use pliers to pinch the 2 clamps and slide them back.
23 Use the pry bars or hose pick tool to work the hoses off of the connectors.
24 Go get a beer because you deserve it! Everything should be disconnected from the tank at this point.
25 Loosen the 5 bolts holding in the tank and shield and leave them threaded about 1/4 of the way in so you can easily turn them with your fingers. My car has been rolling around Massachusetts roads for 11 years and it's pretty rusted up but I got lucky and they spun right out with my pneumatic impact gun. I'm pretty sure that trying to loosen them with a wrench or ratchet would snap them. Beware that they thread into the body so if they snap or strip they're going to be quite a headache to extract.
26 Remove the bolts one at a time and reinstall them loosely so they hold up only the tank and not the shield. Drop the shield.
27 Get a capable helper and remove the 5 bolts (keep them handy in case you need to put the tank back up in a hurry) and GENTLY/SLOWLY lower the tank by dropping the front edge down and sliding it towards the front of the car. Note that the rear edge of the tank has a lip that sits up on top of the control arm center pivot. Have your helper check for any hoses or wires that you missed and watch for the fuel pump electrical connector from step 5 that is taped to the top of the tank. Drop the tank.
28 Install in the reverse order of removal. Remember to use a new gasket between the fuel pump and tank. The MZ17A tank came with a new gasket.
29 Add fuel and check for leaks.
30 Take your mid-pipe to the muffler shop and ask them to cut out the flanges and weld it back up.
Notes:
If anyone has any feedback on using the radiator hose picks, please post about whether they helped or not.
I believe the MZ17A tank has slightly more capacity than the stock because my range has gone from about 320 miles to about 370 miles.
If anyone has any feedback, tips or corrections, please contribute.
~Greg
Last edited: