
Here is the method for cleaning your valves: before/after soaking/after a little blasting


Equipment needed: (noted below, with pics)
Brief Overview of procedure:
TOTAL COST, without air compressor = only ~60 bucks, and you have 24.8/25 pounds of media left to help many others and clean again!
In order to achieve these results, the process goes as follows:
STEP 1
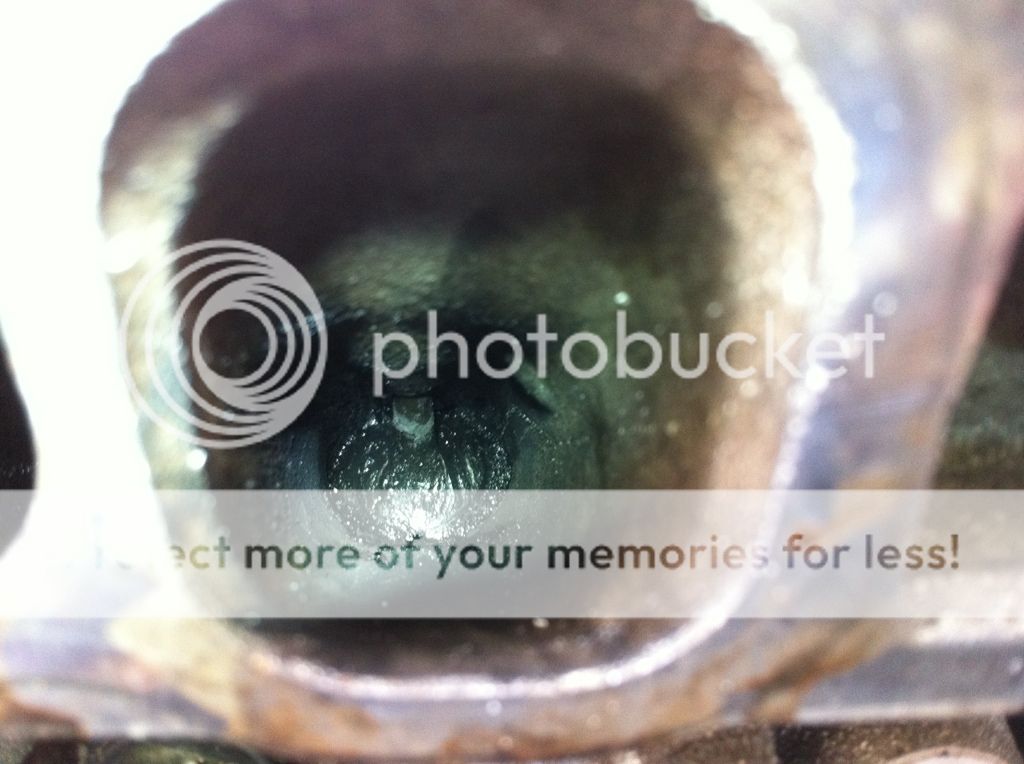
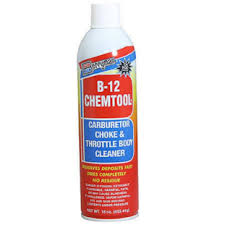
Soak 2 TDC-top dead center valves in B12 (maybe-substitute denatured alcohol/seafoam/methanol)
Top dead center is achevied by removing the passenger front wheel, then a little plastic guard which is held on by 3 plastic screw-you can't miss it, then you will see this:
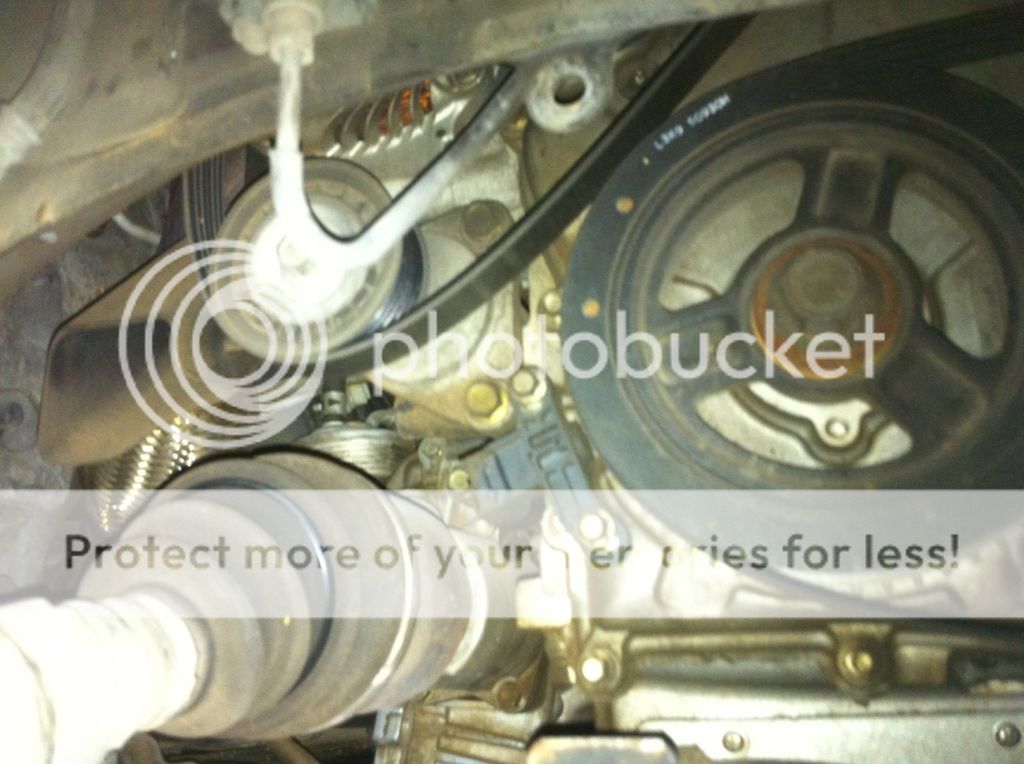
The (14mm) tensioner pulley is on the left-turn this clockwise to loosen the tension on the belt before/after messing with the PS pump. You will need someone to remove the belt from the PS pump as you relieve the tension
The (21mm) crank pulley is on the right, turn clockwise to turn the engine, it will be at TDC when it gets toughest to turn (check valves are TDC by looking, then pouring some B12 in and see if it stays put)
**Note: Only 2 valves will be entirely TDC at a time. On mine, one valve was 90% closed, so take note for next time (ie- valves 2/4 and 1/3 are TDC grouped for me)
**Note: I do recommend removing the belt from the power steering pump before turning the crank pulley (before tilting the PS pump to the side during the Intake Manifold removal is even better), but it is not needed
STEP 2
After soaking the TDC valves either overnight (prep night before), or for 1+ hours, use either your shop vac (if you wish to ruin the filter and spend time cleaning it-trust me on this) or a two way fluid transfer pump (Here: 5 bucks at HF) to suck out as much B12 as you can into a container
Now take your gun, wrap the towel around the tip. Now insert/jam it into the valve to AIR blast all the leftover B12 out (it will shoot out, so wrap the towel in layers to make it thicker, and apply pressure)
**Note: Always use safety goggles and some gloves
STEP 3
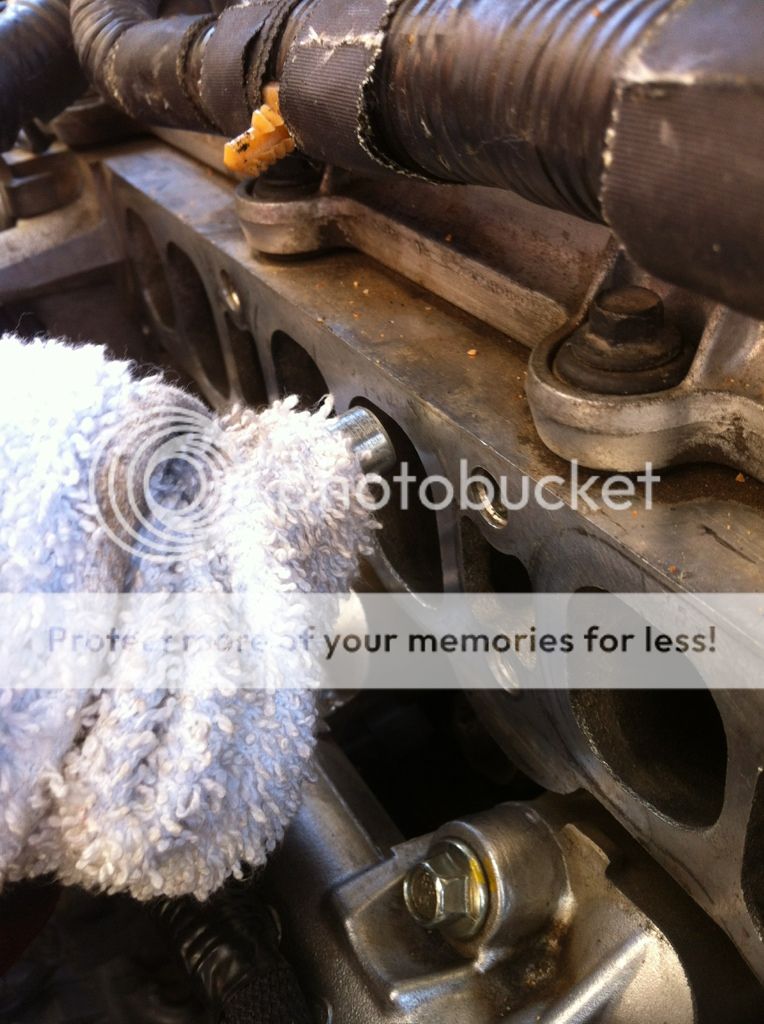
Now, apply the one foot section 1" clear ID tube from Home Depot ($2) into the valve runner, as in this picture:
**Note: I soaked one valve for only ~1hr and got the same results, but it took a whole 2-3 minutes longer to clean!
I drilled a hole just small enough for my gun tip to fit into, roughly 1" from the base of the tube, then I stuck the gun/hose into the valve runner and apply the vacuum cleaner/shop vac to the open end.
I blasted at 90psi-the gun max operating pressure (BMW instructions say 6 bar, which is 116 psi BMW Link)
Blasting was done in pulses of 2sec for about 30 seconds total, then the valves were nearly spotless! Of course, I kept going to make them shiny and pretty, but honestly, this can be done on all the valves in under 10min.
**Note: I turned the vacuum on periodically to suck up excess media, since the tube collects much of the media. Keeping a vacuum on a "low" setting throughout the blasting could also be done, but you will use more media, as noted below. I also held the gun sideways (hood-style) to avoid any jamming, which worked best.
Unlike the prior write ups, I used a gun from harbor freight which had an open/close valve for the media. This allowed me to only blast air, which cleans very well on its own. This also allowed me to use less than 1 hopper of media for ALL the valves (out of the 25 pounds I got from Harbor Freight). Blasting only air into the valve periodically in essence reuses the media which is laying down there; think of it as a balloon which you let loose in a box-it smacks into everything. Another great point of using this gun was the ability to air-clean the engine bay, since 100% of the media is never going to be contained.
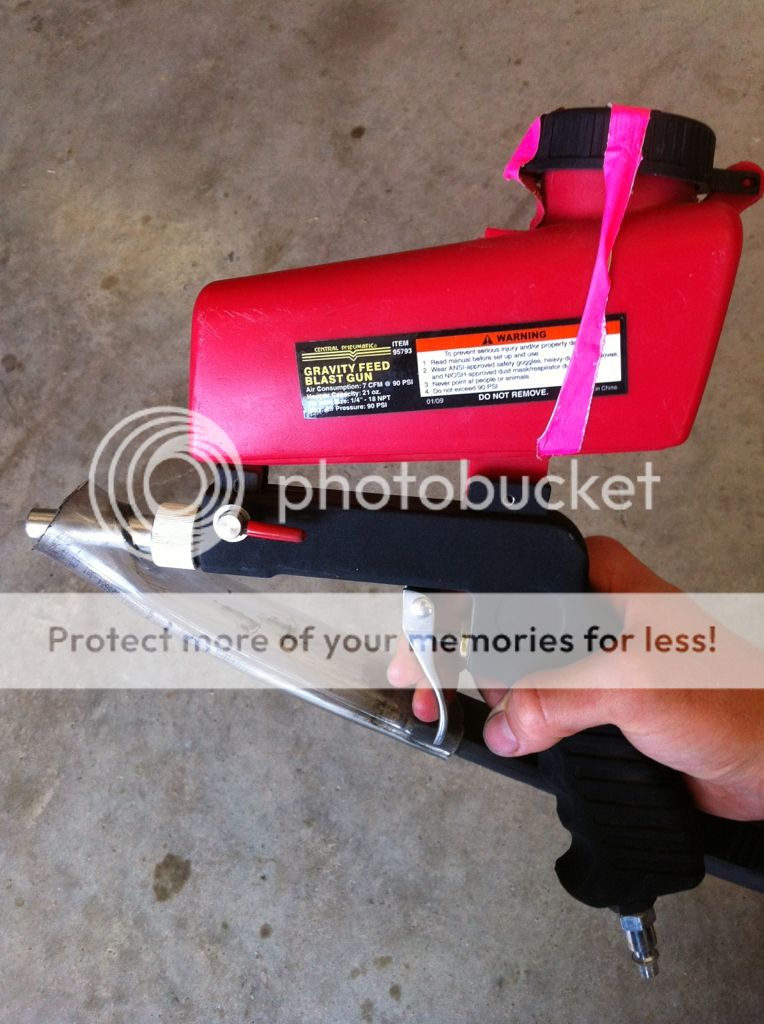
Gun used:
Gun has standard 1/4" air hose fitting and was sealed at the threads using tephlon tape (standard air tool procedure according tpo the neighbor)
This is what my setup looks like, note the vacuum attached on the end:
STEP 4
After blasting was to my liking, I stuck a small plastic hose attached to my vacuum into the valve to suck up any excess, then I blasted the valve with AIR for 10sec to clean anything remaining out (although it would just burn off, walnut is combustable).
**Note: cover the finished/remaining valves with masking tape to avoid any richochet media going in. I also taped the gun's hopper closed since I was holding it at all angles
That's it guys, let me know if you want clarification on anything. As a sidenote, you could probably acheive very clean valves simply by using the air and soaking (as noted in this thread, post #15) Props to @timjs for inspiration on this project. I think B12 does an identical job to the Mazda Zoom Zoom Cleaner, possibly in a less concentrated form; but, nonetheless, it is just as effective for a fraction of the cost. Zoom Zoom Cleaner is originally designed for rotary engine cleaning, link to RX8 forum info
I used the liquid B12, since it is cheaper and the spray does nothing we need
Equipment needed: (noted below, with pics)
- An air compressor setup
- Media gun/abrasive gun (open/close valve-but not necessary)
- Fine walnut media **Note: HF has a different categorization than other places for the grit on the media**
- B12 -2 cans (1 could do, if you are tight on cash)
- 1' section of clear hose from Home Depot - 1" ID, available by plumbing
- A towel you can sacrifice
- Two way fluid transfer pump
- Masking tape
- Safety glasses/gloves (IMPORTANT)
- Camera- to brag once you are done
Brief Overview of procedure:
- Remove IM, followed @jbarone instructions (here)
- Ensure which 2 valves are TDC- top dead center/closed
- Soak those valves in B12 for at least 1 hour & cover other valves with masking tape
- Suck out majority of B12 using two-way fluid pump
- Air blast valve to remove remining B12, while using a towel around gun tip to catch carbon/B12 coming out (goggles/gloves on) (90psi for all air use)
- Blast valves with media in 2sec pulses for 30sec, vacuum on, repeat until happy
- Suck out media with small hose, then air blast for 10sec to remove anything else
- Tape over cleaned valves
- Proceed on other valves in same order (TDC/soak/suck/blast/clean)
- Photoshoot
TOTAL COST, without air compressor = only ~60 bucks, and you have 24.8/25 pounds of media left to help many others and clean again!
In order to achieve these results, the process goes as follows:
STEP 1
Soak 2 TDC-top dead center valves in B12 (maybe-substitute denatured alcohol/seafoam/methanol)
Top dead center is achevied by removing the passenger front wheel, then a little plastic guard which is held on by 3 plastic screw-you can't miss it, then you will see this:
The (14mm) tensioner pulley is on the left-turn this clockwise to loosen the tension on the belt before/after messing with the PS pump. You will need someone to remove the belt from the PS pump as you relieve the tension
The (21mm) crank pulley is on the right, turn clockwise to turn the engine, it will be at TDC when it gets toughest to turn (check valves are TDC by looking, then pouring some B12 in and see if it stays put)
**Note: Only 2 valves will be entirely TDC at a time. On mine, one valve was 90% closed, so take note for next time (ie- valves 2/4 and 1/3 are TDC grouped for me)
**Note: I do recommend removing the belt from the power steering pump before turning the crank pulley (before tilting the PS pump to the side during the Intake Manifold removal is even better), but it is not needed
STEP 2
After soaking the TDC valves either overnight (prep night before), or for 1+ hours, use either your shop vac (if you wish to ruin the filter and spend time cleaning it-trust me on this) or a two way fluid transfer pump (Here: 5 bucks at HF) to suck out as much B12 as you can into a container
Now take your gun, wrap the towel around the tip. Now insert/jam it into the valve to AIR blast all the leftover B12 out (it will shoot out, so wrap the towel in layers to make it thicker, and apply pressure)
**Note: Always use safety goggles and some gloves
STEP 3
Now, apply the one foot section 1" clear ID tube from Home Depot ($2) into the valve runner, as in this picture:
**Note: I soaked one valve for only ~1hr and got the same results, but it took a whole 2-3 minutes longer to clean!
I drilled a hole just small enough for my gun tip to fit into, roughly 1" from the base of the tube, then I stuck the gun/hose into the valve runner and apply the vacuum cleaner/shop vac to the open end.
I blasted at 90psi-the gun max operating pressure (BMW instructions say 6 bar, which is 116 psi BMW Link)
Blasting was done in pulses of 2sec for about 30 seconds total, then the valves were nearly spotless! Of course, I kept going to make them shiny and pretty, but honestly, this can be done on all the valves in under 10min.
**Note: I turned the vacuum on periodically to suck up excess media, since the tube collects much of the media. Keeping a vacuum on a "low" setting throughout the blasting could also be done, but you will use more media, as noted below. I also held the gun sideways (hood-style) to avoid any jamming, which worked best.
Unlike the prior write ups, I used a gun from harbor freight which had an open/close valve for the media. This allowed me to only blast air, which cleans very well on its own. This also allowed me to use less than 1 hopper of media for ALL the valves (out of the 25 pounds I got from Harbor Freight). Blasting only air into the valve periodically in essence reuses the media which is laying down there; think of it as a balloon which you let loose in a box-it smacks into everything. Another great point of using this gun was the ability to air-clean the engine bay, since 100% of the media is never going to be contained.
Gun used:
Gun has standard 1/4" air hose fitting and was sealed at the threads using tephlon tape (standard air tool procedure according tpo the neighbor)
This is what my setup looks like, note the vacuum attached on the end:
STEP 4
After blasting was to my liking, I stuck a small plastic hose attached to my vacuum into the valve to suck up any excess, then I blasted the valve with AIR for 10sec to clean anything remaining out (although it would just burn off, walnut is combustable).
**Note: cover the finished/remaining valves with masking tape to avoid any richochet media going in. I also taped the gun's hopper closed since I was holding it at all angles
That's it guys, let me know if you want clarification on anything. As a sidenote, you could probably acheive very clean valves simply by using the air and soaking (as noted in this thread, post #15) Props to @timjs for inspiration on this project. I think B12 does an identical job to the Mazda Zoom Zoom Cleaner, possibly in a less concentrated form; but, nonetheless, it is just as effective for a fraction of the cost. Zoom Zoom Cleaner is originally designed for rotary engine cleaning, link to RX8 forum info
I used the liquid B12, since it is cheaper and the spray does nothing we need
