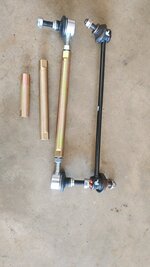
I installed Megan Racing front and rear anti roll bars on our 2024 CX-5 T Pre. I choose Megan because they had a set, front and rear. I didn't want to mix and match from different venders. I like the quality of the bars and stiffer bushings that fit the OE straps. Megan does not furnish step by step instructions. Their web site does not say it will fit a Gen 3. They fit my Gen 3.
https://meganracing.com/mrs-mz-1690
Rear Anti Sway Bar
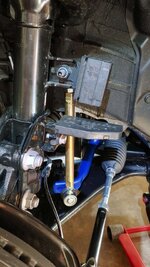
FRONT:
I couldn't find any install instructions for Gen3s. I used Gen 2 instructions. The front was NOT easy. After many hours I put a jack under the exhaust to raise it a few inches and loosed the drive shaft. STILL couldn't remove the OE bar.
Next I removed the drivers side strut and the OE bar came out.
The install was a breeze compared to getting the OE bar out.
Gen 3 turbo guys, put a jack under the exhaust and gently move it to the floor. NA guys might need to do the same. Remove the DS strut. Lower the sub frame as far as possible.
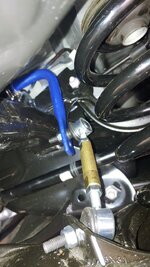
REAR:
Again, no Gen 3 instructions. The Gen 2 instructions were better than the front anti roll bar. I could not loosen the top nut on the passenger side bar strap. I need a 1/2" more clearance to get my socket wrench on the 12mm nut. I loosed the two nuts on the passenger side shock and got that last 1/2". Also had to remove a wiring fasteners on both sides to get that last 1/2" to lower the sub frame.
Gen 3 guys, lower the sub frame as far as possible and remove the fasteners on wiring looms on right and left side. Loosen the pass side shock from the body.
Install was uneventful.
Recommendations: put lithium grease on the bushings before installing. The rear bushings are making a low squeak sound that is going away. Megan said lithium grease would have been a good idea and that I may have over tightened the bar bushing. AND in 75 to a 100 miles it will go away. It's already better after driving 30 miles today. Megan Racing agreed that having the bushing too tight is better than to loose......
Driving experience: Car feels solid, not moving bouncing around on uneven pavement. Corners are firm and controlled. It tracks nicely going down the interstate. It felt like it was out of alignment or the suspension was worn before switching the bars. NOT RACE car quality, this our travel car and wife's grocery getter. Makes driving FUN. I hope MAZDA reads this gets back to their roots....
Was it worth it? For me yes, I would never have been happy with the ride quality of a 3rd Gen. Is this install for everyone? Maybe. With the above tips, it goes much faster. Still a weekend project.
Side note: I have never seen such attention to detail regarding wiring before. I'm impressed. Heavy looming and supported like some OCD guy wired this car.
The front and rear subframes are stout! The weldment and overlapping of metal is impressive. The rear engine mount and fasteners are massive for just a 2.5l turbo, 256 HP 320 torque.
The belly pan is the real deal. It's huge, well constructed and fastened to the hilt!
Next up, waiting on BC Racing BR coilovers. Lower up to 2 inches and dial in the shock setting somewhere between firm and socker Mom soft. My wife and I will discuss! These must be made to order. It takes 3 to 4 weeks to get them. I'll install a toe and camber kit on the rear and get a 4 wheel alignment.
BC Racing BR Coilovers
https://www.amazon.com/dp/ (commissions earned)
Lastly a set of 19" x 8" Entkie wheels. These are 8 to 12 week item. These will are about 24 pounds lighter per set.
Entkie Wheels
We will stay with the the OE Toyo mush tires for awhile. When I increased pressure to 45 psi, they feel much better.
The more I look at this car and turn a few wrenches on it, the more I'm impressed.