CaptainCrunch
Member
- :
- Mazda 5, Mazda Tribute, & 1996 Miata MX-5
Mazda 5 Headlight Bulb Replacement (Low Beam)
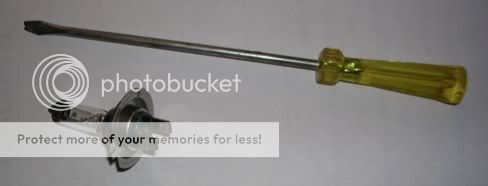
A. This is a frustrating job for most people because the opening in the back of the headlamp is too small for even small fingers, and it takes considerable force to release and re-tension the metal clip that holds the bulb in place. I've found a trick that makes this job a bit easier (it's still a challenge) and am sharing it in this post. The bulb is held in with a metal clip that is nearly impossible to re-clip by your bare hands. Therefore, fashion a tool to assist with the job from an 8” long flat spade screwdriver. Notch the screwdriver in the center of the blade so that the position of the end of the bulb retaining clip can be captured and manipulated into position. Photos are shown below of a screw driver modified with a notch, and a H7 replacement bulb:

B. To remove the old bulb, do the following steps:
1. Make space to work by removing any plastic covers in the vicinity of the back of the headlamp.
2. Unplug the electrical socket from the back of the headlamp.
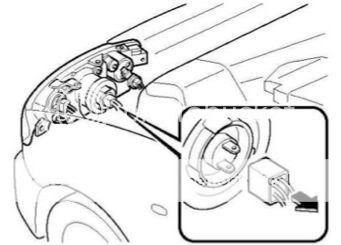
3. Gently pry off the rubber boot on the back of the lamp that prevents water infiltration.
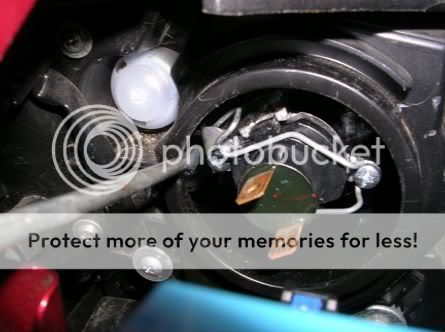
4. Inspect how the bulb is held in place with the retaining clip so that you will know what it looks like when it is properly holding the bulb in position. Use the notched screwdriver to carefully release the bulb retaining clip, and swing it out so that the old bulb can be removed. The clip is too big for the opening in the back of the lamp to swing out without some twisting and manipulation of the end of the clip. With some effort it can be twisted clear of the opening. The photo shows the screw driver blade just prior to pushing and releasing the end of the retaining clip:
5. Disconnect the bulb from the front of the H7 socket adapter and discard the old bulb.
C. To install the new replacement bulb do the following steps:
1. Wear surgical gloves for the following steps so that you don’t get natural oils from your hands all over the new bulb and reduce it’s life span.
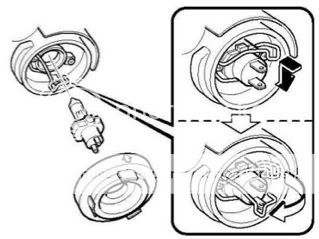
2. Attach the new H7 bulb into the H7 socket adapter and position this assembly into the back of the headlamp so that it fits. There is a stub on one side of the bulb socket that only allows the assembly to fit in snuggly one way.
3. Swing the bulb retaining clip so that it begins to hold the bulb assembly in place. The clip is too big for the opening in the back of the lamp, so it will take some twisting and manipulation to get the clip inside the opening.
4. With the bulb in position, and the clip inside the opening, use the notched screwdriver to push and hook the end of the clip into it’s final position. It takes considerable effort to push the clip in place.
5. Apply some bulb grease around the inside flange of the rubber boot that keeps moisture out of the headlamp. Press the rubber boot onto the headlamp and back of the bulb socket.
6. Press the socket back onto the connections for the bulb.
7. Replace all the various plastic covers to complete the job!
(breakn)
A. This is a frustrating job for most people because the opening in the back of the headlamp is too small for even small fingers, and it takes considerable force to release and re-tension the metal clip that holds the bulb in place. I've found a trick that makes this job a bit easier (it's still a challenge) and am sharing it in this post. The bulb is held in with a metal clip that is nearly impossible to re-clip by your bare hands. Therefore, fashion a tool to assist with the job from an 8” long flat spade screwdriver. Notch the screwdriver in the center of the blade so that the position of the end of the bulb retaining clip can be captured and manipulated into position. Photos are shown below of a screw driver modified with a notch, and a H7 replacement bulb:
B. To remove the old bulb, do the following steps:
1. Make space to work by removing any plastic covers in the vicinity of the back of the headlamp.
2. Unplug the electrical socket from the back of the headlamp.
3. Gently pry off the rubber boot on the back of the lamp that prevents water infiltration.
4. Inspect how the bulb is held in place with the retaining clip so that you will know what it looks like when it is properly holding the bulb in position. Use the notched screwdriver to carefully release the bulb retaining clip, and swing it out so that the old bulb can be removed. The clip is too big for the opening in the back of the lamp to swing out without some twisting and manipulation of the end of the clip. With some effort it can be twisted clear of the opening. The photo shows the screw driver blade just prior to pushing and releasing the end of the retaining clip:
5. Disconnect the bulb from the front of the H7 socket adapter and discard the old bulb.
C. To install the new replacement bulb do the following steps:
1. Wear surgical gloves for the following steps so that you don’t get natural oils from your hands all over the new bulb and reduce it’s life span.
2. Attach the new H7 bulb into the H7 socket adapter and position this assembly into the back of the headlamp so that it fits. There is a stub on one side of the bulb socket that only allows the assembly to fit in snuggly one way.
3. Swing the bulb retaining clip so that it begins to hold the bulb assembly in place. The clip is too big for the opening in the back of the lamp, so it will take some twisting and manipulation to get the clip inside the opening.
4. With the bulb in position, and the clip inside the opening, use the notched screwdriver to push and hook the end of the clip into it’s final position. It takes considerable effort to push the clip in place.
5. Apply some bulb grease around the inside flange of the rubber boot that keeps moisture out of the headlamp. Press the rubber boot onto the headlamp and back of the bulb socket.
6. Press the socket back onto the connections for the bulb.
7. Replace all the various plastic covers to complete the job!
(breakn)
Last edited:
") . Still took me 30 mins for both sides. I ended up using an ace hardware weeder tool since I had that in the garage and didn't feel like cannibalizing a screwdriver. It was a bit wide but it did the job.
. Still took me 30 mins for both sides. I ended up using an ace hardware weeder tool since I had that in the garage and didn't feel like cannibalizing a screwdriver. It was a bit wide but it did the job.