Mazda5 with CEL P1026 & Thermostat Replacement

:
2006 Mazda 6 - auto
I was getting occasional CEL P0126s, so I decided to replace the thermostat on a 2006 Mazda5

1) Drained radiator from drain hole on driver's side of radiator - a little over 1 gal of fluid
2) Removed overflow tank (empty & clean) and all hoses from radiator neck for hand access
3) Did not remove tensioner belt as in manual - not needed
4) Thermostat has three 7mm bolts - used 3/8 ratchet with 1/4 adapter & 6" extension - fit perfectly. Removed 1 bolt from top, 2 bolts from bottom.
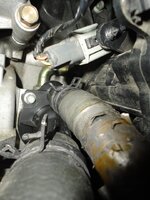
5) Thermostat has 2 hoses attached - 1 large, 1 small - these are pain to get off. I traced small hose to engine - removed small hose from engine(don't pull off hose with face under engine & mouth open :). With small hose removed, was able to bend large hose so that thermostat is under engine - then able to remove both the small & large hoses from the thermostat. Thishttps://www.amazon.com/dp/ (commissions earned) would really help in getting off the clamps.
6) Note that markings on hose - align with marks on thermostat. Attach large hose to thermostat under engine, then small hose. Push thermostat back to original location.
7) attach small hose to engine
8) bolt back thermostat - 2 from below, one from top
9) hook backup hoses & overflow tank
10) flush radiator
11) refill radiator & you're done
12) check for leaks

I hope this helps someone - no pictures - sorry
 
Warning - PITA!

Fixed my P0126 CEL, but did not expect to spend an hour doing this job. Two of the bolts are quite difficult to reach. I didn't remove the belt tensioner either, it's not necessary and would have made this job any easier. Also, advise ditching the original pinch-off hose clamps.

Thanks for the DIY.
 
Thanks for the tips, very helpful. Here is a link to the original part. http://parts.arlingtonmazda.com/products/THERMOSTAT-&-COVER-(L336%2d15%2d170).html
Amazon sells a knock off for cheaper but I bought the original. My vehicle needed a slightly different sequence, as follows:
(a) Remove plastic engine cowling from below (six bolts, two plastic quick-bolts)
(b) Loosen but do not remove radiator pet cock on drivers side of radiator. Petcock faces driver.
(c) Loosen radiator cap and overflow tank cap to allow airflow.
(d) Slip a 14mm socket wrench on belt tensioner hub with handle pointing straight up. Push handle in towards passenger compartment to relax tension and pry off belt from pulley.
(e) Remove belt tensioner assembly from engine block by removing three 12mm bolts.
(f) Squeeze the larger hose clamp and slide away from thermostat. (I needed to pry up the center tang on the clamp a little bit so as to allow the two prongs to come together fully.) I found needle-nose vise-grip pliers to be perfect for clamp removal, e.g https://www.amazon.com/dp/ (commissions earned)
(g) Pull away the large hose from the thermostat housing.
(h) Loosen the hose clamp on the smaller hose and slip down hose. Pull away the small hose from the thermostat if possible. If not, leave for later.
(i) Remove the three 8mm bolts mounting thermostat to engine block. 8mm short socket plus 6inch extension recommended.
(j) If the smaller hose is still on, twist the thermostat housing so smaller hose breaks free.
Mount the new thermostat and put everything back together again. Took me 3 hours.
 
Last edited:
Thanks for all the indications. Several Mazda fora show this as a(nother) common problem with 2006 Mazdas 5. Code P0126 came up about 4 months ago (a week after passing my emissions test ;) ) but since most of my driving is within the city, temperature wasn't an issue (after warming up, temp gauge was always in the middle), so I postponed the work. Eventually, I took a long trip and realized that long periods going downhill or coasting on the highway would lower the engine temperature critically so, it became clear that I could not keep procrastinating any longer. The job took around three hours of which almost one was used taking the damn hose clamps off. Space was really tight and tools (regular pliers, vise grips, etc.) barely fit. I was able to open each clamp with a vise grip and keep it open in place (I wasn't able to slide it back on the hose) while pulling each hose out of the thermostat. I took the big hose first and the small last. Draining the radiator, cleaning the coolant reservoir, removing the old thermostat and installing the new one, flushing and refilling the radiator, etc. was pretty straight forward. I didn't replace the little evil clamps (although I was tempted to throw them away and replacing with screw type clamps). But these original Mazda clamps have special dents/holes to open them and keep them open for installation. After the hose is in place you touch the clamp with a screwdriver and the clamp snaps close, pretty much like a bear trap so, watch out your fingers. I bought an aftermarket thermostat (Stant 48728) at my local Advance ( http://shop.advanceautoparts.com/we...nheit-stant_20480007-p?searchTerm=stant+48728 ) that looks better than the original part. It also seems that operates differently by regulating the flow of coolant rather than simply opening or closing. I disconnected the battery for a couple of hours at the end of the work to reset the engine light. It's been 2+ weeks since I completed this work and things are working perfectly fine. If I can get another 90k out of this thermostat it should be fine. I added pics of the evil clamps and the thermostat in its final position after replacement for reference.
 

Attachments

  • DSC04070'.jpg
    DSC04070'.jpg
    132.2 KB · Views: 9,811
  • DSC04073'.jpg
    DSC04073'.jpg
    112.8 KB · Views: 5,574
  • DSC04085'.jpg
    DSC04085'.jpg
    117.8 KB · Views: 4,617
Last edited:
Looking to get this done on my 07 GT MZ5 pushing 83k miles so far. The CEL has also been sporadically indicating P1026 code almost every week now. Does anyone have the or know the torque specs for the mounting bolts both for the T-stat housing and the tensioner pulley? TIA
 
Looking to get this done on my 07 GT MZ5 pushing 83k miles so far. The CEL has also been sporadically indicating P1026 code almost every week now. Does anyone have the or know the torque specs for the mounting bolts both for the T-stat housing and the tensioner pulley? TIA
My manual for a 2006 Mazda says 8-11.5 N-m for the housing bolts, I think you just move the tensioner pulley? I didn't remove the pulley when I replaced the thermostat.

gl
 
So I just completed the replacement. Now the heater is not blowing air even at several minutes after starting the engine. I let it sit in idle for a several more mintues but no heat. I decided to drive around the block for a few only to find out the temp gauge went up to high and the heater was still blowing cool air. What could be the problem now? Pls chime in and let me know what I need to do. Gettin just a little frustrated now...arrgghhh!!(headbang)(gah)
 
Never mind, figured it out myself. After looking up ways to try and make this work, I decided to give it a shot by making the rad "burp"; first by squeezing the rad hose (passenger side) to let some of the air bubbles out, while at the same time adding more coolant til the level was at the brim. After a several squeezes at the hose and topping the coolant level, I ran the heater at full blast, and problem solved! Heater started working right and the temp gauge was at normal level. Turned out I just needed to add more coolant and get the air bubbles out. The odd thing was I added more coolant (1.75 Gal) than I dumped out (about 1 Gal). I hope this thermostat replacement fix holds up...
 
Quick Update: Since the T-stat replacement, CEL never came back. All's well. To those looking at this DIY post, don't delay on it. If you can turn a wrench you can do this. Easy DIY.
 
Just did this today and have to say that it is much easier in the 5 than the same engine design in my wife's Mercury Milan was. Ford decided to mount the power steering pump where the 5 has the belt tensioner, royal PITA to work around. I will stop by O'Reilly's tomorrow and clear the code. Dave
 
I just completed this repair on my 2006 Mazda 5. It took about 50 minutes, and I consider myself a novice when it comes to car repair. I took off the big hose then unscrewed the 3 screws that hold it on, then removed the small hose. I removed both the left and right top screws from the top of the engine, didn't have to crawl under or remove anything else. I used an 8" socket extension for the screw on the drivers side, and a 4" extension for the passenger side top screw. For the last screw on the bottom, I crawled under the car (I put mine on a jack to make it easier to get under) and used no socket extension. The screws were very easy to remove once I got the socket on it! Replacement was easy. I put the small hose on the new sensor prior to reinstalling, then put in all threw screws then connected the fat hose. Would I do it again? Absolutely.
 
Hey guys, got the P0126 error code the other day and, before researching, I simply cleared the code (on advice from a friend).

Anyways, it hasn't come back on since a few days (monitors still coming up) but I can clearly see (using an obdii reader) that when I am driving on the highway after warming up the car the temperature is staying at 69 degrees celcius. I thought this was because it's stuck open but when I am idling it can climb easily up to 85 degrees.

Should I be replacing the thermostat or the sensor? Or both?
 
Your thermostat is most likely sticking open. Normal operating temp should be between 180 (82c) and 210 (98c). A stuck open thermostat will cause the engine to run too cool. You'll appreciate the extra warmth through the heater after replacement as well.
 
Thanks loosenut ... just want to make sure: does it make sense that it's able to go past 80 when I am idling? If it was stuck open would it stay at 69?
 
Heat builds up during idling due to no airflow through the radiator, so yeah makes perfect sense.
 
I am in the same boat with the p0126. my issue is that the emissions fails because the computer is not ready for testing. I will change my thermostat tomorrow and hope that this is the fix. I am under time constraints because my inspection is 2weeks past and I am paranoid about being pulled over. I will post an update when I replace the thermostat.
 
I am in the same boat with the p0126. my issue is that the emissions fails because the computer is not ready for testing. I will change my thermostat tomorrow and hope that this is the fix. I am under time constraints because my inspection is 2weeks past and I am paranoid about being pulled over. I will post an update when I replace the thermostat.

Were you able to replace it yourself or went to a repair shop. I have the same issue P0126 as of this weekend. Lucky I had one of those ODB tool bought from China for 10 bucks so checked it myself. Came up as P0126. I am looking for videos or pictures to help understand the instructions given by other fellows here. Please share if you have any. Thanks!
 
Were you able to replace it yourself or went to a repair shop. I have the same issue P0126 as of this weekend. Lucky I had one of those ODB tool bought from China for 10 bucks so checked it myself. Came up as P0126. I am looking for videos or pictures to help understand the instructions given by other fellows here. Please share if you have any. Thanks!

You can check on youtube for mazda 3 thermostat replacement - the layout is the same. However, the youtube videos I saw remove the belts and tensioner which are not necessary.
 
Back