changing headlight bulb in Mazda 5

After struggling with my locking needlenose vice grips, I bought some 90 degree (right angle) non-locking needlenose pliers. WOW, what a differece - took me ~5 min to do both headlights after using these.

My suggested steps for replacing headlights:
1) ensure you have 90 degree needlenose pliers
2) buy the replacement bulbs you desire
3) dig in and do the job
 
Just thought I would share my bulb changing experience.

Today my wife tells me on the way home from work that the drivers side burnt out. So the first thing I do before even looking at it, is get on here and search about it and found this thread. Well after reading this I was very skeptical about this task. So I bought 2 new bulbs and went to work.

The driver side did seem easier to get the clip back on. The passenger side was giving me grief just like it has everyone else on here. I realized I couldn't really see what it was I was trying to do. So what I did was get a little mirror and my flashlight and put it behind the light and I was able to see how the clip went into place.

Once I did that, my next attempt to put the clip on was successful. I think the key to it is seeing how the angle on the end of the clip goes under the part that holds it in. It is hard to explain without seeing it but once you do see it, it becomes clear on how to manipulate the clip when installing it.

Had both bulbs changed in about 25 minutes.
Perhaps I was just lucky or maybe I stumbled onto something, but if it helps someone else then it was worth it.
 
definitely need to do it one or 2 times, (own a 3 & a 5), so it's not that bad once you realize you need to use some force on the retaining clip. If you're wimpy with the metal clip, you'll never get the bulb changed out. some 90 degree needle nose pliers help alot as well.
 
I pulled the passenger bulb just for the heck of it after hearing you guys talk about how difficult it is. I got it back in no rear problem, but it seems like the end of the clip could actually be cut slightly short so that it wouldn't be the effort that it is. Who know, guess I'll cross that bridge when I come to it.
 
pita

I've owned some fairly obscure cars (at least in the USA). 1974 Audi 100LS sedan with inboard mounted brakes, a 1974 VW 412 sedan, a 1981 Peugeot 504 diesel wagon, and a 1987 VW Quantum Syncro come to mind right off the top of my head. Yeah, Google some of those. Anyway, all of these in some form or fashion were complete PITAs to work on with some real "what were they thinking" jobs. I must say that after changing my M5 headlight bulbs today, this job ranks right up there, especially since bulbs are a routine maintenance item. I can understand burying a clutch slave cylinder, power steering rack, etc. Those things fail maybe once in the life of a car. Headlight bulbs? Come on. Whoever signed off on this rinky-dink wire bail system of holding the bulbs in needs to get a blanket party. Stupid choice of design, and makes what should be a simple job a pain. I got mine done after inventing a few new curse words, but totally ridiculous amount of work for such a simple maintenance task. I'm now surprised the oil filter isn't remotely located above the fuel tank. Thankfully, the headlight guy didn't design the oil filter.
 
Ok, so I have been thru this twice. One time on a Mazda 3, the other time on a Mazda 5. First time on 3, I had no idea how I would ever get the little clip back in that catch. After fooling with it, I made my own solution. I feel the clip/spring/retaining wire is too tight. This was placed onto the headlamps at the factory, with headlamp out of the car. So I reduced the tension on the clip/spring/retaining wire, by bending it to allow slightly less tension when re installing the bulb. Worked like a charm. Forgot this and had to replace it on Mazda 5, ticked off I searched this issue. Came to this webpage. After looking at the clip/spring/retaining wire I remembered the bending of this clip/spring/retaining wire worked very well a few years prior. I did this, and the bulb went in soo soo soo much easier. Dont take too much tension off, but just enough, and you will find this to be much much easier of installation next time, and this time. I bend the clip/spring/retaining wire where it is shaped like the lower case letter "n". Do this with a set of pliers. Bulbs are still very secure!
 
I just finished doing this job twice. First headlight was a dud, so I got to do it again. Definitely easier the second time around, but a real PITA of a job. I hope the cost cutting they did that makes this a pain was made up for in the durability of the van. I've got 89k on mine and will run out of warranty next month.
 
I finally figured this out after 2 years of doing it wrong. I just realized that the headlight wire will unplug from the back of the light and there is a spacer in there that someone else already mentioned. I was trying to change it with the wire attached made a hard job even harder.
 
Eureka!

Since this thread is well alive and keeps getting hits from google because of the frustration created by the retaining clip, I thought about tossing in my advice.

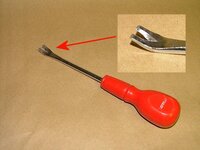
First time I did it on drivers side with long nose pliers. Took me many tries and a very small flashlight. Removing the fuse box cover helped to have a bit more space. But on the passenger side, having a good grip with longnose is almost impossible. The Eureka was to use the fork screwdriver. I'm not a mechanic, so for me it was not that obvious. I DID IT FIRST TRY using this tool. The inside of the fork is sharpened, so once you make it grip on the clip leg you can bend/push/place the clip at will. Now I've found what that weird screwdriver is all about! haha I'm lucky it was in my kit!

And don't forget to keep the H7 connector/adapter that sits at the base of the bulb. The first time, I thought I bought the wrong bulb when I've seen those wider-than-H7 connection legs.

fork-screwdriver.jpg
attachment.php
 
Last edited:
This weird screwdriver is actually intended for the removal of nails. (as used in timbering :)))
 
I think all years of M5 uses H7 bulbs for their lo-beam. If you are in Canada you will also need a relay harness and a 16v 470uF capacitor to make the HID conversion to work with the Daytime Running Lights (DRL) circuit, US models do not have DRL so the relay harness is not needed.

Here is a link to my HID conversion experience:

http://www.msprotege.com/forum/showthread.php?t=123748611

Here are the links of where I bough my HID kit and relay harness. They are located in Hong Kong and the kit arrived in Montreal in 7 days. The capacitor are available at Radio Shack or The Source if you are in Canada:

http://www.vvme.com/standard-h7-hid-conversion-kit-p-51.html?cPath=44_45_23

http://www.vvme.com/relay-harness-for-single-beam-hid-kit-p-140.html?cPath=20

The standard kit that I got works fine but for installation I think the slim kit would have made installing it a little easier.

Hi. Just a quick question about the headlight bulb replacement.

I wonder, is it okay to use HID headlight bulbs in existing OEM halogen housing? Will that look bad or cause any problem later? (heat, too bright, etc.)
If that's the case and I cannot do the entire conversion kit installation, then maybe it is easier just use better halogen bulb with more brightness? (Say.. Sylvania Silverstar vs. Sylvania Silvestar ULTRA)

If anyone has tried this on 5 before, can you please share how it turned out, brightness, looks and etc.? Thank you and have a nice day.
 
You will be fine doing a HID conversion on a halogen housing you will not experience any problem. There are a ton of cars out there including mine that have made the HID change on a halogen housing with no ill effect. However, if you are still hesitant and want to go the Silverstar way. May I reccomend the Silverstar ZXE. Those are amazingly brighter and whiter (not HID white) then any halogen replacement out there including Silverstars and Silverstar ULTRA. I have a set of the ZXE that I was using while DDM Tuning sent me a replacement HID bulb under warranty and I loved them.
 
You will be fine doing a HID conversion on a halogen housing you will not experience any problem. There are a ton of cars out there including mine that have made the HID change on a halogen housing with no ill effect. However, if you are still hesitant and want to go the Silverstar way. May I reccomend the Silverstar ZXE. Those are amazingly brighter and whiter (not HID white) then any halogen replacement out there including Silverstars and Silverstar ULTRA. I have a set of the ZXE that I was using while DDM Tuning sent me a replacement HID bulb under warranty and I loved them.

Silverstar ZXE? Okay thanks!
 
Since this thread is well alive and keeps getting hits from google because of the frustration created by the retaining clip, I thought about tossing in my advice.

First time I did it on drivers side with long nose pliers. Took me many tries and a very small flashlight. Removing the fuse box cover helped to have a bit more space. But on the passenger side, having a good grip with longnose is almost impossible. The Eureka was to use the fork screwdriver. I'm not a mechanic, so for me it was not that obvious. I DID IT FIRST TRY using this tool. The inside of the fork is sharpened, so once you make it grip on the clip leg you can bend/push/place the clip at will. Now I've found what that weird screwdriver is all about! haha I'm lucky it was in my kit!

And don't forget to keep the H7 connector/adapter that sits at the base of the bulb. The first time, I thought I bought the wrong bulb when I've seen those wider-than-H7 connection legs.

View attachment 200007
attachment.php

Took me some time to find this tool. It's called a Tack Puller (used for furniture upholstery I think - someone mentioned "timbering"?)

But after reading someone comments about what a pain it seemed, I went ahead and ordered this too with my Philips H7 X-treme Power Headlight Bulb.

I can see why it was a pain but this tool totally made it easy! Granted I did have to fiddle and study the latch (best viewed on the passenger side) first before doing it.
https://www.amazon.com/dp/ (commissions earned)

Note: I did find that there is a "right side up" on the seating. There is a little notch that fits in between two "posts". I noticed this only after one of the headlamps was shooting more to the ground than the other side. Second time unhinging the latch took two seconds with this tool!

I paid $3 for this at the time. Totally worth it if it saved me time.
 
not sure if anyone else has had this problem, but the retaining clip on my drivers side was made too long to swing out of the housing. Not sure how that happened, but i had to clip a bit off the end to get it to work.
Curse you Stanley headlights...
 
not sure if anyone else has had this problem, but the retaining clip on my drivers side was made too long to swing out of the housing. Not sure how that happened, but i had to clip a bit off the end to get it to work.
Curse you Stanley headlights...

You clipped it? All you had to do was just slightly bend it out. I changed nine with a regular screwdriver in 15 minutes.

Easy as pie.
 
not sure if anyone else has had this problem, but the retaining clip on my drivers side was made too long to swing out of the housing. Not sure how that happened, but i had to clip a bit off the end to get it to work.
Curse you Stanley headlights...

Yes, the fundamental issue with the clip design is that the long side of the clip is slightly too long and interferes with the inside of round hard plastic housing. Because of this interference, the clip will not swing up freely as the Mazda documentation suggests. Removing 2mm to 3mm from the end of the clip on the long side makes this nightmare of a job much, much easier. I used a Dremel tool with an abrasive cut-off wheel to make it shorter. Sounds like you use dikes/dykes (both spellings are used) or something similar. Since the clip is spring steel, that means it is hardened to some degree and could damage dikes/dykes aka diagonal side cutters. That is why I used an abrasive/grinding tool. Be careful not to overdo shortening the long side of the clip: I suggest looking at the clip before you try to open it to see how much extra material there is sticking out from the metal catch for the clip. Obviously, you need to leave enough clip material to still have purchase on the underside of the metal clip. In my experience, removing 2 to 3 mm is enough, but YMMV.

And, as said before in this thread, making a tool out of an old screw driver or buying one makes this job much easier.

~~~
 
I got my first taste of headlight replacement on a Protege5 the last couple days. While trying to get the clip in place on the passenger side, the whole thing came off the mount. I've read some stuff on the net about the clips snapping, but mine just came off. I can't tell what held it in place or if it's possible to re-attach it.

The pax side bulb is being held in with just the rubber boot/seal right now. It seems to be pretty secure. I found a comment elsewhere on the net that a person has been driving their Mazda for over 2 years without the retaining clip(s) and everything stays in place fine.
 

Latest posts

Back