Touch Up Paint

you know I really did intend to let this go, but f--- it. this is starting to get funny now.

I'm not discouraging anyone, I just want people to make an educated decision, taking all things into consideration. this includes potentially ignoring my advice - it's up to the reader to decide what to do with it.

sharing ~my~ experiences is not 'factless' at all. in fact, I am sharing the FACTS of ~my~ experiences. here's another fact: when I told my ex the body shop didn't properly match her bumper cover after her accident, she took one look at it and said I was right, and that she might not have noticed it if I hadn't said anything. she brought it to the body shop and they agreed with my assessment, and repainted the bumper cover - hassle free and free of charge. but please, encourage people to ignore me and listen to you, because I'd really hate it if your fragile ego was somehow damaged.

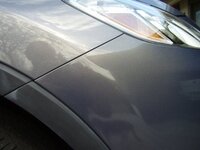
BTW, since you painted a bullseye on your own forehead by COMPLETELY misquoting me, I just wanted to mention: if the 4th photo is an accurate representation of the job you did, I can clearly see the bumper cover is several shades darker than the quarter panel. it's especially noticeable right of the fender and left of the turn signal where the two panels meet. the finish looks decent, but the shades are off. at first I thought maybe the light was hitting at a different angle, but the angle of the panels transition smoothly and there is a very distinct change in shade in your photo. now I know that digital photographs frequently don't represent colors and shades accurately so I don't take for granted that WYSIWYG. and I'm not one to get off on putting anyone down (I make exceptions for overly-opinionated bastards that slander me), but I've got to tell you... if that picture is in fact accurate, the paint clearly doesn't match. and if you ever get those cataracts corrected, you'll see exactly what I mean.
 
Last edited:
For admitting you know nothing about panting a car, you sure talk like an expert.

Your opinions are based on a shop that did a poor job. Not EVERY shop. You're quite insulting, too.


The shade difference is a result of the angle and camera. In the real world they match perfectly, both paint and shine. The photo is intended to show the overall paint job. had you bothered to look closer, you'd see that even on the hood you get the exact same two tones: dark and light. I challenge you to point out the transition between the old and new, on the right side of the photo.
 
Last edited:
For admitting you know nothing about panting a car, you sure talk like an expert.

that's because I have the humility not to overstate my knowledge and admit to zero personal experience in the area. I also had the humility to ask the experts lots of questions when the opportunity did present itself, and to actually LEARN from other people. but I never said I didn't know anything.

Your opinions are based on a shop that did a poor job. Not EVERY shop.

that's exactly right, they did a poor job. I identified it, and they agreed. that gives me a little bit of credibility in this conversation. (glare)

You're quite insulting, too.

like I said, not in my nature, but I make exception for bigots and slanderers. there should be room in this forum for opposing viewpoints and people sharing knowledge, without feeling like they're at risk of being insulted by the likes of you.
 
Lol, I'm not intimidated. I fully plan on touching it up. I probably won't be doing any major repairs like you, but if I was more handy I would give it a go.

Here's the pic of the chip. It's pretty nasty and a little under 1/2" long. There are some wicked reflections in the pic, so hopefully you can make it out. It's dead center in the picture just above the tape. Thanks for the help.

l_a83f1b41fced47cfb1061e58e9c2a37d.jpg
 
Actually, you did that perfect. The phone makes a dark backdrop for the chip.

Is the chip only in the paint, or did the primer chip also? I can't quite tell, but that looks like primer.

You definitely don't need to get crazy with the repair. Mine was a series of gouges up to 1/4" wide and several inches long, with some other scrapes.

Get a touch up bottle, either from Mazda, or Paint Scratch.
Clean out the scratch well, and blow it dry if you have a compressor, or canned air.
Since the chip is horizontal, it will be a bit more tricky to lay the paint in.
Use a really small sharp object. Toothpick, or preferable a pin.
Dip it in the paint, let as much drip back off as physics will allow. Don't scrape it on the side.
Hold the pin at a 45 degree angle to the scratch. Press the tip to one end of the scratch 2/3s of the way up, and slide it across to the other end the moment it makes contact, laying the paint into the scratch.
Continue the process, reversing direction each time until it's filled.

If you want it perfect, you will need a good lacquer, rubbing compound, and fine sand paper. You don't need all the prep and steps of a repair like mine, but the additional work will make your chip disappear, rather than just be less obvious.

If you want to know how to do that, let me know. You can alway try the fill method first then go back and correct it later if you don;t like how it looks.
 
Last edited:
Cool. I'll give it a go. What do the lacquer and rubbing compound do? You had mentioned using a rubbing compound to take out the swirls from the crappy buff job the dealership had done. I wasn't able to get a good picture of the somewhat cloudy areas in the paint.
 
If you don't like how the fill looks, you can use fine sandpaper to smooth the touch up paint, like a filler. Then you use an even finer sandpaper to smooth the last layer of paint, then shoot it with automotive lacquer, feathering it out past the repair, which isn't much in your case. basically you will shoot a quick burst into the air away from the car, then a quick one on the spot. Repeat that at least 3 times at about 10 minute intervals. The air burst first is to avoid splatters on the car. Also, rather than pointing it at the spot and shooting, I'd do a short sweep across the spot, starting the spray just before the spot, and stopping the spray just after it.. This will prevent globs and drips.

Once the lacquer sets (3-4 days), you wipe the area off with a damp cloth, dry it, and apply the rubbing compound to shine the lacquer. I use a slightly damp terry applicator because its easy to hang on to. Then buff with a dry lint free cloth. By hand you will need to buff it at least 3 times, pressing firmly.

See how dull the pain is in photo 3 vs photo 4 of my repair? The clear does not go on glossy. It has to be buffed. The photos aren't that great. In person it's a very good match for paint and sheen.

Here is another look just before I buffed the lacquer:

.
 

Attachments

  • Car Bumper Repair 4.JPG
    Car Bumper Repair 4.JPG
    45.3 KB · Views: 207
Took a photo at an equal angle, just to show the color match...


I just noticed that the cat was behind me.


.
 

Attachments

  • Car Bumper Repair 6.JPG
    Car Bumper Repair 6.JPG
    32.3 KB · Views: 242
Last edited:
Thanks. The mica density and depth is slightly different, but that's mainly to me not layering it as much. It's still a pretty good match, since only I can see it.

Not bad for 3 hours work.

paintscratch has some nice painting materials for DIY.
 
Last edited:
Alright, so here are the pictures. Please note I used regular white paint after I used bondo and primer to see if I'm going to have these uneven buildups of paint around the corners where the masking tape was- and I did. It was just a cheap cost effective way of not wasting expensive ass paint that 34K is.

Nevertheless, here are the pictures, I will be working later today or tomorrow on sanding down that area again.

IMG_0836.jpg


IMG_0837.jpg


IMG_0838.jpg


The reason the outlines in picture three are so dirty is because the car has been sitting there for over a week now- as you can see I'm working on other things as well; oily and dirty hands will do that....

I'll post new pictures when I mask off that area again and finish sanding it down.

Thanks,
Sebastian
 
Yeah, the spot is metal. So, far I applied bondo to fill in the deep cracks (all the way to metal) then I sanded that down and applied general automotive primer.
 
Fine sand the spot I marked until it's smooth. for the final presand, I use those 3M SandBlaster Flexible Finishing Pads. 320, then 400. They will smooth the surface without gouging.

To check for any remaining scratches, wipe the area with a lightly damp towel.

Clean the entire fender VERY well.

Tape off the exposed edges, behind the exterior surface. (Inside the hood, the headlight flange, etc.
Tape the oval black thing I circled, and the leading edge of the door.
Tape off the lower rocker molding.
Cover the Wheel or Hub, and engine with newspaper, etc.

You want the entire fender exposed, except that black thing.

When you paint, you will do back and forth bursts slightly beyond the spot you sanded, top to bottom. Nice light coats. Smooth, but not rough or glossy.

Wait 15 minutes between coats. Apply at least 3 coats. 4 is better.

Wait 30 minutes.

Spray the lacquer the same way as the paint, but overlap the paint by a few inches.

Wait 15 minutes between coats. Apply 4 coats.

The finish will be dull. Don't panic, you didn't do it wrong.

Wait 4 days and then use the rubbing compound to polish the clear coat. If you have a power buffer, use it. Otherwise it will take many applications to get the shine. I used a simple faux lambs wool pad in my drill. Keep moving so you don't burn the paint, if you use one. Wait 30 days to use any paste finishes.

That's it. If anything is unclear, ask.

Have you got the paint, clear, and rubbing compound yet?

.
 

Attachments

  • IMG_0847.jpg
    IMG_0847.jpg
    79.9 KB · Views: 230
Fine sand the spot I marked until it's smooth. for the final presand, I use those 3M SandBlaster Flexible Finishing Pads. 320, then 400. They will smooth the surface without gouging.

To check for any remaining scratches, wipe the area with a lightly damp towel.

Clean the entire fender VERY well.

Tape off the exposed edges, behind the exterior surface. (Inside the hood, the headlight flange, etc.
Tape the oval black thing I circled, and the leading edge of the door.
Tape off the lower rocker molding.
Cover the Wheel or Hub, and engine with newspaper, etc.

You want the entire fender exposed, except that black thing.

When you paint, you will do back and forth bursts slightly beyond the spot you sanded, top to bottom. Nice light coats. Smooth, but not rough or glossy.

Wait 15 minutes between coats. Apply at least 3 coats. 4 is better.

Wait 30 minutes.

Spray the lacquer the same way as the paint, but overlap the paint by a few inches.

Wait 15 minutes between coats. Apply 4 coats.

The finish will be dull. Don't panic, you didn't do it wrong.

Wait 4 days and then use the rubbing compound to polish the clear coat. If you have a power buffer, use it. Otherwise it will take many applications to get the shine. I used a simple faux lambs wool pad in my drill. Keep moving so you don't burn the paint, if you use one. Wait 30 days to use any paste finishes.

That's it. If anything is unclear, ask.

Have you got the paint, clear, and rubbing compound yet?

.


Thanks a lot for the response. There's several things that are unclear so I will ask:

1st: the black oval (side reflector) I will completely remove when repainting. It takes like 5 seconds to remove the whole reflector so I will mask that exposed whole from the inside of the fender.

OK. So from what I understand is this: I tape everything off- first mask the entire fender's edges. Then, like you said, obviously cover everything else...wheel, engine, etc. Bottom line, have nothing but the WHOLE fender exposed.

Now, the larger area that you have circled, I don't need to mask that, right? I just sand down that area like you said? (That's what you did looking from your pictures) if so, I'm understanding this and I am on the right track...

So, with everything covered and that area sanded- I am just repairing or I should say repainting just that area and not the whole fender- even with the clear coat/lacquer, correct?


So, the following steps you outlined:


When you paint, you will do back and forth bursts slightly beyond the spot you sanded, top to bottom. Nice light coats. Smooth, but not rough or glossy.

Wait 15 minutes between coats. Apply at least 3 coats. 4 is better.

Wait 30 minutes.

Spray the lacquer the same way as the paint, but overlap the paint by a few inches.

Wait 15 minutes between coats. Apply 4 coats.

The finish will be dull. Don't panic, you didn't do it wrong.

Wait 4 days and then use the rubbing compound to polish the clear coat. If you have a power buffer, use it.


All those steps are being done just to the area that is primed and sanded? Correct? So, I'm assuming after four days when using a rubbing compound to polish the clear coat- this is what's going to make that repaired area smooth and flushed with the rest of the fender, correct?

Tomorrow, I will post pictures of how I masked the fender just to make sure I did it right.

Also, most importantly, I didn't get the paint, clear and rubbing compound yet. Can you please tell me which clear to get? Because I don't want to get something that isn't needed. Especially with this color, I heard some paint (34K) comes already with a clear coat or something?

If you can tell me exactly what I need (the brand products) I'll make the purchase tomorrow from paint scratch.

Thanks!
-Sebastian
 
1st: the black oval (side reflector) I will completely remove when repainting. It takes like 5 seconds to remove the whole reflector so I will mask that exposed whole from the inside of the fender.

Even easier.

OK. So from what I understand is this: I tape everything off- first mask the entire fender's edges. Then, like you said, obviously cover everything else...wheel, engine, etc. Bottom line, have nothing but the WHOLE fender exposed.

Correct

Now, the larger area that you have circled, I don't need to mask that, right? I just sand down that area like you said? (That's what you did looking from your pictures) if so, I'm understanding this and I am on the right track...

Also correct. You will sand where I circled, and then paint that area.

So, with everything covered and that area sanded- I am just repairing or I should say repainting just that area and not the whole fender- even with the clear coat/lacquer, correct?

Yes. Just that spot.


So, the following steps you outlined:

When you paint, you will do back and forth bursts slightly beyond the spot you sanded, top to bottom. Nice light coats. Smooth, but not rough or glossy.

Wait 15 minutes between coats. Apply at least 3 coats. 4 is better.

Wait 30 minutes.

Spray the lacquer the same way as the paint, but overlap the paint by a few inches.

Wait 15 minutes between coats. Apply 4 coats.

The finish will be dull. Don't panic, you didn't do it wrong.

Wait 4 days and then use the rubbing compound to polish the clear coat. If you have a power buffer, use it.


All those steps are being done just to the area that is primed and sanded? Correct? So, I'm assuming after four days when using a rubbing compound to polish the clear coat- this is what's going to make that repaired area smooth and flushed with the rest of the fender, correct?

Correct. Each step slightly overlaps the last.

Also, most importantly, I didn't get the paint, clear and rubbing compound yet. Can you please tell me which clear to get? Because I don't want to get something that isn't needed. Especially with this color, I heard some paint (34K) comes already with a clear coat or something?
If you can tell me exactly what I need (the brand products) I'll make the purchase tomorrow from paint scratch.

12.5oz. Base Coat, mixed from your paint code.
12.5 oz Clear Coat.
2oz. Bottle Rubbing Compound
Since you didn't specify your exact vehicle or paint code, my list is based on a standard base/clear, not a tricoat. Enter your vehicle info at PaintScratch, and it will tell you. Then, order the Spray Can Kit, but delete the thinners and wax removers. (The sanding and thorough cleaning with a damp cloth will take care of that unless you have very heavy wax on the car. Then order the wax remover)

This illustrates just how important it is to be exact and specific about your vehicle when asking for advice.
 
Thanks again, I really appreciate it. However, I did specify the car's color code which is 34K Crystal White Pearl.

If I remember correctly the 34K paint is a tri-coat and if so, do I still need a stand alone clear coat?
 
You didn't give the year, so I couldn't look it up.

When you enter the vehicle info and select the spray kit (no primer), it will tell you what you need in the spray kit.
 
Last edited:
Back