Someone please move this to the how-to section. Thanks!!!
Well, after the other "how-to" did a whole lot of nothing other than tell you what the MAF was and what can happen to it, I decided to clean mine today. So here is the how to I made in the process, I hope it helps guys!!! If I left anything out feel free to let me know and I will add it in or you can post it in a separate post.
Difficulty: EASY
Time: 10 minutes
IItems Needed:
*CRC Mass Air Flow Sensor Cleaner (can get at any autoparts store by the brake cleaner)- make sure it has the straw with it. Other people have use electronics cleaner, but I would play it safe when working with something this sensitive and expensive.
*Flat Head Screw Driver
*10mm Socket

This how to is based on aftermarket intakes, if you have the stock airbox, accessing your MAF sensor will be different, but the rest is the same.
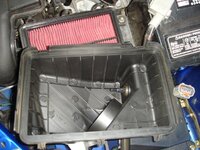
(The MAF sensor housing is the black box)

First thing you need to do is unplug the wire harness that is connected to the MAF sensor (be sure to plug this back in when you are done or the car will run like total crap).
Undo the 10mm nut that connects the MAF housing to the bracket and once unplugged, loosen the clamps on the couplers so that you can pull the box out of the intake.

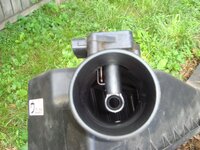
One side of the box will have plastic grating (the part that faces the front of the car) and the other will be unblocked. You will see a thin wire hanging inside the MAF housing, DO NOT TOUCH THE WIRE OR IT WILL BECOME DAMAGED AND YOU MAY NEED TO BUY ANOTHER WHICH IS ABOUT $200. Sorry for the blurry picture but in order to get close enough to see it in the picture it blurred it a little.

Take the MAF sensor cleaner and spray the sensor about 10 times on each side, you will have to stick the straw through the grating but don't touch the sensor and don't get too close or the force from the spray may damage it as well. Once you have sprayed the sensor on both sides you can assemble the intake in reverse order of how you took it apart. Let the sensor dry before you start the car again. Be sure to plug all harnesses back in. And while you are there you can also wipe off the IAT (intake air temperature), but be sure to put that back in as well.
Well that's about all their is to it. If I left anything out let me know or feel free to post below. I hope this helps. It's really easy to do and takes hardly any time, just be careful with the sensor as it is VERY fragile and VERY expensive. Enjoy!
Aaron
Well, after the other "how-to" did a whole lot of nothing other than tell you what the MAF was and what can happen to it, I decided to clean mine today. So here is the how to I made in the process, I hope it helps guys!!! If I left anything out feel free to let me know and I will add it in or you can post it in a separate post.
Difficulty: EASY
Time: 10 minutes
IItems Needed:
*CRC Mass Air Flow Sensor Cleaner (can get at any autoparts store by the brake cleaner)- make sure it has the straw with it. Other people have use electronics cleaner, but I would play it safe when working with something this sensitive and expensive.
*Flat Head Screw Driver
*10mm Socket
This how to is based on aftermarket intakes, if you have the stock airbox, accessing your MAF sensor will be different, but the rest is the same.
(The MAF sensor housing is the black box)
First thing you need to do is unplug the wire harness that is connected to the MAF sensor (be sure to plug this back in when you are done or the car will run like total crap).
Undo the 10mm nut that connects the MAF housing to the bracket and once unplugged, loosen the clamps on the couplers so that you can pull the box out of the intake.
One side of the box will have plastic grating (the part that faces the front of the car) and the other will be unblocked. You will see a thin wire hanging inside the MAF housing, DO NOT TOUCH THE WIRE OR IT WILL BECOME DAMAGED AND YOU MAY NEED TO BUY ANOTHER WHICH IS ABOUT $200. Sorry for the blurry picture but in order to get close enough to see it in the picture it blurred it a little.
Take the MAF sensor cleaner and spray the sensor about 10 times on each side, you will have to stick the straw through the grating but don't touch the sensor and don't get too close or the force from the spray may damage it as well. Once you have sprayed the sensor on both sides you can assemble the intake in reverse order of how you took it apart. Let the sensor dry before you start the car again. Be sure to plug all harnesses back in. And while you are there you can also wipe off the IAT (intake air temperature), but be sure to put that back in as well.
Well that's about all their is to it. If I left anything out let me know or feel free to post below. I hope this helps. It's really easy to do and takes hardly any time, just be careful with the sensor as it is VERY fragile and VERY expensive. Enjoy!
Aaron