
How To: The Poor Man's SRI For Mazda3
Tools Needed:
Time: 30 mins - 1 hr.
Admittedly, this procedure is a stop-gap measure and will probably not produce the kind of results a properly designed/ engineered CAI/SRI would, but is none-the-less is a fun little no-cost mod one can do in about an hour should you decide;
1. you don't want a CAI, or SRI
2. you do want a CAI/SRI but just can't wait for it to be delivered and are bored waiting for it.
3. it's a low priority as you have other things to spend the money on first (my excuse.)
4. you think $150-$300 is a lot of $$$ for a piece of polished tubing and universal air filter (my main excuse.)
This mod should produce some increase in power, based solely on my seat-of-the-pants ("Butt") dyno, and will certainly sound a hell of a lot cooler than the stock, closed airbox. Working together w/the exhaust I installed I notice a big difference in everyday driving, especially in mid to upper range power.
Also, as is obvious from the pictures, I have chosen to use the K&N replacement panel filter (around $40) which I had already installed before doing this mod. Using the stock filter should give you almost the same results, though the K&N does breath a bit easier.
It should also be noted that the pictures used for these instructions were taken after the fact. As is my usual style, I wasn't thinking about pictures (or a write up) when I originally did this.
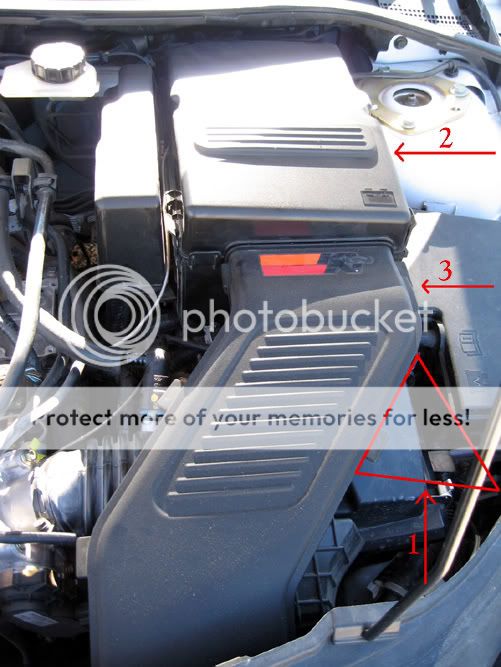
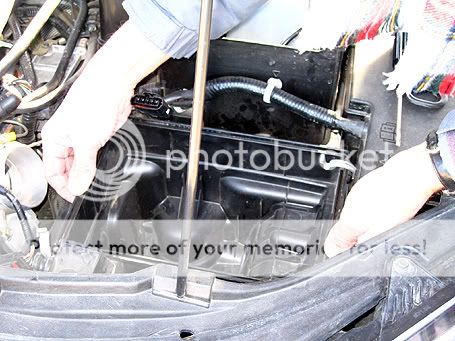
Remove the airbox cover.
To do this remove the three "Fisher-Price" screws and clips holding the little plastic triangle thingy (#1) connecting the battery box snorkel to the front apron. (Mine is permanently removed, but is represented by the outline marked #1 in the picture.) Remove the battery box cover (#2) and finally the snorkel (#3.)
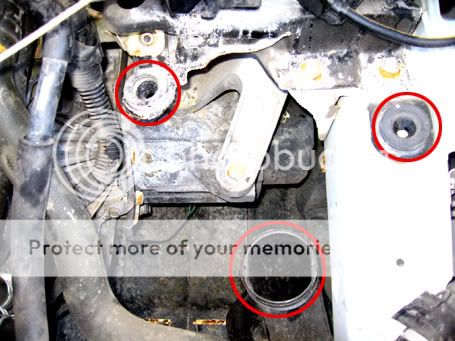
Next, disconnect the PCV hose (#3) by squeezing in the tabs on the blue collar to release and pull the hose off.
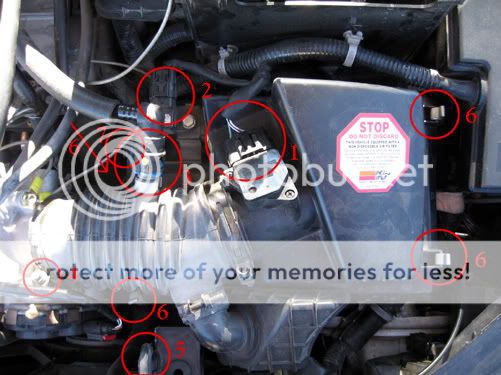
Disconnect the sensors (#1 & #2.) Using your flat bladed screwdriver helps to release and hold the clips.
Using the Phillips head screwdriver, unscrew the clamp (#4) @ the throttle body.
Release the four clips (#6) holding the top of the airbox to the bottom.
Release the small coolant recovery hose from the clip (#7) on the lower left side of the upper airbox, the throttle body hose (#4) and take out the upper airbox cover.
Gently push the rag into the exposed throttle body opening, or cover w/a plastic baggie to keep out dirt, dust and other contaminates.
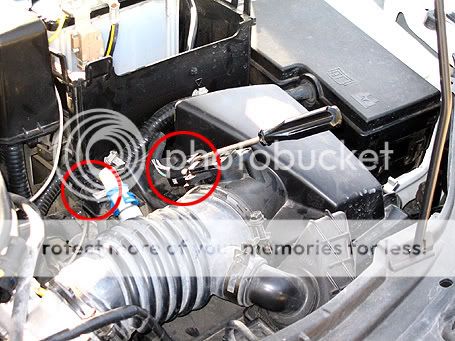
Remove the stock air filter from the airbox bottom.
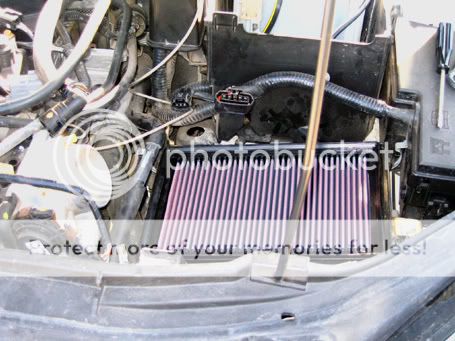
Remove the bottom part of the airbox.
Pull off the rubber pull ring (#5) that holds the front of the box down.
Now that everything is disconnected, grab the bottom part with both hands and pull straight up. It will pop out of the two rubber bushings near the back of the box that hold it to the frame and away from the inlet duct.
Doing the MOD.
If you have a vise, now's the time to use it.
I was trying to drill my holes w/o compromising the integrity of the support structure of the box so three 7/8" holes on the far right (fender) side in between the reinforcements are about all you can do, unless you wanted to elongate them vertically.
Next come the two 1-1/2" holes on the right near the inlet duct. To maintain integrity, I decided not to connect these.
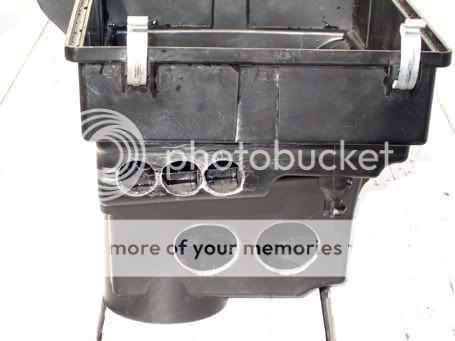
Originally, I drilled four 1-1/4" holes in the front then decided why not connect them and turn them into a long slot instead, so I used my trusty tin snips to cut out the excess.
If you're not lucky enough to have a decent set of hole saws on hand you might drill some pilot/access holes (3/8-1/2") and use your various blades here instead of the snips.
Finishing it off.
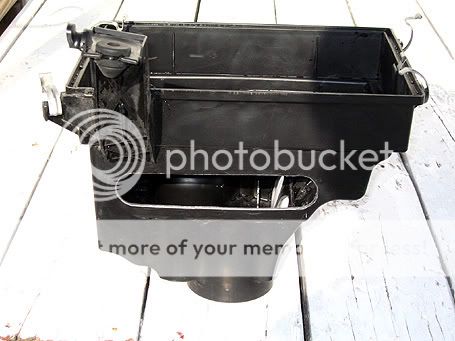
NOW, get out your file(s) and sandpaper, and proceed to chamfer and smooth all the edges removing any burrs that may have been left from the previous steps. It really doesn't take that long since this soft plastic is pretty easy to work with.
Make sure all the shavings and dust are cleaned out before you reinstall the box. (Duh!)
I've kept all the holes to the front, or fender side of the box to give it a chance to draw in as much cold air from outside as possible and to help avoid drawing in all the hot air around the engine itself. It may be moot, I can't be sure. I will surely never know definitively.
Now that your bottom box look like Swiss Cheese ( (lol) ), you've accomplished the mission and can re-install everything in reverse order. Then you can enjoy the extra power and the Whooot-Whooot! sound when you step on it.
Tools Needed:
- A thin blade slotted head screwdriver (for releasing clips on the electrical plugs)
- A Phillips head screwdriver or drill driver
- Various hole saws (recommended 7/8", 1-1/4", 1-1/2")
- Alternative to hole saws: Drill bits and a saw suitable for plastic
- Tin snips
- A vise, helps but is not necessary
- Round and/or half-round single cut smoothing file
- 100 grit sandpaper
- A clean rag and/or plastic baggie and rubber band
Time: 30 mins - 1 hr.
Admittedly, this procedure is a stop-gap measure and will probably not produce the kind of results a properly designed/ engineered CAI/SRI would, but is none-the-less is a fun little no-cost mod one can do in about an hour should you decide;
1. you don't want a CAI, or SRI
2. you do want a CAI/SRI but just can't wait for it to be delivered and are bored waiting for it.
3. it's a low priority as you have other things to spend the money on first (my excuse.)
4. you think $150-$300 is a lot of $$$ for a piece of polished tubing and universal air filter (my main excuse.)
This mod should produce some increase in power, based solely on my seat-of-the-pants ("Butt") dyno, and will certainly sound a hell of a lot cooler than the stock, closed airbox. Working together w/the exhaust I installed I notice a big difference in everyday driving, especially in mid to upper range power.
Also, as is obvious from the pictures, I have chosen to use the K&N replacement panel filter (around $40) which I had already installed before doing this mod. Using the stock filter should give you almost the same results, though the K&N does breath a bit easier.
It should also be noted that the pictures used for these instructions were taken after the fact. As is my usual style, I wasn't thinking about pictures (or a write up) when I originally did this.
Remove the airbox cover.
To do this remove the three "Fisher-Price" screws and clips holding the little plastic triangle thingy (#1) connecting the battery box snorkel to the front apron. (Mine is permanently removed, but is represented by the outline marked #1 in the picture.) Remove the battery box cover (#2) and finally the snorkel (#3.)
Next, disconnect the PCV hose (#3) by squeezing in the tabs on the blue collar to release and pull the hose off.
Disconnect the sensors (#1 & #2.) Using your flat bladed screwdriver helps to release and hold the clips.
Using the Phillips head screwdriver, unscrew the clamp (#4) @ the throttle body.
Release the four clips (#6) holding the top of the airbox to the bottom.
Release the small coolant recovery hose from the clip (#7) on the lower left side of the upper airbox, the throttle body hose (#4) and take out the upper airbox cover.
Gently push the rag into the exposed throttle body opening, or cover w/a plastic baggie to keep out dirt, dust and other contaminates.
Remove the stock air filter from the airbox bottom.
Remove the bottom part of the airbox.
Pull off the rubber pull ring (#5) that holds the front of the box down.
Now that everything is disconnected, grab the bottom part with both hands and pull straight up. It will pop out of the two rubber bushings near the back of the box that hold it to the frame and away from the inlet duct.
Doing the MOD.
If you have a vise, now's the time to use it.
I was trying to drill my holes w/o compromising the integrity of the support structure of the box so three 7/8" holes on the far right (fender) side in between the reinforcements are about all you can do, unless you wanted to elongate them vertically.
Next come the two 1-1/2" holes on the right near the inlet duct. To maintain integrity, I decided not to connect these.
Originally, I drilled four 1-1/4" holes in the front then decided why not connect them and turn them into a long slot instead, so I used my trusty tin snips to cut out the excess.
If you're not lucky enough to have a decent set of hole saws on hand you might drill some pilot/access holes (3/8-1/2") and use your various blades here instead of the snips.
Finishing it off.
NOW, get out your file(s) and sandpaper, and proceed to chamfer and smooth all the edges removing any burrs that may have been left from the previous steps. It really doesn't take that long since this soft plastic is pretty easy to work with.
Make sure all the shavings and dust are cleaned out before you reinstall the box. (Duh!)
I've kept all the holes to the front, or fender side of the box to give it a chance to draw in as much cold air from outside as possible and to help avoid drawing in all the hot air around the engine itself. It may be moot, I can't be sure. I will surely never know definitively.
Now that your bottom box look like Swiss Cheese ( (lol) ), you've accomplished the mission and can re-install everything in reverse order. Then you can enjoy the extra power and the Whooot-Whooot! sound when you step on it.
Last edited:
