I decided to do a compression test on my car today and took a bunch of pictures so maybe they can add this to the "How To" section.
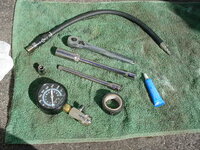
First off: What you will need-
Compression tester
3/8 racket
3/8 extension
10mm socket
5/8 Spark plug socket
electrical tape
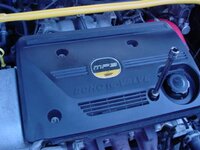
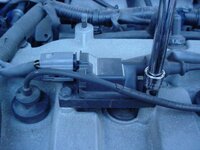
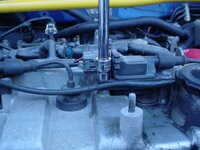
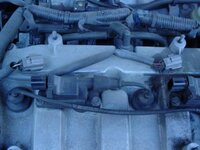
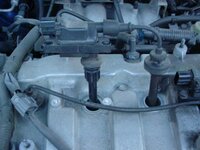
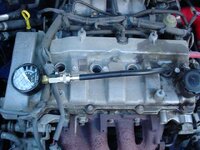
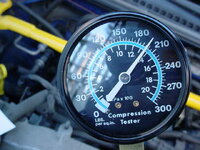
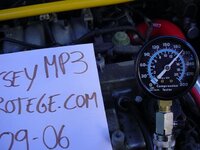
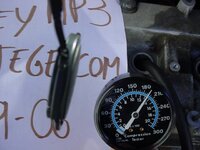
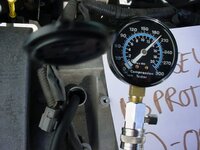
Make sure the car is warmed up to operating temperature than shut if off and wait ten minutes. Disconnect the fuse for the fuel injection.Take off the four screws holding on the plastic engine cover using the 10mm socket. When you take it off you can see the two coil packs with the spark plugs wires coming out of them. They are also held in by 10mm screws, 2 screws on each coil. Take them off and than unclip the plugs going into each coil pack. At this point you can pull the coil and wires out. The spark plugs are now exposed. Take the extension and spark plug socket and wrap the electrical tape around them so the socket will not fall off(not neccessary, but a simple precaution.) Remove all four spark plugs and check for condition, if they need replacing now is the time. Take the compression gauge and attach the fitting so it is the same size as your spark plugs. TAPE THIS ON. I didn't, and when I went to take out the gauge the fitting stayed in the spark plug hole. I wound up putting lock-tite on the fitting and leaving it there until it dryed, than removing the whole piece. It wasn't bad, but it wasted time and allowed the engine to get cold. That is why the last cylinders numbers were slightly lower. Now that you have the proper fitting for the gauge, screw it in until is is sealed snug. Go inside the car and press the gas pedal all the way to the floor. Crank the car as if you were starting it and let it crank over 5 times. You can hear it everytime it cranks over. Stop cranking and go see what the gauge says. Right down the numbers or just remember them(it's only 4 cylinders.) Take the gauge out and go to the next cylinder and repeat. Continue for all four cylinders. After you are done put all the spark plugs back in and snug them down(aluminum head so don't go crazy.) Put all the wires and coils back. Put the cover back on. Put the fuse back and close the hood and go have lunch. Hope this helps somebody out. -John
First off: What you will need-
Compression tester
3/8 racket
3/8 extension
10mm socket
5/8 Spark plug socket
electrical tape
Make sure the car is warmed up to operating temperature than shut if off and wait ten minutes. Disconnect the fuse for the fuel injection.Take off the four screws holding on the plastic engine cover using the 10mm socket. When you take it off you can see the two coil packs with the spark plugs wires coming out of them. They are also held in by 10mm screws, 2 screws on each coil. Take them off and than unclip the plugs going into each coil pack. At this point you can pull the coil and wires out. The spark plugs are now exposed. Take the extension and spark plug socket and wrap the electrical tape around them so the socket will not fall off(not neccessary, but a simple precaution.) Remove all four spark plugs and check for condition, if they need replacing now is the time. Take the compression gauge and attach the fitting so it is the same size as your spark plugs. TAPE THIS ON. I didn't, and when I went to take out the gauge the fitting stayed in the spark plug hole. I wound up putting lock-tite on the fitting and leaving it there until it dryed, than removing the whole piece. It wasn't bad, but it wasted time and allowed the engine to get cold. That is why the last cylinders numbers were slightly lower. Now that you have the proper fitting for the gauge, screw it in until is is sealed snug. Go inside the car and press the gas pedal all the way to the floor. Crank the car as if you were starting it and let it crank over 5 times. You can hear it everytime it cranks over. Stop cranking and go see what the gauge says. Right down the numbers or just remember them(it's only 4 cylinders.) Take the gauge out and go to the next cylinder and repeat. Continue for all four cylinders. After you are done put all the spark plugs back in and snug them down(aluminum head so don't go crazy.) Put all the wires and coils back. Put the cover back on. Put the fuse back and close the hood and go have lunch. Hope this helps somebody out. -John