Improving Current Cooling Efficiency

Familia323

_______________
EDIT: OK now it should work.. I copied the page after I found a way past their registering BS....


I have been looking into a way to reduce heat under the hood and ran across this little bit of info on improving your cars current cooling efficiency. I found it interesting.

(thought)

*see article below...
 
Last edited:
Code:
Choose your Purchase Option
	Special Offer 6 Years of AutoSpeed - Includes Issues 1 to 324
	$27.67
	Buy online access to this issue
Get all of issue 282 including Undertrays, Spoilers & Bonnet Vents, Part 1
	$4.75
	Subscribe and Save!
Subscribe to AutoSpeed and get huge discounts. Includes issue 282 as a bonus!
	from $35.59

If you're already a Member you should login as you may have already purchased this issue.
(notcool)
 
<TABLE style="MARGIN-LEFT: 3px" cellSpacing=0 cellPadding=0 width="100%" border=0><TBODY><TR><TD vAlign=top width="50%">Undertrays, Spoilers & Bonnet Vents, Part 1

Designing, siting, installing and testing!

by Julian Edgar

</TD><TD vAlign=bottom align=right width="50%" rowSpan=2><TABLE style="BORDER-RIGHT: #336699 1px solid; BORDER-TOP: #336699 1px solid; BACKGROUND: #e3ebf3; BORDER-LEFT: #336699 1px solid; WIDTH: 310px; MARGIN-RIGHT: 6px; BORDER-BOTTOM: #336699 1px solid" cellSpacing=0 cellPadding=0 border=0><TBODY><TR><TD style="FONT-SIZE: 11px; WIDTH: 100%; COLOR: #000099"> Advertisement</TD></TR><TR><TD align=middle><SCRIPT language=JavaScript1.1 src="http://campaigns.f2.com.au/js.ng/site=autospeed&cat=techfeatures&adspace=300x250&subcat=&carmake=&carmodel=&area="></SCRIPT><SCRIPT src="http://ads.webpublications.com.au/scripts/wpas.js?site=autospeed&adspace=300x250"></SCRIPT><NOSCRIPT> <AHREF="http://ads.webpublications.com.au/scripts/clickthrough.cgi?site=autospeed&adspace=300x250"><IMGSRC="http://ads.webpublications.com.au/scripts/wpas.js?site=autospeed&adspace=300x250&noscript=1"></NOSCRIPT> <NOSCRIPT></NOSCRIPT></TD></TR><TR><TD style="FONT-SIZE: 11px; WIDTH: 100%; COLOR: #000099; TEXT-ALIGN: right">Advertisement </TD></TR></TBODY></TABLE></TD></TR><TR><TD style="BORDER-RIGHT: #666666 1px solid; BORDER-TOP: #666666 1px solid; BACKGROUND: #f9f9f9; BORDER-LEFT: #666666 1px solid; BORDER-BOTTOM: #666666 1px solid" vAlign=top width="50%">At a glance...

  • <LI style="FONT-SIZE: 11px; MARGIN: 3px 3px 6px 15px; COLOR: #666666">Part 1 of a 3-part series <LI style="FONT-SIZE: 11px; MARGIN: 3px 3px 6px 15px; COLOR: #666666">Engine bay aerodynamic flows <LI style="FONT-SIZE: 11px; MARGIN: 3px 3px 6px 15px; COLOR: #666666">How scoops and vents work <LI style="FONT-SIZE: 11px; MARGIN: 3px 3px 6px 15px; COLOR: #666666">Measuring underbonnet aero
  • Using Magnehelic gauges and manometers
</TD></TR></TBODY></TABLE><TABLE style="MARGIN-TOP: 3px" cellSpacing=0 cellPadding=0 width="100%" border=0><TBODY><TR><TD style="PADDING-RIGHT: 5px" align=right width="100%">Email a friend Print article </TD></TR></TBODY></TABLE>


All modern car designs have spent thousands of hours in the wind tunnel while the engineers refined and altered, tested and assessed. But contrary to popular belief, many of those hours werent used to create a body shape with great drag and lift figures. Instead the engineers were spending the time optimising the cooling system airflows - making sure that plenty of air reached the radiator(s) and could then leave without obstruction.

The average modified car is very different. Perhaps theres a randomly designed bodykit in place and there might also be added bonnet (hood) vents. But theres invariably not a lot of rhyme or reason to it all - sometimes directional vents are put in backwards, while others intended to let air in are almost certainly letting air out. Aftermarket undertrays? Well, while theres plenty of discussion on web groups about them, fitting and then testing their effectiveness is almost unknown.

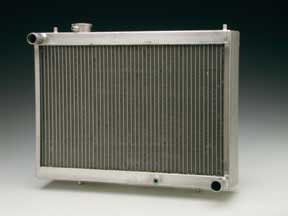
So is it possible to design, install and test front aero aids that achieve something thats worthwhile? It sure is. In this series we take a detailed look at designing and fitting a front undertray, front spoiler, and bonnet vents. These were aimed at improving the airflow through the front heat exchangers radiator, oil cooler, air con condenser, intercooler and power steering cooler. (In this article well concentrate on intercooler flows, but the others apply just as much.)

The whole exercise proved to be a learning experience in more ways than one - like finding out that at some speeds, the guinea pig cars underbonnet intercooler had in fact, zero outside airflow through it... Surely not? but thats the truth.

But lets start at the beginning.


Pressures

Air will only flow if there is a pressure differential. This is a really important point to grasp air doesnt pass through the radiator just because the car is moving forward. Instead, there needs to be a higher pressure in front of the radiator and a lower pressure behind it that is, a difference in pressure.

To better understand this, imagine that the engine bay is sealed off top and bottom. (In most cases it is sealed off at the top by the bonnet, but there are usually openings around the engine to allow air to flow out under the car - but here well think about a car with a totally sealed engine bay.)


The car with the sealed engine bay moves forward and air initially flows in through the radiator.


However, without any escape route, the engine bay soon fills up with air, until the pressures either side of the radiator become equal. Now, no more air will flow through the radiator.


With the normal openings beneath the engine, some air can flow out. The pressure build-up in the engine bay is therefore reduced, although it may be still higher than ambient.


With extra exit vents in the bonnet preventing any build-up in engine bay pressure, best flow through the radiator is gained. (Of course, you can substitute intercooler or oil cooler for radiator, if in fact their exit flows are also into the engine bay.)

So the airflow through a radiator doesnt depend on the pressure in front of the core; it depends on the pressure difference across the core. IOTW, the air exit is just as important as the air entrance if the air exits arent big enough (or the airflow doesnt pas through them quickly enough), pressure will build up on the downstream side of the heat exchanger, decreasing the flow thats occurring through it.

In this application, the primary purpose of front spoilers, undertrays and bonnet exit vents is to lower the pressure build-up inside the engine bay, so increasing the pressure differential across the heat exchangers (rad, intercooler, etc).


<TABLE class=breakout><TBODY><TR><TD class=breakoutCell>Intake Vents?


Bonnet entrance vents eg to an intercooler are located and shaped to build-up a positive pressure on one side of the heat exchanger. For example, this Impreza WRX uses a very large forward-facing scoop to cause increased air pressure on the top surface of the intercooler. If at the same time there is a lower pressure on the other side of the cooler, air flows through it. However, this in turn directs more airflow into the underbonnet space, creating an even greater need for a lot of exit flow capability.

So if youve added a bonnet scoop to pick up air or you have enlarged the standard scoop its quite possible that theres a pressure build-up under the bonnet which is dropping the efficiency of your radiator, intercooler, oil cooler and/or air-conditioning condenser.

Get rid of that pressure build-up and all of the above will work better...

</TD></TR></TBODY></TABLE>Measuring Instruments

This discussion of pressures rather than flow all sounds very scientific I am sure hes right, but what the hell? However, when I tell you that its very easy to actually measure these pressures on a moving car so you can see whats really going on, it all becomes a heap more relevant.

There are two instruments that can be used to measure these pressure variations. One is a Magnehelic gauge and the other, a manometer. (You cant use a normal pressure gauge like a turbo boost gauge because the pressures are very small.)


Magnehelic gauges are made by the <?xml:namespace prefix = st1 ns = "urn:schemas-microsoft-com:eek:ffice:smarttags" /><st1:country-region><st1:place>US</st1:place></st1:country-region> company, Dwyer. They are designed to measure both positive and negative pressures, and so have two measuring ports. By using both ports simultaneously its easy to measure pressure differentials just what is wanted in this application.

Magnehelic gauges can be bought new from Dwyer, or alternatively, secondhand. eBay is a good way of buying these gauges very cheaply expect to pay about US$15-25 for one. When buying a Magnehelic gauge, select a gauge that measures up to a maximum of about 3 inches of water. (The 3-inch gauge lets you use it in other applications as well see below. If you intend using it purely for aerodynamic work, buy a 0-1 inch gauge like the one shown here.)


<TABLE class=breakout><TBODY><TR><TD class=breakoutCell>Other Uses?

Magnehelic gauges are extremely useful in car modification. They can be additionally used to measure flow restriction throughout the intake system, including pressure drops across intercoolers and the air filter. For more on these techniques, do an AutoSpeed site search under Magnehelic.

</TD></TR></TBODY></TABLE>


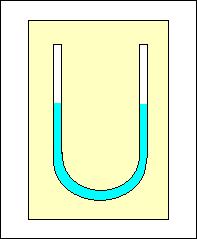
Instead of a Magnehelic gauge you can use a water manometer. A manometer simply consists of a U-shaped clear plastic tube, partly filled with a liquid (usually water with food colouring in it). You can easily make your own by using some plastic hose and a plywood or particle board backing.


Each arm of the manometer is connected to the pressures being measured. The fluid in the manometer then moves in response to this pressure difference the more it moves, the greater the pressure difference. The actual pressure change can be indicated by measuring the difference in height of the two fluid columns. For example, if their levels are vertically 1 inch apart, you are measuring a pressure differential of 1 inch of water.

To make the manometer more sensitive, you can incline it at a fixed angle. If the manometer is angled at 30 degrees from the horizontal, a difference in level of 1 inch (measured along the tubes) becomes an actual inches of water measurement of 0.5 inches. In this way, very small pressure differences can be easily read off, even in a moving car. (Of course, you should use an assistant to read the manometer.)

Note that while I have spoken throughout this series of measurements in inches of water, its usually not worth making the measurements in actual units its a lot easier to just put arbitrary makings on the manometer backing board so you can see relative changes.

The only downside of the home-built manometer is that its orientation must be kept fixed (eg vertically or at a constant angle) and very small pressure differences are hard to measure.


<TABLE class=breakout><TBODY><TR><TD class=breakoutCell>More on Manometers

  • U-shaped manometers are also commercially available. Some use liquids that are less dense than water, so providing an expanded scale that still reads in inches of water.
  • Make sure that the pressure differential is never so great that the water all ends up in one arm of the U-tube. If this occurs, you need a taller manometer with more water in it.
  • A home-built manometer can be a very sensitive instrument, capable of showing pressure differences of just 0.01 psi. So despite the simplicity of the instrument, dont think for a moment that it is a poor relation.
</TD></TR></TBODY></TABLE>Making Measurements

The first measurements that you should make are of the pressures under the bonnet. Leaving one arm of the manometer open to the pressure inside the car, connect a tube from the other arm to the underbonnet area. You can temporarily stick the open end of the tube to the underside of the bonnet with masking tape. If you are using a Magnehelic gauge, connect the sensing tube to the high port and leave the other port open.

Then drive the car and watch what happens on the measuring instrument.


On the guinea pig car a Nissan Maxima V6 Turbo with an added bonnet scoop for the side-mount intercooler the underbonnet pressure rise was considerable. For example, at 80 km/h there was no less than 0.4 inches of water pressure build-up in the engine bay. Given that we have previously measured a pressure in the intercooler scoop of 0.4 inches of water at this speed, it looks very much like the air movement through the intercooler (without the intercooler fan working) is zero. That's because the pressure either side of the intercooler core is the same.

Its worth repeating that: first measurements indicate that the Maximas underbonnet intercooler is getting no outside airflow through it when its fan isnt running, even at high road speeds. OUCH!

You can see why all this stuff is pretty damn important to car performance...

Next week: testing, building and
 
thanks. this makes a lot of sense. I think the reverse cowl scoops are a lot more useful than most people realize.
 
toucci said:
thanks. this makes a lot of sense. I think the reverse cowl scoops are a lot more useful than most people realize.

(spin) Its nothing really technical, but it's something that I didn't think about. Glad you enjoyed it.
 
Part 2: ...
<TABLE WIDTH=100% CELLPADDING=0 CELLSPACING=0 BORDER=0 STYLE="MARGIN-LEFT:3px"><TR><TD WIDTH=50% VALIGN=TOP><P STYLE="FONT-SIZE:24px;FONT-WEIGHT:bold;MARGIN:5px 15px 10px 5px">Undertrays,Spoiler & Bonnet Vents,Part 2</P><P STYLE="FONT-SIZE:12px;FONT-WEIGHT:bold;MARGIN:10px 15px 5px 5px">Designing,siting,installing and testing an undertray/spoiler</P><P STYLE="MARGIN:10px 0px 5px 5px">by Julian Edgar</P></TD><TD WIDTH=50% ROWSPAN=2 VALIGN=BOTTOM ALIGN=RIGHT><TABLE CELLPADDING=0 CELLSPACING=0 BORDER=0 STYLE="WIDTH:310px;BORDER:1px solid #336699;BACKGROUND:#E3EBF3;MARGIN-RIGHT:6px"><TR><TD STYLE="WIDTH:100%;COLOR:#000099;FONT-SIZE:11px"> Advertisement</TD></TR><TR><TD ALIGN=CENTER></TD></TR><TR><TD STYLE="WIDTH:100%;COLOR:#000099;FONT-SIZE:11px;TEXT-ALIGN:right">Advertisement </TD></TR></TABLE></TD></TR><TR><TD WIDTH=50% VALIGN=TOP STYLE="BORDER:1px solid #666666;BACKGROUND:#f9f9f9"><P STYLE="COLOR:#666666;FONT-SIZE:16px;FONT-WEIGHT:bold;MARGIN:5px 5px 8px 5px">At a glance...</P><UL STYLE="MARGIN:10px"><LI STYLE="MARGIN:3px 3px 7px 15px;COLOR:#666666;FONT-SIZE:11px">Designing a new undertray</LI><LI STYLE="MARGIN:3px 3px 7px 15px;COLOR:#666666;FONT-SIZE:11px">Building different prototype undertrays</LI><LI STYLE="MARGIN:3px 3px 7px 15px;COLOR:#666666;FONT-SIZE:11px">Measuring the effectiveness of undertrays</LI></UL></TD></TR></TABLE><TABLE CELLPADDING=0 CELLSPACING=0 BORDER=0 WIDTH=100% STYLE="MARGIN-TOP:3px"><TR><TD WIDTH=100% ALIGN=RIGHT STYLE="PADDING-RIGHT:5px"><A HREF="/cms/A_2160/emailit.html" STYLE="FONT-SIZE:11px;TEXT-DECORATION:none;COLOR:#999999"><IMG SRC="http://us1.webpublications.com.au/static/images/interface/common/mail.gif" WIDTH=14 HEIGHT=13 BORDER=0 STYLE="MARGIN-RIGHT:3px">Email a friend</A>    <A HREF="/cms/A_2160/printArticle.html" STYLE="FONT-SIZE:11px;TEXT-DECORATION:none;COLOR:#999999"><IMG SRC="http://us1.webpublications.com.au/static/images/interface/common/print.gif" WIDTH=14 HEIGHT=13 BORDER=0 STYLE="MARGIN-RIGHT:3px">Print article</A></TD></TR></TABLE><DIV CLASS=article><P><I style="mso-bidi-font-style:normal">In this article we’ll be installing an undertray/spoiler that dramatically and measurably improves underbonnet intercooler and radiator efficiency.No,you don’t need a wind tunnel like the one above-just a cheap measuring instrument,some cardboard and sticky tape,and your local roads.</I></P><P>Last week<A href="/A_2159/cms/article.html">Undertrays,Spoilers & Bonnet Vents,Part 1</A>we introduced the idea that before air can flow,a pressure difference is needed.So for example,before air will pass through an intercooler or radiator,there needs to be a higher pressure on one side than the other.Even if the pressure is high on the front face of the radiator or intercooler,if it’s also high on the back face,no air will flow through it.</P><P>In short,air exits are just as important as air entrances.</P><P><DIV CLASS=wpimg STYLE="width:302;float:right;"><A HREF="http://us1.webpublications.com.au/static/images/articles/i21/2160_3mg.jpg"><IMG SRC="http://us1.webpublications.com.au/static/images/articles/i21/2160_3lo.jpg" WIDTH='302'ALT="Click for larger image" HEIGHT='265'BORDER='0'/></A></DIV><P>In Part 1 of this series we left you with the information that the measured pressure increase on the front face of the guinea pig Maxima V6 Turbo’s underbonnet intercooler(air channelled to it by a bonnet scoop)was pretty well matched with the air pressure in the engine bay...which is where the intercooler air exit is.</P><P>Of course in this situation,no airflow through the intercooler will be occurring....</P><DIV style="clear:both;MARGIN:0px"></DIV><h3>Starting Point</h3><P><DIV CLASS=wpimg STYLE="width:302;"><A HREF="http://us1.webpublications.com.au/static/images/articles/i21/2160_13mg.jpg"><IMG SRC="http://us1.webpublications.com.au/static/images/articles/i21/2160_13lo.jpg" WIDTH='302'ALT="Click for larger image" HEIGHT='212'BORDER='0'/></A></DIV><P>The whole desire to make some aerodynamic changes to the front of the car came about because when doing some other road testing,I’d had the standard undertray off the car.This design is in two small pieces,with one section hanging down low at the rear.I’d already found that when this undertray was tied upwards,the measured intake air temp rose as intercooler efficiency dropped(see<A href="/A_1900/article.html">Driving Emotion</A>).But with the undertray removed completely,the performance of the intercooler and radiator seemed to go even further backwards.</P><P>It therefore seemed that some tweaking of the undertray had the potential to dramatically improve intercooler(and perhaps also radiator)efficiencies.But at this stage I had no idea what I was getting into –the data subsequently proved to be absolutely startling....</P><h3>Underbonnet Measurements</h3><P><DIV CLASS=wpimg STYLE="width:302;float:right;"><A HREF="http://us1.webpublications.com.au/static/images/articles/i21/2160_4mg.jpg"><IMG SRC="http://us1.webpublications.com.au/static/images/articles/i21/2160_4lo.jpg" WIDTH='302'ALT="Click for larger image" HEIGHT='258'BORDER='0'/></A></DIV><P>Using a Dwyer Magnehelic 0-1 inches of water gauge(see last week’s story for more on these gauges)I made measurements of the pressure under the bonnet of the Maxima.Two measuring locations were picked:</P><UL style="MARGIN-TOP:0cm" type=disc><LI>against the underside of the bonnet,basically in the middle of the panel towards the rear</LI><LI>near to the intercooler air outlet,which is towards the front left of the engine bay</LI></UL><P>The road speed for all the measurements was 80 km/h and the radiator and intercooler fans were not operating when the measurements were taken.(Interestingly,the underbonnet pressure measurably rises when the rad fans are working –they’re pushing more air into the space,you see.)</P><P>The first measurements were taken with the standard undertray configuration,as shown in the pic above.As the table below shows,the pressure build-up in the engine bay at 80 km/h was 0.4 inches of water.</P><TABLE width="250" border="1"><TR><TD></TD><TD><P><B>Standard Undertrays</B></P></TD></TR><TR><TD><P><B>Rear of bonnet</B></P></TD><TD><P>0.4 inches</P></TD></TR><TR><TD><P><B>Near intercooler</B></P></TD><TD><P>0.4 inches</P></TD></TR></TABLE><P><DIV CLASS=wpimg STYLE="width:258;"><A HREF="http://us1.webpublications.com.au/static/images/articles/i21/2160_5mg.jpg"><IMG SRC="http://us1.webpublications.com.au/static/images/articles/i21/2160_5lo.jpg" WIDTH='258'ALT="Click for larger image" HEIGHT='272'BORDER='0'/></A></DIV><P>The short factory undertrays were then removed,leaving an opening that allowed the road to be seen by peering down between the radiator and the engine.The table below shows the measurements that were taken.As can be seen,the pressure at the rear of the engine bay stayed the same at 0.4 inches but the pressure at the front of the engine bay(which is where the intercooler is mounted)rose to 0.5 inches of water.This explained why the rad and ‘cooler didn’t work as well with the small undertrays removed.</P><TABLE width="330" border="1"><TR><TD></TD><TD><P><B>Standard Undertrays</B></P></TD><TD><P><B>No Undertrays</B></P></TD></TR><TR><TD><P><B>Rear of bonnet</B></P></TD><TD><P>0.4 inches</P></TD><TD><P>0.4</P></TD></TR><TR><TD><P><B>Near intercooler</B></P></TD><TD><P>0.4 inches</P></TD><TD><P>0.5</P></TD></TR></TABLE><P>A test undertray was then fabricated from some plastic sheet that had once backed an advertising hoarding.The front of the trial undertray was held in place with cable ties connecting to the lower edge of the bumper and at the rear,by a wire that connected it to the anti-roll bar.The undertray was allowed to droop down at the rear,creating a gap that reached about 10cm in the middle.</P><P><DIV CLASS=wpimg STYLE="width:302;float:right;"><A HREF="http://us1.webpublications.com.au/static/images/articles/i21/2160_8mg.jpg"><IMG SRC="http://us1.webpublications.com.au/static/images/articles/i21/2160_8lo.jpg" WIDTH='302'ALT="Click for larger image" HEIGHT='202'BORDER='0'/></A></DIV><P>This photo shows the test undertray in place.</P><P>The measurements taken with this undertray are shown in the table below.As can be seen,the pressures found towards the front of the engine bay are markedly altered by the presence and shape of the front undertray.Over having no undertray at all,the trial plastic undertray reduced the pressure in the front part of the engine bay by 40 per cent.Significantly,it was also much better than the standard undertrays,reducing the pressure build-up over them by 25 per cent.</P><TABLE width=454 border="1"><TBODY><TR><TD></TD><TD><P><B>Standard Undertray</B></P></TD><TD><P><B>No Undertrays</B></P></TD><TD><P><B>Plastic Undertray</B></P></TD></TR><TR><TD><P><B>Rear of bonnet</B></P></TD><TD><P>0.4 inches</P></TD><TD><P>0.4</P></TD><TD><P>0.4</P></TD></TR><TR><TD><P><B>Near intercooler</B></P></TD><TD><P>0.4 inches</P></TD><TD><P>0.5</P></TD><TD><P>0.3</P></TD></TR></TABLE><P><DIV CLASS=wpimg STYLE="width:302;"><A HREF="http://us1.webpublications.com.au/static/images/articles/i21/2160_7mg.jpg"><IMG SRC="http://us1.webpublications.com.au/static/images/articles/i21/2160_7lo.jpg" WIDTH='302'ALT="Click for larger image" HEIGHT='202'BORDER='0'/></A></DIV><P>Next a spoiler lip was added to the undertray.The trial lip was formed from foam rubber and was 5 x 5cm,being attached to the undertray 15cm back from the leading edge.</P><P>The measured results are shown in the table and graph below.Over the new undertray alone,the lip made no difference to the recorded pressure at the front of the engine bay but had a dramatic effect on the rear pressure –dropping it by 25 per cent.</P><TABLE width="560" border="1"><TR><TD></TD><TD><P><B>Standard Undertray</B></P></TD><TD><P><B>No Undertrays</B></P></TD><TD><P><B>Plastic Undertray</B></P></TD><TD><P><B>Plastic Undertray with Spoiler</B></P></TD></TR><TR><TD><P><B>Rear of bonnet</B></P></TD><TD><P>0.4 inches</P></TD><TD><P>0.4</P></TD><TD><P>0.4</P></TD><TD><P>0.3</P></TD></TR><TR><TD><P><B>Near intercooler</B></P></TD><TD><P>0.4 inches</P></TD><TD><P>0.5</P></TD><TD><P>0.3</P></TD><TD><P>0.3</P></TD></TR></TABLE><P><DIV CLASS=wpimg STYLE="width:302;float:right;"><A HREF="http://us1.webpublications.com.au/static/images/articles/i21/2160_12mg.jpg"><IMG SRC="http://us1.webpublications.com.au/static/images/articles/i21/2160_12lo.jpg" WIDTH='302'ALT="Click for larger image" HEIGHT='264'BORDER='0'/></A></DIV>
 
Last edited:
<P>So compared with standard,the new trial undertray and spoiler lip decreased the front and rear pressure engine bay build-ups by 25 per cent.Over having no undertray at all,the new combo dropped the front and rear underbonnet pressures by 25 per cent and 40 per cent,respectively.This major pressure drop(improving airflow through all the front-mounted heat exchangers)is especially important to consider if your car has no undertray.</P><DIV STYLE="CLEAR:both"></DIV><TABLE CLASS="breakout"><TR><TD CLASS="breakoutCell"><h3>Why They Worked –Maybe!</h3><P>Measuring that in fact these trial designs<B style="mso-bidi-font-weight:normal">did</B>work is far better than any theory –but what is likely to have been going on?</P><P>Firstly,the absence of any undertrays probably created turbulence under the engine bay.Despite turbulence often being characterised as ‘low pressure’it can have the effect of preventing other airflows smoothly joining it.By having a relatively smooth undertray hanging down at the rear,air is accelerated between the undertray and the road,better drawing air out of the engine bay at the trailing rear edge of the undertray.</P><P>And the spoiler? Like nearly everything in car aerodynamics,this partly contradicts what was just said –the spoiler is likely to have created a slightly lower pressure behind it,either by changing the effective shape of the undertray or by causing localised high speed turbulence.</P></TD></TR></TABLE><h3>Intercooler Measurements</h3><P>The measurements taken so far were referenced against cabin pressure –with the windows open,effectively the same as ambient.However,because I wanted to achieve a specific outcome(better airflow through the radiator and<B style="mso-bidi-font-weight:normal">especially</B>the intercooler)I decided to do some more measurements.These were to be true differential measurements –that is,carried out by running two sensing tubes from the measuring instrument to either side of the intercooler and then measuring the actual pressure difference across the core.</P><P>And what an eye-opener these measurements were! Remember,the higher the pressure difference across the intercooler,the more air that will be flowing through it.</P><TABLE width=500 border="1"><TR><TD></TD><TD><P><B>No Undertrays</B></P></TD><TD><P><B>New Plastic Undertray</B></P></TD><TD><P><B>New Plastic Undertray with Spoiler</B></P></TD></TR><TR><TD><P>Intercooler Pressure Differential</P></TD><TD><P><B>Minus</B>0.1 inches</P></TD><TD><P>0</P></TD><TD><P>0.1 inches</P></TD></TR></TABLE><P><DIV CLASS=wpimg STYLE="width:302;float:right;"><A HREF="http://us1.webpublications.com.au/static/images/articles/i21/2160_11mg.jpg"><IMG SRC="http://us1.webpublications.com.au/static/images/articles/i21/2160_11lo.jpg" WIDTH='302'ALT="Click for larger image" HEIGHT='191'BORDER='0'/></A></DIV><P>The table above and this graph show that without any undertrays in place,the air from under the bonnet is likely to have been flowing<B style="mso-bidi-font-weight:normal">out</B>through the bonnet scoop! That is,there was a measured higher pressure under the intercooler than on top,even at 80 km/h! No bloody wonder intake air temps went up in this configuration –the air was coming in through the radiator,being heated,then passing through the intercooler and out the forward-facing bonnet scoop!</P><P>I had had a<B style="mso-bidi-font-weight:normal">pre-heater</B>happening,not an intercooler...</P><P>With my mock-up plastic undertray in place,the pressure at 80 km/h was the same top and bottom of the intercooler.That is,no airflow through the core would have been occurring.</P><P>And with the trial plastic undertray and the foam rubber spoiler,I had a very small positive differential of 0.1 inches –the pressure was a little higher on top than underneath.</P><P>Hmmmmm.</P><P>This was serious food for thought.When the intercooler fan is off,the flow through the intercooler core is lousy –sometimes backwards,even.</P><P>I then made a cardboard undertray that I fitted under the intercooler side of the engine bay.I replicated the foam rubber spoiler with more cardboard,then went for a drive.The resulting pressure differential was zero...<B><I>unless I was in the turbulent wake of another car,</I></B>where it was 0.1 inches! Yes,incredible as it sounds,the intercooler airflow was clearly being affected by other vehicles –in this case,when following another vehicle,it got better.</P><P>This was all getting seriously involved,so rather than spend more time on mock-ups,I decided to start work on the real thing.</P><DIV STYLE="CLEAR:both"></DIV><TABLE CLASS="breakout"><TR><TD CLASS="breakoutCell"><h3>Prototyping...</h3><P>By far the easiest way of assessing aero changes is to make quick and easy mock-ups of proposed undertray shapes out of cardboard and/or sheet plastic,cable ties and sticky tape.It might attract some interested looks from passers-by,but in five minutes of on-road pressure testing you can prove or disprove a design.</P><P>Not mentioned in the main text is another front-end shape that was trialled –a straight up/down spoiler so low that it scraped on the ground.Despite preventing lots of airflow under the car,the pressure differential across the intercooler remained at zero.So this quickly showed that there was no point in going for a deep front spoiler-it didn’t work.</P><P>Incidentally,that goes against nearly all the textbook wisdom...</P></TD></TR></TABLE><h3>The New Undertray</h3><P>Undertrays of this sort can be made from a variety of materials,including fibreglass,ABS plastic,polycarbonate(Lexan)or marine plywood.I chose ABS –a tough plastic that can be bent when heated and is easily drilled,sanded and cut.I bought a half-sheet offcut from a plastics shop for AUD$28.(To find outlets selling a variety of types of plastic sheet,look up ‘plastics’in the Yellow Pages.)</P><P><DIV CLASS=wpimg STYLE="width:302;"><A HREF="http://us1.webpublications.com.au/static/images/articles/i21/2160_2mg.jpg"><IMG SRC="http://us1.webpublications.com.au/static/images/articles/i21/2160_2lo.jpg" WIDTH='302'ALT="Click for larger image" HEIGHT='183'BORDER='0'/></A></DIV><P>I won’t take you through every design iteration made with the ABS,but after hours of constructing and testing,constructing and testing,I struck gold.With the short undertray configured as shown here(flush with the lower bumper at the front,angled slightly downwards and open at the rear,and with the sides sealed-off with angled folded panels),the measured pressure differential across the intercooler skyrocketed to 0.3 inches of water at 80 km/h.</P><TABLE width=568 border="1"><TR><TD></TD><TD><P><B>No Undertrays</B></P></TD><TD><P><B>Plastic Undertray</B></P></TD><TD><P><B>Plastic Undertray with Spoiler</B></P></TD><TD><P><B>Final Undertray</B></P></TD></TR><TR><TD><P>Intercooler Pressure Differential</P></TD><TD><P><B>Minus</B>0.1 inches</P></TD><TD><P>0</P></TD><TD><P>0.1 inches</P></TD><TD><P>0.3 inches</P></TD></TR></TABLE><P><DIV CLASS=wpimg STYLE="width:302;float:right;"><A HREF="http://us1.webpublications.com.au/static/images/articles/i21/2160_10mg.jpg"><IMG SRC="http://us1.webpublications.com.au/static/images/articles/i21/2160_10lo.jpg" WIDTH='302'ALT="Click for larger image" HEIGHT='185'BORDER='0'/></A></DIV><P>In the above table and on this graph you can see what an incredible change that is –no less than a 400 per cent improvement over having no undertray at all! Over the worse-case scenario(ie no undertrays)the intake cruise air temp on a 30 degree C day also dropped from 65 to 47 degrees C....Yes,the intercooler was now working –even without the fan on!</P><P>So could the pressure difference be improved even further with the addition of a spoiler? The answer was ‘no’.Despite trialling lip spoilers in different positions and of different heights on the undertray,no significant gain in pressure across the intercooler could be made with this version of the undertray.</P><P>And what about underbonnet pressures –the starting point of the measuring process?</P><TABLE width="350" border="1"><TR><TD></TD><TD><P><B>Standard Undertrays</B></P></TD><TD><P><B>New Undertray</B></P></TD></TR><TR><TD><P><B>Rear of bonnet</B></P></TD><TD><P>0.4 inches</P></TD><TD><P>0.4 inches</P></TD></TR><TR><TD><P><B style="mso-bidi-font-weight:normal">Near intercooler</B></P></TD><TD><P>0.4</P></TD><TD><P>0.1 inches</P></TD></TR></TABLE><P>Towards the front of the engine bay the underbonnet pressure has been reduced by 75 per cent,from 0.4 inches down to 0.1 inches(both at 80 km/h).However the final version of the undertray does not reduce pressures towards the rear of the engine bay at all.To a large extent,getting a big pressure decrease at the front of the engine bay is far more important on this car than at the rear –the intercooler and radiator are both mounted near the front of the car and so have their exit air exhausting at this position.(Of course,a car with a top-mount intercooler mounted over-or behind-the engine may be a completely different kettle of fish!)</P><h3>Conclusion</h3><P><DIV CLASS=wpimg STYLE="width:302;"><A HREF="http://us1.webpublications.com.au/static/images/articles/i21/2160_6mg.jpg"><IMG SRC="http://us1.webpublications.com.au/static/images/articles/i21/2160_6lo.jpg" WIDTH='302'ALT="Click for larger image" HEIGHT='202'BORDER='0'/></A></DIV><P>This series is entitled ‘Undertrays,Spoilers &Bonnet Vents’but there isn’t going to be a front spoiler.As indicated above,several versions were trialled but they were not effective at increasing the pressure difference across the intercooler,while at the same time they reduced ground clearance.</P><P>However,the simple undertray(well,simple now that all the work has been done!)makes a radical difference to the airflow passing through the intercooler –an increase in airflow that measurably drops cruise intake air temps.</P><P>(If the car didn’t run an intercooler fan which comes on at low road speeds and also when intercooler temps are high,the new undertray would also have dropped peak intake air temps considerably.)</P><P>In addition,it is noticeable that the radiator fans(being monitored by a LED inside the cabin)don’t operate nearly as often as previously –basically,if the car is moving on the flat,the fans stay off,whatever the outside temp.IOTW,the radiator is now working much better.</P><P>Playing with different undertrays and front spoilers can result in significantly increased intercooler(and radiator)efficiencies.However,if you’re not measuring actual aerodynamic pressures,you’re working in the dark –even apparently minor changes in design can yield major changes in aerodynamic flows.</P><P><B style="mso-bidi-font-weight:normal"><I style="mso-bidi-font-style:normal">Next week –fitting the bonnet vents</I></B></P></DIV>
 
Last edited:
<TABLE WIDTH=100% CELLPADDING=0 CELLSPACING=0 BORDER=0 STYLE="MARGIN-LEFT:3px"><TR><TD WIDTH=50% VALIGN=TOP><P STYLE="FONT-SIZE:24px;FONT-WEIGHT:bold;MARGIN:5px 15px 10px 5px">Undertrays,Spoiler & Bonnet Vents,Part 3</P><P STYLE="FONT-SIZE:12px;FONT-WEIGHT:bold;MARGIN:10px 15px 5px 5px">Designing,siting,installing and testing bonnet vents</P><P STYLE="MARGIN:10px 0px 5px 5px">by Julian Edgar</P></TD><TD WIDTH=50% ROWSPAN=2 VALIGN=BOTTOM ALIGN=RIGHT><TABLE CELLPADDING=0 CELLSPACING=0 BORDER=0 STYLE="WIDTH:310px;BORDER:1px solid #336699;BACKGROUND:#E3EBF3;MARGIN-RIGHT:6px"><TR><TD STYLE="WIDTH:100%;COLOR:#000099;FONT-SIZE:11px"> Advertisement</TD></TR><TR><TD ALIGN=CENTER><SCRIPT LANGUAGE="JavaScript1.1" SRC="http://campaigns.f2.com.au/js.ng/site=autospeed&cat=techfeatures&adspace=300x250&subcat=&carmake=&carmodel=&area="></SCRIPT><NOSCRIPT><A HREF="http://ads.webpublications.com.au/scripts/clickthrough.cgi?site=autospeed&adspace=300x250"><IMG SRC="http://ads.webpublications.com.au/scripts/wpas.js?site=autospeed&adspace=300x250&noscript=1" BORDER=0></A></NOSCRIPT></TD></TR><TR><TD STYLE="WIDTH:100%;COLOR:#000099;FONT-SIZE:11px;TEXT-ALIGN:right">Advertisement </TD></TR></TABLE></TD></TR><TR><TD WIDTH=50% VALIGN=TOP STYLE="BORDER:1px solid #666666;BACKGROUND:#f9f9f9"><P STYLE="COLOR:#666666;FONT-SIZE:16px;FONT-WEIGHT:bold;MARGIN:5px 5px 8px 5px">At a glance...</P><UL STYLE="MARGIN:10px"><LI STYLE="MARGIN:3px 3px 7px 15px;COLOR:#666666;FONT-SIZE:11px">Finding the best location for bonnet vents</LI><LI STYLE="MARGIN:3px 3px 7px 15px;COLOR:#666666;FONT-SIZE:11px">Fitting bonnet vents</LI><LI STYLE="MARGIN:3px 3px 7px 15px;COLOR:#666666;FONT-SIZE:11px">Measuring the effectiveness of bonnet vents</LI></UL></TD></TR></TABLE><TABLE CELLPADDING=0 CELLSPACING=0 BORDER=0 WIDTH=100% STYLE="MARGIN-TOP:3px"><TR><TD WIDTH=100% ALIGN=RIGHT STYLE="PADDING-RIGHT:5px"><A HREF="/cms/A_2162/emailit.html" STYLE="FONT-SIZE:11px;TEXT-DECORATION:none;COLOR:#999999"><IMG SRC="http://us1.webpublications.com.au/static/images/interface/common/mail.gif" WIDTH=14 HEIGHT=13 BORDER=0 STYLE="MARGIN-RIGHT:3px">Email a friend</A>    <A HREF="/cms/A_2162/printArticle.html" STYLE="FONT-SIZE:11px;TEXT-DECORATION:none;COLOR:#999999"><IMG SRC="http://us1.webpublications.com.au/static/images/interface/common/print.gif" WIDTH=14 HEIGHT=13 BORDER=0 STYLE="MARGIN-RIGHT:3px">Print article</A></TD></TR></TABLE><DIV CLASS=article><P>Last week in<A href="/A_2160/cms/article.html">Undertrays,Spoiler & Bonnet Vents,Part 2</A>we showed you how a newly-fitted undertray dropped the underbonnet pressure build-up on our guinea pig Maxima V6 turbo by 75 per cent at 80 km/h,considerably improving flow through the intercooler and radiator.But the pesky under-bonnet pressure build-up still occurred and got even higher when the car was driven faster.</P><P>Time for some bonnet vents...</P><h3>Siting Bonnet Vents</h3><P>Bonnet vents are openings designed to exhaust air –to promote the flow of air out from under the bonnet.As covered in detail in Part 1 of this series(<A href="/A_2159/cms/article.html">Undertrays,Spoiler & Bonnet Vents,Part 1</A>),air movement will occur only when there is a pressure differential.So,to cause air to flow out from under the bonnet,what’s needed is an underbonnet pressure that is greater than the pressure on top of the bonnet...at the exact location where the vent is.</P><DIV CLASS=wpimg STYLE="width:302;float:right;"><A HREF="http://us1.webpublications.com.au/static/images/articles/i21/2162_6mg.jpg"><IMG SRC="http://us1.webpublications.com.au/static/images/articles/i21/2162_6lo.jpg" WIDTH='302'ALT="Click for larger image" HEIGHT='157'BORDER='0'/></A></DIV><P>Pressure on top of the bonnet? Why would there be any? The pressure on the surface of the bodywork depends on the aerodynamic flows over it.This DaimlerChrysler graphic shows the typical frontal pressure distribution of a car.Looking just at the bonnet you can see that there is low pressure(blue)where the air wraps around the leading edge of the bonnet,grading to high pressure(green)as the air reaches the obstruction which is the windscreen.</P><P>So you wouldn’t site a bonnet outlet vent close to the windscreen –in fact that’s usually where the cabin ventilation<B style="mso-bidi-font-weight:normal">inlet</B>ducts are...they’re taking advantage of that high pressure! Looking at just the exterior pressures,what we want at the vent location is the very lowest external pressure.</P><DIV style="clear:both;MARGIN:0px"></DIV><P>That’s the theory –but what about on the road? By using the Magnehelic gauge(see the previous parts in this series for more on these gauges),it’s dead-easy to directly measure the pressures over the outside of the bonnet.Simple run a tube from the Magnehelic gauge to the area to be measured,making sure that the open end of the tube is at right-angles to the direction of airflow.Leave the other port of the gauge open,and swap the tube from port to port,depending on whether you find that you’re measuring a high or low pressure.</P><DIV CLASS=wpimg STYLE="width:302;"><A HREF="http://us1.webpublications.com.au/static/images/articles/i21/2162_7mg.jpg"><IMG SRC="http://us1.webpublications.com.au/static/images/articles/i21/2162_7lo.jpg" WIDTH='302'ALT="Click for larger image" HEIGHT='221'BORDER='0'/></A></DIV><P>This is exactly what we did on the Maxima,using the same 80 km/h road speed for all testing.The results were astounding –not because they reflected the textbook example shown in the graphic above,but because the pressure variations were so great! As can be seen here,the front half of the bonnet surface was clearly a negative pressure zone,while the rear half was all in positive pressure.And the further forwards the measurements were taken,the lower the pressure;and the further backwards,the higher the pressures!</P><P>In Part 2 of this series we measured the maximum underbonnet pressure at 80 km/h as 0.4 inches of water –and here,near to the windscreen,the surface pressure was 0.6 inches! IOTW,place a bonnet vent at this location and air will be flowing in from outside-ie through the vent and into the engine bay! So much for relieving the pressure under the bonnet...</P><P>Clearly,the further forward that the vents were to be placed,the lower the available outside pressures.</P><P>But the outside pressures are literally only half the story.What about the underbonnet pressures? As mentioned above,with the new-design undertray in place,the maximum pressures under the bonnet(again at 80 km/h)was 0.4 inches.This was recorded across the rear half of the engine bay.At the front of the engine bay(in reality,about 30cm back from the radiator),the underbonnet pressure was 0.1 inches.</P><P>So what were the alternatives?</P><TABLE class=MsoTableGrid style="BORDER-RIGHT:medium none;BORDER-TOP:medium none;BORDER-LEFT:medium none;BORDER-BOTTOM:medium none;BORDER-COLLAPSE:collapse;mso-border-alt:solid windowtext.5pt;mso-yfti-tbllook:480;mso-padding-alt:0cm 5.4pt 0cm 5.4pt;mso-border-insideh:.5pt solid windowtext;mso-border-insidev:.5pt solid windowtext" cellSpacing=0 cellPadding=0 border=1><TBODY><TR style="mso-yfti-irow:0"><TD style="BORDER-RIGHT:windowtext 1pt solid;PADDING-RIGHT:5.4pt;BORDER-TOP:windowtext 1pt solid;PADDING-LEFT:5.4pt;PADDING-BOTTOM:0cm;BORDER-LEFT:windowtext 1pt solid;WIDTH:85.2pt;PADDING-TOP:0cm;BORDER-BOTTOM:windowtext 1pt solid;BACKGROUND-COLOR:transparent;mso-border-alt:solid windowtext.5pt" vAlign=top width=114><P><o:p> </o:p></P></TD><TD style="BORDER-RIGHT:windowtext 1pt solid;PADDING-RIGHT:5.4pt;BORDER-TOP:windowtext 1pt solid;PADDING-LEFT:5.4pt;PADDING-BOTTOM:0cm;BORDER-LEFT:#d4d0c8;WIDTH:85.2pt;PADDING-TOP:0cm;BORDER-BOTTOM:windowtext 1pt solid;BACKGROUND-COLOR:transparent;mso-border-alt:solid windowtext.5pt;mso-border-left-alt:solid windowtext.5pt" vAlign=top width=114><P><B style="mso-bidi-font-weight:normal">Leading Edge of Bonnet</B></P></TD><TD style="BORDER-RIGHT:windowtext 1pt solid;PADDING-RIGHT:5.4pt;BORDER-TOP:windowtext 1pt solid;PADDING-LEFT:5.4pt;PADDING-BOTTOM:0cm;BORDER-LEFT:#d4d0c8;WIDTH:85.2pt;PADDING-TOP:0cm;BORDER-BOTTOM:windowtext 1pt solid;BACKGROUND-COLOR:transparent;mso-border-alt:solid windowtext.5pt;mso-border-left-alt:solid windowtext.5pt" vAlign=top width=114><P><B style="mso-bidi-font-weight:normal">Front Third of Bonnet</B></P></TD><TD style="BORDER-RIGHT:windowtext 1pt solid;PADDING-RIGHT:5.4pt;BORDER-TOP:windowtext 1pt solid;PADDING-LEFT:5.4pt;PADDING-BOTTOM:0cm;BORDER-LEFT:#d4d0c8;WIDTH:85.25pt;PADDING-TOP:0cm;BORDER-BOTTOM:windowtext 1pt solid;BACKGROUND-COLOR:transparent;mso-border-alt:solid windowtext.5pt;mso-border-left-alt:solid windowtext.5pt" vAlign=top width=114><P><B style="mso-bidi-font-weight:normal">Midpoint of Bonnet</B></P></TD><TD style="BORDER-RIGHT:windowtext 1pt solid;PADDING-RIGHT:5.4pt;BORDER-TOP:windowtext 1pt solid;PADDING-LEFT:5.4pt;PADDING-BOTTOM:0cm;BORDER-LEFT:#d4d0c8;WIDTH:85.25pt;PADDING-TOP:0cm;BORDER-BOTTOM:windowtext 1pt solid;BACKGROUND-COLOR:transparent;mso-border-alt:solid windowtext.5pt;mso-border-left-alt:solid windowtext.5pt" vAlign=top width=114><P><B style="mso-bidi-font-weight:normal">Rear of Bonnet</B></P></TD></TR><TR style="mso-yfti-irow:1"><TD style="BORDER-RIGHT:windowtext 1pt solid;PADDING-RIGHT:5.4pt;BORDER-TOP:#d4d0c8;PADDING-LEFT:5.4pt;PADDING-BOTTOM:0cm;BORDER-LEFT:windowtext 1pt solid;WIDTH:85.2pt;PADDING-TOP:0cm;BORDER-BOTTOM:windowtext 1pt solid;BACKGROUND-COLOR:transparent;mso-border-alt:solid windowtext.5pt;mso-border-top-alt:solid windowtext.5pt" vAlign=top width=114><P><B style="mso-bidi-font-weight:normal">Above bonnet pressure</B></P></TD><TD style="BORDER-RIGHT:windowtext 1pt solid;PADDING-RIGHT:5.4pt;BORDER-TOP:#d4d0c8;PADDING-LEFT:5.4pt;PADDING-BOTTOM:0cm;BORDER-LEFT:#d4d0c8;WIDTH:85.2pt;PADDING-TOP:0cm;BORDER-BOTTOM:windowtext 1pt solid;BACKGROUND-COLOR:transparent;mso-border-alt:solid windowtext.5pt;mso-border-left-alt:solid windowtext.5pt;mso-border-top-alt:solid windowtext.5pt" vAlign=top width=114><P>-0.5</P></TD><TD style="BORDER-RIGHT:windowtext 1pt solid;PADDING-RIGHT:5.4pt;BORDER-TOP:#d4d0c8;PADDING-LEFT:5.4pt;PADDING-BOTTOM:0cm;BORDER-LEFT:#d4d0c8;WIDTH:85.2pt;PADDING-TOP:0cm;BORDER-BOTTOM:windowtext 1pt solid;BACKGROUND-COLOR:transparent;mso-border-alt:solid windowtext.5pt;mso-border-left-alt:solid windowtext.5pt;mso-border-top-alt:solid windowtext.5pt" vAlign=top width=114><P>-0.3</P></TD><TD style="BORDER-RIGHT:windowtext 1pt solid;PADDING-RIGHT:5.4pt;BORDER-TOP:#d4d0c8;PADDING-LEFT:5.4pt;PADDING-BOTTOM:0cm;BORDER-LEFT:#d4d0c8;WIDTH:85.25pt;PADDING-TOP:0cm;BORDER-BOTTOM:windowtext 1pt solid;BACKGROUND-COLOR:transparent;mso-border-alt:solid windowtext.5pt;mso-border-left-alt:solid windowtext.5pt;mso-border-top-alt:solid windowtext.5pt" vAlign=top width=114><P>0.1</P></TD><TD style="BORDER-RIGHT:windowtext 1pt solid;PADDING-RIGHT:5.4pt;BORDER-TOP:#d4d0c8;PADDING-LEFT:5.4pt;PADDING-BOTTOM:0cm;BORDER-LEFT:#d4d0c8;WIDTH:85.25pt;PADDING-TOP:0cm;BORDER-BOTTOM:windowtext 1pt solid;BACKGROUND-COLOR:transparent;mso-border-alt:solid windowtext.5pt;mso-border-left-alt:solid windowtext.5pt;mso-border-top-alt:solid windowtext.5pt" vAlign=top width=114><P>+0.6</P></TD></TR><TR style="mso-yfti-irow:2"><TD style="BORDER-RIGHT:windowtext 1pt solid;PADDING-RIGHT:5.4pt;BORDER-TOP:#d4d0c8;PADDING-LEFT:5.4pt;PADDING-BOTTOM:0cm;BORDER-LEFT:windowtext 1pt solid;WIDTH:85.2pt;PADDING-TOP:0cm;BORDER-BOTTOM:windowtext 1pt solid;BACKGROUND-COLOR:transparent;mso-border-alt:solid windowtext.5pt;mso-border-top-alt:solid windowtext.5pt" vAlign=top width=114><P><B style="mso-bidi-font-weight:normal">Below bonnet pressure</B></P></TD><TD style="BORDER-RIGHT:windowtext 1pt solid;PADDING-RIGHT:5.4pt;BORDER-TOP:#d4d0c8;PADDING-LEFT:5.4pt;PADDING-BOTTOM:0cm;BORDER-LEFT:#d4d0c8;WIDTH:85.2pt;PADDING-TOP:0cm;BORDER-BOTTOM:windowtext 1pt solid;BACKGROUND-COLOR:transparent;mso-border-alt:solid windowtext.5pt;mso-border-left-alt:solid windowtext.5pt;mso-border-top-alt:solid windowtext.5pt" vAlign=top width=114><P>0.1</P></TD><TD style="BORDER-RIGHT:windowtext 1pt solid;PADDING-RIGHT:5.4pt;BORDER-TOP:#d4d0c8;PADDING-LEFT:5.4pt;PADDING-BOTTOM:0cm;BORDER-LEFT:#d4d0c8;WIDTH:85.2pt;PADDING-TOP:0cm;BORDER-BOTTOM:windowtext 1pt solid;BACKGROUND-COLOR:transparent;mso-border-alt:solid windowtext.5pt;mso-border-left-alt:solid windowtext.5pt;mso-border-top-alt:solid windowtext.5pt" vAlign=top width=114><P>0.1</P></TD><TD style="BORDER-RIGHT:windowtext 1pt solid;PADDING-RIGHT:5.4pt;BORDER-TOP:#d4d0c8;PADDING-LEFT:5.4pt;PADDING-BOTTOM:0cm;BORDER-LEFT:#d4d0c8;WIDTH:85.25pt;PADDING-TOP:0cm;BORDER-BOTTOM:windowtext 1pt solid;BACKGROUND-COLOR:transparent;mso-border-alt:solid windowtext.5pt;mso-border-left-alt:solid windowtext.5pt;mso-border-top-alt:solid windowtext.5pt" vAlign=top width=114><P>0.3</P></TD><TD style="BORDER-RIGHT:windowtext 1pt solid;PADDING-RIGHT:5.4pt;BORDER-TOP:#d4d0c8;PADDING-LEFT:5.4pt;PADDING-BOTTOM:0cm;BORDER-LEFT:#d4d0c8;WIDTH:85.25pt;PADDING-TOP:0cm;BORDER-BOTTOM:windowtext 1pt solid;BACKGROUND-COLOR:transparent;mso-border-alt:solid windowtext.5pt;mso-border-left-alt:solid windowtext.5pt;mso-border-top-alt:solid windowtext.5pt" vAlign=top width=114><P>0.4</P></TD></TR><TR style="mso-yfti-irow:3;mso-yfti-lastrow:yes"><TD style="BORDER-RIGHT:windowtext 1pt solid;PADDING-RIGHT:5.4pt;BORDER-TOP:#d4d0c8;PADDING-LEFT:5.4pt;PADDING-BOTTOM:0cm;BORDER-LEFT:windowtext 1pt solid;WIDTH:85.2pt;PADDING-TOP:0cm;BORDER-BOTTOM:windowtext 1pt solid;BACKGROUND-COLOR:transparent;mso-border-alt:solid windowtext.5pt;mso-border-top-alt:solid windowtext.5pt" vAlign=top width=114><P><B style="mso-bidi-font-weight:normal">Difference</B></P></TD><TD style="BORDER-RIGHT:windowtext 1pt solid;PADDING-RIGHT:5.4pt;BORDER-TOP:#d4d0c8;PADDING-LEFT:5.4pt;PADDING-BOTTOM:0cm;BORDER-LEFT:#d4d0c8;WIDTH:85.2pt;PADDING-TOP:0cm;BORDER-BOTTOM:windowtext 1pt solid;BACKGROUND-COLOR:transparent;mso-border-alt:solid windowtext.5pt;mso-border-left-alt:solid windowtext.5pt;mso-border-top-alt:solid windowtext.5pt" vAlign=top width=114><P>0.6</P></TD><TD style="BORDER-RIGHT:windowtext 1pt solid;PADDING-RIGHT:5.4pt;BORDER-TOP:#d4d0c8;PADDING-LEFT:5.4pt;PADDING-BOTTOM:0cm;BORDER-LEFT:#d4d0c8;WIDTH:85.2pt;PADDING-TOP:0cm;BORDER-BOTTOM:windowtext 1pt solid;BACKGROUND-COLOR:transparent;mso-border-alt:solid windowtext.5pt;mso-border-left-alt:solid windowtext.5pt;mso-border-top-alt:solid windowtext.5pt" vAlign=top width=114><P>0.4</P></TD><TD style="BORDER-RIGHT:windowtext 1pt solid;PADDING-RIGHT:5.4pt;BORDER-TOP:#d4d0c8;PADDING-LEFT:5.4pt;PADDING-BOTTOM:0cm;BORDER-LEFT:#d4d0c8;WIDTH:85.25pt;PADDING-TOP:0cm;BORDER-BOTTOM:windowtext 1pt solid;BACKGROUND-COLOR:transparent;mso-border-alt:solid windowtext.5pt;mso-border-left-alt:solid windowtext.5pt;mso-border-top-alt:solid windowtext.5pt" vAlign=top width=114><P>0.2</P></TD><TD style="BORDER-RIGHT:windowtext 1pt solid;PADDING-RIGHT:5.4pt;BORDER-TOP:#d4d0c8;PADDING-LEFT:5.4pt;PADDING-BOTTOM:0cm;BORDER-LEFT:#d4d0c8;WIDTH:85.25pt;PADDING-TOP:0cm;BORDER-BOTTOM:windowtext 1pt solid;BACKGROUND-COLOR:transparent;mso-border-alt:solid windowtext.5pt;mso-border-left-alt:solid windowtext.5pt;mso-border-top-alt:solid windowtext.5pt" vAlign=top width=114><P>-0.2</P></TD></TR></TBODY></TABLE>
 
<P>As the table above shows,the greatest difference between the underbonnet and overbonnet pressures is at the very leading edge of the bonnet,where it is 0.6 inches of water.(However,it’s very hard to site a vent here and moving backwards a little to the front third of the bonnet still gives 0.4 inches of water pressure difference.)</P><h3>Types of Vents</h3><DIV CLASS=wpimg STYLE="width:302;"><A HREF="http://us1.webpublications.com.au/static/images/articles/i21/2162_5mg.jpg"><IMG SRC="http://us1.webpublications.com.au/static/images/articles/i21/2162_5lo.jpg" WIDTH='302'ALT="Click for larger image" HEIGHT='162'BORDER='0'/></A></DIV><P>For reasons of aerodynamic drag(which we’ve not touched on at all in this series),it is normal to direct the air out of vents as parallel to the surface as possible.This causes least turbulence.But of course bonnet vent selection also depends on issues like price,durability and aesthetics –bonnet vents are much more visible than undertrays! Taking into account all of these factors,I purchased from a boating supplies shop(Whitworth’s Nautical World)some stainless steel louvred vents.These were 325 x 111mm and cost AUD$19.50 each.</P><P>The vents were bought prior to making the above pressure measurements(silly boy!)and I had figured they would be installed north-south,ie with their long axis parallel with the car.However,after making the pressure measurements,I realised that this would put a considerable portion of each vent in a less than ideal area of pressure –it would be like each vent was only half as big as it really was...</P><P>I then reconsidered.What was really required was a vent that could be mounted east-west,ie across the bonnet.This would be best sited as far forward as possible:realistically,about where-0.3 surface pressure existed.In fact,the shape of the vent wouldn’t be all that different to a ventilation inlet grille at the base of the windscreen –except it would be sited a long way forward and exiting(rather than entrancing)air.</P><DIV CLASS=wpimg STYLE="width:201;float:right;"><A HREF="http://us1.webpublications.com.au/static/images/articles/i21/2162_4mg.jpg"><IMG SRC="http://us1.webpublications.com.au/static/images/articles/i21/2162_4lo.jpg" WIDTH='201'ALT="Click for larger image" HEIGHT='302'BORDER='0'/></A></DIV><P>A trip to the wreckers and a long walk around the yard found the ideal vents –the ventilation inlet vents on a Holden VL Commodore,which are normally positioned in the trailing edge of the bonnet.The cost was AUD$10 for the pair.</P><h3>Vent Installation</h3><DIV CLASS=wpimg STYLE="width:302;"><A HREF="http://us1.webpublications.com.au/static/images/articles/i21/2162_2mg.jpg"><IMG SRC="http://us1.webpublications.com.au/static/images/articles/i21/2162_2lo.jpg" WIDTH='302'ALT="Click for larger image" HEIGHT='204'BORDER='0'/></A></DIV><P>The Commodore vents come in two pieces.If required –as was the case here –they can be shortened by chopping off a section at each end.(The vent assembly is slightly curved in plan,so this keeps their symmetry.)A hacksaw was used to do this then an electric jigsaw was used to cut out the long,mostly rectangular hole in which they sat.Some metal clips(made from ‘eye’electrical terminals)and double-sided tape were used to hold them in place.</P><h3>Measurements</h3><P>As we’ve covered,there are two ways of assessing the effectiveness of the new vent:</P><P>1)      measure underbonnet pressure</P><P>2)      measure the pressure difference across the intercooler(or radiator,etc)</P><P>In this case the underbonnet pressure itself didn’t concern me all<B style="mso-bidi-font-weight:normal">that</B>much –I wanted as much airflow through the intercooler as possible and that would depend on the pressures each side of the ‘cooler!</P><P>However,underbonnet pressures were measured first.</P><P><o:p> </o:p></P><TABLE class=MsoTableGrid style="BORDER-RIGHT:medium none;BORDER-TOP:medium none;BORDER-LEFT:medium none;BORDER-BOTTOM:medium none;BORDER-COLLAPSE:collapse;mso-border-alt:solid windowtext.5pt;mso-yfti-tbllook:480;mso-padding-alt:0cm 5.4pt 0cm 5.4pt;mso-border-insideh:.5pt solid windowtext;mso-border-insidev:.5pt solid windowtext" cellSpacing=0 cellPadding=0 border=1><TBODY><TR style="mso-yfti-irow:0"><TD style="BORDER-RIGHT:windowtext 1pt solid;PADDING-RIGHT:5.4pt;BORDER-TOP:windowtext 1pt solid;PADDING-LEFT:5.4pt;PADDING-BOTTOM:0cm;BORDER-LEFT:windowtext 1pt solid;WIDTH:85.2pt;PADDING-TOP:0cm;BORDER-BOTTOM:windowtext 1pt solid;BACKGROUND-COLOR:transparent;mso-border-alt:solid windowtext.5pt" vAlign=top width=114><P><o:p> </o:p></P></TD><TD style="BORDER-RIGHT:windowtext 1pt solid;PADDING-RIGHT:5.4pt;BORDER-TOP:windowtext 1pt solid;PADDING-LEFT:5.4pt;PADDING-BOTTOM:0cm;BORDER-LEFT:#d4d0c8;WIDTH:85.2pt;PADDING-TOP:0cm;BORDER-BOTTOM:windowtext 1pt solid;BACKGROUND-COLOR:transparent;mso-border-alt:solid windowtext.5pt;mso-border-left-alt:solid windowtext.5pt" vAlign=top width=114><P><B style="mso-bidi-font-weight:normal">New Undertray</B></P></TD><TD style="BORDER-RIGHT:windowtext 1pt solid;PADDING-RIGHT:5.4pt;BORDER-TOP:windowtext 1pt solid;PADDING-LEFT:5.4pt;PADDING-BOTTOM:0cm;BORDER-LEFT:#d4d0c8;WIDTH:85.2pt;PADDING-TOP:0cm;BORDER-BOTTOM:windowtext 1pt solid;BACKGROUND-COLOR:transparent;mso-border-alt:solid windowtext.5pt;mso-border-left-alt:solid windowtext.5pt" vAlign=top width=114><P><B style="mso-bidi-font-weight:normal">Bonnet Vent</B></P></TD></TR><TR style="mso-yfti-irow:1"><TD style="BORDER-RIGHT:windowtext 1pt solid;PADDING-RIGHT:5.4pt;BORDER-TOP:#d4d0c8;PADDING-LEFT:5.4pt;PADDING-BOTTOM:0cm;BORDER-LEFT:windowtext 1pt solid;WIDTH:85.2pt;PADDING-TOP:0cm;BORDER-BOTTOM:windowtext 1pt solid;BACKGROUND-COLOR:transparent;mso-border-alt:solid windowtext.5pt;mso-border-top-alt:solid windowtext.5pt" vAlign=top width=114><P><B style="mso-bidi-font-weight:normal">Rear of bonnet</B></P></TD><TD style="BORDER-RIGHT:windowtext 1pt solid;PADDING-RIGHT:5.4pt;BORDER-TOP:#d4d0c8;PADDING-LEFT:5.4pt;PADDING-BOTTOM:0cm;BORDER-LEFT:#d4d0c8;WIDTH:85.2pt;PADDING-TOP:0cm;BORDER-BOTTOM:windowtext 1pt solid;BACKGROUND-COLOR:transparent;mso-border-alt:solid windowtext.5pt;mso-border-left-alt:solid windowtext.5pt;mso-border-top-alt:solid windowtext.5pt" vAlign=top width=114><P>0.4 inches</P></TD><TD style="BORDER-RIGHT:windowtext 1pt solid;PADDING-RIGHT:5.4pt;BORDER-TOP:#d4d0c8;PADDING-LEFT:5.4pt;PADDING-BOTTOM:0cm;BORDER-LEFT:#d4d0c8;WIDTH:85.2pt;PADDING-TOP:0cm;BORDER-BOTTOM:windowtext 1pt solid;BACKGROUND-COLOR:transparent;mso-border-alt:solid windowtext.5pt;mso-border-left-alt:solid windowtext.5pt;mso-border-top-alt:solid windowtext.5pt" vAlign=top width=114><P>0.3 inches</P></TD></TR><TR style="mso-yfti-irow:2;mso-yfti-lastrow:yes"><TD style="BORDER-RIGHT:windowtext 1pt solid;PADDING-RIGHT:5.4pt;BORDER-TOP:#d4d0c8;PADDING-LEFT:5.4pt;PADDING-BOTTOM:0cm;BORDER-LEFT:windowtext 1pt solid;WIDTH:85.2pt;PADDING-TOP:0cm;BORDER-BOTTOM:windowtext 1pt solid;BACKGROUND-COLOR:transparent;mso-border-alt:solid windowtext.5pt;mso-border-top-alt:solid windowtext.5pt" vAlign=top width=114><P><B style="mso-bidi-font-weight:normal">Near intercooler</B></P></TD><TD style="BORDER-RIGHT:windowtext 1pt solid;PADDING-RIGHT:5.4pt;BORDER-TOP:#d4d0c8;PADDING-LEFT:5.4pt;PADDING-BOTTOM:0cm;BORDER-LEFT:#d4d0c8;WIDTH:85.2pt;PADDING-TOP:0cm;BORDER-BOTTOM:windowtext 1pt solid;BACKGROUND-COLOR:transparent;mso-border-alt:solid windowtext.5pt;mso-border-left-alt:solid windowtext.5pt;mso-border-top-alt:solid windowtext.5pt" vAlign=top width=114><P>0.1 inches</P></TD><TD style="BORDER-RIGHT:windowtext 1pt solid;PADDING-RIGHT:5.4pt;BORDER-TOP:#d4d0c8;PADDING-LEFT:5.4pt;PADDING-BOTTOM:0cm;BORDER-LEFT:#d4d0c8;WIDTH:85.2pt;PADDING-TOP:0cm;BORDER-BOTTOM:windowtext 1pt solid;BACKGROUND-COLOR:transparent;mso-border-alt:solid windowtext.5pt;mso-border-left-alt:solid windowtext.5pt;mso-border-top-alt:solid windowtext.5pt" vAlign=top width=114><P>0.1 inches</P></TD></TR></TBODY></TABLE><P>As the table above shows,the underbonnet pressure with the vent in place was unchanged near to the intercooler and down by 25 per cent further rearwards in the engine bay.However,the figure for near the intercooler is a little deceptive,as measuring of the pressure differential showed:</P><TABLE class=MsoTableGrid style="BORDER-RIGHT:medium none;BORDER-TOP:medium none;BORDER-LEFT:medium none;WIDTH:255.55pt;BORDER-BOTTOM:medium none;BORDER-COLLAPSE:collapse;mso-border-alt:solid windowtext.5pt;mso-yfti-tbllook:480;mso-padding-alt:0cm 5.4pt 0cm 5.4pt;mso-border-insideh:.5pt solid windowtext;mso-border-insidev:.5pt solid windowtext" cellSpacing=0 cellPadding=0 width=341 border=1><TBODY><TR style="mso-yfti-irow:0"><TD style="BORDER-RIGHT:windowtext 1pt solid;PADDING-RIGHT:5.4pt;BORDER-TOP:windowtext 1pt solid;PADDING-LEFT:5.4pt;PADDING-BOTTOM:0cm;BORDER-LEFT:windowtext 1pt solid;WIDTH:85.15pt;PADDING-TOP:0cm;BORDER-BOTTOM:windowtext 1pt solid;BACKGROUND-COLOR:transparent;mso-border-alt:solid windowtext.5pt" vAlign=top width=114><P><o:p> </o:p></P></TD><TD style="BORDER-RIGHT:windowtext 1pt solid;PADDING-RIGHT:5.4pt;BORDER-TOP:windowtext 1pt solid;PADDING-LEFT:5.4pt;PADDING-BOTTOM:0cm;BORDER-LEFT:#d4d0c8;WIDTH:85.2pt;PADDING-TOP:0cm;BORDER-BOTTOM:windowtext 1pt solid;BACKGROUND-COLOR:transparent;mso-border-alt:solid windowtext.5pt;mso-border-left-alt:solid windowtext.5pt" vAlign=top width=114><P><B style="mso-bidi-font-weight:normal">Final Undertray</B></P></TD><TD style="BORDER-RIGHT:windowtext 1pt solid;PADDING-RIGHT:5.4pt;BORDER-TOP:windowtext 1pt solid;PADDING-LEFT:5.4pt;PADDING-BOTTOM:0cm;BORDER-LEFT:#d4d0c8;WIDTH:85.2pt;PADDING-TOP:0cm;BORDER-BOTTOM:windowtext 1pt solid;BACKGROUND-COLOR:transparent;mso-border-alt:solid windowtext.5pt;mso-border-left-alt:solid windowtext.5pt" vAlign=top width=114><P><B style="mso-bidi-font-weight:normal">Bonnet vent</B></P></TD></TR><TR style="mso-yfti-irow:1;mso-yfti-lastrow:yes"><TD style="BORDER-RIGHT:windowtext 1pt solid;PADDING-RIGHT:5.4pt;BORDER-TOP:#d4d0c8;PADDING-LEFT:5.4pt;PADDING-BOTTOM:0cm;BORDER-LEFT:windowtext 1pt solid;WIDTH:85.15pt;PADDING-TOP:0cm;BORDER-BOTTOM:windowtext 1pt solid;BACKGROUND-COLOR:transparent;mso-border-alt:solid windowtext.5pt;mso-border-top-alt:solid windowtext.5pt" vAlign=top width=114><P>Intercooler Pressure Differential</P></TD><TD style="BORDER-RIGHT:windowtext 1pt solid;PADDING-RIGHT:5.4pt;BORDER-TOP:#d4d0c8;PADDING-LEFT:5.4pt;PADDING-BOTTOM:0cm;BORDER-LEFT:#d4d0c8;WIDTH:85.2pt;PADDING-TOP:0cm;BORDER-BOTTOM:windowtext 1pt solid;BACKGROUND-COLOR:transparent;mso-border-alt:solid windowtext.5pt;mso-border-left-alt:solid windowtext.5pt;mso-border-top-alt:solid windowtext.5pt" vAlign=top width=114><P>0.3</P></TD><TD style="BORDER-RIGHT:windowtext 1pt solid;PADDING-RIGHT:5.4pt;BORDER-TOP:#d4d0c8;PADDING-LEFT:5.4pt;PADDING-BOTTOM:0cm;BORDER-LEFT:#d4d0c8;WIDTH:85.2pt;PADDING-TOP:0cm;BORDER-BOTTOM:windowtext 1pt solid;BACKGROUND-COLOR:transparent;mso-border-alt:solid windowtext.5pt;mso-border-left-alt:solid windowtext.5pt;mso-border-top-alt:solid windowtext.5pt" vAlign=top width=114><P>0.4 inches</P></TD></TR></TBODY></TABLE><P>Yes,as can be seen in the above table,the measured pressure differential across the intercooler at 80 km/h averaged 0.4 inches –up from 0.3 without the bonnet vent.But if the underbonnet pressure was unchanged,where did the extra difference come from? The answer is in the ‘average’prefix –the new difference ‘averaged’0.4 inches.</P><P>Prior to the bonnet vent being installed,the pressure differential across the intercooler was fairly stable at 0.3 inches of water.But with the bonnet vents installed,even the slightest gust of wind caused the pressure differential to leap.Driving through some hilly urban areas on what was apparently a calm day,tiny gusts of wind took the pressure difference as high as 0.6 inches! This lifted my subjective ‘average’figure from 0.3 to 0.4 inches of water.</P><P>This effect could also be observed at higher speeds –the pressure differential increased considerably as the car went faster,whereas before the bonnet vent was installed,the pressure difference across the intercooler had remained pretty well constant.</P><h3>Final Tally</h3><P>Concentrating on the pressure difference across the underbonnet intercooler,what do the final figures look like?(This is the scorecard of the entire three part series!)</P><DIV CLASS=wpimg STYLE="width:302;float:right;"><A HREF="http://us1.webpublications.com.au/static/images/articles/i21/2162_8mg.jpg"><IMG SRC="http://us1.webpublications.com.au/static/images/articles/i21/2162_8lo.jpg" WIDTH='302'ALT="Click for larger image" HEIGHT='187'BORDER='0'/></A></DIV><P>Over having no undertray at all,the fitting of the new undertray and bonnet vent have lifted the pressure difference across the intercooler from minus 0.1 to plus 0.4 inches of water. Or to put it another way,the pressure difference across the intercooler has been increased by a factor of five! You can't therefore say that there's now five times as much external airflow through the intercooler at 80 km/h,but you can be sure that it has risen considerably.The measured intake air temp certainly shows that the intercooler is now working far better.</P><h3>Conclusion</h3><P>In this series we’ve given you a heap of figures –perhaps too many.But in the area of DIY aerodynamic modification,there is always a lot of talk,very little action –and never any data! We hope that we’ve helped address that problem –and remember,all you need is a cheap Magnehelic gauge and you can collect figures for your own car.</P><P>Let’s summarise what we’ve found:</P><UL><LI>Scoops,vents and air exits do not always work as you intuitively figure they do</LI><LI>It’s easy and cheap to collect information that allows you to make intelligent aero design decisions</LI><LI>Trial design front undertrays can be easily made from cardboard,plastic sheet,etc and then road tested</LI><LI>A well-designed undertray can make a radical difference to the airflow through intercoolers,radiators,oil coolers and air-conditioning condensers</LI><LI>Bonnet vents should only be sited after making under-and over-bonnet pressure measurements</LI><LI>Properly sited bonnet vents can further improve airflow through intercoolers,radiators,oil cooler and air-conditioning condensers</LI></UL><P>The bottom line:the Maxima now boasts far improved intercooler efficiencies and noticeably improved radiator performance from two aerodynamic mods that together cost AUD$38.</P><P>Oh yes,and a few days of DIY work....</P></DIV>
 
I'll have to read this more carefully when I've got time but skimming showed a lot of great info.

For a second I thought you were talking about this:

0000-01-3502lg.jpg


http://www.awrracing.com/pages/pro/3502.html
 
Back