UK 2006 Mazda5 cabin filter help

Hi

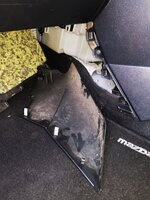
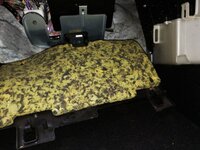
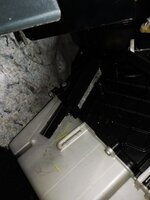
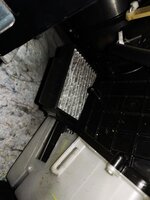
I have a 2006 RHD/UK mazda 5 sport. I have been looking into replacing the cabin filter as previous owners had dogs and when I brought it, it looked like they had taken them for a wet walk got home locked the car up a left it. So even after a full valet and deodoriser there is still a doggy smell.

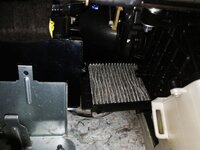
So back to my actually question, where exactly is the cabin filter located, I've seen several videos on YouTube but they are all for LHD cars, and my research seems to suggest that the RHD versions aren't as easy to access.

Can someone help me please, ideally with a step by step instructions

Many thanks in advance

Mark
 
Arg, the filter on the LHD version is already rather challenging!

I would presume (but could well be wrong) that the UK (RHD) version is the mirror-opposite - that is, you remove that panel on the L (rather than the R) of the console, down in the passenger footwell.

First time was challenging. My dexterity (or lack thereof) was challenged. It's a 2-piece filter to add to the fun. Well worth it though - ours was badly clogged with leaves after nine years.

Good luck!
 
Many thanks for your replies, I'll have another look tomorrow but when I looked before I couldn't see the access panel. Doing some research it seemed to suggest the RHD filter access was similar to mazda 3 however my fuse box isn't where I would expect if this was the case. So all in all I'm stumped lol. I'll have a better look tomorrow and hopefully get an answer
 
Many thanks for your replies, I'll have another look tomorrow but when I looked before I couldn't see the access panel. Doing some research it seemed to suggest the RHD filter access was similar to mazda 3 however my fuse box isn't where I would expect if this was the case. So all in all I'm stumped lol. I'll have a better look tomorrow and hopefully get an answer

Hi I took some pictures from mine. Try from pass anger side, to get out easier is better to remove ecu as well. There is little cover on 4 screws, but mine is only on 2 as previous over must to lose.
 

Attachments

  • Resizer_15843722564220.jpg
    Resizer_15843722564220.jpg
    403.7 KB · Views: 248
  • Resizer_15843722564221.jpg
    Resizer_15843722564221.jpg
    181.8 KB · Views: 240
  • Resizer_15843722564223.jpg
    Resizer_15843722564223.jpg
    156.7 KB · Views: 229
  • Resizer_15843722564224.jpg
    Resizer_15843722564224.jpg
    164.1 KB · Views: 242
  • Resizer_15843722564225.jpg
    Resizer_15843722564225.jpg
    139.2 KB · Views: 241
Brilliant many thanks krisvr4 that a great help, been on several forums and finally got the answer lol. Can't really tell from your pictures but do I have to remove the glovebox, obviously for ease of access I guess yes but if I can bend myself into the space do I actually have to. Also how easy is it to remove the ECU
 
No you don't have to remove glovebox just remove plastic cover by legs and another plastic cover under glovebox. There is no screws just pull them out. If you still struggle i will try to record short video for you.
 
No you don't have to remove glovebox just remove plastic cover by legs and another plastic cover under glovebox. There is no screws just pull them out. If you still struggle i will try to record short video for you.


Again many thanks, after reviewing your pics and advice I'm going to have another look tomorrow but if you don't mind recording a short video that would be great, don't worry if you haven't got time I'll have a look anyway

Mark
 
Check this one i recorded this morning
Hi Krisvr4,

Thank you very much for your helpful pictures and video! I have a similar Mazda and did not know how to change its cabin air filter, until I found your superb information :) Very soon I'll be able to replace its probably 12-year-old filter.
 
The video created by Krisvr4 was a great help :) I was finally able to change the two cabin air filters. (My car was bought several months ago). The ECU under the glovebox was very hard to push aside though. I also had to contort myself and risk getting back and other joint injuries. This task is easier for a left handed person as the access panel is to the right. Finally, after a lot of struggle, the old filters were removed. As you can see, they were downright filthy!
IMG_20220308_191306.jpg
The new cabin filters immediately made the airflow much stronger as the system was no longer clogged. The air-conditioner and heater are now functioning at a much higher level of effectiveness and efficiency. My passengers and I can now breathe clean air again :)
 
Last edited:
Back