I bought the front splash guards yesterday and plan to self-install those. But held off on buying rear guards because the space is so tight. Do you have to pull the rear wheels to get those in? I live near MedCenter Mazda and picked up the parts and the guy indicated the wheels need to be pulled. I see the install instructions here and they don't indicate that. https://sep.yimg.com/ty/cdn/yhst-24809172479195/KB7W-V3-460.pdf?t=1620501107&

You are using an out of date browser. It may not display this or other websites correctly.
You should upgrade or use an alternative browser.
You should upgrade or use an alternative browser.
Installing CX-5 rear splash guards question
- Thread starter shaggy23
- Start date
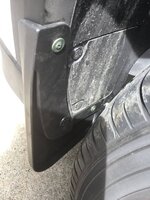
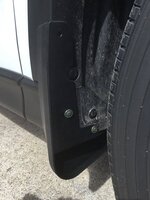
I bought aftermarket splash guards, so the mounting procedures might be a little different, but not much. It is MUCH easier to put on the rear splash guards if you remove the rear tires. I drilled pilot holes for the screws, as needed. You need to have the tires off to do that. Plus, it’s so much easier to run the screws in with a regular Philips screw driver than the little angled one supplied with the splash guards. Once I got the tires off, the rear splash guards only took about 10 min each to put on. They are so easy, anyone can do it.
On the front splash guards, you don’t have to remove the tires. Just turn the tires one way or the other to get them out of the way. There is plenty of room to get a drill and Philips screwdriver in there. One word of caution on the front splash guards, if drilling pilot holes through the plastic wheel well trim/liners, DO NOT drill a hole for the top mounting screw, as it will go into sheet metal behind the plastic. If you drill into the metal, rust will set in where you cannot see it until it’s too late. The top mounting screw was completely unnecessary on my splash guards. There is a bottom mounting on the front splash guards needs a bolt. I used plastic bolts so they would not rust. They are tricky to get in, as you have to lay on your back and pry some of the plastic wheel well trim away to gain access to put the nut on the bolt. It’s not brain surgery, just a little difficult and awkward to get to.
Here are pictures of mine, back and front. Notice the last picture of the front guard without using a mounting screw in the top hole to avoid drilling into sheet metal behind it.
Attachments


Upvote
0
- :
- Pueblo county CO
- :
- CX-5 Sport 16.5 6M
I didn't remove the wheels, but I did point the front wheels towards the opposite side of the one I was installing for better access.I bought the front splash guards yesterday and plan to self-install those. But held off on buying rear guards because the space is so tight. Do you have to pull the rear wheels to get those in? I live near MedCenter Mazda and picked up the parts and the guy indicated the wheels need to be pulled. I see the install instructions here and they don't indicate that. https://sep.yimg.com/ty/cdn/yhst-24809172479195/KB7W-V3-460.pdf?t=1620501107&
Upvote
0
LikewiseI did the OEM front and rear with no trouble not removing the wheels.
Upvote
0
- :
- South Carolina
- :
- 12 MZ5 13 CX-5
It's a give and take. If you live in a salt area, DO NOT get them, as they do tend to hold dirt behind themselves. I'd imagine it would collect salt just as efficiently, and thus rapidly rot out your corners.
Other than that, I do think that they help keep the sides of the car clean.
I live in an area that gets 1" of snow every 5 years, so no salt to worry about.
Other than that, I do think that they help keep the sides of the car clean.
I live in an area that gets 1" of snow every 5 years, so no salt to worry about.
Upvote
0
BushWickz
2021 CX-5 Reserve
I bought aftermarket splash guards, so the mounting procedures might be a little different, but not much. It is MUCH easier to put on the rear splash guards if you remove the rear tires. I drilled pilot holes for the screws, as needed. You need to have the tires off to do that. Plus, it’s so much easier to run the screws in with a regular Philips screw driver than the little angled one supplied with the splash guards. Once I got the tires off, the rear splash guards only took about 10 min each to put on. They are so easy, anyone can do it.
On the front splash guards, you don’t have to remove the tires. Just turn the tires one way or the other to get them out of the way. There is plenty of room to get a drill and Philips screwdriver in there. One word of caution on the front splash guards, if drilling pilot holes through the plastic wheel well trim/liners, DO NOT drill a hole for the top mounting screw, as it will go into sheet metal behind the plastic. If you drill into the metal, rust will set in where you cannot see it until it’s too late. The top mounting screw was completely unnecessary on my splash guards. There is a bottom mounting on the front splash guards needs a bolt. I used plastic bolts so they would not rust. They are tricky to get in, as you have to lay on your back and pry some of the plastic wheel well trim away to gain access to put the nut on the bolt. It’s not brain surgery, just a little difficult and awkward to get to.
Here are pictures of mine, back and front. Notice the last picture of the front guard without using a mounting screw in the top hole to avoid drilling into sheet metal behind it.
I got some aftermarkies on Amazon and got dissapointed (and returned inmediatelly) at the momento I saw I had to DRILL!?! a brand new car.!?!
Hell no..
Upvote
0
- :
- Plano, Texas, USA
The OEM ones use clip nuts, no drilling to the metal required. At least this’s the way installing on my 2016 CX-5. No corrosion concerns either as all OEM mud flaps touching are plastic trims.I got some aftermarkies on Amazon and got dissapointed (and returned inmediatelly) at the momento I saw I had to DRILL!?! a brand new car.!?!
Hell no..
Upvote
0
- :
- South Carolina
- :
- 12 MZ5 13 CX-5
That's not true, at least not on my 2013. They mount to plastic, but they wrap around the metal of the fenders. Go look for yourself.No corrosion concerns either as all OEM mud flaps touching are plastic trims.
Upvote
0
- :
- Plano, Texas, USA
Well, I don’t have to look, because I installed them by myself. All screws if needed are screwed into the clip nuts, the clip nuts are clipped onto the plastic trims. There’re some plastic fasteners needed to plug into the plastic trims too. As far as I could see at the time, no metal contact at any location by the OEM mud flaps, and no rust concerns to me.That's not true, at least not on my 2013. They mount to plastic, but they wrap around the metal of the fenders. Go look for yourself.
Upvote
0
If I recall correctly, on our 2014, I bought a 90 degree screwdriver from Home Depot, and it made the job much easier to do, without removing the rear wheels.Well, I don’t have to look, because I installed them by myself. All screws if needed are screwed into the clip nuts, the clip nuts are clipped onto the plastic trims. There’re some plastic fasteners needed to plug into the plastic trims too. As far as I could see at the time, no metal contact at any location by the OEM mud flaps, and no rust concerns to me.
I have not purchased or installed mudflaps on the 21 yet. Not sure if I am going to.
Upvote
0
- :
- Plano, Texas, USA
Yes, I did remove rear wheels getting more room to install rear mud flaps. Installation on gen-2 or 2021 CX-5 should be very similar.If I recall correctly, on our 2014, I bought a 90 degree screwdriver from Home Depot, and it made the job much easier to do, without removing the rear wheels.
I have not purchased or installed mudflaps on the 21 yet. Not sure if I am going to.
As long as you use OEM mud flaps, no metal contacts and no rust concerns.
Upvote
0
Similar threads
- Replies
- 0
- Views
- 2K
- Replies
- 18
- Views
- 17K