
You are using an out of date browser. It may not display this or other websites correctly.
You should upgrade or use an alternative browser.
You should upgrade or use an alternative browser.
How to remove licence plate bulb covers on 2012 Mazda5?
- Thread starter Twinbros
- Start date
BaconLewis
Member
- :
- 2012 Mazda5 GT
I assume you got this figured out, but for everyone else, on the 2012 Mazda5 it is pretty much just like the manual says, put a screwdriver head into one of the slots on the side of the cover and then pry that side loose by applying pressure on the screwdriver and pushing the screwdriver handle towards the opposite side of the cover. It should just pop off. It is a little tricky to get the cover out all the way and then to put it back on, but not overly complicated. Hope this helps!
I just removed the lenses on a 2012 Mazda5. What a terrible way to have to get them off the car.
You insert the screwdriver and then pry OUTWARDS from the center of the lens to the outside of the lens. If you are lucky, you won't pop the screwdriver out and scratch the paint. I'd rather take out the whole rear panel than pry with that kind of force on a tiny piece of clear plastic.
For those that are interested in LED conversions, the 194/W5W bulbs for this space need to be 21-22mm total length from the base to the top of the bulb. Anything longer and the lens won't fit back on. You will probably need a low-profile LED type - the towers probably won't fit.
Whitegrill5
Member
- :
- Mazda 5 Sport
I just removed the lenses on a 2012 Mazda5. What a terrible way to have to get them off the car.
You insert the screwdriver and then pry OUTWARDS from the center of the lens to the outside of the lens. If you are lucky, you won't pop the screwdriver out and scratch the paint. I'd rather take out the whole rear panel than pry with that kind of force on a tiny piece of clear plastic.
For those that are interested in LED conversions, the 194/W5W bulbs for this space need to be 21-22mm total length from the base to the top of the bulb. Anything longer and the lens won't fit back on. You will probably need a low-profile LED type - the towers probably won't fit.
I am in agreement with JPX, I also would rather take the whole panel off the inside of the hatch like you used to be able to due with the previous gen to change the license Plate light bulbs, I shined my flashlight through the access to change the backup lights and on my 2013 it only looks like a hold down barbs to remove the license light assemblies (once the lens covers are removed!) and not a way of removing the bulb like the ever popular twist and remove.
I have been trying to remove either of these lenses yesterday and also today, at one point the screwdriver slipped out and made a small scratch on the paint above the license plate (first scratch on car
 ), ironically partially due to the use of the cloth to try to protect the lens and paint. I have been trying to apply pressure towards the underside to try to grab the bottom edge of the lens and also trying to apply pressure towards the opposite side of the lens. I have applied considerable pressure and not been able to get the lens to release. With the force that I have been trying to apply I am afraid of breaking something.
 After seeing these posts it almost sounds like I need to be trying to apply pressure towards the outside of the lens (away from the center of the lens). Perhaps there is a overlaping nib/catch near the bottom inside of the lens that mates with a corresponding nib/catch on the reflector part that stays on the car when the lens is removed? If this is true pushing outward from the center to outside of lens might flex the lens just enough to release it? Does that sound correct? I thought about something like that and tried it a little but am afraid to apply to much force outward due to possibly cracking the slim piece of plastic on the outside edge.
Any advice? Is my most recent paragraph better describe the approach I should be taking?
Thanks, WhiteGrill5
The owners manual says to wrap a cloth around a flat head and pry? Has anyone done this?
I personally have done this and It's a bit tricky to take those lamp covers out. I actually broke one of the ppastic notches at the side of the plastic cause the covers wont budge. anyway, the covers still do work even if i broke one of the side notches. LED bulbs that i used for mine were the white T10 LED bulbs that i purchased off of ebay for 10 bucks
I am in agreement with JPX, I also would rather take the whole panel off the inside of the hatch like you used to be able to due with the previous gen to change the license Plate light bulbs, I shined my flashlight through the access to change the backup lights and on my 2013 it only looks like a hold down barbs to remove the license light assemblies (once the lens covers are removed!) and not a way of removing the bulb like the ever popular twist and remove.
I have been trying to remove either of these lenses yesterday and also today, at one point the screwdriver slipped out and made a small scratch on the paint above the license plate (first scratch on car
After seeing these posts it almost sounds like I need to be trying to apply pressure towards the outside of the lens (away from the center of the lens). Perhaps there is a overlaping nib/catch near the bottom inside of the lens that mates with a corresponding nib/catch on the reflector part that stays on the car when the lens is removed? If this is true pushing outward from the center to outside of lens might flex the lens just enough to release it? Does that sound correct? I thought about something like that and tried it a little but am afraid to apply to much force outward due to possibly cracking the slim piece of plastic on the outside edge.
Any advice? Is my most recent paragraph better describe the approach I should be taking?
Thanks, WhiteGrill5
i applied pressure alternating from one side of the cover to the next just to ease the cover out. after doing so for a couple of times. then i proceed to prying the covers out. i do not pry it outwards. last time i did, i broke the notch lol. so now, when i remove the bulb covers, i remove it by prying inwards and it actually comes off more easily that way.
Whitegrill5
Member
- :
- Mazda 5 Sport
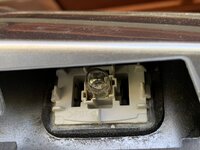
I ended up trying several times to get the lens off from the outside and was afraid with the force required to take a peek from the inside since I needed to be in there anyway to install the Backup camera for my new touchscreen I installled, it was a breeze removing the wire connection and pushing on the retainers from either side from the inside and the whole license light assembly removes easily. No grunt force or risk of cracking plastic required. Only bad thing with this method is you have to remove all (about 4) of the plastic pieces off of the inside of the tailgate. See pictures. I installed LED so hopefully I won't need to do this again for some time.
 [/URL][/IMG]
 [/URL][/IMG]
The problem that so many have (yours truly included) on removing the lens of the license plate light of a 2012 Mazda5 is that the picture on p.8-46 of the Owner's Manual is confusing! The barbs of a Stanley P2514 lamp has the barbs/tabs on both the short sides facing outward. So the prying direction of the screwdriver handle should be inward and down, levering the shank of the screwdriver on the convex lens, thus lifting the edge of the lens outward. The manual shows a dark arrow on the left, which is supposed to indicate the insertion of a flat-head screw driver, but could be taken as the prying direction. The hollow arrow (second left) shows the direction of prying.
Attachments

Thanks for your suggestion, but it borders on killing a bug with a sledge hammer. I had extreme difficulty prying out the lens of the first one, because the instruction in the Owner's Manual and the various blogs did not address the root cause of the problem. Once I figured out the CORRECT PRYING DIRECTION, the second one popped out in a few seconds.
Similar threads
- Replies
- 1
- Views
- 1K
- Replies
- 3
- Views
- 786