
This is a DIY How-To to shut off the overhead console ambient light for those that find it too bright and distracting but still want to keep the rest of the ambient lighting on. I just completed this and have not fully tested the result yet. Will update the post if I find any unwanted effect. When done right this procedure is 100% reversible.
This process was documented/photographed by myself, using my crappy cellphone camera and my 2018 Mazda CX-9 GT as the "demo" vehicle. This DIY is provided as a learning aid and reference guide. I assume no responsibility for any warranties this process may void, or damages you may inflict on yourself or your vehicle. (Thanks sm1ke for the disclaimer)

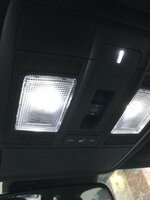
1. Remove the overhead console. The overhead console is held in place at the front by two screws hidden inside the sunglasses holder, and at the back by 2 clips. For step 1 use a phillips screwdriver to remove the 2 screws, be careful not to drop them and loose them.

2. Gently lower the front of the overhead console (it might be slightly stuck in the roof liner material. Once it clears the roof liner, move the overhead console down and forward to free the rear clips from the roof.

3. The overhead console should be hanging from the roof by three cables, you can leave these cables connected for the rest of the procedure. The ambient lighting LED is located towards the rear of the overhead console and is connected to the overhead console by a black and a white wire travelling towards the middle of the overhead console where it is connected through a white connector covered by a felt. (My fingers in the photo points to the ambient LED at the bottom and the connector at the top).

4. All you need to do is to disconnect the white connector that is under the grey felt. There is a clip on the connector that needs to be pressed to disengage it. It is easier to disconnect if the grey felt is lifted and if black and the white wire are free from the path guides first (the little clips routing the cable.)
5. Leave the connector unplugged and secure it in a location to prevent unwanted rattle and reassemble in reverse holder.
Option 2: You can also use a phillips screwdriver to completely remove the LED at step 4. it is only held in place by 1 screw (silver screw in the photo). I did it at first and it made freeing the white and the black wire easier but did not like the hole that was left in the overhead console without it so I decided to put it back in place and leave it disconnected instead.
Very simple procedure. Hope this helps those that were struggling with the bright overhead console ambient light.
This process was documented/photographed by myself, using my crappy cellphone camera and my 2018 Mazda CX-9 GT as the "demo" vehicle. This DIY is provided as a learning aid and reference guide. I assume no responsibility for any warranties this process may void, or damages you may inflict on yourself or your vehicle. (Thanks sm1ke for the disclaimer)
1. Remove the overhead console. The overhead console is held in place at the front by two screws hidden inside the sunglasses holder, and at the back by 2 clips. For step 1 use a phillips screwdriver to remove the 2 screws, be careful not to drop them and loose them.
2. Gently lower the front of the overhead console (it might be slightly stuck in the roof liner material. Once it clears the roof liner, move the overhead console down and forward to free the rear clips from the roof.
3. The overhead console should be hanging from the roof by three cables, you can leave these cables connected for the rest of the procedure. The ambient lighting LED is located towards the rear of the overhead console and is connected to the overhead console by a black and a white wire travelling towards the middle of the overhead console where it is connected through a white connector covered by a felt. (My fingers in the photo points to the ambient LED at the bottom and the connector at the top).
4. All you need to do is to disconnect the white connector that is under the grey felt. There is a clip on the connector that needs to be pressed to disengage it. It is easier to disconnect if the grey felt is lifted and if black and the white wire are free from the path guides first (the little clips routing the cable.)
5. Leave the connector unplugged and secure it in a location to prevent unwanted rattle and reassemble in reverse holder.
Option 2: You can also use a phillips screwdriver to completely remove the LED at step 4. it is only held in place by 1 screw (silver screw in the photo). I did it at first and it made freeing the white and the black wire easier but did not like the hole that was left in the overhead console without it so I decided to put it back in place and leave it disconnected instead.
Very simple procedure. Hope this helps those that were struggling with the bright overhead console ambient light.
Attachments
Last edited:
")