
I've seen in various threads here and on other Mazda 2/Demio forums that folks have been looking for a walkthrough on changing their oil and replacing the filter. I needed to do an oil change recently, and took some photos during the process. If you're familiar with the process of changing the oil on a car in general, then none of this should be new to you.
First of all, changing the oil on the 2/Demio is stupid easy. On my first gen Mazda 3, you have to remove the splash shield (and tackle the clips that like to rust out) and deal with changing the cartridge filter. The 2/Demio doesn't have either of those, and both the drain plug and spin-on filter are easy to access.
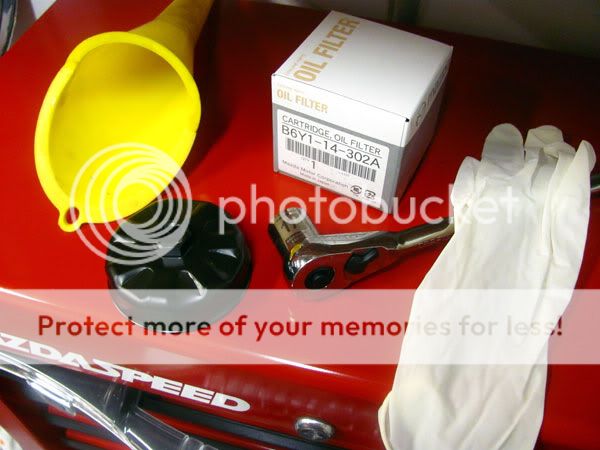
Here are the tools and supplies you'll need for the oil change:
Tools
1. 3/8" ratcheting wrench (something with a longer handle is better, more leverage that way).
2. 19mm socket for said wrench (preferably 6-point).
3. Oil filter cup wrench; your Mazda dealer should have them under part number 49G014001 and the cost should be in the $8-10 range. You could probably get away with using a strap wrench or universal adjustable oil filter wrench, but I prefer the peace of mind from knowing I'm using a tool that has the proper fit (and besides, it was only like $8).
4. Funnel for clean oil. I prefer to use two funnels, one for clean oil only and another for dirty oil only. The "clean oil" funnel I have has a long, skinny neck so it can also work for filling transmission fluid through the dipstick tube. If you clean it between filling the new oil and dumping the old, you can get away with only needing one funnel.
5. Funnel for dirty oil. I use this when dumping out the old oil from my...
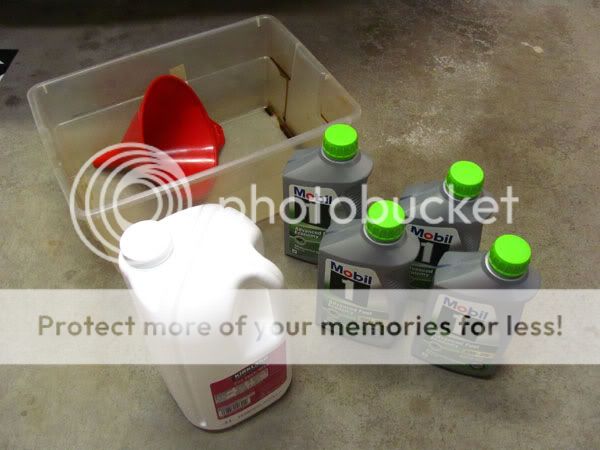
6. Oil drain pan. There are a number of different shapes/sizes/types of these out there, and I've tried a bunch but found myself preferring to use a plain Rubbermaid storage bin. I marked fluid capacity on the side of mine so I know how much fluid has drained into the pan (particularly useful when doing transmission fluid flushes, but that's another thread).
7. Ramps, or jack and jackstands (not pictured). The 2/Demio has decent ground clearance, but you need to get it further up so you can crawl under to drain the old oil. I have a set of Rhino Ramps (about $30) that are safe and easy to use.
Supplies
1. Oil, 4 quarts. The factory recommendation for the 2/Demio is 0W20. The total capacity, according to the owner's manual, is 4.1 quarts with an oil filter change, but you'll never get *all* the old oil out during a change so an even 4 quarts is just enough. I've decided to go with Mobil 1 synthetic as I've had good results with it in the past on MZR engines (the engine in the 2/Demio is a member of the MZR family). I found it for $6.50/quart, but supposedly it can also be found in a 5-quart jug for about $25.
2. Oil filter. I prefer to use OEM filters as they've been found to be of very high quality and are decently priced (about $7 from the dealer). The part number you want for the OEM filter is BY61-14-302A (there is supposedly another part number that will also work, but isn't compatible with the oil filter cup wrench above). Other brands I've heard of people having good luck with are Wix and Purolator.
3. Empty 1 gallon jug for old oil. I suppose you could just pour the old oil back into the empty 1 quart bottles the new oil came in, but when I've done that in the past it was a PITA and I got oil all over the place. Pouring it all into an old milk jug made taking it to the recycling center so much easier. (Note: In the USA you *have* to recycle old motor oil. It's illegal to throw it in the trash, and extra illegal to pour it down the drain.)
4. Latex gloves (optional). At some point during the oil change you're likely to get some on your hands; wearing gloves is a good idea.
Oil Change Process
1. Drive the car around for a little while to warm up the oil. You can change the oil when it's cold, but I like to think that if the oil is warm when you change it, all of the particles (dirt, metal shavings, etc.) are still in suspension and are more likely to drain out with the old oil. Don't try to change the oil just after driving though, you'll end up burning yourself -- wait a good 20 minutes after driving to let the oil cool down a little.
2. Put the car up on ramps or jackstands. Never get under a car supported just by a jack!
3. Pop the hood and unscrew the oil filler cap (this should help the old oil drain out a bit faster):

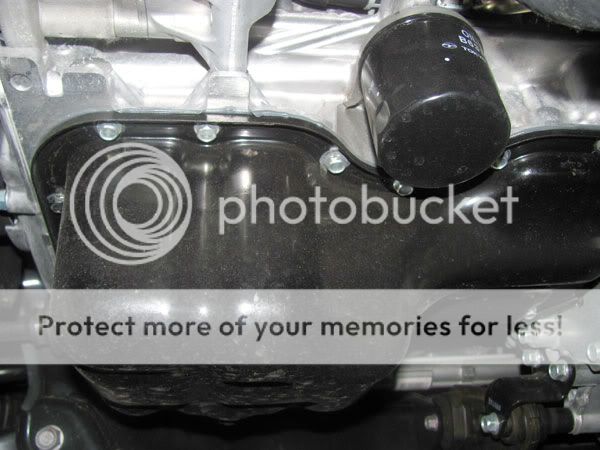
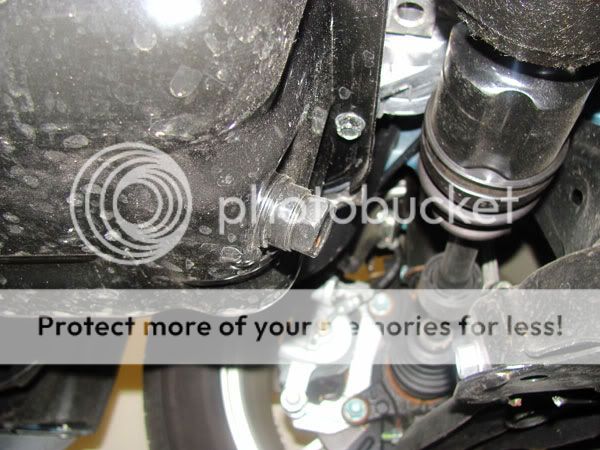
4. Under the car, locate the oil filter and oil pan drain plug. The first picture was taken from the front of the car looking towards the back and shows the oil filter. The second picture was taken from underneath the car looking towards the front right wheel and shows the oil pan drain plug.
5. Position your oil drain pan underneath the drain plug, and use your wrench and 19mm socket to break the plug loose:
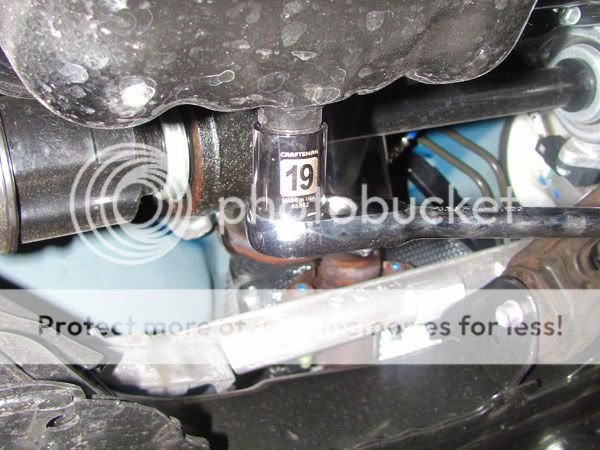
Only break the plug loose with the wrench, unscrew it the rest of the way by hand. When it comes out you'll likely get some oil on your hands, so gloves are a really good idea. Be careful to not drop the plug into the drain pan!
6. Let all of the old oil drain out. If your drain pan has capacity markings, you should get about 3.75 quarts out.
7. When the oil has stopped dripping from the oil pan, clean the area up with a paper towel and thread the drain plug back in. Use your wrench to snug the plug back on; it should be tight enough to not work itself loose, but not so tight that you're stripping threads or won't be able to remove it again in the future. (If you have a torque wrench, I'd estimate the appropriate torque to be about 20-25 ft-lbs.)
8. Time to remove the old oil filter. Move your drain pan to under the filter, then break it loose with your ratchet and cup wrench:
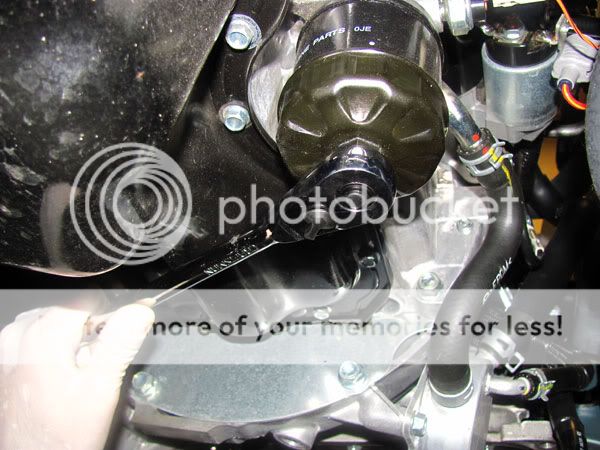
Once you've broken it loose, you should be able to unscrew it the rest of the way by hand. Again, you'll probably get some oil on your hands. Once the filter is off, dump the oil that's in it into the drain pan and set the old filter aside.
9. Prep the new filter and pre-fill it with oil. Take the new filter out of the box and crack open one of the quarts of new oil. Pour the oil into the new filter until it's full, then stop and wait a few seconds. You'll notice the oil level in the filter go down; this is due to the material inside the filter soaking up the oil. Repeat the process of filling and waiting until the filter stops soaking up the oil and is full. Then, dab your finger with some of the clean oil and lubricate the black rubber seal around the top of the filter.
10. Back under the car, screw the new filter on. It should go on smoothly and easily; if you have to crank on it to thread it, you either bought the wrong filter or are cross-threading it. The Mazda OEM filters spin on like butter. Once the filter is hand-tight, give it an extra cinch with your wrench (again, just tight enough so that it won't work itself loose, but not too tight).
11. You're done underneath the car. Put your clean funnel into the oil filler hole and pour in the remainder of the quart you opened to pre-fill the filter, then two more whole quarts. Then, add 3/4 of the last quart and stop.
12. You don't want to overfill the oil, so check the oil level now before putting in the remainder of that last quart. Pull out the dipstick (yellow handle right next to the oil filler), wipe down the blade with a clean paper towel or microfiber, then reinsert it. After a couple seconds, pull it back out and take a look at the very end. You want the oil level to be between the two holes, preferably closer to the one farthest from the end:
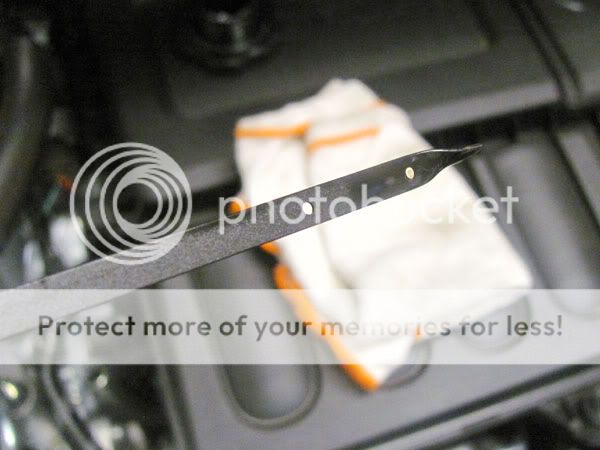
Here you can see my oil level is halfway between the two holes on the dipstick.
13. If the oil level on the dipstick is low, add more new oil through the funnel and check the dipstick again. During the oil change I performed when making this walkthrough, I ended up using all four quarts of oil and the final oil level was right in the middle between the "MIN" and "MAX" holes on the dipstick.
14. Screw the oil filler cap back on, close the hood and start the engine. Let the car idle for a minute; take a peek underneath to make sure no oil is dripping (or gushing, for that matter) out. If it is, kill the engine immediately!
15. If everything looks good and there aren't any drips, take the car for a quick spin around the block. When you get back, again take a quick look underneath to make sure there are no leaks. If there aren't any, you're done!
16. Dump out the old oil from the drain pan into the gallon jug using the "dirty oil" funnel. You'll need to take the old oil and filter to someplace that will recycle them. Many auto repair or parts shops will accept used oil and filters for recycling, or your city/county may operate a recycling center that you can take them to.
Congratulations! You just changed your own oil -- you probably saved at least a little money in the process, and you now know that it was definitely done correctly.
Disclaimer: I cannot be held liable for anything you may do or screw up by following this walkthrough.
First of all, changing the oil on the 2/Demio is stupid easy. On my first gen Mazda 3, you have to remove the splash shield (and tackle the clips that like to rust out) and deal with changing the cartridge filter. The 2/Demio doesn't have either of those, and both the drain plug and spin-on filter are easy to access.
Here are the tools and supplies you'll need for the oil change:
Tools
1. 3/8" ratcheting wrench (something with a longer handle is better, more leverage that way).
2. 19mm socket for said wrench (preferably 6-point).
3. Oil filter cup wrench; your Mazda dealer should have them under part number 49G014001 and the cost should be in the $8-10 range. You could probably get away with using a strap wrench or universal adjustable oil filter wrench, but I prefer the peace of mind from knowing I'm using a tool that has the proper fit (and besides, it was only like $8).
4. Funnel for clean oil. I prefer to use two funnels, one for clean oil only and another for dirty oil only. The "clean oil" funnel I have has a long, skinny neck so it can also work for filling transmission fluid through the dipstick tube. If you clean it between filling the new oil and dumping the old, you can get away with only needing one funnel.
5. Funnel for dirty oil. I use this when dumping out the old oil from my...
6. Oil drain pan. There are a number of different shapes/sizes/types of these out there, and I've tried a bunch but found myself preferring to use a plain Rubbermaid storage bin. I marked fluid capacity on the side of mine so I know how much fluid has drained into the pan (particularly useful when doing transmission fluid flushes, but that's another thread).
7. Ramps, or jack and jackstands (not pictured). The 2/Demio has decent ground clearance, but you need to get it further up so you can crawl under to drain the old oil. I have a set of Rhino Ramps (about $30) that are safe and easy to use.
Supplies
1. Oil, 4 quarts. The factory recommendation for the 2/Demio is 0W20. The total capacity, according to the owner's manual, is 4.1 quarts with an oil filter change, but you'll never get *all* the old oil out during a change so an even 4 quarts is just enough. I've decided to go with Mobil 1 synthetic as I've had good results with it in the past on MZR engines (the engine in the 2/Demio is a member of the MZR family). I found it for $6.50/quart, but supposedly it can also be found in a 5-quart jug for about $25.
2. Oil filter. I prefer to use OEM filters as they've been found to be of very high quality and are decently priced (about $7 from the dealer). The part number you want for the OEM filter is BY61-14-302A (there is supposedly another part number that will also work, but isn't compatible with the oil filter cup wrench above). Other brands I've heard of people having good luck with are Wix and Purolator.
3. Empty 1 gallon jug for old oil. I suppose you could just pour the old oil back into the empty 1 quart bottles the new oil came in, but when I've done that in the past it was a PITA and I got oil all over the place. Pouring it all into an old milk jug made taking it to the recycling center so much easier. (Note: In the USA you *have* to recycle old motor oil. It's illegal to throw it in the trash, and extra illegal to pour it down the drain.)
4. Latex gloves (optional). At some point during the oil change you're likely to get some on your hands; wearing gloves is a good idea.
Oil Change Process
1. Drive the car around for a little while to warm up the oil. You can change the oil when it's cold, but I like to think that if the oil is warm when you change it, all of the particles (dirt, metal shavings, etc.) are still in suspension and are more likely to drain out with the old oil. Don't try to change the oil just after driving though, you'll end up burning yourself -- wait a good 20 minutes after driving to let the oil cool down a little.
2. Put the car up on ramps or jackstands. Never get under a car supported just by a jack!
3. Pop the hood and unscrew the oil filler cap (this should help the old oil drain out a bit faster):
4. Under the car, locate the oil filter and oil pan drain plug. The first picture was taken from the front of the car looking towards the back and shows the oil filter. The second picture was taken from underneath the car looking towards the front right wheel and shows the oil pan drain plug.
5. Position your oil drain pan underneath the drain plug, and use your wrench and 19mm socket to break the plug loose:
Only break the plug loose with the wrench, unscrew it the rest of the way by hand. When it comes out you'll likely get some oil on your hands, so gloves are a really good idea. Be careful to not drop the plug into the drain pan!
6. Let all of the old oil drain out. If your drain pan has capacity markings, you should get about 3.75 quarts out.
7. When the oil has stopped dripping from the oil pan, clean the area up with a paper towel and thread the drain plug back in. Use your wrench to snug the plug back on; it should be tight enough to not work itself loose, but not so tight that you're stripping threads or won't be able to remove it again in the future. (If you have a torque wrench, I'd estimate the appropriate torque to be about 20-25 ft-lbs.)
8. Time to remove the old oil filter. Move your drain pan to under the filter, then break it loose with your ratchet and cup wrench:
Once you've broken it loose, you should be able to unscrew it the rest of the way by hand. Again, you'll probably get some oil on your hands. Once the filter is off, dump the oil that's in it into the drain pan and set the old filter aside.
9. Prep the new filter and pre-fill it with oil. Take the new filter out of the box and crack open one of the quarts of new oil. Pour the oil into the new filter until it's full, then stop and wait a few seconds. You'll notice the oil level in the filter go down; this is due to the material inside the filter soaking up the oil. Repeat the process of filling and waiting until the filter stops soaking up the oil and is full. Then, dab your finger with some of the clean oil and lubricate the black rubber seal around the top of the filter.
10. Back under the car, screw the new filter on. It should go on smoothly and easily; if you have to crank on it to thread it, you either bought the wrong filter or are cross-threading it. The Mazda OEM filters spin on like butter. Once the filter is hand-tight, give it an extra cinch with your wrench (again, just tight enough so that it won't work itself loose, but not too tight).
11. You're done underneath the car. Put your clean funnel into the oil filler hole and pour in the remainder of the quart you opened to pre-fill the filter, then two more whole quarts. Then, add 3/4 of the last quart and stop.
12. You don't want to overfill the oil, so check the oil level now before putting in the remainder of that last quart. Pull out the dipstick (yellow handle right next to the oil filler), wipe down the blade with a clean paper towel or microfiber, then reinsert it. After a couple seconds, pull it back out and take a look at the very end. You want the oil level to be between the two holes, preferably closer to the one farthest from the end:
Here you can see my oil level is halfway between the two holes on the dipstick.
13. If the oil level on the dipstick is low, add more new oil through the funnel and check the dipstick again. During the oil change I performed when making this walkthrough, I ended up using all four quarts of oil and the final oil level was right in the middle between the "MIN" and "MAX" holes on the dipstick.
14. Screw the oil filler cap back on, close the hood and start the engine. Let the car idle for a minute; take a peek underneath to make sure no oil is dripping (or gushing, for that matter) out. If it is, kill the engine immediately!
15. If everything looks good and there aren't any drips, take the car for a quick spin around the block. When you get back, again take a quick look underneath to make sure there are no leaks. If there aren't any, you're done!
16. Dump out the old oil from the drain pan into the gallon jug using the "dirty oil" funnel. You'll need to take the old oil and filter to someplace that will recycle them. Many auto repair or parts shops will accept used oil and filters for recycling, or your city/county may operate a recycling center that you can take them to.
Congratulations! You just changed your own oil -- you probably saved at least a little money in the process, and you now know that it was definitely done correctly.
Disclaimer: I cannot be held liable for anything you may do or screw up by following this walkthrough.
")