Quick question for the group -- I have a 2014 CX-5. Looked at the repair manual, and it notes that only three nuts need to be removed in order for removal. When I do this, I can't remove the lower eyelet completely from the bolt as the lower arm is in the way. Does the lower arm need to be loosened and lowered? Or, is there a way around this?

You are using an out of date browser. It may not display this or other websites correctly.
You should upgrade or use an alternative browser.
You should upgrade or use an alternative browser.
2013~2016 CX-5 Rear shock removal question
- Thread starter eelliiss
- Start date
- :
- San Antonio, Texas
- :
- '15 CX-5 Miata AWD
You shouldnt have to remove the stud, in fact that's risky and it isn't supposed to come out (however the design sucks and it happens). They actually updated that part in the newer cx5s. Once you remove the 17mm bolt from the lca you can pull/compress the shock down by hand and wiggle it off.
You shouldnt have to remove the stud, in fact thats risky ad it isn't supposed to come out (however the design sucks and it happens). They actually updated that part in the newer cx5s. Once you remove the 17mm bolt from the lca you can pull/compress the shock down by hand and wiggle it off.
The shock did not look like it was going to come off at all. I did try to compress and wriggle off, and I figured my only option was to remove the stud. Seemed to me like the length of the stud was too long to remove the shock. Perhaps I didn't try long enough before going through the route of stud removal.
Seems like removing that stuff is a lot of trouble for a rear shock.
What does the official Mazda shop manual say?
The bottom mount was different from what the manual illustrated. In the manual, there is a bolt holding the lower shock in place, and mine is a nut tightened over a stud to hold the lower eyelet in place. Also, the manual shows that shock can be removed without lowering the lower arm. That was impossible with my experience.
- :
- San Antonio, Texas
- :
- '15 CX-5 Miata AWD
Yea, I'm assuming you have a 2015 or older, I was replacing a blown strut (pair) and the nut pulled the stud out. Never got the stud al the way back in, but uts in enough to be mechanically sound. I did get a new drud however, for some future use. Although when that time comes I'm likely going to use a bolt instead.The bottom mount was different from what the manual illustrated. In the manual, there is a bolt holding the lower shock in place, and mine is a nut tightened over a stud to hold the lower eyelet in place. Also, the manual shows that shock can be removed without lowering the lower arm. That was impossible with my experience.
Yea, I'm assuming you have a 2015 or older, I was replacing a blown strut (pair) and the nut pulled the stud out. Never got the stud al the way back in, but uts in enough to be mechanically sound. I did get a new drud however, for some future use. Although when that time comes I'm likely going to use a bolt instead.
Yeah, I was able to get the stud to bottom out, so everything felt fine. It didn't add all that much more time to the overall project. The most time consuming part was lining the bolt back into the lower arm.
@eelliiss So how did you get the lower part of the shock out?Yeah, I was able to get the stud to bottom out, so everything felt fine. It didn't add all that much more time to the overall project. The most time consuming part was lining the bolt back into the lower arm.
I know this post is old, but I wanted to contribute. I have a 2016 Mazda CX-5 GT AWD that I bought in December 2015. It has the STUD mount for the lower rear shock mounts. They are rusted so badly that they will have to be cut off. After plenty of research and talking to a very patient out-of-state dealership, I think I have the correct part on the way.
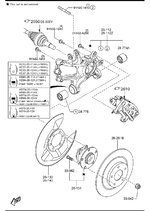
The shock mounting STUD shows up in the rear steering knuckle diagram--not anywhere else and is only referred to as a stud, with no other description. Below is the diagram and the OEM part number for the shock mounting stud. Thank you all here for your contributions which helped me find what I need in the end!
The part is #2 in the diagram, Part # 9YA90-1410
My only concern now is whether or not I will be able to get the stud out of the rear steering knuckle. If not, I guess I'll be replacing those too.
Lesson learned: Don't wait till 190,000 miles to change your shocks!")
The shock mounting STUD shows up in the rear steering knuckle diagram--not anywhere else and is only referred to as a stud, with no other description. Below is the diagram and the OEM part number for the shock mounting stud. Thank you all here for your contributions which helped me find what I need in the end!
The part is #2 in the diagram, Part # 9YA90-1410
My only concern now is whether or not I will be able to get the stud out of the rear steering knuckle. If not, I guess I'll be replacing those too.
Lesson learned: Don't wait till 190,000 miles to change your shocks!
Attachments
Thanks for posting this info. I, too, got surprised when the service manual was showing a bolt retaining the rear shock eyelet and my rear spindle has the stud making shock removal more complicated.I know this post is old, but I wanted to contribute. I have a 2016 Mazda CX-5 GT AWD that I bought in December 2015. It has the STUD mount for the lower rear shock mounts. They are rusted so badly that they will have to be cut off. After plenty of research and talking to a very patient out-of-state dealership, I think I have the correct part on the way.
The shock mounting STUD shows up in the rear steering knuckle diagram--not anywhere else and is only referred to as a stud, with no other description. Below is the diagram and the OEM part number for the shock mounting stud. Thank you all here for your contributions which helped me find what I need in the end!
The part is #2 in the diagram, Part # 9YA90-1410
My only concern now is whether or not I will be able to get the stud out of the rear steering knuckle. If not, I guess I'll be replacing those too.
Lesson learned: Don't wait till 190,000 miles to change your shocks!
Hello, going through the same process of shock replacement on my 2015 AWD Mazda CX5. Were you able to replace the stud or had to change the knuckle entirely? I'm thinking of changing the knuckle assembly but seeing how the parts on my car (and seems like everyone else's CX5s) have rusted, I'm now too scared to touch anything new.I know this post is old, but I wanted to contribute. I have a 2016 Mazda CX-5 GT AWD that I bought in December 2015. It has the STUD mount for the lower rear shock mounts. They are rusted so badly that they will have to be cut off. After plenty of research and talking to a very patient out-of-state dealership, I think I have the correct part on the way.
The shock mounting STUD shows up in the rear steering knuckle diagram--not anywhere else and is only referred to as a stud, with no other description. Below is the diagram and the OEM part number for the shock mounting stud. Thank you all here for your contributions which helped me find what I need in the end!
The part is #2 in the diagram, Part # 9YA90-1410
My only concern now is whether or not I will be able to get the stud out of the rear steering knuckle. If not, I guess I'll be replacing those too.
Lesson learned: Don't wait till 190,000 miles to change your shocks!
Hi, I'm also getting ready to go through the same process on my 2015 CX-5 AWD Touring. My upper rear mount fractured after corrosion damage. I have the Type B configuration which is the stud. Question: After removing the 19 mm nut from the stud, can't the lower shock eyelet just be slid off the stud - I presume some prying of the rubber insulator will be necessary? That is, does the stud need to be removed?
As follow-up to my last post, never mind, I figured it out. The Mazda procedure requires the removal of the mounting stud, from the knuckle, after removing the shock upper mount nuts and the lower mount stud nut, on Type 2, so that the suspension shock absorber can be removed without dropping the control arm and removing the spring. In my case the stud was corroded and seized up in the knuckle so I opted to leave it and just "carefully" remove the lower control arm bolt and control arm stabilizer link nut so I could drop the arm and remove the spring to give me room to remove the shock lower mount that was seized up on the stud. After a lot of PB Blaster, "modified" Pitman Arm Removal Tool to pull the shock's lower mount off the stud leaving the rubber bushing and inner sleeve on the stud, I was able to twist off the metal sleeve from the stud with a Vise Grip after shaving off the rubber bushing material.
- :
- Plano, Texas, USA
Thanks fir the update. How did you fix broken upper shock mount? Did you get very expensive nowadays OEM shocks which includes the top mount?As follow-up to my last post, never mind, I figured it out. The Mazda procedure requires the removal of the mounting stud, from the knuckle, after removing the shock upper mount nuts and the lower mount stud nut, on Type 2, so that the suspension shock absorber can be removed without dropping the control arm and removing the spring. In my case the stud was corroded and seized up in the knuckle so I opted to leave it and just "carefully" remove the lower control arm bolt and control arm stabilizer link nut so I could drop the arm and remove the spring to give me room to remove the shock lower mount that was seized up on the stud. After a lot of PB Blaster, "modified" Pitman Arm Removal Tool to pull the shock's lower mount off the stud leaving the rubber bushing and inner sleeve on the stud, I was able to twist off the metal sleeve from the stud with a Vise Grip after shaving off the rubber bushing material.
Last edited:
yrwei52 & Jmaz, I ended up buying the pre-assembled complete suspension shock absorber (upper mount, dust cover, shock, and hardware) through a local Dealership's "on-line" Mazda store. The Dealership's Mazda Parts Dept initially quoted me $339 per assembly, but I was able to order two at $254/ea using their on-line system. Yes, very pricey, but after trying to find third-party parts (like KYB shock parts) at local auto parts stores, Amazon, and other on-line businesses like Rock Auto, I found that getting the upper mount in a timely manner would be a problem for some reason - I was trying to get the DORMAN (OE Fix) upper mount; KYB wasn't readily available. Even my local auto repair shop owner, who I use for inspections, etc., said getting the upper mount would take time so he was going to go to Mazda for the upper mounts. Anyway, I needed to get it fixed ASAP as this car is a daily driver, so I reluctantly purchased the assemblies from Mazda. Talking with my local repair shop's owner, I would've paid at least $500 in time and materials for a repair shop to do the work, likely more if they have to spend more time dealing with corrosion to get parts apart and/or replacing them. I do agree with Jmaz. It's difficult and time consuming dealing with corroded parts especially at ground level. Before getting into future DIY auto work to save a buck, I'll more carefully consider the extent of corrosion to determine if it's worth the time and effort.
I think that was a good decision and I would have done the same thing considering the vehicle is needed ASAP, the availability of the upper mount (which is a known factor discussed on this forum before) and time taken to source aftermarket parts. Cost takes a back seat when availability is critical/limited. Sometimes you have to bite the bullet but you got OEM quality parts and saved on expensive labor by doing the job yourself. I'd say you did the best you could considering the circumstances and got an education in the process. It's a good feeling when the job is done and you can get on with life. Good job and thanks for the update.yrwei52 & Jmaz, I ended up buying the pre-assembled complete suspension shock absorber (upper mount, dust cover, shock, and hardware) through a local Dealership's "on-line" Mazda store. The Dealership's Mazda Parts Dept initially quoted me $339 per assembly, but I was able to order two at $254/ea using their on-line system. Yes, very pricey, but after trying to find third-party parts (like KYB shock parts) at local auto parts stores, Amazon, and other on-line businesses like Rock Auto, I found that getting the upper mount in a timely manner would be a problem for some reason - I was trying to get the DORMAN (OE Fix) upper mount; KYB wasn't readily available. Even my local auto repair shop owner, who I use for inspections, etc., said getting the upper mount would take time so he was going to go to Mazda for the upper mounts. Anyway, I needed to get it fixed ASAP as this car is a daily driver, so I reluctantly purchased the assemblies from Mazda. Talking with my local repair shop's owner, I would've paid at least $500 in time and materials for a repair shop to do the work, likely more if they have to spend more time dealing with corrosion to get parts apart and/or replacing them. I do agree with Jmaz. It's difficult and time consuming dealing with corroded parts especially at ground level. Before getting into future DIY auto work to save a buck, I'll more carefully consider the extent of corrosion to determine if it's worth the time and effort.
You mentioned corrosion making for difficult removal. Read up on some of the members experiences trying to remove the pinch bolt that retains the ball joint on the front lower control arms. That was one big factor in having my mechanic replace mine. I figured it wasn't going to be easy when my impact wrench couldn't even rotate/spin the bolt in place (nut removed).
P.S. be careful when considering Dorman parts. Depending on the type of part they are about the last on my list of brands to consider.
Last edited:
Jmaz,I think that was a good decision and I would have done the same thing considering the vehicle is needed ASAP, the availability of the upper mount (which is a known factor discussed on this forum before) and time taken to source aftermarket parts. Cost takes a back seat when availability is critical/limited. Sometimes you have to bite the bullet but you got OEM quality parts and saved on expensive labor by doing the job yourself. I'd say you did the best you could considering the circumstances and got an education in the process. It's a good feeling when the job is done and you can get on with life. Good job and thanks for the update.
You mentioned corrosion making for difficult removal. Read up on some of the members experiences trying to remove the pinch bolt that retains the ball joint on the front lower control arms. That was one big factor in having my mechanic replace mine. I figured it wasn't going to be easy when my impact wrench couldn't even rotate/spin the bolt in place (nut removed).
P.S. be careful when considering Dorman parts. Depending on the type of part they are about the last on my list of brands to consider.
Thanks for the tips on the Dorman parts and especially the front lower control arm ball joint replacement, as it "sounds" like my right one could be the next project - I'm getting too old for this.
When it came to scoping out the job to replace my lower control arms and whether to consider doing it myself , a few things tipped it to having it done by a mechanic.Jmaz,
Thanks for the tips on the Dorman parts and especially the front lower control arm ball joint replacement, as it "sounds" like my right one could be the next project - I'm getting too old for this.
1) the dreaded pinch bolt that retains the ball joint. After reading about the difficulty experienced by some members here, I tried to see if it would loosen. No dice.
2) looked in the shop manual and saw that the front LCA bolt torque is 158-191 ft-lb torque. It's a straight shot to get to the passenger side but the driver side isn't. Would require an extension and universal joint both of which reduce (rob) torque so a more powerful impact wrench than I have would be needed. I wasn't going to lay on the ground with a long breaker bar. Also, the control arm bushings were replaced right after I bought the car (per TSB) because of squeaking problem. Who knows how tight the dealer tightened the bolts.
I supplied the LCA's (new Mazda OEM purchased online) to my mechanic and also ordered new OEM bolts to go along. The bolts came with a red coating on the threads that looked like a 'threadlocker', which if used at the factory, would have required even more torque to loosen than an uncoated bolt.
Similar threads
- Replies
- 18
- Views
- 973