Hi all,
To this day, Mazda still does not make Mud flaps / guards that will fit the Mazda3 Hatch S with Side Sill Extension. I didn't want gravel and mud get thrown up against the side of my brand new car. So, I decided to make my own mud guards from a waste basket (that I had lying around but not being used). All that I had to spend was $1.47 to buy a package of screws and plastic anchors from Home Depot.
Why did I decide to make my own? Well, the main reason is because the local auto-part stores in my area no longer sell generic mud flaps for cars. There are a few stores that sells mud flaps for SUV and trucks, but those are too big for our car. The only solution for me is to make my own. Here are the instructions along with pictures so that you can make your own.
Parts Needed:
-Waste Basket Size 28 Quarts (about $3-$4)
-Plastic Anchors #14-16 x 1-1/2" (Home Depot $1.47 package for 5 screws and 5 anchors)
-Drill
-3/16" Drill Bit
-5/16" Drill Bit
-Phillips-head Screw Driver
-Scissors
-Black permanent marker (optional)

Start out with printing the cut-out pattern on a Legal size paper (8.5" x 14"). Make sure that you print it with no scaling (100% original size). You can use a ruler to verify that the print-out is in correct scaling. The pattern is attached to this thread and can be downloaded (login as a registered user and scroll down to the bottom of this post).
Next, trace this pattern onto each side of the waste basket and then cut them out. Then drill the holes. I have already marked the places to drill on the cut-out pattern. This will save you the trouble of making sure that the holes line up such that the mud flap is parallel to the ground. Use the 3/16" drill bit on the top hole and the 5/16" drill bit on the bottom two holes.
You should now have the mud flaps looking like these:

It's time to install the mud flaps. Turn the front wheels all the way to the left to install on the driver's side. Take out the 3 screws (the top one is metal and the two on the sill are plastic). Be careful taking out the plastic screws. Unscrew the plastic screw and then carefully pry out the plastic retainers. Keep these in a safe place in case you want to remove the mud flaps in the future.

This is what the holes look like after the screws are removed:

Next, insert two plastic anchors into the bottom two holes of the mud flaps. The reason to put these through the mud flap is so that if you do end up deciding to take these out later, it will be much easier to pull these out this way. And also, this way when you unscrew the screw, the plastic anchor will NOT turn with the screw making it practically impossible to unscrew the screw from the plastic anchor later on. I used a black permanent marker to color the top of the plastic anchors black.
Front Side:

Back Side:

Now install the mud flaps and screw them in. I also colored the top of the screws with the black permanent marker. The mud flap should be 4" off the ground. Turn the tire and verify that the tire does not rub the mud flap at any angles. I have created this pattern so that the stock tires do not rub the mud flap.
NOTE: Do NOT over tighten the screws. Not much force is needed to hold the flap secured.
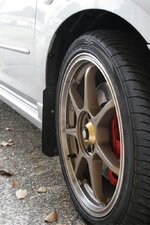
This is how it looks when you have the driver side installed.


Lastly, do the same steps for the other side.
That's it, this shouldn't take more than 30min to do.
Don't hesitate to ask questions, leave comments, suggestions, or feedbacks")
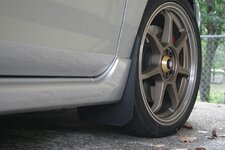
I tried taking wider shots of the whole car, but because the mud flaps are black, they are really hard to see. Here are some pictures....
I had to crank up the brightness so that you can see the mud flaps, but it makes the rest of the picture very overexposed.


To this day, Mazda still does not make Mud flaps / guards that will fit the Mazda3 Hatch S with Side Sill Extension. I didn't want gravel and mud get thrown up against the side of my brand new car. So, I decided to make my own mud guards from a waste basket (that I had lying around but not being used). All that I had to spend was $1.47 to buy a package of screws and plastic anchors from Home Depot.
Why did I decide to make my own? Well, the main reason is because the local auto-part stores in my area no longer sell generic mud flaps for cars. There are a few stores that sells mud flaps for SUV and trucks, but those are too big for our car. The only solution for me is to make my own. Here are the instructions along with pictures so that you can make your own.
Parts Needed:
-Waste Basket Size 28 Quarts (about $3-$4)
-Plastic Anchors #14-16 x 1-1/2" (Home Depot $1.47 package for 5 screws and 5 anchors)
-Drill
-3/16" Drill Bit
-5/16" Drill Bit
-Phillips-head Screw Driver
-Scissors
-Black permanent marker (optional)
Start out with printing the cut-out pattern on a Legal size paper (8.5" x 14"). Make sure that you print it with no scaling (100% original size). You can use a ruler to verify that the print-out is in correct scaling. The pattern is attached to this thread and can be downloaded (login as a registered user and scroll down to the bottom of this post).
Next, trace this pattern onto each side of the waste basket and then cut them out. Then drill the holes. I have already marked the places to drill on the cut-out pattern. This will save you the trouble of making sure that the holes line up such that the mud flap is parallel to the ground. Use the 3/16" drill bit on the top hole and the 5/16" drill bit on the bottom two holes.
You should now have the mud flaps looking like these:
It's time to install the mud flaps. Turn the front wheels all the way to the left to install on the driver's side. Take out the 3 screws (the top one is metal and the two on the sill are plastic). Be careful taking out the plastic screws. Unscrew the plastic screw and then carefully pry out the plastic retainers. Keep these in a safe place in case you want to remove the mud flaps in the future.
This is what the holes look like after the screws are removed:
Next, insert two plastic anchors into the bottom two holes of the mud flaps. The reason to put these through the mud flap is so that if you do end up deciding to take these out later, it will be much easier to pull these out this way. And also, this way when you unscrew the screw, the plastic anchor will NOT turn with the screw making it practically impossible to unscrew the screw from the plastic anchor later on. I used a black permanent marker to color the top of the plastic anchors black.
Front Side:
Back Side:
Now install the mud flaps and screw them in. I also colored the top of the screws with the black permanent marker. The mud flap should be 4" off the ground. Turn the tire and verify that the tire does not rub the mud flap at any angles. I have created this pattern so that the stock tires do not rub the mud flap.
NOTE: Do NOT over tighten the screws. Not much force is needed to hold the flap secured.
This is how it looks when you have the driver side installed.
Lastly, do the same steps for the other side.
That's it, this shouldn't take more than 30min to do.
Don't hesitate to ask questions, leave comments, suggestions, or feedbacks
I tried taking wider shots of the whole car, but because the mud flaps are black, they are really hard to see. Here are some pictures....
I had to crank up the brightness so that you can see the mud flaps, but it makes the rest of the picture very overexposed.
Attachments
Last edited: