
You are using an out of date browser. It may not display this or other websites correctly.
You should upgrade or use an alternative browser.
You should upgrade or use an alternative browser.
Trailer Wiring Harness for Towing
- Thread starter Surfsup
- Start date
I got the 56011 on Amazon.
http://www.etrailer.com/Custom-Fit-Vehicle-Wiring/Mazda/CX-5/2013/C56011.html?vehicleid=20138678
It says custom fit for CX-5, but also fits a lot of other cars. The amazon reviews complain the one wire that runs to right tail light is a little short and requires lengthening. I have it hap-hazardly plugged in now, but I can see that to neatly hide it behind all the plastics could require lengthening one foot of wire.
I'm not aware of the non-custom fit one.
BTW, its super easy to install. Plug and play. Pop off the rear panels and takes 5 minutes if that.
Ok I appreciate it. I build custom guitar valve amps on the side so I have plenty of wires/shrink etc. I'm going to order this one, the picture looks different so I figure it might work as is and it's a buck cheaper with $1 shipping. They were the lowest price on the hitch as well and delivered in one day, so I'll give them more of my business.
http://www.hitchanything.com/Curt-56011-Trailer-Wiring-Harness.html
If not, I can lengthen a wire or two.
http://www.hitchanything.com/Curt-56011-Trailer-Wiring-Harness.html
If not, I can lengthen a wire or two.
- :
- San Antonio, Texas
- :
- '15 CX-5 Miata AWD
Howlin4u posted a good write up on how to. I used all the parts he listed and came out clean install.
Thanks Chris. I found it, it's "Howlin4you":
http://www.mazdas247.com/forum/show...ly-install-a-Non-Factory-CX-5-Trailer-Harness
I'll read through it tonight...
http://www.mazdas247.com/forum/show...ly-install-a-Non-Factory-CX-5-Trailer-Harness
I'll read through it tonight...
- :
- San Antonio, Texas
- :
- '15 CX-5 Miata AWD
Yea, it's a good write up. Hands down cheaper than stealership install. No wiretapping invloved; the connectors simply plug into (piggyback) the existing hookups. No scheisse looking wires dangling below your car. I wrapped the wires in some of that tubing you get at autozone for like $3. Used long zip ties to ties them around the hitch bar, out of sight and protected from elements. I was worried because I have resistres wired into mine for my LEDS; well I tested it at a U-haul joint and it worked fine, ofc their trailers have LED lights. Not really mentioned in the write up, but when you stick the wire through the rubber grommet (which i sprayed rubber sealent around when I was done) it will come out above the heat shield above the rear muffler. You just have to push the wire bundle until it's at teh edge of the shield ; it's rigid enough then you can jsut pull it out.
Not really mentioned in the write up, but when you stick the wire through the rubber grommet (which i sprayed rubber sealent around when I was done) it will come out above the heat shield above the rear muffler. You just have to push the wire bundle until it's at teh edge of the shield ; it's rigid enough then you can jsut pull it out.
Ok thanks for the tip...from the pics of Howlin's link and mine, the harnesses look exactly the same. His/her install notes appear to only discuss the extra stuff used to mount the wiring connector under the bumper. I think I'm going to just zip it underneath b/c the trailers all have long wires to reach. I don't want to see that connector everyday (not going to be towing too much)....sweet. No more risk of getting a ticket! The dudes at the place I rented a tree stumper from were all freaked about me taking their trailer with no working lights last weekend.
I have been using a trailer for 40 years and I have never mounted the connector outside the car. It has always been in the trunk or the back of the wagon. It keeps it clean, and working. Pinching the. Wire has never been a problem.
Now the trailer lights them selves, well, there is another trick to keep them working.
Now the trailer lights them selves, well, there is another trick to keep them working.
Well I installed this yesterday after work. the panels were a pain to get off, because I didn't have any real directions and had to keep going to get tools. In terms of installing the trailer hitch wiring, here is what I did as a synopsis:
Curt wiring harness kit: Includes everything but I did use 5 extra, large-format zip ties.
Tools: small screwdriver (very small), medium screwdriver, Phillips head screwdriver, 10mm socket wrench, utility knife
The harness basically is plug and play, you don't need any wire cutters, or anything, unless you want to get fancy with it. I'll explain later. Ok from memory:
First you need to remove the cargo floor. there are I think 8 screws just behind the seats that when tugged on firmly enough, will pop off.
Then you take out the two foam tire wrap compartments for the jack, etc. - place them aside.
Pop off rear trim cover along bumper. There are two pushpins on the inside bottom corner, use small screwdriver or nail to pull up center and then pull it off - vertically.
Pop off the left and right side panel that is just behind each tail light. Use small screwdriver. I found popping the bottom corner off first was the best.
On driver side un screw each the 10mm bolt that holds the two tie downs (one under tail light, one just behind seat) - remove only the rear one on passenger side (pop off trim tab with very small screwdriver)
Pop off two pushpins on bottom inside edge of each rear large panel
pop off trim tab inside each side's seat release and unscrew the screw (Phillips). On driver there is another screw a bit more forward under middle of window
pull driver side panel off enough to get in there, don't pull too hard to dislodge the rear cargo light wiring
disconnect the two larger plugs, push the tab in middle and lightly tug on the wires, comes off easy.
plug in the Curt wires here that have the two "T"s (four plugs total) into each the 3-plug and 4-plug connectors
Unscrew the ground bolt just forward and down from the light screwed into the sheetmetal. add the Curt white wire with ground ring terminal to it and screw it back in.
Undo the rubberbands and run the green wire with the last "T" to the passenger side.
Loosen passenger side enough to feed the green T connectors up and back out the panel hole behind the light.
Disconnect and connect the T to the passenger side rear light (4 way or 3 way I don't remember, only one fits)
Push the passenger panel back in being sure not to pinch the green wire but take as much of the slack you can because you need it to feed around the hatch to the driver side
I zip tied the green wire to the black-wrapped wiring running around the hatch - up to you - don't do it if you don't have extra zips?
peel off one side of stickytape and place onto back of Curt control box
Test fit the control box with the panel being pushed most of the way back in so you know where you put it will be out of the way so you can put the panel back in
(**I put the controlbox on the underside of the taillight metal housing - seemed to be a perfect spot)
Make sure the wires are not tangled and the green wire reaches properly, no kinking
Stick the box on to the car.
Secure loose wires for any rattling with the remaining zips
Take the 4-plug trailer connector and decide what you want tto do with it at this point (here's where I used extra zips)
I pulled out the 2" dia rubber grommet just behind the wheel well (driver side) and used the utility knife to cut a 3/4" to 1" long slit across the side and jammed the head of the 4-plug connector through it and fed it down and out of the vehicle. Then I used 5 extra zip ties - large ones - to zip it and secure it to the hitch so I can plug the trailer in from the outside. I secured the end so it was right by where the 2" center mount is but hidden just behind the bumper.
Reassemble everything and put your crap back in your car, done.
All this took me about 90 mins. but I had to figure out how to get the panels off, etc.
Wiring a converter with power.
I finally installed the Mazda trailer wiring package. It is a powered unit, and I wanted that for a couple of reasons.
The powered units supply a full 12 volts, the unpowered ones have a voltage drop because they need to run the lights through diodes to combine them.
More important, I want a separate fused circuit for the trailer lights to protect the car lighting from the trailer. I have had trailer lights short out and take out the car lights as well. Being on a dark rainy 4 lane with no tail lights or turn signals is not good.
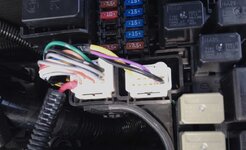
The instructions from Mazda are good, but here is a bit more detail on getting the 12 volts. It turns out there is a unused wire running from the fuse panel under the hood to the back drivers side of the car.
Under the hood it is located where the big red wire is in the attached picture. Lower left of the left white connector. You need to push this wire with a connector on it into the plastic housing. Mazda calls it populating the connector.
At the other end, the wire you are looking for is Black with white dots.
I brought the flat 4 wire connector out into the sare tire area. Easy to do, no cutting. It is invisible when not in use. protected from the weather, and easy to get to.
I finally installed the Mazda trailer wiring package. It is a powered unit, and I wanted that for a couple of reasons.
The powered units supply a full 12 volts, the unpowered ones have a voltage drop because they need to run the lights through diodes to combine them.
More important, I want a separate fused circuit for the trailer lights to protect the car lighting from the trailer. I have had trailer lights short out and take out the car lights as well. Being on a dark rainy 4 lane with no tail lights or turn signals is not good.
The instructions from Mazda are good, but here is a bit more detail on getting the 12 volts. It turns out there is a unused wire running from the fuse panel under the hood to the back drivers side of the car.
Under the hood it is located where the big red wire is in the attached picture. Lower left of the left white connector. You need to push this wire with a connector on it into the plastic housing. Mazda calls it populating the connector.
At the other end, the wire you are looking for is Black with white dots.
I brought the flat 4 wire connector out into the sare tire area. Easy to do, no cutting. It is invisible when not in use. protected from the weather, and easy to get to.
Attachments
Last edited:
I think a wiring harness can be installed without removing the cargo floor or the left and right side panels If you are using unpowered control, or if you get your power from the rear power outlet.
For the cargo hatch, Fold the back seats forward, then open the hatch and fold it back on top of the seats. Now you can remove the foam around the tire. Next remove the two access panels that allow you to get at the tail lights. At this point you can fish from the spare tire well up to the tail light access opening on each side. Use an electricians fish or a coat hanger.
I fished the passenger side of my install, and I had to interrupt the install after getting the power from the front connected, but before I had run the trailer connector or connected to the tail lights. I put the car back together and did that latter using a fish.
Well I installed this yesterday after work. the panels were a pain to get off, because I didn't have any real directions and had to keep going to get tools. In terms of installing the trailer hitch wiring, here is what I did as a synopsis:
I pulled out the 2" dia rubber grommet just behind the wheel well (driver side) and used the utility knife to cut a 3/4" to 1" long slit across the side and jammed the head of the 4-plug connector through it and fed it down and out of the vehicle. Then I used 5 extra zip ties - large ones - to zip it and secure it to the hitch so I can plug the trailer in from the outside. I secured the end so it was right by where the 2" center mount is but hidden just behind the bumper.
Thanks for the detailed directions was helpful and made the process simple. I do have a question about the 4 wires you ran through the body gromet plug. That plug, if I am looking at the same one, is the one directly above the muffler shield. I was a bit concerned the heat on long drives and councerend it could melt the wires. Has this been an issue? For now I opted to just leave it coiled up in the spare tire well and run it out the lift gate when I need to use it.
- :
- San Antonio, Texas
- :
- '15 CX-5 Miata AWD
nah the heat shield doesn't get hot.. its like pulling foil out of the oven.. the pan will burn but the foil won't. Also those wires/coating are 250 deg rated at least I believe.Thanks for the detailed directions was helpful and made the process simple. I do have a question about the 4 wires you ran through the body gromet plug. That plug, if I am looking at the same one, is the one directly above the muffler shield. I was a bit concerned the heat on long drives and councerend it could melt the wires. Has this been an issue? For now I opted to just leave it coiled up in the spare tire well and run it out the lift gate when I need to use it.
Similar threads

- Replies
- 15
- Views
- 2K
- Replies
- 2
- Views
- 2K
- Replies
- 19
- Views
- 2K