
I did this myself on jack stands, in my driveway.
Tools Needed:
Ratchet and socket set (10,12,14,17mm) Deep well and standard
6" and 12" extensions
Swivel ratchet
Ratcheting angled wrenches (14mm and 17mm)
Pry bar
Rubber Mallet
Lubricant such as WD40
Low profile floor jack, with padding
Time: 5 hours for both mounts, or 2 hours for only the "Jugg"-Front Differential Mount
Difficulty: Intermediate, patience high
Prep
With your car in gear and e brake pulled, place the car on 4 jack stands, as high up as possible. Use the front and rear jack points to make this faster (Front is the metal trapezoid in front of your splash guard, rear jack point is the double T of your rear differential housing)
Remove your catback exhaust
There are 6 exhaust hangers holding the exhaust up. First, spray each bushing with WD40 or other lubricant to greatly ease the removal, then use a prybar to push them off.
The bolts holding your catback are all 14mm, use a deep well socket and ratcheting wrench to remove.
Note* You can remove the whole catback in one piece by just unbolting the catback from the 2nd catalytic converter, but take care to lift the exhaust tips out of the exhaust surrounds to avoid damaging anything. (do these exhaust hangers last)
*Note: Spray all your differential bolts and bushings with lubricant at this time to make extraction smoother later
Disconnect your rear sway bar and end links
First, remove the sway bar brackets, this will allow the end links to easily be removed. There are two brackets, one on each side of the sway bar. Use a swivel ratchet with a 14mm socket on the lower bolt, and a deep well 14mm socket on the top bolt.
Lower

Top
Using a 14mm deep well socket to remove the bolt holding your 2 endlinks on (one on each side). Use a screw driver to push the bolt out if needed. You can pull/push the sway bar up or down to make the bolt come out smoothly.
Your swaybar is now disconnected. Take the two endlinks and angle them as below, to provide for maneuverability later.
*Note: If you want to remove/replace your sway bar you will also need to remove the springs from the rear of the car. Use this how-to
Disconnect drive shaft
Mark the drive shaft with a sharpie or scrape it to allow you to line it up again later
With your car in gear and e-brake pulled, remove the 4 14mm bolt/nuts using a deep well socket. Remove 2 bolts at a time, then remove the other two. Disconnect the e-brake/gear to then easily turn the driveshaft by hand to provide access to the other bolts, then reapply e-brake/gear to lock the driveshaft again.

Your driveshaft is now unbolted, but will still be firmly held in place.
Disconnect the heat shield - 4 10mm black plastic nuts
Pull the driveshaft towards the front of the car, then down, to remove completely. The easiest way to do this is to lay with your head toward the front of the car and pull it towards you. The heat shield can then be maneuvered out
Unbolt the gas tank straps
Disconnect only the 2 rear gas tank bolts. Your gas tank is held by 2 straps, with 2 bolts on each one (front/rear). You only need to remove the rear bolts, and the gas tank will then slightly hang down. It does not need to be supported while doing this.
Remove using a 12" extension with 14mm socket
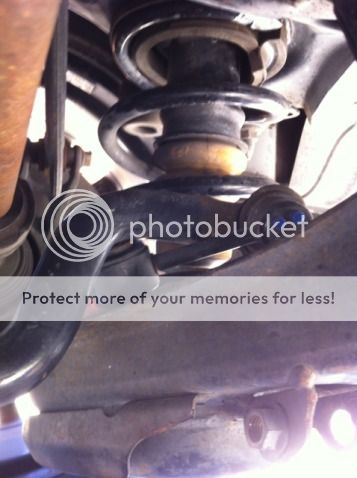
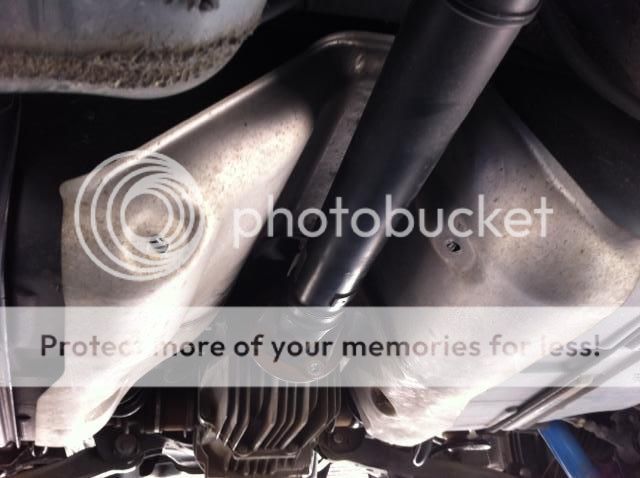
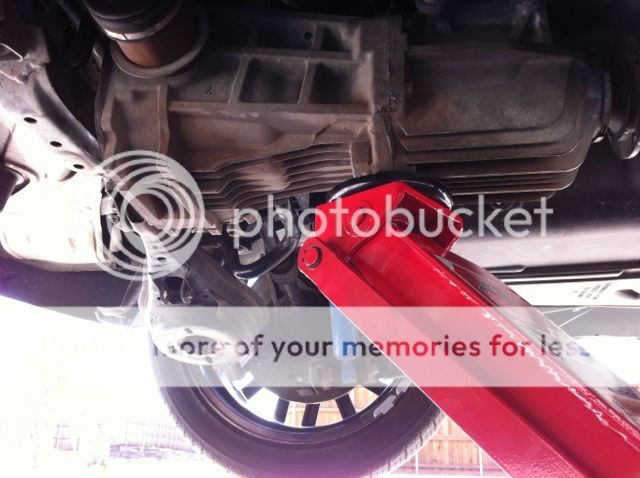
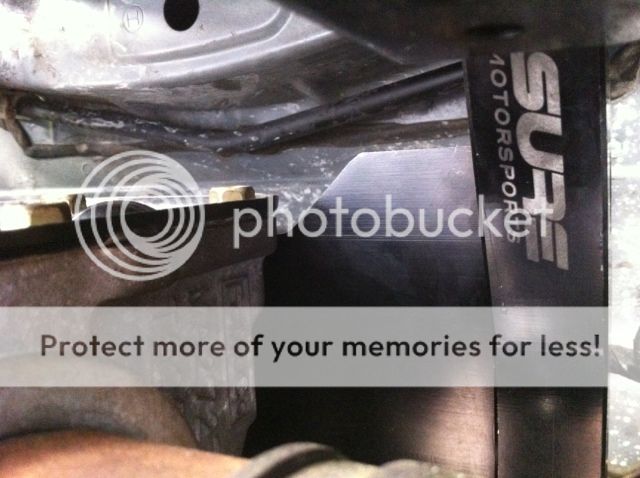
Remove the Rear Differential- Front Mount "The Jugg"
Support the differential as shown, then lift it 1" to relieve the weight from the mount
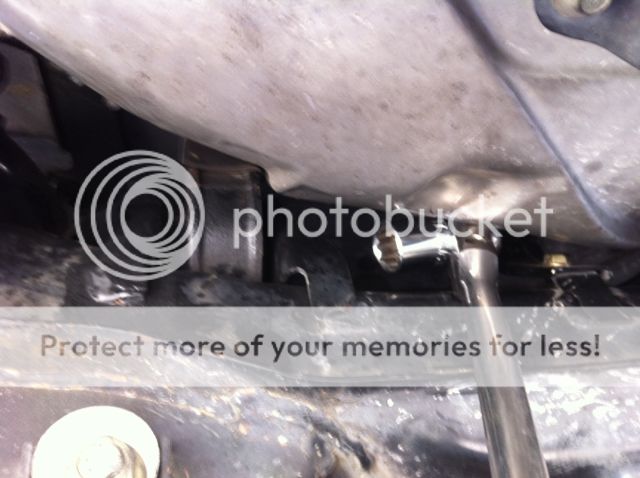
Remove the 2 17mm side bolts of the OEM mount using a ratcheting wrench. You may tap the wrench using a rubber mallet to break the bolts loose if needed.
Now lower the differential 8", to give you access to the top bolt, and to allow extraction of the mount.
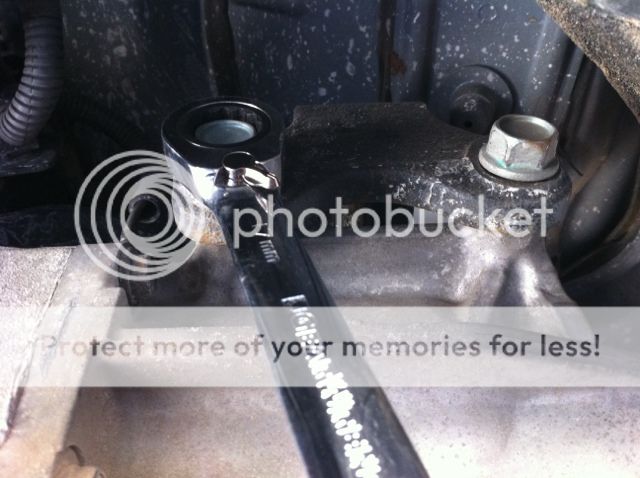
Remove the 17mm bolt holding the mount to the frame on the opposite side of the car using a ratcheting 17mm wrench.
You will need to use a pry bar to slightly move the gas tank to allow you to extract the bolt all the way (see Jugg Install below)

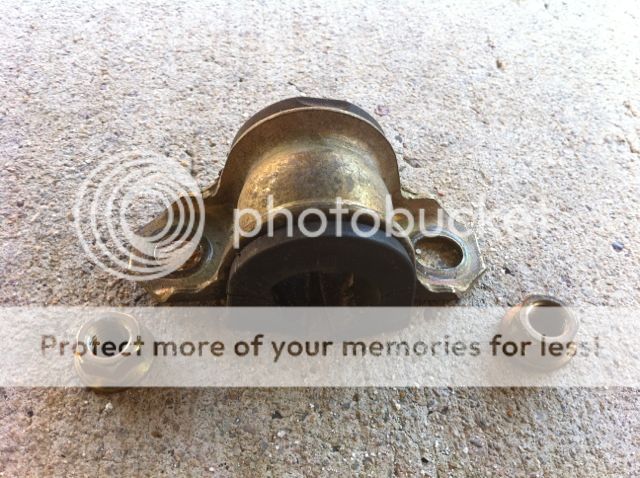
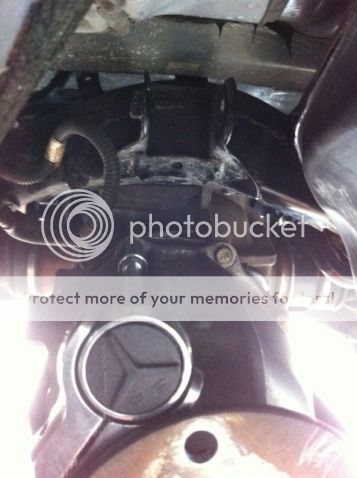
Remove the Rear Differential- Rear Mount "The Dread"
This is the time consuming mount, but also the most important mount, so this is a good time to take a break to prepare for some hard work to come!
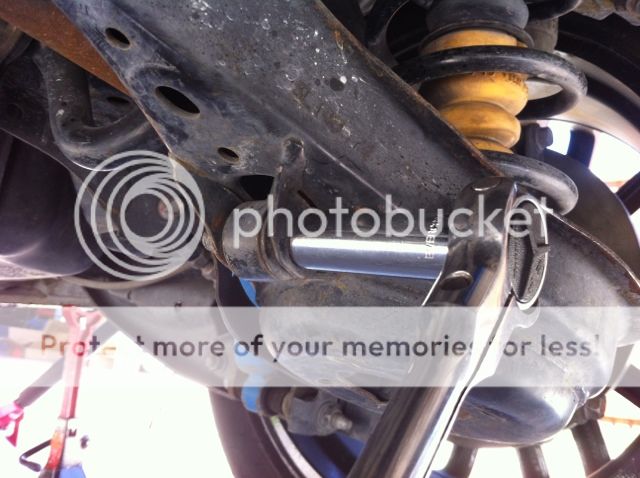
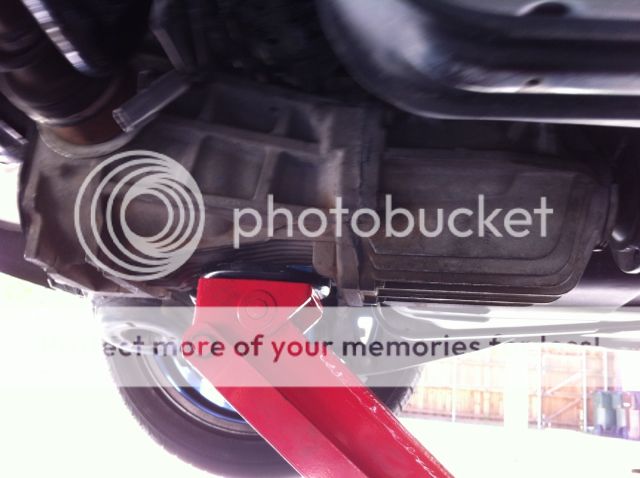
Place the jack as follows to provide better support for the differential, as you want to avoid lowering it too much to avoid damaging your axles once the other mount is removed. The diff can be moved around by hand, it is not very heavy (~200 pounds). You do not need to worry about supporting the differential while moving the jack, as the other mount holds it in place.
Now supporting the diff, remove the 2 17mm bolts holding the bushings to the frame. Move the sway bar as needed to allow for access.
To easily break the bolts loose, use a 17mm ratcheting wrench with a pry bar.
Use a 17mm swivel with regular socket from the rear of the car to access the driver side bolt (between the subframe and the rear tire mold)
Use a short/regular 17mm ratchet to remove the passenger side bolt.
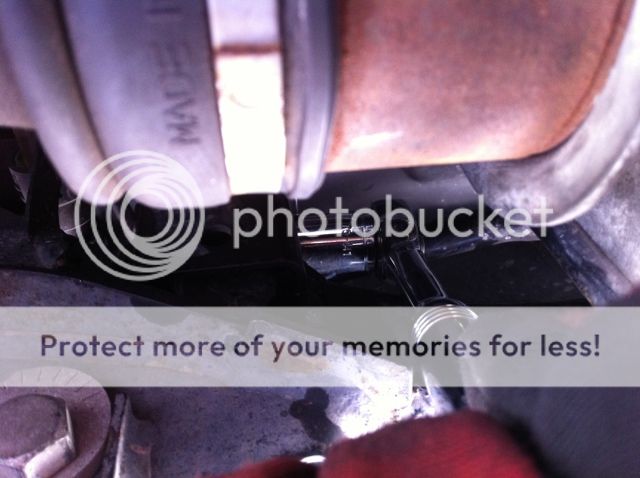
*Note: You may need to use a 17mm ratcheting wrench on these bolts as well; use whatever tool provides you with the best access. Alternatively, you can also access the bolts using extensions and swivel adapter, but I did not have those. This process is not hard, but tedious since you can only turn the bolt a little bit at a time.
With the 2 bolts removed, lower the differential 8-10". Take note of the angle of your axles, try to avoid making them angle down too much.
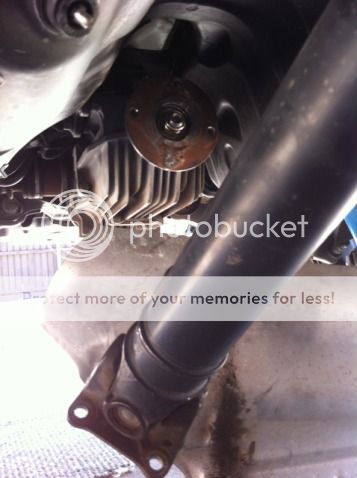
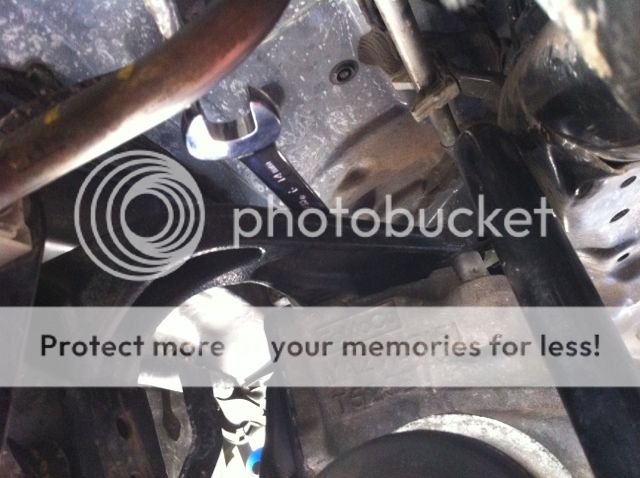
You will now have more room to the top bolts. Remove these 4 14mm top bolts holding the mount to the differential using a 14mm ratcheting wrench. You may use a crow bar to help you break them loose if needed. I removed all 4 from the following angle, but you can also access the bolts from the other side of the differential.
To remove the mount, move it up/over the differential, or remove it on the driver side of the differential, by angling and maneuvering it out.
*Note: You will have to move the sway bar around to give you access to all these bolts. You may need to move the differential around by hand to maneuver the mount out.
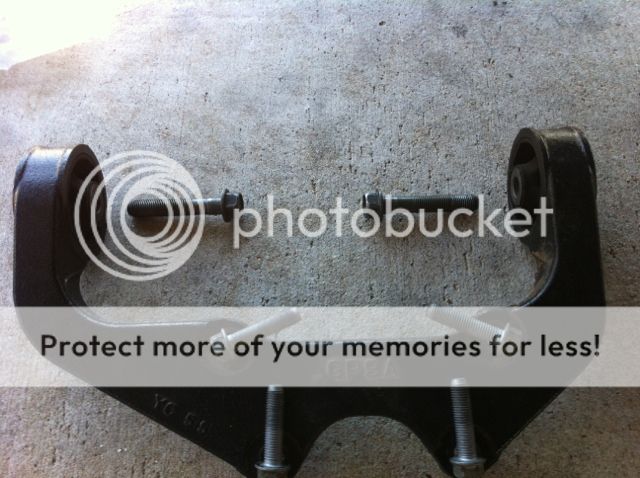
Installing your new Rear Differential Rear Mount- "The Dread"
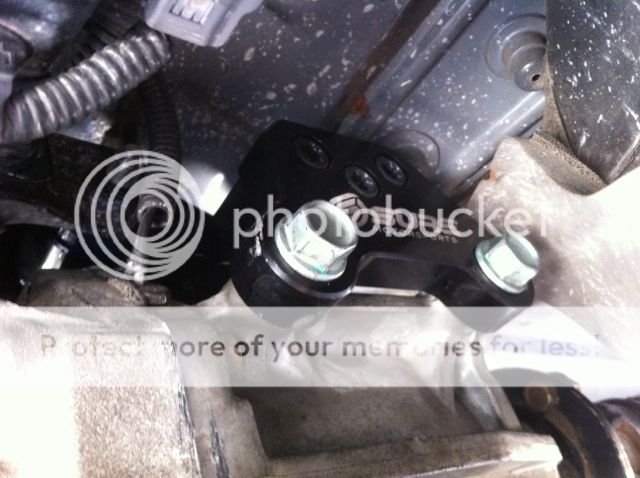
First, spray all the bushings and the bushing brackets with lubricant to ease the install. Manuever the new mount into the bushing brackets in the same way as you removed the old mount. This is what you should see once it is in position, with the logo facing the ground:
Insert and thread the 2 17mm bolts into place to keep the mount at the right angle for installing the 4 top bolts. Do not tighten, just thread them until almost snug.
Re-install the 4 14mm top bolts:
This is easiest done by first angling the mount so it is parallel to the ground, then lifting the diff until it is close enough for you to thread in the bolts. First, insert and hand thread the 2 passenger side bolts by moving the diff up/down/shaking it, while continuously threading the bolt with the other hand until the bolt's threads catch. Once you have 1 of the bolts just starting to thread, thread in the other bolt, making the two bolts line up more easily.
Do not force these bolts in, you will be able to insert and hand thread them by shaking/moving the diff around (patience patience). Once the threads are in a few turns, you can then use a ratcheting wrench to insert them until almost snug.
Now insert the other two top bolts (2 driver side bolts) using the same method as with the other 2 bolts (patience patience)
Once all 4 bolts are in, tighten them in an X pattern to 32-44 ft/lbs (Use your best judgement if you can't fit a torque wrench)
Tighten the 2 17mm bushing bolts to 64-85 ft/lbs using a torque wrench
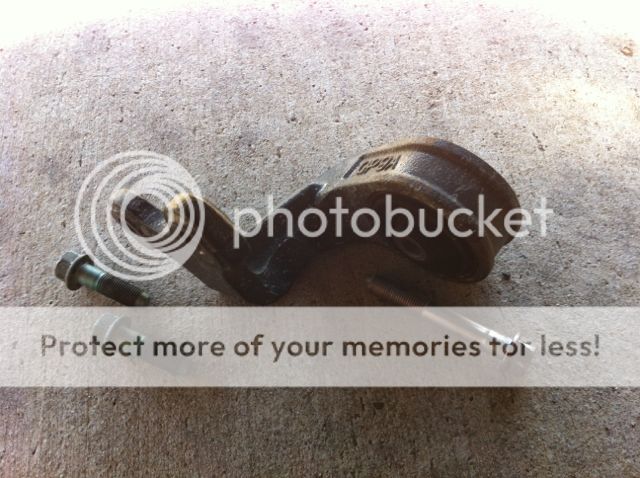
Installing the Rear Differential Front Mount "The Jugg"
Move the floor jack back to the first position used, but let the diff hang unsupported by the rear mount for now.
First, remove the 2 12mm bolts at the top of the differential using a 12" extension with deep well socket.
Now, position your new mount onto the differential, and spray some lubricant in the bolt holes and bushing/bracket. Then, thread the 2 17mm side bolts in using a ratcheting wrench. Do not force any bolts in, they will go in easily when aligned correctly.
Now, install the 2 new supplied 13mm bolts where the 2 removed 12mm bolts were.
FIRST: Torque the 2 new bolts to16-19 ft/lbs using a 12" extension and socket
SECOND: Torque the 2 side bolts to 55-77 ft/lbs using a torque wrench and socket.
Spray the mount's bushing and frame bracket with lubricant again, then raise the diff to position the bushing into the bracket. You will need to use a crow bar to align the mount's bushing into the frame bracket. Place the crow bar at a slight angle in the bracket, then lift the differential until the bushing is pushed into place.
*Note: You may need to pry the mount and lift/lower the differential to align (patience patience)
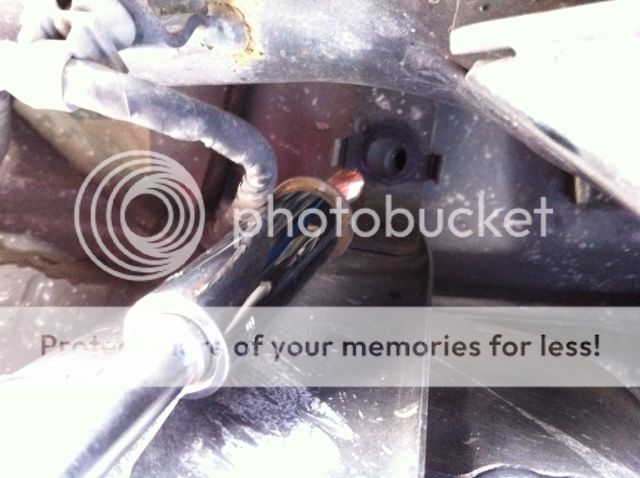
Once aligned, insert the top bolt by slightly prying the gas tank towards the front of the car, while inserting the bolt with your other hand.

Use a 17mm ratcheting wrench to thread the bolt in, then torque to 55-77 ft/lbs using a torque wrench and socket.
Reinstall:
Torque the drive shaft to 40 ft/lbs*
Torque the end links and sway bar bushings to 32 ft/lbs*
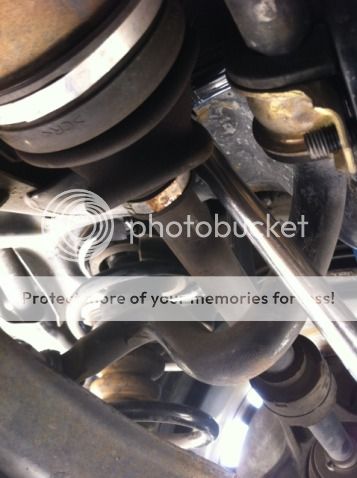
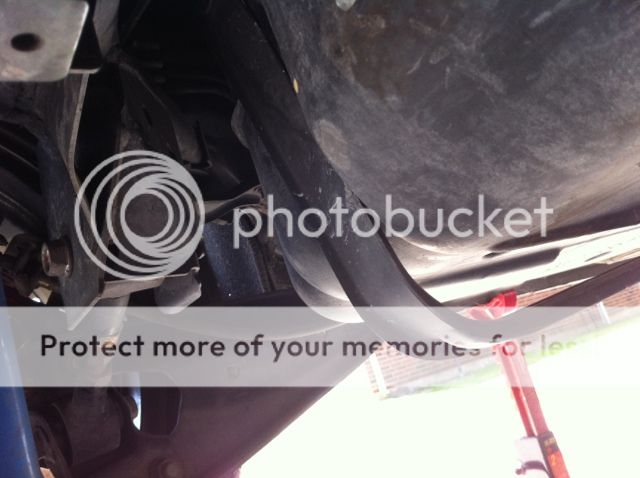
*Note: Install the sway bar brackets and bushings first, then use the floor jack to lift the rear control arm as follows to easily align the end link bolt.
Enjoy your new 4-wheel burnouts!
Tools Needed:
Ratchet and socket set (10,12,14,17mm) Deep well and standard
6" and 12" extensions
Swivel ratchet
Ratcheting angled wrenches (14mm and 17mm)
Pry bar
Rubber Mallet
Lubricant such as WD40
Low profile floor jack, with padding
Time: 5 hours for both mounts, or 2 hours for only the "Jugg"-Front Differential Mount
Difficulty: Intermediate, patience high
Prep
With your car in gear and e brake pulled, place the car on 4 jack stands, as high up as possible. Use the front and rear jack points to make this faster (Front is the metal trapezoid in front of your splash guard, rear jack point is the double T of your rear differential housing)
Remove your catback exhaust
There are 6 exhaust hangers holding the exhaust up. First, spray each bushing with WD40 or other lubricant to greatly ease the removal, then use a prybar to push them off.
The bolts holding your catback are all 14mm, use a deep well socket and ratcheting wrench to remove.
Note* You can remove the whole catback in one piece by just unbolting the catback from the 2nd catalytic converter, but take care to lift the exhaust tips out of the exhaust surrounds to avoid damaging anything. (do these exhaust hangers last)
*Note: Spray all your differential bolts and bushings with lubricant at this time to make extraction smoother later
Disconnect your rear sway bar and end links
First, remove the sway bar brackets, this will allow the end links to easily be removed. There are two brackets, one on each side of the sway bar. Use a swivel ratchet with a 14mm socket on the lower bolt, and a deep well 14mm socket on the top bolt.
Lower
Top
Using a 14mm deep well socket to remove the bolt holding your 2 endlinks on (one on each side). Use a screw driver to push the bolt out if needed. You can pull/push the sway bar up or down to make the bolt come out smoothly.
Your swaybar is now disconnected. Take the two endlinks and angle them as below, to provide for maneuverability later.
*Note: If you want to remove/replace your sway bar you will also need to remove the springs from the rear of the car. Use this how-to
Disconnect drive shaft
Mark the drive shaft with a sharpie or scrape it to allow you to line it up again later
With your car in gear and e-brake pulled, remove the 4 14mm bolt/nuts using a deep well socket. Remove 2 bolts at a time, then remove the other two. Disconnect the e-brake/gear to then easily turn the driveshaft by hand to provide access to the other bolts, then reapply e-brake/gear to lock the driveshaft again.
Your driveshaft is now unbolted, but will still be firmly held in place.
Disconnect the heat shield - 4 10mm black plastic nuts
Pull the driveshaft towards the front of the car, then down, to remove completely. The easiest way to do this is to lay with your head toward the front of the car and pull it towards you. The heat shield can then be maneuvered out
Unbolt the gas tank straps
Disconnect only the 2 rear gas tank bolts. Your gas tank is held by 2 straps, with 2 bolts on each one (front/rear). You only need to remove the rear bolts, and the gas tank will then slightly hang down. It does not need to be supported while doing this.
Remove using a 12" extension with 14mm socket
Remove the Rear Differential- Front Mount "The Jugg"
Support the differential as shown, then lift it 1" to relieve the weight from the mount
Remove the 2 17mm side bolts of the OEM mount using a ratcheting wrench. You may tap the wrench using a rubber mallet to break the bolts loose if needed.
Now lower the differential 8", to give you access to the top bolt, and to allow extraction of the mount.
Remove the 17mm bolt holding the mount to the frame on the opposite side of the car using a ratcheting 17mm wrench.
You will need to use a pry bar to slightly move the gas tank to allow you to extract the bolt all the way (see Jugg Install below)
Remove the Rear Differential- Rear Mount "The Dread"
This is the time consuming mount, but also the most important mount, so this is a good time to take a break to prepare for some hard work to come!
Place the jack as follows to provide better support for the differential, as you want to avoid lowering it too much to avoid damaging your axles once the other mount is removed. The diff can be moved around by hand, it is not very heavy (~200 pounds). You do not need to worry about supporting the differential while moving the jack, as the other mount holds it in place.
Now supporting the diff, remove the 2 17mm bolts holding the bushings to the frame. Move the sway bar as needed to allow for access.
To easily break the bolts loose, use a 17mm ratcheting wrench with a pry bar.
Use a 17mm swivel with regular socket from the rear of the car to access the driver side bolt (between the subframe and the rear tire mold)
Use a short/regular 17mm ratchet to remove the passenger side bolt.
*Note: You may need to use a 17mm ratcheting wrench on these bolts as well; use whatever tool provides you with the best access. Alternatively, you can also access the bolts using extensions and swivel adapter, but I did not have those. This process is not hard, but tedious since you can only turn the bolt a little bit at a time.
With the 2 bolts removed, lower the differential 8-10". Take note of the angle of your axles, try to avoid making them angle down too much.
You will now have more room to the top bolts. Remove these 4 14mm top bolts holding the mount to the differential using a 14mm ratcheting wrench. You may use a crow bar to help you break them loose if needed. I removed all 4 from the following angle, but you can also access the bolts from the other side of the differential.
To remove the mount, move it up/over the differential, or remove it on the driver side of the differential, by angling and maneuvering it out.
*Note: You will have to move the sway bar around to give you access to all these bolts. You may need to move the differential around by hand to maneuver the mount out.
Installing your new Rear Differential Rear Mount- "The Dread"
First, spray all the bushings and the bushing brackets with lubricant to ease the install. Manuever the new mount into the bushing brackets in the same way as you removed the old mount. This is what you should see once it is in position, with the logo facing the ground:
Insert and thread the 2 17mm bolts into place to keep the mount at the right angle for installing the 4 top bolts. Do not tighten, just thread them until almost snug.
Re-install the 4 14mm top bolts:
This is easiest done by first angling the mount so it is parallel to the ground, then lifting the diff until it is close enough for you to thread in the bolts. First, insert and hand thread the 2 passenger side bolts by moving the diff up/down/shaking it, while continuously threading the bolt with the other hand until the bolt's threads catch. Once you have 1 of the bolts just starting to thread, thread in the other bolt, making the two bolts line up more easily.
Do not force these bolts in, you will be able to insert and hand thread them by shaking/moving the diff around (patience patience). Once the threads are in a few turns, you can then use a ratcheting wrench to insert them until almost snug.
Now insert the other two top bolts (2 driver side bolts) using the same method as with the other 2 bolts (patience patience)
Once all 4 bolts are in, tighten them in an X pattern to 32-44 ft/lbs (Use your best judgement if you can't fit a torque wrench)
Tighten the 2 17mm bushing bolts to 64-85 ft/lbs using a torque wrench
Installing the Rear Differential Front Mount "The Jugg"
Move the floor jack back to the first position used, but let the diff hang unsupported by the rear mount for now.
First, remove the 2 12mm bolts at the top of the differential using a 12" extension with deep well socket.
Now, position your new mount onto the differential, and spray some lubricant in the bolt holes and bushing/bracket. Then, thread the 2 17mm side bolts in using a ratcheting wrench. Do not force any bolts in, they will go in easily when aligned correctly.
Now, install the 2 new supplied 13mm bolts where the 2 removed 12mm bolts were.
FIRST: Torque the 2 new bolts to16-19 ft/lbs using a 12" extension and socket
SECOND: Torque the 2 side bolts to 55-77 ft/lbs using a torque wrench and socket.
Spray the mount's bushing and frame bracket with lubricant again, then raise the diff to position the bushing into the bracket. You will need to use a crow bar to align the mount's bushing into the frame bracket. Place the crow bar at a slight angle in the bracket, then lift the differential until the bushing is pushed into place.
*Note: You may need to pry the mount and lift/lower the differential to align (patience patience)
Once aligned, insert the top bolt by slightly prying the gas tank towards the front of the car, while inserting the bolt with your other hand.
Use a 17mm ratcheting wrench to thread the bolt in, then torque to 55-77 ft/lbs using a torque wrench and socket.
Reinstall:
Torque the drive shaft to 40 ft/lbs*
Torque the end links and sway bar bushings to 32 ft/lbs*
*Note: Install the sway bar brackets and bushings first, then use the floor jack to lift the rear control arm as follows to easily align the end link bolt.
Enjoy your new 4-wheel burnouts!